1.安装及优化
1.1基本环境配置
| 主机名 | ip地址 | 说明 |
|---|---|---|
| k8s–master01 | 192.168.2.96 | master节点 |
| k8s–master02 | 192.168.2.97 | master节点 |
| k8s–master03 | 192.168.2.98 | master节点 |
| k8s–node01 | 192.168.2.99 | node节点 |
| k8s–node02 | 192.168.2.100 | node节点 |
| k8s–master–vip | 192.168.2.236 | keepalived虚拟ip |
(2).网段规划
| 网段名称 | 网段划分 |
|---|---|
| 宿主机网段 | 192.168.2.1/24 |
| Pod网段 | 172.16.0.0/12 |
| Service网段 | 10.0.0.0/16 |
2.配置信息
| 配置信息 | 备注 |
|---|---|
| 系统版本 | centos7.9 |
| Docker版本 | 20.10x |
| kubeadm版本 | v1.23.17 |
cat /etc/redhat-release
CentOS Linux release 7.9.2009 (Core)
 docker --version
Docker version 20.10.21, build baeda1f
 kubeadm version
kubeadm version: &version.Info{Major:"1", Minor:"23", GitVersion:"v1.23.17", GitCommit:"953be8927218ec8067e1af2641e540238ffd7576", GitTreeState:"clean", BuildDate:"2023-02-22T13:33:14Z", GoVersion:"go1.19.6", Compiler:"gc", Platform:"linux/amd64"}
注意事项:宿主机网段、K8s Service网段、Pod网段不能重复!!!
3.修改主机名
(1)根据规划信息在每台机器上修改主机名
hostnamectl set-hostname k8s-master01
hostnamectl set-hostname k8s-master02
hostnamectl set-hostname k8s-master03
hostnamectl set-hostname k8s-node01
hostnamectl set-hostname k8s-node02
4.修改hosts文件
(1)安装vim编辑器,如果已安装则可忽略
yum insytall vim -y
(2)修改每台机器的hosts文件
vim /etc/hosts
192.168.2.96 k8s-master01
192.168.2.97 k8s-master02
192.168.2.98 k8s-master03
192.168.2.236 k8s-master-vip
192.168.2.99 k8s-node01
192.168.2.100 k8s-node02
注意事项:如果不是高可用集群,上面VIP为Master01的IP!!!
5.安装yum源
curl -o /etc/yum.repos.d/CentOS-Base.repo https://mirrors.aliyun.com/repo/Centos-7.repo
yum install -y yum-utils device-mapper-persistent-data lvm2
yum-config-manager --add-repo https://mirrors.aliyun.com/docker-ce/linux/centos/docker-ce.repo
(3)在每台机器上执行以下命令配置kubernetes的yum源
cat <<EOF > /etc/yum.repos.d/kubernetes.repo
[kubernetes]
name=Kubernetes
baseurl=https://mirrors.aliyun.com/kubernetes/yum/repos/kubernetes-el7-x86_64/
enabled=1
gpgcheck=0
repo_gpgcheck=0
gpgkey=https://mirrors.aliyun.com/kubernetes/yum/doc/yum-key.gpg https://mirrors.aliyun.com/kubernetes/yum/doc/rpm-package-key.gpg
EOF
sed -i -e '/mirrors.cloud.aliyuncs.com/d' -e '/mirrors.aliyuncs.com/d' /etc/yum.repos.d/CentOS-Base.repo
6.必备工具安装
(1)在每台机器上执行以下命令安装必备工具
yum install wget jq psmisc vim net-tools telnet yum-utils device-mapper-persistent-data lvm2 git -y
7.关闭防火墙、swap分区、dnsmasq、selinux
systemctl disable --now firewalld
 setenforce 0
 sed -i 's#SELINUX=enforcing#SELINUX=disabled#g' /etc/sysconfig/selinux
 sed -i 's#SELINUX=enforcing#SELINUX=disabled#g' /etc/selinux/config
systemctl disable --now dnsmasq
Failed to execute operation: No such file or directory
注意:这里如果是通过VMware虚拟机实践的,会因为没有这个服务而报错!!!
(4)在每台机器上执行以下命令关闭NetworkManager
systemctl disable --now NetworkManager
swapoff -a && sysctl -w vm.swappiness=0
永久关闭
sed -ri '/^[^#]*swap/s@^@#@' /etc/fstab
 rpm -ivh http://mirrors.wlnmp.com/centos/wlnmp-release-centos.noarch.rpm
 yum install ntpdate -y
(2)在每台机器上执行以下命令同步时间
 ln -sf /usr/share/zoneinfo/Asia/Shanghai /etc/localtime
 echo 'Asia/Shanghai' >/etc/timezone
 ntpdate time2.aliyun.com
 crontab -e
*/5 * * * * /usr/sbin/ntpdate time2.aliyun.com
9.配置limit
(1)在每台机器上执行以下命令配置limit
ulimit -SHn 65535
vim /etc/security/limits.conf
末尾添加以下内容
* soft nofile 65536
* hard nofile 131072
* soft nproc 65535
* hard nproc 655350
* soft memlock unlimited
* hard memlock unlimited
(1)在Master01节点上配置如下命令,使其免密钥登录其他节点
ssh-keygen -t rsa #按3次回车即可
for i in k8s-master01 k8s-master02 k8s-master03 k8s-node01 k8s-node02;do ssh-copy-id -i .ssh/id_rsa.pub $i;done
注意:此操作结束后会提示输入4次其他节点的密码!!!
(2)在Master01节点上远程登录k8s-node02节点进行测试,发现测试成功
ssh k8s-node02
git clone https://gitee.com/jeckjohn/k8s-ha-install.git
cd k8s-ha-install
git branch -a
[root@192 k8s-ha-install]# git branch -a
* master
  remotes/origin/HEAD -> origin/master
  remotes/origin/manual-installation
  remotes/origin/manual-installation-v1.16.x
  remotes/origin/manual-installation-v1.17.x
  remotes/origin/manual-installation-v1.18.x
  remotes/origin/manual-installation-v1.19.x
  remotes/origin/manual-installation-v1.20.x
  remotes/origin/manual-installation-v1.20.x-csi-hostpath
  remotes/origin/manual-installation-v1.21.x
  remotes/origin/manual-installation-v1.22.x
  remotes/origin/manual-installation-v1.23.x
  remotes/origin/manual-installation-v1.24.x
  remotes/origin/manual-installation-v1.25.x
  remotes/origin/manual-installation-v1.26.x
  remotes/origin/manual-installation-v1.27.x
  remotes/origin/manual-installation-v1.28.x
  remotes/origin/master
1.2内核升级
1.3Containerd作为Runtime
如果安装的版本低于1.24,选择Docker和Containerd均可,高于1.24选择Containerd作为Runtime。
1.在每台机器上执行以下命令安装docker–ce-20.10,注意这里安装docker时会把Containerd也装上
yum install docker-ce-20.10.* docker-ce-cli-20.10.* -y
2.在每台机器上执行以下命令配置Containerd所需的模块
cat <<EOF | sudo tee /etc/modules-load.d/containerd.conf
overlay
br_netfilter
EOF
modprobe -- overlay
modprobe -- br_netfilter
4.在每台机器上执行以下命令配置Containerd所需的内核
cat <<EOF | sudo tee /etc/sysctl.d/99-kubernetes-cri.conf
net.bridge.bridge-nf-call-iptables  = 1
net.ipv4.ip_forward                 = 1
net.bridge.bridge-nf-call-ip6tables = 1
EOF
sysctl --system
6.在每台机器上执行以下命令配置Containerd的配置文件
mkdir -p /etc/containerd
containerd config default | tee /etc/containerd/config.toml
7.在每台机器上执行以下命令将Containerd的Cgroup改为Systemd,找到containerd.runtimes.runc.options,添加SystemdCgroup = true(如果已存在直接修改,否则会报错)
vim /etc/containerd/config.toml
...
...
[plugins."io.containerd.grpc.v1.cri".containerd.runtimes.runc.options]
  BinaryName = ""
  CriuImagePath = ""
  CriuPath = ""
  CriuWorkPath = ""
  IoGid = 0
  IoUid = 0
  NoNewKeyring = false
  NoPivotRoot = false
  Root = ""
  ShimCgroup = ""
  SystemdCgroup = true
8.在每台机器上执行以下命令将sandbox_image的Pause镜像改成符合自己版本的地址http://registry.cn-hangzhou.aliyuncs.com/google_containers/pause:3.6
vim /etc/containerd/config.toml

#原本内容
sandbox_image = "registry.k8s.io/pause:3.6"
#修改后的内容
sandbox_image = "registry.cn-hangzhou.aliyuncs.com/google_containers/pause:3.6"
9.在每台机器上执行以下命令启动Containerd,并配置开机自启动
systemctl daemon-reload
systemctl enable --now containerd
ls /run/containerd/containerd.sock /run/containerd/containerd.sock
10.在每台机器上执行以下命令配置crictl客户端连接的运行时位置
cat > /etc/crictl.yaml <<EOF
runtime-endpoint: unix:///run/containerd/containerd.sock
image-endpoint: unix:///run/containerd/containerd.sock
timeout: 10
debug: false
EOF
11.在每台机器上执行以下命令进行验证
ctr image ls
REF TYPE DIGEST SIZE PLATFORMS LABELS
1.4安装Kubernetes组件Kubeadm&Kubelet
1.在Master01节点查看最新的Kubernetes版本是多少
yum list kubeadm.x86_64 --showduplicates | sort -r
2.在每台机器上执行以下命令安装1.23最新版本kubeadm、kubelet和kubectl
yum install kubeadm-1.23* kubelet-1.23* kubectl-1.23* -y
查看版本
kubeadm version
3.在每台机器上执行以下命令更改Kubelet的配置使用Containerd作为Runtime,如果选择的是docker作为的Runtime,则不需要进行更改
cat >/etc/sysconfig/kubelet<<EOF
KUBELET_KUBEADM_ARGS="--container-runtime=remote --runtime-request-timeout=15m --container-runtime-endpoint=unix:///run/containerd/containerd.sock"
EOF
4.在每台机器上执行以下命令设置Kubelet开机自启动(由于还未初始化,没有kubelet的配置文件,此时kubelet无法启动,无需管理)
systemctl daemon-reload
systemctl enable --now kubelet

systemctl status kubelet
说明:由于还未初始化,没有kubelet的配置文件,此时kubelet无法启动,无需管理
1.5高可用组件安装
公有云要用公有云自带的负载均衡,比如阿里云的SLB,腾讯云的ELB,用来替代haproxy和keepalived,因为公有云大部分都是不支持keepalived的,另外如果用阿里云的话,kubectl控制端不能放在master节点,推荐使用腾讯云,因为阿里云的slb有回环的问题,也就是slb代理的服务器不能反向访问SLB,但是腾讯云修复了这个问题。
注意:如果不是高可用集群,haproxy和keepalived无需安装!!!
1.安装HAProxy
(1)所有Master节点通过yum安装HAProxy和KeepAlived
yum install keepalived haproxy -y
(2)所有Master节点配置HAProxy,所有Master节点的HAProxy配置相同
mkdir /etc/haproxy
vim /etc/haproxy/haproxy.cfg

global
 maxconn 2000
 ulimit-n 16384
 log 127.0.0.1 local0 err
 stats timeout 30s

defaults
 log global
 mode http
 option httplog
 timeout connect 5000
 timeout client 50000
 timeout server 50000
 timeout http-request 15s
 timeout http-keep-alive 15s

frontend monitor-in
 bind *:33305
 mode http
 option httplog
 monitor-uri /monitor

frontend k8s-master
 bind 0.0.0.0:16443
 bind 127.0.0.1:16443
 mode tcp
 option tcplog
 tcp-request inspect-delay 5s
 default_backend k8s-master

backend k8s-master
 mode tcp
 option tcplog
 option tcp-check
 balance roundrobin
 default-server inter 10s downinter 5s rise 2 fall 2 slowstart 60s maxconn 250 maxqueue 256 weight 100
 server k8s-master01 192.168.2.96:6443 check
 server k8s-master02 192.168.2.97:6443 check
 server k8s-master03 192.168.2.98:6443 check
(3)所有Master节点重启HAProxy,并验证端口16443
systemctl restart haproxy
netstat -lntp | grep 16443
tcp        0      0 127.0.0.1:16443         0.0.0.0:*               LISTEN      1075/haproxy
tcp        0      0 0.0.0.0:16443           0.0.0.0:*
所有Master节点配置KeepAlived,配置不一样,注意区分每个节点的IP和网卡(interface参数)
(1)Master01节点的配置如下
! Configuration File for keepalived
global_defs {
    router_id LVS_DEVEL
    script_user root
    enable_script_security
}
vrrp_script chk_apiserver {
    script "/etc/keepalived/check_apiserver.sh"
    interval 5
    weight -5
    fall 2
    rise 1
}
vrrp_instance VI_1 {
    state MASTER
    interface ens33
    mcast_src_ip 192.168.2.96
    virtual_router_id 51
    priority 101
    advert_int 2
    authentication {
        auth_type PASS
        auth_pass K8SHA_KA_AUTH
    }
    virtual_ipaddress {
        192.168.2.236
    }
    track_script {
        chk_apiserver
    }
}
(2)Master02节点的配置如下
! Configuration File for keepalived
global_defs {
    router_id LVS_DEVEL
    script_user root
    enable_script_security
}
vrrp_script chk_apiserver {
    script "/etc/keepalived/check_apiserver.sh"
    interval 5
    weight -5
    fall 2
    rise 1
}
vrrp_instance VI_1 {
    state MASTER
    interface ens33
    mcast_src_ip 192.168.2.97
    virtual_router_id 51
    priority 101
    advert_int 2
    authentication {
        auth_type PASS
        auth_pass K8SHA_KA_AUTH
    }
    virtual_ipaddress {
        192.168.2.236
    }
    track_script {
        chk_apiserver
    }
}
(3)Master03节点的配置如下
! Configuration File for keepalived
global_defs {
    router_id LVS_DEVEL
    script_user root
    enable_script_security
}
vrrp_script chk_apiserver {
    script "/etc/keepalived/check_apiserver.sh"
    interval 5
    weight -5
    fall 2
    rise 1
}
vrrp_instance VI_1 {
    state MASTER
    interface ens33
    mcast_src_ip 192.168.2.98
    virtual_router_id 51
    priority 101
    advert_int 2
    authentication {
        auth_type PASS
        auth_pass K8SHA_KA_AUTH
    }
    virtual_ipaddress {
        192.168.2.236
    }
    track_script {
        chk_apiserver
    }
}
(4)所有master节点配置KeepAlived健康检查文件
vim /etc/keepalived/check_apiserver.sh
#!/bin/bash

#初始化错误计数器
err=0
#循环三次检查HAProxy进程是否在运行
for k in $(seq 1 3)
do
    check_code=$(pgrep haproxy)
    if [[ $check_code == "" ]]; then
        #如果未找到进程,增加错误计数器并等待一秒钟
        err=$(expr $err + 1)
        sleep 1
        continue
    else
        #如果找到进程,重置错误计数器并退出循环
        err=0
        break
    fi
done

#根据错误计数器的值,决定是否停止keepalived服务并退出脚本
if [[ $err != "0" ]]; then
    echo "systemctl stop keepalived"
    /usr/bin/systemctl stop keepalived
    exit 1
else
    exit 0
fi

#赋权
chmod +x /etc/keepalived/check_apiserver.sh
3.所有master节点启动haproxy和keepalived
systemctl daemon-reload
systemctl enable --now haproxy
systemctl enable --now keepalived
ping 192.168.2.236 -c 4
2.集群搭建
2.1Master节点初始化
1.Master01节点创建kubeadm-config.yaml配置文件如下
vim kubeadm-config.yaml
apiVersion: kubeadm.k8s.io/v1beta2
bootstrapTokens:
- groups:
  - system:bootstrappers:kubeadm:default-node-token
  token: 7t2weq.bjbawausm0jaxury
  ttl: 24h0m0s
  usages:
  - signing
  - authentication
kind: InitConfiguration
localAPIEndpoint:
  advertiseAddress: 192.168.2.96 #Master01节点的IP地址
  bindPort: 6443
nodeRegistration:
  criSocket: /run/containerd/containerd.sock
  name: k8s-master01
  taints:
  - effect: NoSchedule
    key: node-role.kubernetes.io/master

---
apiServer:
  certSANs:
  - 192.168.2.236 #VIP地址/公有云的负载均衡地址
  timeoutForControlPlane: 4m0s
apiVersion: kubeadm.k8s.io/v1beta2
certificatesDir: /etc/kubernetes/pki
clusterName: kubernetes
controlPlaneEndpoint: 192.168.2.236:16443
controllerManager: {}
dns:
  type: CoreDNS
etcd:
  local:
    dataDir: /var/lib/etcd
imageRepository: registry.cn-hangzhou.aliyuncs.com/google_containers
kind: ClusterConfiguration
kubernetesVersion: v1.23.17 #此处版本号和kubeadm版本一致
networking:
  dnsDomain: cluster.local
  podSubnet: 172.16.0.0/12
  serviceSubnet: 10.0.0.0/16
scheduler: {}
kubeadm config migrate --old-config kubeadm-config.yaml --new-config new.yaml
3.在Master01节点上将new.yaml文件复制到其他master节点
for i in k8s-master02 k8s-master03; do scp new.yaml $i:/root/; done
4.所有Master节点提前下载镜像,可以节省初始化时间(其他节点不需要更改任何配置,包括IP地址也不需要更改)
kubeadm config images pull --config /root/new.yaml
systemctl enable --now kubelet
6.Master01节点初始化,初始化以后会在/etc/kubernetes目录下生成对应的证书和配置文件,之后其他Master节点加入Master01即可
kubeadm init --config /root/new.yaml --upload-certs
[root@k8s-master01 ~]# kubeadm init --config /root/new.yaml  --upload-certs
[init] Using Kubernetes version: v1.23.17
[preflight] Running pre-flight checks
[preflight] Pulling images required for setting up a Kubernetes cluster
[preflight] This might take a minute or two, depending on the speed of your internet connection
[preflight] You can also perform this action in beforehand using 'kubeadm config images pull'
[certs] Using certificateDir folder "/etc/kubernetes/pki"
[certs] Generating "ca" certificate and key
[certs] Generating "apiserver" certificate and key
[certs] apiserver serving cert is signed for DNS names [k8s-master01 kubernetes kubernetes.default kubernetes.default.svc kubernetes.default.svc.cluster.local] and IPs [10.0.0.1 192.168.2.96 192.168.2.236]
[certs] Generating "apiserver-kubelet-client" certificate and key
[certs] Generating "front-proxy-ca" certificate and key
[certs] Generating "front-proxy-client" certificate and key
[certs] Generating "etcd/ca" certificate and key
[certs] Generating "etcd/server" certificate and key
[certs] etcd/server serving cert is signed for DNS names [k8s-master01 localhost] and IPs [192.168.2.96 127.0.0.1 ::1]
[certs] Generating "etcd/peer" certificate and key
[certs] etcd/peer serving cert is signed for DNS names [k8s-master01 localhost] and IPs [192.168.2.96 127.0.0.1 ::1]
[certs] Generating "etcd/healthcheck-client" certificate and key
[certs] Generating "apiserver-etcd-client" certificate and key
[certs] Generating "sa" key and public key
[kubeconfig] Using kubeconfig folder "/etc/kubernetes"
[endpoint] WARNING: port specified in controlPlaneEndpoint overrides bindPort in the controlplane address
[kubeconfig] Writing "admin.conf" kubeconfig file
[endpoint] WARNING: port specified in controlPlaneEndpoint overrides bindPort in the controlplane address
[kubeconfig] Writing "kubelet.conf" kubeconfig file
[endpoint] WARNING: port specified in controlPlaneEndpoint overrides bindPort in the controlplane address
[kubeconfig] Writing "controller-manager.conf" kubeconfig file
[endpoint] WARNING: port specified in controlPlaneEndpoint overrides bindPort in the controlplane address
[kubeconfig] Writing "scheduler.conf" kubeconfig file
[kubelet-start] Writing kubelet environment file with flags to file "/var/lib/kubelet/kubeadm-flags.env"
[kubelet-start] Writing kubelet configuration to file "/var/lib/kubelet/config.yaml"
[kubelet-start] Starting the kubelet
[control-plane] Using manifest folder "/etc/kubernetes/manifests"
[control-plane] Creating static Pod manifest for "kube-apiserver"
[control-plane] Creating static Pod manifest for "kube-controller-manager"
[control-plane] Creating static Pod manifest for "kube-scheduler"
[etcd] Creating static Pod manifest for local etcd in "/etc/kubernetes/manifests"
[wait-control-plane] Waiting for the kubelet to boot up the control plane as static Pods from directory "/etc/kubernetes/manifests". This can take up to 4m0s
[apiclient] All control plane components are healthy after 22.532424 seconds
[upload-config] Storing the configuration used in ConfigMap "kubeadm-config" in the "kube-system" Namespace
[kubelet] Creating a ConfigMap "kubelet-config-1.23" in namespace kube-system with the configuration for the kubelets in the cluster
NOTE: The "kubelet-config-1.23" naming of the kubelet ConfigMap is deprecated. Once the UnversionedKubeletConfigMap feature gate graduates to Beta the default name will become just "kubelet-config". Kubeadm upgrade will handle this transition transparently.
[upload-certs] Storing the certificates in Secret "kubeadm-certs" in the "kube-system" Namespace
[upload-certs] Using certificate key:
3b03fabd6969ee744908335536f94e0ac11d15be87edd918d8ad08324ddfdbb2
[mark-control-plane] Marking the node k8s-master01 as control-plane by adding the labels: [node-role.kubernetes.io/master(deprecated) node-role.kubernetes.io/control-plane node.kubernetes.io/exclude-from-external-load-balancers]
[mark-control-plane] Marking the node k8s-master01 as control-plane by adding the taints [node-role.kubernetes.io/master:NoSchedule]
[bootstrap-token] Using token: 7t2weq.bjbawausm0jaxury
[bootstrap-token] Configuring bootstrap tokens, cluster-info ConfigMap, RBAC Roles
[bootstrap-token] configured RBAC rules to allow Node Bootstrap tokens to get nodes
[bootstrap-token] configured RBAC rules to allow Node Bootstrap tokens to post CSRs in order for nodes to get long term certificate credentials
[bootstrap-token] configured RBAC rules to allow the csrapprover controller automatically approve CSRs from a Node Bootstrap Token
[bootstrap-token] configured RBAC rules to allow certificate rotation for all node client certificates in the cluster
[bootstrap-token] Creating the "cluster-info" ConfigMap in the "kube-public" namespace
[kubelet-finalize] Updating "/etc/kubernetes/kubelet.conf" to point to a rotatable kubelet client certificate and key
[addons] Applied essential addon: CoreDNS
[endpoint] WARNING: port specified in controlPlaneEndpoint overrides bindPort in the controlplane address
[addons] Applied essential addon: kube-proxy

Your Kubernetes control-plane has initialized successfully!

To start using your cluster, you need to run the following as a regular user:

  mkdir -p $HOME/.kube
  sudo cp -i /etc/kubernetes/admin.conf $HOME/.kube/config
  sudo chown $(id -u):$(id -g) $HOME/.kube/config

Alternatively, if you are the root user, you can run:

  export KUBECONFIG=/etc/kubernetes/admin.conf

You should now deploy a pod network to the cluster.
Run "kubectl apply -f [podnetwork].yaml" with one of the options listed at:
  https://kubernetes.io/docs/concepts/cluster-administration/addons/

You can now join any number of the control-plane node running the following command on each as root:

  kubeadm join 192.168.2.236:16443 --token 7t2weq.bjbawausm0jaxury
	--discovery-token-ca-cert-hash sha256:c5891bc7b53ee8e7548de96db1f4ed5ef353b77e572910f8aa3965040356701d
	--control-plane --certificate-key 3b03fabd6969ee744908335536f94e0ac11d15be87edd918d8ad08324ddfdbb2

Please note that the certificate-key gives access to cluster sensitive data, keep it secret!
As a safeguard, uploaded-certs will be deleted in two hours; If necessary, you can use
"kubeadm init phase upload-certs --upload-certs" to reload certs afterward.

Then you can join any number of worker nodes by running the following on each as root:

kubeadm join 192.168.2.236:16443 --token 7t2weq.bjbawausm0jaxury
	--discovery-token-ca-cert-hash sha256:c5891bc7b53ee8e7548de96db1f4ed5ef353b77e572910f8aa3965040356701d
补充:
如果初始化失败,重置后再次初始化,命令如下(没有失败不要执行)
kubeadm reset -f ; ipvsadm --clear ; rm -rf ~/.kube
7.Master01节点配置环境变量,用于访问Kubernetes集群
mkdir -p $HOME/.kube
sudo cp -i /etc/kubernetes/admin.conf $HOME/.kube/config
sudo chown $(id -u):$(id -g) $HOME/.kube/config

#查看节点状态
kubectl get node
NAME           STATUS     ROLES                  AGE    VERSION
k8s-master01   NotReady   control-plane,master   4m5s   v1.23.17
2.2添加Master和Node到k8s集群
1.添加Master02节点和Master03节点到k8s集群
kubeadm join 192.168.2.236:16443 --token 7t2weq.bjbawausm0jaxury
	--discovery-token-ca-cert-hash sha256:c5891bc7b53ee8e7548de96db1f4ed5ef353b77e572910f8aa3965040356701d
	--control-plane --certificate-key 3b03fabd6969ee744908335536f94e0ac11d15be87edd918d8ad08324ddfdbb2
2.添加Node01节点和Node02节点到k8s集群
kubeadm join 192.168.2.236:16443 --token 7t2weq.bjbawausm0jaxury
	--discovery-token-ca-cert-hash sha256:c5891bc7b53ee8e7548de96db1f4ed5ef353b77e572910f8aa3965040356701d
3.在Master01节点上查看节点状态
kubectl get node
NAME           STATUS     ROLES                  AGE     VERSION
k8s-master01   NotReady   control-plane,master   7m11s   v1.23.17
k8s-master02   NotReady   control-plane,master   2m28s   v1.23.17
k8s-master03   NotReady   control-plane,master   102s    v1.23.17
k8s-node01     NotReady   <none>                 106s    v1.23.17
k8s-node02     NotReady   <none>                 84s     v1.23.17
2.3Calico组件安装
cd /root/k8s-ha-install && git checkout manual-installation-v1.23.x && cd calico/
POD_SUBNET=`cat /etc/kubernetes/manifests/kube-controller-manager.yaml | grep cluster-cidr= | awk -F= '{print $NF}'`
3.修改calico.yaml文件
sed -i "s#POD_CIDR#${POD_SUBNET}#g" calico.yaml
4.安装Calico
kubectl apply -f calico.yaml
5.查看节点状态
kubectl get node
NAME           STATUS   ROLES                  AGE   VERSION
k8s-master01   Ready    control-plane,master   9h    v1.23.17
k8s-master02   Ready    control-plane,master   9h    v1.23.17
k8s-master03   Ready    control-plane,master   9h    v1.23.17
k8s-node01     Ready    <none>                 9h    v1.23.17
k8s-node02     Ready    <none>                 9h    v1.23.17
kubectl get po -n kube-system
NAME                                       READY   STATUS    RESTARTS      AGE
calico-kube-controllers-6f6595874c-tntnr   1/1     Running   0             8m52s
calico-node-5mj9g                          1/1     Running   1 (41s ago)   8m52s
calico-node-hhjrv                          1/1     Running   2 (61s ago)   8m52s
calico-node-szjm7                          1/1     Running   0             8m52s
calico-node-xcgwq                          1/1     Running   0             8m52s
calico-node-ztbkj                          1/1     Running   1 (11s ago)   8m52s
calico-typha-6b6cf8cbdf-8qj8z              1/1     Running   0             8m52s
coredns-65c54cc984-nrhlg                   1/1     Running   0             9h
coredns-65c54cc984-xkx7w                   1/1     Running   0             9h
etcd-k8s-master01                          1/1     Running   1 (29m ago)   9h
etcd-k8s-master02                          1/1     Running   1 (29m ago)   9h
etcd-k8s-master03                          1/1     Running   1 (29m ago)   9h
kube-apiserver-k8s-master01                1/1     Running   1 (29m ago)   9h
kube-apiserver-k8s-master02                1/1     Running   1 (29m ago)   9h
kube-apiserver-k8s-master03                1/1     Running   2 (29m ago)   9h
kube-controller-manager-k8s-master01       1/1     Running   2 (29m ago)   9h
kube-controller-manager-k8s-master02       1/1     Running   1 (29m ago)   9h
kube-controller-manager-k8s-master03       1/1     Running   1 (29m ago)   9h
kube-proxy-7rmrs                           1/1     Running   1 (29m ago)   9h
kube-proxy-bmqhr                           1/1     Running   1 (29m ago)   9h
kube-proxy-l9rqg                           1/1     Running   1 (29m ago)   9h
kube-proxy-nn465                           1/1     Running   1 (29m ago)   9h
kube-proxy-sghfb                           1/1     Running   1 (29m ago)   9h
kube-scheduler-k8s-master01                1/1     Running   2 (29m ago)   9h
kube-scheduler-k8s-master02                1/1     Running   1 (29m ago)   9h
kube-scheduler-k8s-master03                1/1     Running   1 (29m ago)   9h
2.4Metrics部署
在新版的Kubernetes中系统资源的采集均使用Metrics-server,可以通过Metrics采集节点和Pod的内存、磁盘、CPU和网络的使用率。
1.将Master01节点的front–proxy-ca.crt复制到Node-01节点和Node-02节点
scp /etc/kubernetes/pki/front-proxy-ca.crt k8s-node01:/etc/kubernetes/pki/front-proxy-ca.crt
scp /etc/kubernetes/pki/front-proxy-ca.crt k8s-node02:/etc/kubernetes/pki/front-proxy-ca.crt
2.在Master01节点上操作安装metrics server
cd /root/k8s-ha-install/kubeadm-metrics-server
kubectl  create -f comp.yaml
3.在Master01节点上查看metrics-server部署情况
kubectl get po -n kube-system -l k8s-app=metrics-server
NAME                              READY   STATUS    RESTARTS   AGE
metrics-server-5cf8885b66-jdjtb   1/1     Running   0          115s
4.在Master01节点上查看node使用情况
kubectl top node
NAME           CPU(cores)   CPU%   MEMORY(bytes)   MEMORY%
k8s-master01   130m         0%     1019Mi          12%
k8s-master02   102m         0%     1064Mi          13%
k8s-master03   93m          0%     971Mi           12%
k8s-node01     45m          0%     541Mi           6%
k8s-node02     57m          0%     544Mi           6%
2.5Dashboard部署
Dashboard 是基于网页的 Kubernetes 用户界面。 你可以使用 Dashboard 将容器应用部署到 Kubernetes 集群中,也可以对容器应用排错,还能管理集群资源。 你可以使用 Dashboard 获取运行在集群中的应用的概览信息,也可以创建或者修改 Kubernetes 资源 (如 Deployment,Job,DaemonSet 等等)。 例如,你可以对 Deployment 实现弹性伸缩、发起滚动升级、重启 Pod 或者使用向导创建新的应用。Dashboard 同时展示了 Kubernetes 集群中的资源状态信息和所有报错信息。
1.在Master01节点上操作安装Dashboard
cd /root/k8s-ha-install/dashboard/
kubectl  create -f .
2.在Master01节点上查看Dashboard服务
kubectl get svc -n kubernetes-dashboard
NAME                        TYPE        CLUSTER-IP     EXTERNAL-IP   PORT(S)         AGE
dashboard-metrics-scraper   ClusterIP   10.0.159.210   <none>        8000/TCP        2m6s
kubernetes-dashboard        NodePort    10.0.241.159   <none>        443:31822/TCP   2m6s
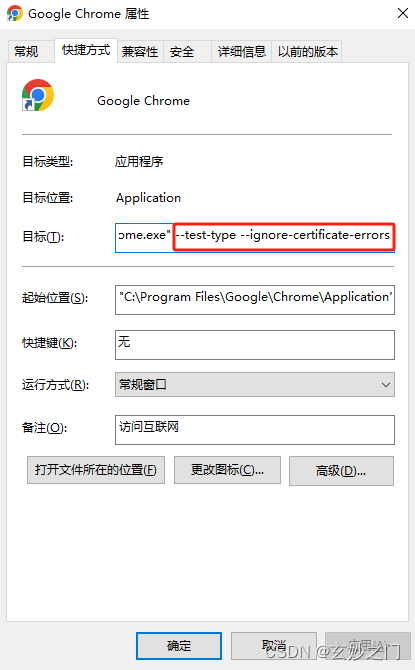
3.在谷歌浏览器(Chrome)启动文件中加入启动参数,用于解决无法访问Dashboard的问题
(2)在【目标】位置处添加下面参数,这里再次强调一下–test–type —ignore-certificate-errors前面有参数
–test–type —ignore-certificate-errors
4.在Master01节点上查看token值
kubectl -n kube-system describe secret $(kubectl -n kube-system get secret | grep admin-user | awk '{print $1}')
5.打开谷歌浏览器(Chrome),输入https://任意节点IP:服务端口,这里以Master01节点为例
https://192.168.2.97:32636/
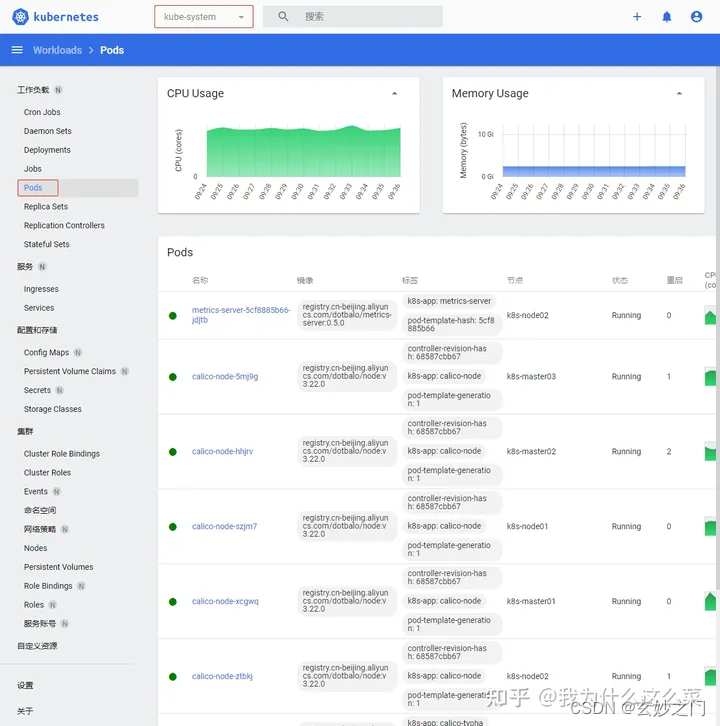
6.切换命名命名空间为kube-system,默认defult命名空间没有资源
2.6设置Kube-proxy模式为ipvs
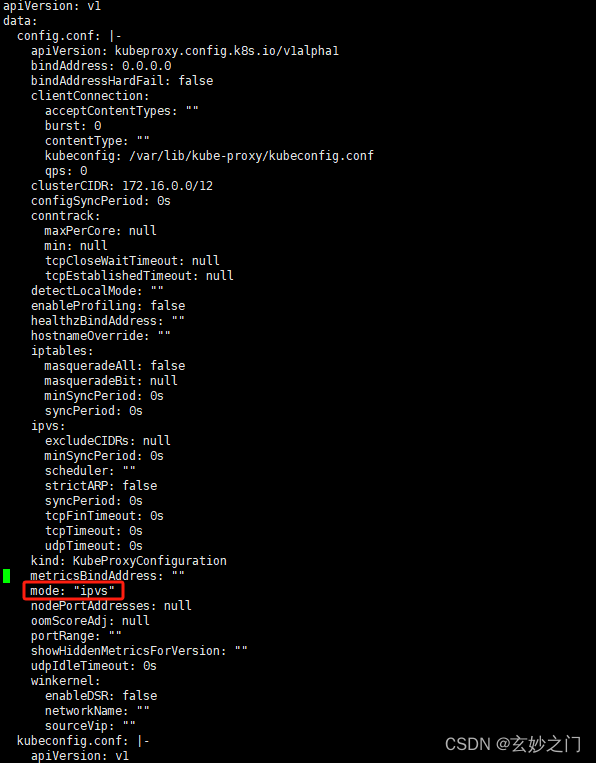
1.在Master01节点上将Kube-proxy改为ipvs模式,默认是iptables
kubectl edit cm kube-proxy -n kube-system
2.在Master01节点上更新Kube-Proxy的Pod
kubectl patch daemonset kube-proxy -p "{"spec":{"template":{"metadata":{"annotations":{"date":"`date +'%s'`"}}}}}" -n kube-system
3.在Master01节点上查看kube-proxy滚动更新情况
kubectl get po -n kube-system | grep kube-proxy
kube-proxy-2kz9g                           1/1     Running   0             58s
kube-proxy-b54gh                           1/1     Running   0             63s
kube-proxy-kclcc                           1/1     Running   0             61s
kube-proxy-pv8gc                           1/1     Running   0             59s
kube-proxy-xt52m                           1/1     Running   0             56s
curl 127.0.0.1:10249/proxyMode
ipvs
2.7Kubectl自动补全
source <(kubectl completion bash)
echo "source <(kubectl completion bash)" >> ~/.bashrc
2.在Master01节点上为 kubectl 使用一个速记别名
alias k=kubectl
complete -o default -F __start_kubectl k
3.集群可用性验证
1.在Master01节点上查看节点是否正常,确定都是Ready
kubectl get node
[root@k8s-master01 ~]# kubectl get node
NAME           STATUS   ROLES                  AGE    VERSION
k8s-master01   Ready    control-plane,master   2d2h   v1.23.17
k8s-master02   Ready    control-plane,master   2d     v1.23.17
k8s-master03   Ready    control-plane,master   2d     v1.23.17
k8s-node01     Ready    <none>                 2d     v1.23.17
k8s-node02     Ready    <none>                 2d     v1.23.17
[root@k8s-master01 ~]#

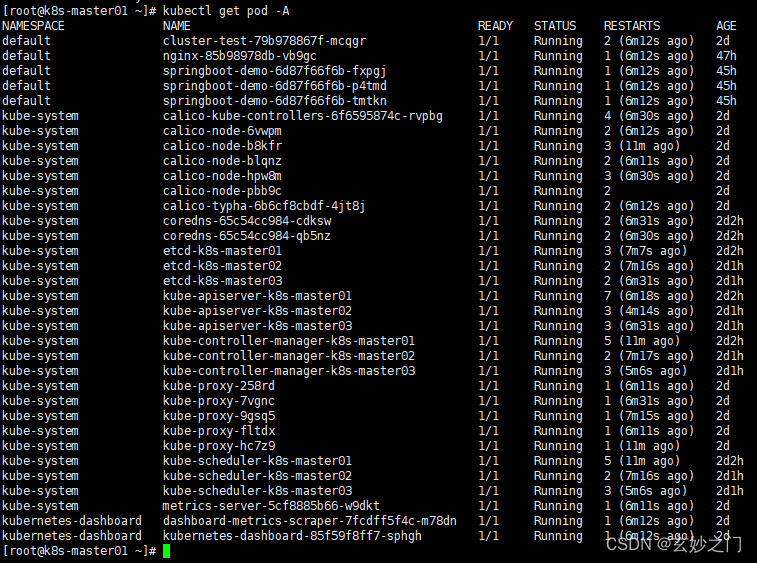
2.在Master01节点上查看所有Pod是否正常,确定READY都是N/N形式的且STATUS 都为Running
3.在Master01节点上查看集群网段是否冲突
(1)在Master01节点上查看SVC网段
kubectl get svc
NAME              TYPE        CLUSTER-IP     EXTERNAL-IP   PORT(S)           AGE
kubernetes        ClusterIP   10.0.0.1       <none>        443/TCP           2d2h
nginx             NodePort    10.0.25.21     <none>        80:30273/TCP      47h
springboot-demo   NodePort    10.0.115.157   <none>        30000:30001/TCP   45h
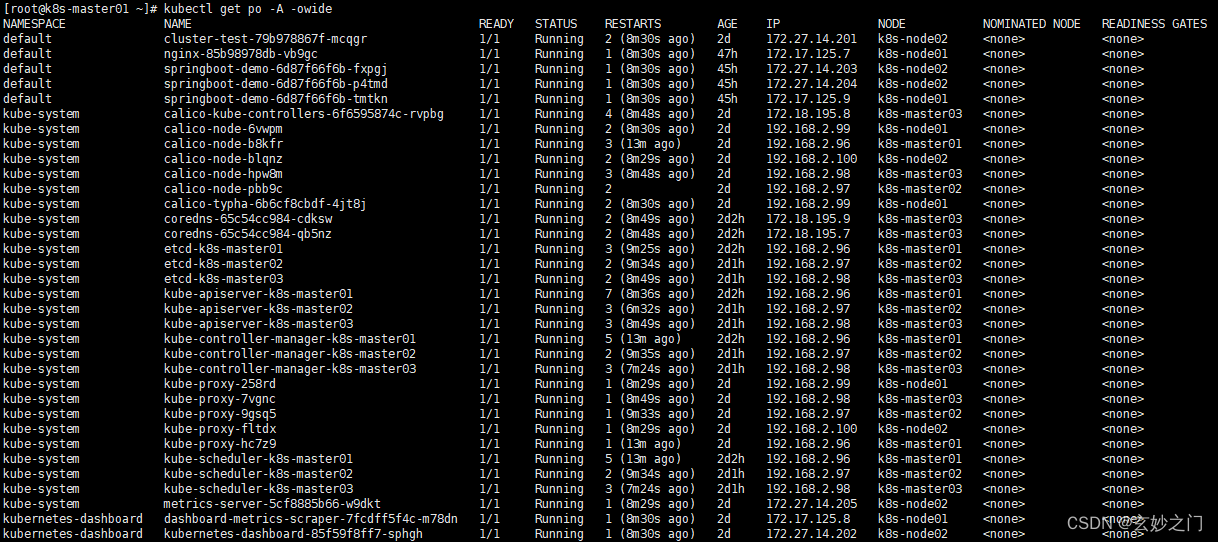
(2)在Master01节点上查看POD网段,主要分为两段,一段是因为使用HostNetwork,所以使用宿主机网段;另一段使用POD网段
4.在Master01节点上查看是否正常创建资源
(1)在Master01节点上创建名为cluster-test的deployment
kubectl create deploy cluster-test --image=registry.cn-hangzhou.aliyuncs.com/zq-demo/debug-tools -- sleep 3600
(2)在Master01节点上查看deployment创建情况
kubectl get po
NAME                               READY   STATUS    RESTARTS      AGE
cluster-test-79b978867f-mcqgr      1/1     Running   2 (10m ago)   2d
nginx-85b98978db-vb9gc             1/1     Running   1 (10m ago)   47h
springboot-demo-6d87f66f6b-fxpgj   1/1     Running   1 (10m ago)   45h
springboot-demo-6d87f66f6b-p4tmd   1/1     Running   1 (10m ago)   45h
springboot-demo-6d87f66f6b-tmtkn   1/1     Running   1 (10m ago)   45h
5.在Master01节点上检查Pod 是否能够解析 Service
(1)在Master01节点上解析kubernetes,观察到和上面SVC地址一致
[root@k8s-master01 ~]# kubectl exec -it cluster-test-79b978867f-mcqgr -- bash
(06:53 cluster-test-79b978867f-mcqgr:/)  nslookup kubernetes
Server:		10.0.0.10
Address:	10.0.0.10#53

Name:	kubernetes.default.svc.cluster.local
Address: 10.0.0.1
(2)在Master01节点上解析kube-dns.kube-system,观察到和上面SVC地址一致
(06:53 cluster-test-79b978867f-mcqgr:/) nslookup kube-dns.kube-system
Server:		10.0.0.10
Address:	10.0.0.10#53

Name:	kube-dns.kube-system.svc.cluster.local
Address: 10.0.0.10
6.每个节点是否能访问 Kubernetes 的 kubernetes svc 443 和 kube-dns 的 service 53
(1)在每台机器上测试访问 Kubernetes 的 kubernetes svc 443
[root@k8s-master02 ~]# curl https://10.0.0.1:443
curl: (60) Peer's Certificate issuer is not recognized.
More details here: http://curl.haxx.se/docs/sslcerts.html

curl performs SSL certificate verification by default, using a "bundle"
 of Certificate Authority (CA) public keys (CA certs). If the default
 bundle file isn't adequate, you can specify an alternate file
 using the --cacert option.
If this HTTPS server uses a certificate signed by a CA represented in
 the bundle, the certificate verification probably failed due to a
 problem with the certificate (it might be expired, or the name might
 not match the domain name in the URL).
If you'd like to turn off curl's verification of the certificate, use
 the -k (or --insecure) option.
(2)在每台机器上测试访问 Kubernetes 的kube-dns 的 service 53
curl 10.0.0.10:53
curl: (52) Empty reply from server
7.Pod 和机器之间是否能正常通讯
(1)在Master01节点上查看pod节点IP
[root@k8s-master01 ~]# kubectl get po -owide
NAME                               READY   STATUS    RESTARTS      AGE   IP              NODE         NOMINATED NODE   READINESS GATES
cluster-test-79b978867f-mcqgr      1/1     Running   2 (16m ago)   2d    172.27.14.201   k8s-node02   <none>           <none>
nginx-85b98978db-vb9gc             1/1     Running   1 (16m ago)   47h   172.17.125.7    k8s-node01   <none>           <none>
springboot-demo-6d87f66f6b-fxpgj   1/1     Running   1 (16m ago)   45h   172.27.14.203   k8s-node02   <none>           <none>
springboot-demo-6d87f66f6b-p4tmd   1/1     Running   1 (16m ago)   45h   172.27.14.204   k8s-node02   <none>           <none>
springboot-demo-6d87f66f6b-tmtkn   1/1     Running   1 (16m ago)   45h   172.17.125.9    k8s-node01   <none>           <none>
(2)在Master01节点上ping测试
[root@k8s-master01 ~]# ping 172.27.14.201
PING 172.27.14.201 (172.27.14.201) 56(84) bytes of data.
64 bytes from 172.27.14.201: icmp_seq=1 ttl=63 time=0.418 ms
64 bytes from 172.27.14.201: icmp_seq=2 ttl=63 time=0.222 ms
64 bytes from 172.27.14.201: icmp_seq=3 ttl=63 time=0.269 ms
64 bytes from 172.27.14.201: icmp_seq=4 ttl=63 time=0.364 ms
64 bytes from 172.27.14.201: icmp_seq=5 ttl=63 time=0.197 ms
^C
--- 172.27.14.201 ping statistics ---
5 packets transmitted, 5 received, 0% packet loss, time 4106ms
rtt min/avg/max/mdev = 0.197/0.294/0.418/0.084 ms
[root@k8s-master01 ~]#
(1)在Master01节点上查看default默认命名空间下的Pod
[root@k8s-master01 ~]# kubectl get po -owide
NAME READY STATUS RESTARTS AGE IP NODE NOMINATED NODE READINESS GATES
cluster-test-79b978867f-mcqgr 1/1 Running 2 (19m ago) 2d 172.27.14.201 k8s-node02
nginx-85b98978db-vb9gc 1/1 Running 1 (19m ago) 47h 172.17.125.7 k8s-node01
springboot–demo-6d87f66f6b-fxpgj 1/1 Running 1 (19m ago) 45h 172.27.14.203 k8s-node02
springboot–demo-6d87f66f6b-p4tmd 1/1 Running 1 (19m ago) 45h 172.27.14.204 k8s-node02
springboot-demo-6d87f66f6b-tmtkn 1/1 Running 1 (19m ago) 45h 172.17.125.9 k8s-node01
您在 /var/spool/mail/root 中有新邮件
[root@k8s-master01 ~]#
(2)在Master01节点上kube-system命名空间下的Pod
[root@k8s-master01 ~]# kubectl get po -n kube-system -owide
NAME                                       READY   STATUS    RESTARTS      AGE    IP              NODE           NOMINATED NODE   READINESS GATES
calico-kube-controllers-6f6595874c-rvpbg   1/1     Running   4 (20m ago)   2d1h   172.18.195.8    k8s-master03   <none>           <none>
calico-node-6vwpm                          1/1     Running   2 (20m ago)   2d1h   192.168.2.99    k8s-node01     <none>           <none>
calico-node-b8kfr                          1/1     Running   3 (25m ago)   2d1h   192.168.2.96    k8s-master01   <none>           <none>
calico-node-blqnz                          1/1     Running   2 (20m ago)   2d1h   192.168.2.100   k8s-node02     <none>           <none>
calico-node-hpw8m                          1/1     Running   3 (20m ago)   2d1h   192.168.2.98    k8s-master03   <none>           <none>
calico-node-pbb9c                          1/1     Running   2             2d1h   192.168.2.97    k8s-master02   <none>           <none>
calico-typha-6b6cf8cbdf-4jt8j              1/1     Running   2 (20m ago)   2d1h   192.168.2.99    k8s-node01     <none>           <none>
coredns-65c54cc984-cdksw                   1/1     Running   2 (20m ago)   2d3h   172.18.195.9    k8s-master03   <none>           <none>
coredns-65c54cc984-qb5nz                   1/1     Running   2 (20m ago)   2d3h   172.18.195.7    k8s-master03   <none>           <none>
etcd-k8s-master01                          1/1     Running   3 (21m ago)   2d3h   192.168.2.96    k8s-master01   <none>           <none>
etcd-k8s-master02                          1/1     Running   2 (21m ago)   2d1h   192.168.2.97    k8s-master02   <none>           <none>
etcd-k8s-master03                          1/1     Running   2 (20m ago)   2d1h   192.168.2.98    k8s-master03   <none>           <none>
kube-apiserver-k8s-master01                1/1     Running   7 (20m ago)   2d3h   192.168.2.96    k8s-master01   <none>           <none>
kube-apiserver-k8s-master02                1/1     Running   3 (18m ago)   2d1h   192.168.2.97    k8s-master02   <none>           <none>
kube-apiserver-k8s-master03                1/1     Running   3 (20m ago)   2d1h   192.168.2.98    k8s-master03   <none>           <none>
kube-controller-manager-k8s-master01       1/1     Running   5 (25m ago)   2d3h   192.168.2.96    k8s-master01   <none>           <none>
kube-controller-manager-k8s-master02       1/1     Running   2 (21m ago)   2d1h   192.168.2.97    k8s-master02   <none>           <none>
kube-controller-manager-k8s-master03       1/1     Running   3 (19m ago)   2d1h   192.168.2.98    k8s-master03   <none>           <none>
kube-proxy-258rd                           1/1     Running   1 (20m ago)   2d     192.168.2.99    k8s-node01     <none>           <none>
kube-proxy-7vgnc                           1/1     Running   1 (20m ago)   2d     192.168.2.98    k8s-master03   <none>           <none>
kube-proxy-9gsq5                           1/1     Running   1 (21m ago)   2d     192.168.2.97    k8s-master02   <none>           <none>
kube-proxy-fltdx                           1/1     Running   1 (20m ago)   2d     192.168.2.100   k8s-node02     <none>           <none>
kube-proxy-hc7z9                           1/1     Running   1 (25m ago)   2d     192.168.2.96    k8s-master01   <none>           <none>
kube-scheduler-k8s-master01                1/1     Running   5 (25m ago)   2d3h   192.168.2.96    k8s-master01   <none>           <none>
kube-scheduler-k8s-master02                1/1     Running   2 (21m ago)   2d1h   192.168.2.97    k8s-master02   <none>           <none>
kube-scheduler-k8s-master03                1/1     Running   3 (19m ago)   2d1h   192.168.2.98    k8s-master03   <none>           <none>
metrics-server-5cf8885b66-w9dkt            1/1     Running   1 (20m ago)   2d     172.27.14.205   k8s-node02     <none>           <none>
(3)在Master01节点上进入cluster-test-79b978867f-429xg进行ping测试
[root@k8s-master01 ~]# kubectl exec -it cluster-test-79b978867f-mcqgr -- bash
(07:02 cluster-test-79b978867f-mcqgr:/) ping 192.168.2.99
PING 192.168.2.99 (192.168.2.99) 56(84) bytes of data.
64 bytes from 192.168.2.99: icmp_seq=1 ttl=63 time=0.260 ms
64 bytes from 192.168.2.99: icmp_seq=2 ttl=63 time=0.431 ms
64 bytes from 192.168.2.99: icmp_seq=3 ttl=63 time=0.436 ms
64 bytes from 192.168.2.99: icmp_seq=4 ttl=63 time=0.419 ms
64 bytes from 192.168.2.99: icmp_seq=5 ttl=63 time=0.253 ms
64 bytes from 192.168.2.99: icmp_seq=6 ttl=63 time=0.673 ms
64 bytes from 192.168.2.99: icmp_seq=7 ttl=63 time=0.211 ms
64 bytes from 192.168.2.99: icmp_seq=8 ttl=63 time=0.374 ms
64 bytes from 192.168.2.99: icmp_seq=9 ttl=63 time=0.301 ms
64 bytes from 192.168.2.99: icmp_seq=10 ttl=63 time=0.194 ms
^C
--- 192.168.2.99 ping statistics ---
10 packets transmitted, 10 received, 0% packet loss, time 9217ms
rtt min/avg/max/mdev = 0.194/0.355/0.673/0.137 ms
原文地址:https://blog.csdn.net/yangfenggh/article/details/134693975
本文来自互联网用户投稿,该文观点仅代表作者本人,不代表本站立场。本站仅提供信息存储空间服务,不拥有所有权,不承担相关法律责任。
如若转载,请注明出处:http://www.7code.cn/show_34164.html
如若内容造成侵权/违法违规/事实不符,请联系代码007邮箱:suwngjj01@126.com进行投诉反馈,一经查实,立即删除!


