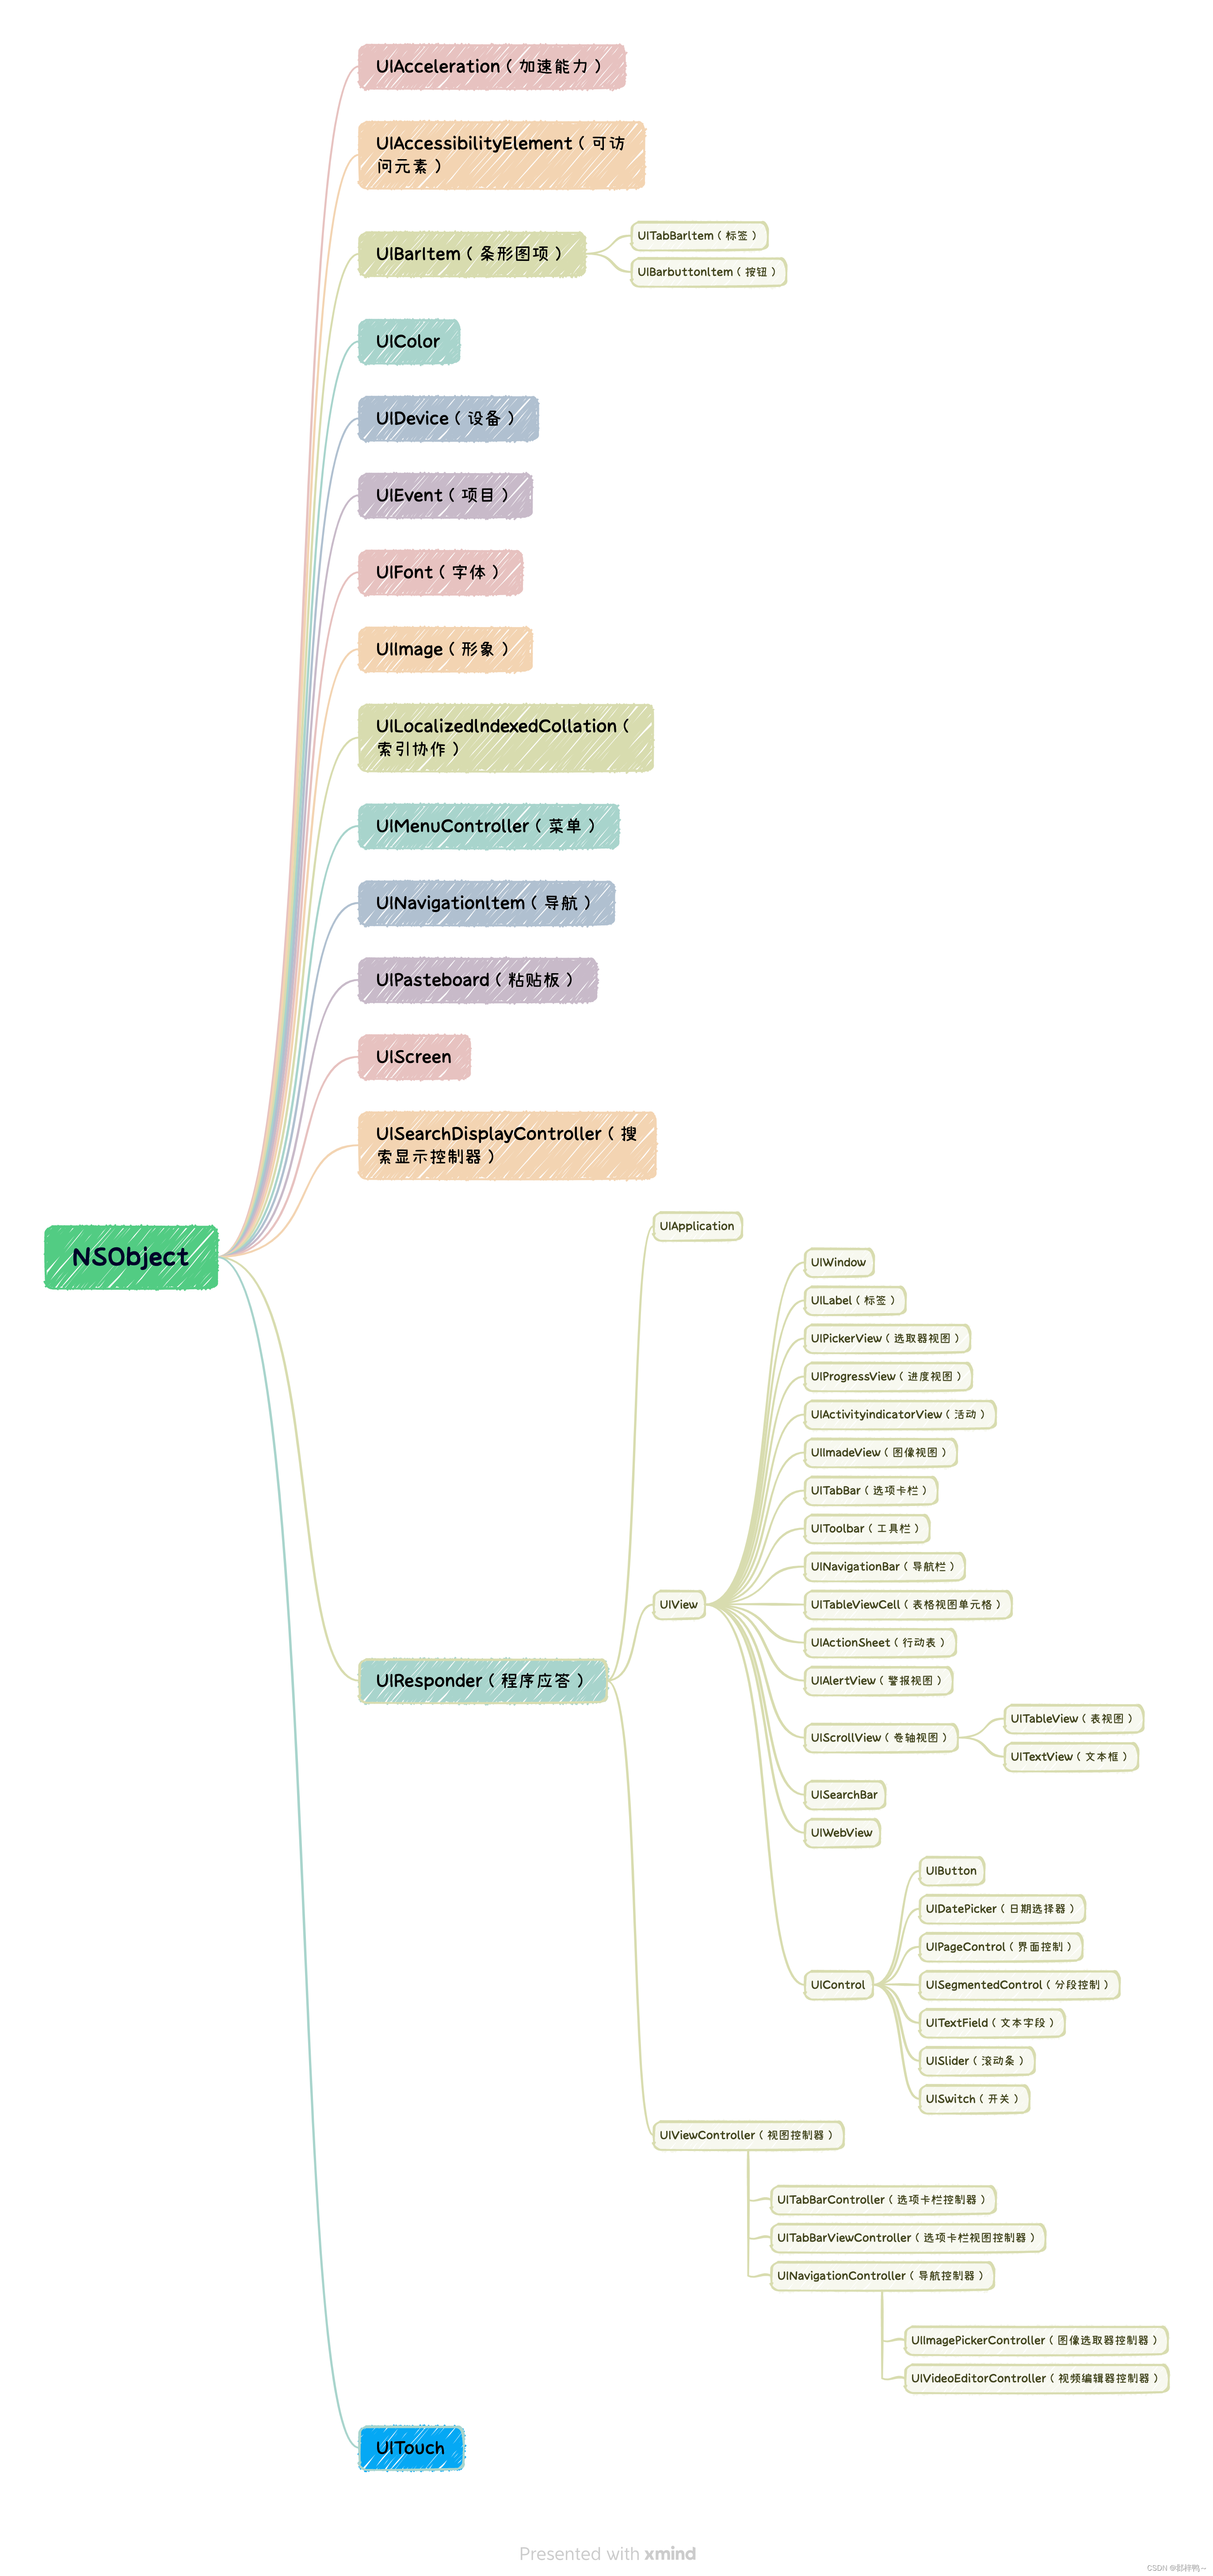
11.开发框架一览
打开软件——Hlep——developer Documentation——UIkit
12.UIKit简介
(打开同1.1)
NS——操作系统
思维导图
13.UIViewController
➡️Root Controller (直向进行)管理列表的控制器 ——Table View Cell——Content ——Static Cells静态模式——可以直接在模式中设置数据
点击对应想要连接的开头文件 ➡️control➡️下一个想要连接的文件➡️选择ViewContrller(创造联系)
三种搭建方法(UserInterface) 最后打包的时候xib转为nib
14.视图与控件
view.safeAreaInsets.top 防止颜色被顶端占领14
按钮约束——长按control键键头拖向View,再选取相关约束种类。“自动布局”(同前面frame函数“手动布局”的运用相同,两个方法约束)
15. 滚动控件UIScrollView
//
// ViewController.m
// UIScrollView-滚动视图
//
// Created by sofia 朱 on 2023/1/30
// Copyright © 2020 Liu,Wenbo(TBRD). All rights reserved.
//
#import "ViewController.h"
@interface ViewController () <UIScrollViewDelegate> //设置代理
{
UIScrollView *scrollview;
UILabel *lable;
UIImageView *imageView;
}
@end
@implementation ViewController
- (void)viewDidLoad {
[super viewDidLoad];
// Do any additional setup after loading the view.
scrollview = [[UIScrollView alloc] initWithFrame:self.view.frame];
scrollview.backgroundColor = [UIColor grayColor];
UIImage *image = [UIImage imageNamed:@"test1.png"];
imageView = [[UIImageView alloc] initWithFrame:CGRectMake(self.view.frame.origin.x, self.view.frame.origin.y, self.view.frame.size.width, self.view.frame.size.height)];
imageView.image = image;
[scrollview addSubview:imageView];
lable = [[UILabel alloc] initWithFrame:CGRectMake(150, 150, 100, 100)];
lable.backgroundColor = [UIColor whiteColor];
//设置滚动视图的内容区域
scrollview.contentSize = CGSizeMake(self.view.frame.size.width * 2, self.view.frame.size.height * 2);
//设置内容区域位置的偏移量 这里设置到了最右边
scrollview.contentOffset = CGPointMake(self.view.frame.size.width, 0);
//设置内容区域大小的偏移量 这里相当于多加一个屏幕的大小
scrollview.contentInset = UIEdgeInsetsMake(0, self.view.frame.size.width, 0, 0);
//设置代理
scrollview.delegate = self;
//方向锁定 先水平滑动则限定水平滑动(既不能垂直滑动);先垂直滑动的话就限定垂直滑动;但是对角线上没有限定
scrollview.directionalLockEnabled = YES;
//设置是否允许回弹
scrollview.bounces = NO;
//设置滑动提示线是否显示
//scrollview.showsVerticalScrollIndicator = YES;
//设置提示线的风格
scrollview.indicatorStyle = UIScrollViewIndicatorStyleWhite;
//设置scrollview的加速度
//scrollview.decelerationRate = 0.5;
//设置scrollview的缩放比
scrollview.minimumZoomScale = 0.5; // 最小缩0.5
scrollview.maximumZoomScale = 2; //最大扩大2
[scrollview addSubview:lable];
[self.view addSubview: scrollview];
}
//想缩放哪个控件就返回哪个控件
-(UIView *)viewForZoomingInScrollView:(UIScrollView *)scrollView{
return imageView;
}
16. 列表控件UITableView
初步了解:
17.UICollectionView
- (NSInteger)numberOfSectionsInCollectionView:(UICollectionView *)collectionView {
    return 1;
}

- (NSInteger)collectionView:(UICollectionView *)collectionView numberOfItemsInSection:(NSInteger)section {
    return 9;
}

- (UICollectionViewCell *)collectionView:(UICollectionView *)collectionView cellForItemAtIndexPath:(NSIndexPath *)indexPath {

    UICollectionViewCell* cell = [collectionView dequeueReusableCellWithReuseIdentifier:@"cell" forIndexPath:indexPath];
    cell.backgroundColor = [UIColor colorWithRed:arc4random()%255/255.0 green:arc4random()%255/255.0 blue:arc4random()%255/255.0 alpha:1];
    return cell;
}
UICollectionViewFlowLayout* flowLayout = [[UICollectionViewFlowLayout alloc] init];
    //定义每个cell的大小
    flowLayout.itemSize = CGSizeMake((self.view.frame.size.width - 80) / 3, 100);
    //定义布局方向
    flowLayout.scrollDirection = UICollectionViewScrollDirectionVertical;
    //定义每个cell纵向的间距
    flowLayout.minimumLineSpacing = 20;
    //定义每个cell的横向间距
    flowLayout.minimumInteritemSpacing = 20;
    //定义每个cell到容器边缘的距离
    flowLayout.sectionInset = UIEdgeInsetsMake(20, 20, 20, 20);
    self.collectionView = [[UICollectionView alloc] initWithFrame:self.view.frame collectionViewLayout:flowLayout];
    //注册cell
    [self.collectionView registerClass:[UICollectionViewCell class] forCellWithReuseIdentifier:@"cell"];
    //设置代理
    self.collectionView.delegate = self;
    //设置数据源
    self.collectionView.dataSource = self;
    [self.view addSubview:self.collectionView];
18.包管理CocoaPods字幕版
问题1:终端中no such file or directory
➡️cd no such file or directory
➡️zsh no such file or directory
但是最终解决是因为路径未标明,一下子全写上去了,电脑无法识别,一步一步写上去就不会报错了。(可见下面代码)
问题2:[!] No Xcode project found, please specify one
但是问题仍然未被解决—— Successfully installed cocoapods-1.11.3已经出现,但相关demo project仍然未出现
问题得到解决——因为使用桌面创建文件夹时桌面大文件夹名字与其中小文件夹相同,系统优先识别打文件夹,导致ViewControllerDemo.xcodeproj未被识别出。
cd Desktop
MacBook-Air Desktop % cd gift
MacBook-Air gift % cd ViewControllerDemo
MacBook-Air ViewControllerDemo % ls
ViewControllerDemo ViewControllerDemo.xcodeproj问题3: No string under cursor
解决方法:错误就应该是没有按“i”进入插入模式。再按一下“ESC”,即可。
问题4:在打开Podfile后终端由于未知原因无法操作,故只能又从头开始
VScode
问题5:当复制粘贴过来的网址出现报错,网址无法找到时
[!] Smart quotes were detected and ignored in your Podfile. To avoid issues in the future, you should not use TextEdit for editing it. If you are not using TextEdit, you should turn off smart quotes in your editor of choice.

[!] The Podfile does not contain any dependencies.

[!] Automatically assigning platform `iOS` with version `16.2` on target `ViewControllerDemo` because no platform was specified. Please specify a platform for this target in your Podfile. See `https://guides.cocoapods.org/syntax/podfile.html#platform`.
使用 gem sources 将网址转换为中国的
19.工程设置
问题1公匙私匙:(终端)
Key is invalid. You must supply a key in OpenSSH public key format :
cat ~/.ssh/sofiazhu_rsa.pub问题2 Permission denied (publickey).(主要问题:权限被拒绝(公钥))
fatal: Could not read from remote repository.
Please make sure you have the correct access rights
and the repository exists.
MacBook-Air .ssh % vim /etc/ssh/sshd_config

#       $OpenBSD: sshd_config,v 1.104 2021/07/02 05:11:21 dtucker Exp $

# This is the sshd server system-wide configuration file.  See
# sshd_config(5) for more information.

# This sshd was compiled with PATH=/usr/bin:/bin:/usr/sbin:/sbin

# The strategy used for options in the default sshd_config shipped with
# OpenSSH is to specify options with their default value where
# possible, but leave them commented.  Uncommented options override the
# default value.

# This Include directive is not part of the default sshd_config shipped with
# OpenSSH. Options set in the included configuration files generally override
# those that follow.  The defaults only apply to options that have not been
# explicitly set.  Options that appear multiple times keep the first value set,
# unless they are a multivalue option such as HostKey.
Include /etc/ssh/sshd_config.d/*

#Port 22
#AddressFamily any
#ListenAddress 0.0.0.0
#ListenAddress ::

#HostKey /etc/ssh/ssh_host_rsa_key
#HostKey /etc/ssh/ssh_host_ecdsa_key
#HostKey /etc/ssh/ssh_host_ed25519_key

# Ciphers and keying
#RekeyLimit default none

# Logging
#SyslogFacility AUTH
#LogLevel INFO

# Authentication:

#LoginGraceTime 2m
#PermitRootLogin prohibit-password
#StrictModes yes
#MaxAuthTries 6
#MaxSessions 10

#PubkeyAuthentication yes

# The default is to check both .ssh/authorized_keys and .ssh/authorized_keys2
# but this is overridden so installations will only check .ssh/authorized_keys
AuthorizedKeysFile      .ssh/authorized_keys

#AuthorizedPrincipalsFile none

#AuthorizedKeysCommand none
#AuthorizedKeysCommandUser nobody

# For this to work you will also need host keys in /etc/ssh/ssh_known_hosts
#HostbasedAuthentication no
# Change to yes if you don't trust ~/.ssh/known_hosts for
# HostbasedAuthentication
#IgnoreUserKnownHosts no
# Don't read the user's ~/.rhosts and ~/.shosts files
#IgnoreRhosts yes

# To disable tunneled clear text passwords, change to no here!
#PasswordAuthentication yes
问题3:Key is invalid. You must supply a key in OpenSSH public key format(密钥无效。您必须提供OpenSSH公钥格式的密钥)
- (1条消息) 解决问题:Key is invalid. You must supply a key in OpenSSH public key format_风卷残云_迟来大师的博客-CSDN博客
(无效问题)
问题4 : Could not read from remote repository.
Please make sure you have the correct access rights
and the repository exists.
终端关于——返回上一级目录
方法一:
3、然后上级目录是根下面的home,那么返回上级目录,输入【cd /home】不要少了斜杠。(完成后直接到达home目录,对于上级目录不可行)
4、再次【pwd】一下,那么即可看到返回到home目录。(✅)
方法二:(可用)
2、输入上级目录替代【..】。
sofiadeAir /home % cd ..
sofiadeAir / % cdssofiadeAir ViewControllerDemo % ls
Podfile ViewControllerDemo
Podfile.lock ViewControllerDemo.xcodeproj
Pods ViewControllerDemo.xcworkspace
sofiadeAir ViewControllerDemo % cd
sofiadeAir ~ % cd .ssh
sofiadeAir .ssh % 检验终端与github连接方式:
sofiadeAir .ssh % ssh -T git@github.com


git@github.com: Permission denied (publickey).markdown使用方法:
需要保存的仓库:
(Git 或者 source tree软件可以查看命令行中无法看清的代码以及修改历史等)
原文地址:https://blog.csdn.net/ZZY329888/article/details/128596666
本文来自互联网用户投稿,该文观点仅代表作者本人,不代表本站立场。本站仅提供信息存储空间服务,不拥有所有权,不承担相关法律责任。
如若转载,请注明出处:http://www.7code.cn/show_34998.html
如若内容造成侵权/违法违规/事实不符,请联系代码007邮箱:suwngjj01@126.com进行投诉反馈,一经查实,立即删除!


![[软件工具]文档页数统计工具软件pdf统计页数word统计页数ppt统计页数图文打印店快速报价工具](https://img-blog.csdnimg.cn/direct/09dfbaff3e9a47a9a551dd65fef5d482.jpeg)