项目场景:
实现后台上传图片
本次使用vue2加elementui的upload组件实现功能
技术代码
方式一:使用action自动上传
    <el-upload
              :action="uploadFileUrl"
              ref="upload"
              list-type="picture-card"
              :on-preview="handlePictureCardPreview"
              :on-remove="handleRemove"
              :before-upload="beforeAvatarUpload"
              :limit="10"
              :headers="headers"
              :on-exceed="handleExceed"
              :file-list="formData.fileList"

            >
              <i class="el-icon-plus"></i>
            </el-upload>
注意使用action 的话需要设置请求token。否则请求失败
      uploadFileUrl: process.env.VUE_APP_BASE_API + '/请求地址', // 上传的图片服务器地址
      headers: {
        Authorization: 'Bearer ' + getToken()
      },
方式二:使用自动上传:http–request=“UploadImage”
<el-upload
action="#"
ref="upload"
:http-request="UploadImage"
list-type="picture-card"
:on-preview="handlePictureCardPreview"
:on-remove="handleRemove"
:before-upload="beforeAvatarUpload"
:limit="10"
:headers="headers"
:on-exceed="handleExceed"
:file-list="formData.fileList"
>
<i class="el-icon-plus"></i>
</el-upload>
 // 在使用http-request方法的时候,调用的事件必须以param为参数,通过param.file取得文件。
    UploadImage(param) {
      const formData = new FormData();
      formData.append("file", param.file);
      Shoppingupoload(formData)
        .then((response) => {
          console.log("上传图片成功");
          this.formData.fileList.push([
            { name: param.file.name, url: response.data.data },
          ]);
          console.log(this.formData.fileList);
          // param.onSuccess()  // 上传成功的图片会显示绿色的对勾
          // 但是我们上传成功了图片, fileList 里面的值却没有改变,还好有on-change指令可以使用
        })
        .catch((response) => {
          console.log("图片上传失败");
          param.onError();
        });
    },
方式三:使用手动上传:auto-upload=”false“禁止自动上传,然后使用点击按钮ref上传
注意如果element upload before-upload 不起作用原因:设置了auto-upload为false
 <el-upload
              :action="uploadFileUrl"
              ref="upload"
              list-type="picture-card"
              :on-preview="handlePictureCardPreview"
              :on-remove="handleRemove"
              :before-upload="beforeAvatarUpload"
               :on-change="handleChange"
              :limit="10"
              :headers="headers"
              :on-exceed="handleExceed"
              :file-list="formData.fileList"
              :auto-upload="false"
            >
              <i class="el-icon-plus"></i>
              <el-button style="margin-left: 10px;" size="small" type="success" @click="submitUpload">上传到服务器</el-button>
            </el-upload>
  submitUpload() {
        this.$refs.upload.submit();
      },
遇到问题
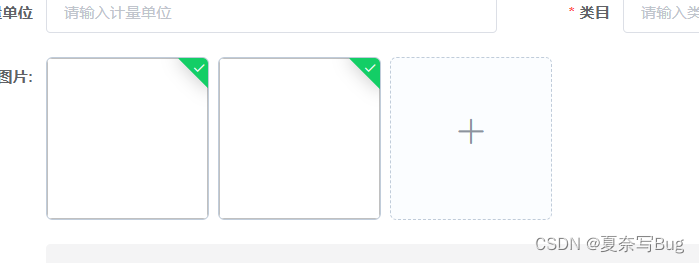 上传以后会出现上传空白图片以及原图一闪而过的画面,原因是在获取后端url以后我把数据push到file-list的数据列表时,push格式写错了,导致push到了列表第二层,所以监听不到url导致空白显示和一闪而过尴尬的画面。
    UploadImage(param) {
      const formData = new FormData();
      formData.append("file", param.file);
      Shoppingupoload(formData)
        .then((response) => {
          console.log("上传图片成功");
          // 错误示范
          this.formData.fileList.push([
            { name: param.file.name, url: response.data.data },
          ]);
          // 正确代码
        // this.formData.fileList.push({ name: param.file.name, url: response.data.data, uid: param.file.uid, });
        //   console.log(this.formData.fileList);
          param.onSuccess(); // 上传成功的图片会显示绿色的对勾
          // 但是我们上传成功了图片, fileList 里面的值却没有改变,还好有on-change指令可以使用
        })
        .catch((response) => {
          console.log("图片上传失败");
          param.onError();
        });
    },
第二个问题
上传文件需求需要禁止重复上传,所以需要判断重复,这里我选择在before-upload里和图片大小和格式一并判断,使用foreach遍历list列表数组,然后根据file.name 和list中的name对比,如果相同则拦截上传。
this.formData.fileList.forEach((item, index) => {
        if (file.name === item.name) {
          this.isname = false;
        }else{
        this.isname = true
      });
这时测试 上传第一个图片A以后,继续上传图片A虽然可以拦截,但是再次上传图片B,然后在上传图片A时仍然可以上传,并没有拦截成功。最后发现是因为foreach会遍历数组中的所有元素,满足条件后还继续执行了循环,所以会没上传一次就完全遍历一次数组,直到数组遍历完毕,会一直执行完fi else。导致了最后返回的this.isname 还是true,所以就拦截不成功。
解决方式很简单,只需要把else语句删除就好了,
完整代码
// 上传检测
beforeAvatarUpload(file) {
const isJPG = file.type === "image/jpeg";
const isLt2M = file.size / 1024 / 1024 < 2;
this.isname = true;
// 不能在foreach中增加else判断,否则会进行多次执行
// forEach 会遍历数组中的所有元素,满足条件后还继续执行了循环,
// 可以通过 try catch 抛出异常的方式跳出循环
this.formData.fileList.forEach((item, index) => {
if (file.name === item.name) {
this.isname = false;
}
});
if (!this.isname) {
this.$message.error("图片重复");
}
if (!isJPG) {
this.$message.error("上传头像图片只能是 JPG 格式!");
// this.$refs.upload.handleRemove(file);
}
if (!isLt2M) {
this.$message.error("上传头像图片大小不能超过 2MB!");
// this.$refs.upload.handleRemove(file);
}
return isJPG && isLt2M && this.isname;
},
<el-upload
              action="#"
              ref="upload"
              list-type="picture-card"
              :http-request="UploadImage"
              :on-preview="handlePictureCardPreview"
              :on-remove="handleRemove"
              :before-upload="beforeAvatarUpload"
              :limit="10"
              :on-change="handleChange"
              :on-exceed="handleExceed"
              :file-list="formData.fileList"
            >
              <i class="el-icon-plus"></i>
            </el-upload>
            <el-dialog :visible.sync="dialogVisible">
              <img width="100%" :src="dialogImageUrl" alt="" />
            </el-dialog>
//删除图片
handleRemove(file, fileList) {
console.log(file);
// 判断是否是正确格式图片才能执行删除
if (file && file.status === "success") {
let Pics = this.formData.fileList;
Pics.forEach((item, index) => {
if (file.name == item.name) {
Pics.splice(index, 1);
}
});
}
// console.log(this.formData.fileList);
},
//查看图片
handlePictureCardPreview(file) {
this.dialogImageUrl = file.url;
this.dialogVisible = true;
},
handleChange(file, fileList) {
// console.log(fileList);
// console.log(file);
},
// 手动上传
// submitUpload() {
// console.log(this.$refs.upload)
// this.$refs.upload.submit();
// },
// 在使用http-request方法的时候,调用的事件必须以param为参数,通过param.file取得文件。
UploadImage(param) {
const formData = new FormData();
formData.append("file", param.file);
Shoppingupoload(formData)
.then((response) => {
console.log("上传图片成功");
this.formData.fileList.push({
name: param.file.name,
url: response.data.data,
uid: param.file.uid,
});
param.onSuccess(); // 上传成功的图片会显示绿色的对勾
// 但是我们上传成功了图片, fileList 里面的值却没有改变,还好有on-change指令可以使用
})
.catch((response) => {
console.log("图片上传失败");
param.onError();
});
},
// 上传检测
beforeAvatarUpload(file) {
const isJPG = file.type === "image/jpeg";
const isLt2M = file.size / 1024 / 1024 < 2;
this.isname = true;
// 不能在foreach中增加else判断,否则会进行多次执行
// forEach 会遍历数组中的所有元素,满足条件后还继续执行了循环,
// 可以通过 try catch 抛出异常的方式跳出循环
this.formData.fileList.forEach((item, index) => {
if (file.name === item.name) {
this.isname = false;
}
});
if (!this.isname) {
this.$message.error("图片重复");
}
if (!isJPG) {
this.$message.error("上传头像图片只能是 JPG 格式!");
// this.$refs.upload.handleRemove(file);
}
if (!isLt2M) {
this.$message.error("上传头像图片大小不能超过 2MB!");
// this.$refs.upload.handleRemove(file);
}
return isJPG && isLt2M && this.isname;
},
//控制上传数量提示
handleExceed(files, fileList) {
this.$message.warning(`最多上传10个文件`);
},
data
  formData: {
        name: "",
        brand: "",
        unit: "",
        category: [],
        desc: "",
        fileList: [],
        img: [],
      },
      isname: true,
      dialogImageUrl: undefined,
      videoFlag: false,
      uploadFileUrl: process.env.VUE_APP_BASE_API + "/system/image/uploadFile", // 上传的图片服务器地址
      headers: {
        Authorization: "Bearer " + getToken(),
      },
原文地址:https://blog.csdn.net/weixin_51601829/article/details/130983528
本文来自互联网用户投稿,该文观点仅代表作者本人,不代表本站立场。本站仅提供信息存储空间服务,不拥有所有权,不承担相关法律责任。
如若转载,请注明出处:http://www.7code.cn/show_42092.html
如若内容造成侵权/违法违规/事实不符,请联系代码007邮箱:suwngjj01@126.com进行投诉反馈,一经查实,立即删除!

