搭建vue3环境
我们使用vite来搭建vue3环境(没有安装vite需要去安装vite)
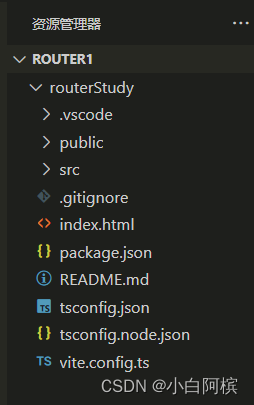
npm create vite routerStudy
cd routerStudy
npm i
npm run dev
vue–router入门(宝宝模式)
npm i vue-router@4
<template>
<div>
这是文件一
</div>
</template>
<script setup lang="ts">
</script>
<style scoped>
</style>
src/components/File2.vue:
<template>
    <div>
        这是文件二
    </div>
</template>

<script setup lang="ts">

</script>

<style scoped>

</style>
在src下新建router文件夹
在router文件夹下新建router.ts:
import { createRouter,createWebHistory,createWebHashHistory } from 'vue-router'
import File1 from '../components/File1.vue'
import File2 from '../components/File2.vue'

const routes = [
    {
        path: '/',
        component:File1
    },
    {
        path: '/file2',
        component:File2
    }
]

const router = createRouter({
    // history: createWebHistory(),
    history:createWebHashHistory(),
    routes,
})

export default router;
import { createApp } from 'vue'
import './style.css'
import App from './App.vue'
import router from './router/router'

createApp(App).use(router).mount('#app')
<script setup lang="ts">

</script>

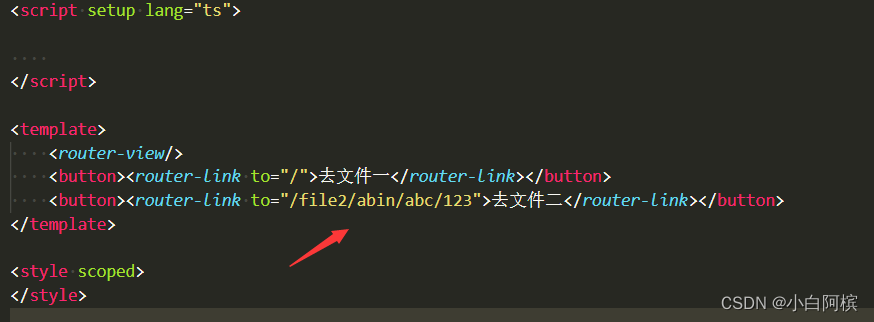
<template>
    <router-view/>
    <button><router-link to="/">去文件一</router-link></button>
    <button><router-link to="/file2">去文件二</router-link></button>
</template>

<style scoped>
</style>
vue-router基础(青年模式)
一。动态路由匹配
1.带参数的动态路由匹配
当我们需要对每个用户加载同一个组件,但用户id不同。我们就需要在vue-router种使用一个动态字段来实现,再通过$routr.params来获取值:

import { createRouter,createWebHistory,createWebHashHistory } from 'vue-router'
import File1 from '../components/File1.vue'
import File2 from '../components/File2.vue'

const routes = [
    {
        path: '/',
        component:File1
    },
    {
        path: '/file2/:username/abc/:userid', //注意看这个
        component:File2
    }
]

const router = createRouter({
    history: createWebHistory(),
    // history:createWebHashHistory(),
    routes,
})

export default router;
(2)修改组件HelloWorld.vue:

(3) 修改组件File2.vue:
<template>
    <div>
        这是文件二
    </div>
</template>

<script setup lang="ts">
import {getCurrentInstance,onMounted } from 'vue'

const instance  = getCurrentInstance()
if (instance != null) {
    const _this = instance.appContext.config.globalProperties //vue3获取当前this

onMounted(() => {
    console.log(_this.$route.params)
  })
}
</script>

<style scoped>

</style>
2.捕获所有路由或404 Not Found路由
当用户在导航栏乱输一通后,路由表中没有对应的路由,这时候,就需要将用户转去404页面。那么
我们该如何处理呢?
(1)修改router/router.ts:
import { createRouter,createWebHistory,createWebHashHistory } from 'vue-router'
import File1 from '../components/File1.vue'
import File2 from '../components/File2.vue'
import NotFound from '../components/NotFound.vue'
import UserGeneric from '../components/UserGeneric.vue'


const routes = [
    {
        path: '/',
        component:File1
    },
    {
        path: '/file2/:username/abc/:userid',
        component:File2
    },
    // 将匹配所有内容并将其放在 `$route.params.pathMatch` 下
    {
        path: '/:pathMatch(.*)*', name: 'NotFound', component: NotFound
    },
    // 将匹配以 `/user-` 开头的所有内容,并将其放在 `$route.params.afterUser` 下
    {
        path: '/user-:afterUser(.*)', component: UserGeneric
    },
]

const router = createRouter({
    history: createWebHistory(),
    // history:createWebHashHistory(),
    routes,
})

export default router;
<template>
    <div>
        糟糕!页面没有找到。。。呜呜呜
    </div>
</template>

<script setup lang="ts">
import {getCurrentInstance,onMounted } from 'vue'

const instance  = getCurrentInstance()
if (instance != null) {
    const _this = instance.appContext.config.globalProperties //vue3获取当前this

onMounted(() => {
    console.log(_this.$route.params)
  })
}
</script>

<style scoped>

</style>
(3)修改HelloWorld.vue

(4)点击去404页面按钮(或者在地址栏乱写一通)


(5)出现404页面,说明运行成功!!!
二。嵌套路由
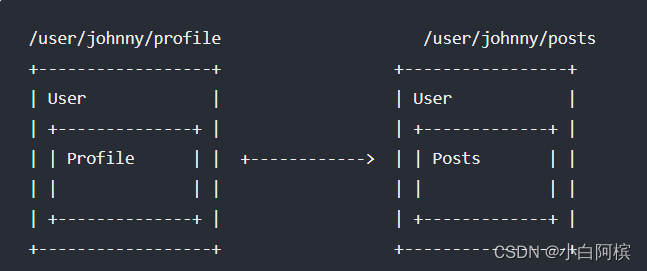
路由是可以嵌套的。例如:

嵌套的理解挺简单的,我就不多叭叭了,直接上代码,看完就懂了。
(1)新建组件Children1.vue:
<template>
    <div>
        我是孩子1
    </div>
</template>

<script setup lang="ts">

</script>

<style scoped>

</style>
<template>
    <div>
        我是孩子2
    </div>
</template>

<script setup lang="ts">

</script>

<style scoped>

</style>
(3)修改router/router.ts:
import { createRouter,createWebHistory,createWebHashHistory } from 'vue-router'
import File1 from '../components/File1.vue'
import File2 from '../components/File2.vue'
import NotFound from '../components/NotFound.vue'
import UserGeneric from '../components/UserGeneric.vue'
import Children1 from '../components/Children1.vue'
import Children2 from '../components/Children2.vue'


const routes = [
    {
        path: '/',
        component: File1,

    },
    {
        path: '/file2',
        component: File2,
        children: [  //使用嵌套路由
            {
                path: 'children1',
                component:Children1
            },
            {
                path: 'children2',
                component:Children2
            },
        ]
    },
    {
        path: '/:pathMatch(.*)*', name: 'NotFound', component: NotFound
    },
    {
        path: '/user-:afterUser(.*)', component: UserGeneric
    },
]

const router = createRouter({
    history: createWebHistory(),
    // history:createWebHashHistory(),
    routes,
})

export default router;
(4)修改组件HelloWorld.vue:

(5)修改组件File2.vue:
<template>
    <div>
        这是文件二
        <div>
            我是文件二里的内容
            <router-view/>
            <button><router-link to="/file2/children1">找孩子1</router-link></button>
            <button><router-link to="/file2/children2">找孩子2</router-link></button>
        </div>
    </div>
</template>

<script setup lang="ts">

</script>

<style scoped>

</style>
三。编程式导航
除了使用/< router-link/> 创建 a 标签来定义导航链接,我们还可以借助 router 的实例方法,通过编写代码来实现。
1.router.push()方法的使用
(1)修改组件NotFound.vue:
<template>
    <div>
        糟糕!页面没有找到。。。呜呜呜
    </div>
</template>

<script setup lang="ts">
import {getCurrentInstance,onMounted } from 'vue'

const instance  = getCurrentInstance()
if (instance != null) {
    const _this = instance.appContext.config.globalProperties //vue3获取当前this


    // 1.字符串路径
    _this.$router.push('/file2/children2')

    // 2.带有路径的对象
    // _this.$router.push({path:'/file2/children2'})

    // 3.命名的路由,并加上参数,让路由建立 url
    // _this.$router.push({name:'file2',params:{username:'children2'}})

    // 4.带查询参数,结果是 /register?plan=private
    // _this.$router.push({ path: '/file2/children2', query: {userid:'123'} })


    onMounted(() => {
    console.log(_this.$route.params)
  })
}
</script>

<style scoped>

</style>
(2)再点“去404页面”,发现没有去404页面了,说明编程式导航成功!!

2.router.replace()方法的使用
它的作用类似于 router.push,唯一不同的是,它在导航时不会向 history 添加新记录,正如它的名字所暗示的那样——它取代了当前的条目。
修改组件NotFound.vue:
<template>
    <div>
        糟糕!页面没有找到。。。呜呜呜
    </div>
</template>

<script setup lang="ts">
import {getCurrentInstance,onMounted } from 'vue'

const instance  = getCurrentInstance()
if (instance != null) {
    const _this = instance.appContext.config.globalProperties //vue3获取当前this

    // 一。router.push的使用:
    // 1.字符串路径
    // _this.$router.push('/file2/children2')

    // 2.带有路径的对象
    // _this.$router.push({path:'/file2/children2'})

    // 3.命名的路由,并加上参数,让路由建立 url
    // _this.$router.push({name:'file2',params:{username:'children2'}})

    // 4.带查询参数,结果是 /register?plan=private
    // _this.$router.push({ path: '/file2/children2', query: {userid:'123'} })

    // 二。router.replace的使用:
    _this.$router.replace('/file2/children1')


    onMounted(() => {
    console.log(_this.$route.params)
  })
}
</script>

<style scoped>

</style>
3.router.go()方法的使用
修改组件NotFound.vue:
<template>
    <div>
        糟糕!页面没有找到。。。呜呜呜
    </div>
</template>

<script setup lang="ts">
import {getCurrentInstance,onMounted } from 'vue'

const instance  = getCurrentInstance()
if (instance != null) {
    const _this = instance.appContext.config.globalProperties //vue3获取当前this

    // 一。router.push的使用:
    // 1.字符串路径
    // _this.$router.push('/file2/children2')

    // 2.带有路径的对象
    // _this.$router.push({path:'/file2/children2'})

    // 3.命名的路由,并加上参数,让路由建立 url
    // _this.$router.push({name:'file2',params:{username:'children2'}})

    // 4.带查询参数,结果是 /register?plan=private
    // _this.$router.push({ path: '/file2/children2', query: {userid:'123'} })

    // 二。router.replace的使用:
    // _this.$router.replace('/file2/children1')

    // 三。router.go的使用:
    _this.$router.go(-1)  //相当于点击回退一次

    onMounted(() => {
    console.log(_this.$route.params)
  })
}
</script>

<style scoped>

</style>
原文地址:https://blog.csdn.net/qq_52769059/article/details/126760000
本文来自互联网用户投稿,该文观点仅代表作者本人,不代表本站立场。本站仅提供信息存储空间服务,不拥有所有权,不承担相关法律责任。
如若转载,请注明出处:http://www.7code.cn/show_46548.html
如若内容造成侵权/违法违规/事实不符,请联系代码007邮箱:suwngjj01@126.com进行投诉反馈,一经查实,立即删除!


