就可以生成一个HTML的表格, 而Android中也允许我们使用表格的方式来排列组件,就是行与列的方式,就说我们这节的TableLayout!但却不像我们后面会讲到的Android 4.0后引入的GridLayout(网格)布局一样,直接就可以设置多少行与多少列!
本节引言:前面我们已经学习了平时实际开发中用得较多的线性布局(LinearLayout)与相对布局(RelativeLayout), 其实学完这两个基本就够用了,笔者在实际开发中用得比较多的也是这两个,当然作为一个好学的程序猿, 都是喜欢刨根问题的,所以虽说用得不多,但是还是有必要学习一下基本的用法的,说不定哪一天能用得上呢! 你说是吧,学多点东西没什么的,又不吃亏!好了,扯淡就扯到这里,开始这一节的学习吧,这一节我们会学习 Android中的第三个布局:TableLayout(表格布局)! 1.本节学习路线图
2.TableLayout的介绍
3.如何确定行数与列数
4.三个常用属性
①collapseColumns(隐藏列)流程:在TableRow中定义5个按钮后,接着在最外层的TableLayout中添加以下属性: android:collapseColumns = “0,2”,就是隐藏第一与第三列,代码如下: <TableLayout android:id="@+id/TableLayout2" android:layout_width="fill_parent" android:layout_height="wrap_content" android:collapseColumns="0,2" > <TableRow> <Button android:layout_width="wrap_content" android:layout_height="wrap_content" android:text="one" /> <Button android:layout_width="wrap_content" android:layout_height="wrap_content" android:text="two" /> <Button android:layout_width="wrap_content" android:layout_height="wrap_content" android:text="three" /> <Button android:layout_width="wrap_content" android:layout_height="wrap_content" android:text="four" /> <Button android:layout_width="wrap_content" android:layout_height="wrap_content" android:text="five" /> </TableRow> </TableLayout>
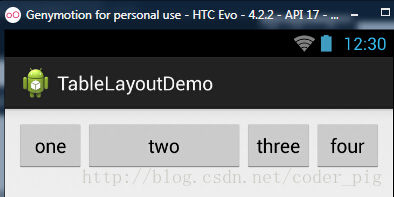
②stretchColumns(拉伸列)流程:在TableLayout中设置了四个按钮,接着在最外层的TableLayout中添加以下属性: android:stretchColumns = “1” 设置第二列为可拉伸列,让该列填满这一行所有的剩余空间,代码如下: <TableLayout
android:id="@+id/TableLayout2"
android:layout_width="fill_parent"
android:layout_height="wrap_content"
android:stretchColumns="1" >
<TableRow>
<Button
android:layout_width="wrap_content"
android:layout_height="wrap_content"
android:text="one" />
<Button
android:layout_width="wrap_content"
android:layout_height="wrap_content"
android:text="two" />
<Button
android:layout_width="wrap_content"
android:layout_height="wrap_content"
android:text="three" />
<Button
android:layout_width="wrap_content"
android:layout_height="wrap_content"
android:text="four" />
</TableRow>
</TableLayout>
③shrinkColumns(收缩列)步骤:这里为了演示出效果,设置了5个按钮和一个文本框,在最外层的TableLayout中添加以下属性: android:shrinkColumns = “1” <TableLayout
android:id="@+id/TableLayout2"
android:layout_width="fill_parent"
android:layout_height="wrap_content"
android:shrinkColumns="1" >
<TableRow>
<Button
android:layout_width="wrap_content"
android:layout_height="wrap_content"
android:text="one" />
<Button
android:layout_width="wrap_content"
android:layout_height="wrap_content"
android:text="two" />
<Button
android:layout_width="wrap_content"
android:layout_height="wrap_content"
android:text="three" />
<Button
android:layout_width="wrap_content"
android:layout_height="wrap_content"
android:text="four" />
<Button
android:layout_width="wrap_content"
android:layout_height="wrap_content"
android:text="five" />
<TextView
android:layout_width="wrap_content"
android:layout_height="wrap_content"
android:text="文本XX" />
</TableRow>
</TableLayout>
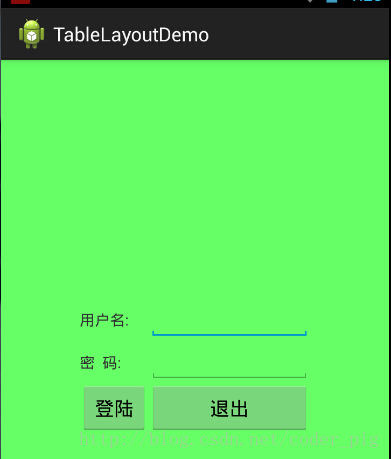
从图中我们可以看到two这个按钮被挤压成条条状,这个就是收缩,为了保证表格能适应 父容器的宽度!至于另外两个属性就不讲解了,用法和HTML相同!有兴趣的可以研究下! 5.使用实例使用TableLayout来完成简单的登录界面,运行效果图如下:
原文地址:https://blog.csdn.net/leyang0910/article/details/130911351 本文来自互联网用户投稿,该文观点仅代表作者本人,不代表本站立场。本站仅提供信息存储空间服务,不拥有所有权,不承担相关法律责任。 如若转载,请注明出处:http://www.7code.cn/show_48348.html 如若内容造成侵权/违法违规/事实不符,请联系代码007邮箱:suwngjj01@126.com进行投诉反馈,一经查实,立即删除! 声明:本站所有文章,如无特殊说明或标注,均为本站原创发布。任何个人或组织,在未征得本站同意时,禁止复制、盗用、采集、发布本站内容到任何网站、书籍等各类媒体平台。如若本站内容侵犯了原著者的合法权益,可联系我们进行处理。
|
本文介绍: 相信学过HTML的朋友都知道,我们可以通过




![[office] excel怎么在表格中画斜线 #经验分享#知识分享#媒体](http://www.7code.cn/wp-content/uploads/2023/11/ee6748cbc735e6105405f8a984d954c804b93f34bc916-Z0IqTf_fw1200.png)
