前言
说实在的,Spring Cloud的这个系列,很多人都写过,写的比博主好的一大堆,网友们百度一下,就可以发现很多很多,甚至有一批都是系列文章,我只不过之前学过一段时间,但是过了一段时间了,很多东西都忘了,在这里再次巩固一下相关知识点,如果你也一样,那么可以看一下我这个系列的文章,如果你是初学者,你可以先去了解一下比我写的更好的博主,我可以做到的,仅仅就是把这个系列相对好一点,但是我却不能满足大众的所有口味,所以如果你喜欢,你可以看一下,如果你不喜欢,可以移步看看别的博主文章。
顺便在提及一句,这个系列可能比较长,我尽可能的更新,但是我也会同步更新我在实际开发中碰到的其他关于我处理问题的博文,所以这个系列将会很漫长,对我来说很漫长。
好了废话不多说了,本文主要目标,搭建一个Spring Cloud的系列的项目,然后使用Spring Cloud的相关组件,完成整个框架的搭建。
相关工具
| 工具名称 | 版本 |
|---|---|
| IDEA | 2022.1 |
| MySQL | 5.7及以上 |
| Rabbit MQ | 暂且未定 |
| Linux | centos 7 |
| api fox | lastest |
| OV Virtual Box | 6.0以上 |
| Vagrant | 2.3.6 |
| redis | lastest |
| maven | 3.8.x |
| – | – |
切记,OV 就是Oracle VM VirtualBox vagrant 和 OV的版本最好和我差不多,建议是一样,不然你会很难受,我踩过一段时间的坑,是因为版本问题导致的,这个后续我使用到的时候再说。
项目搭建
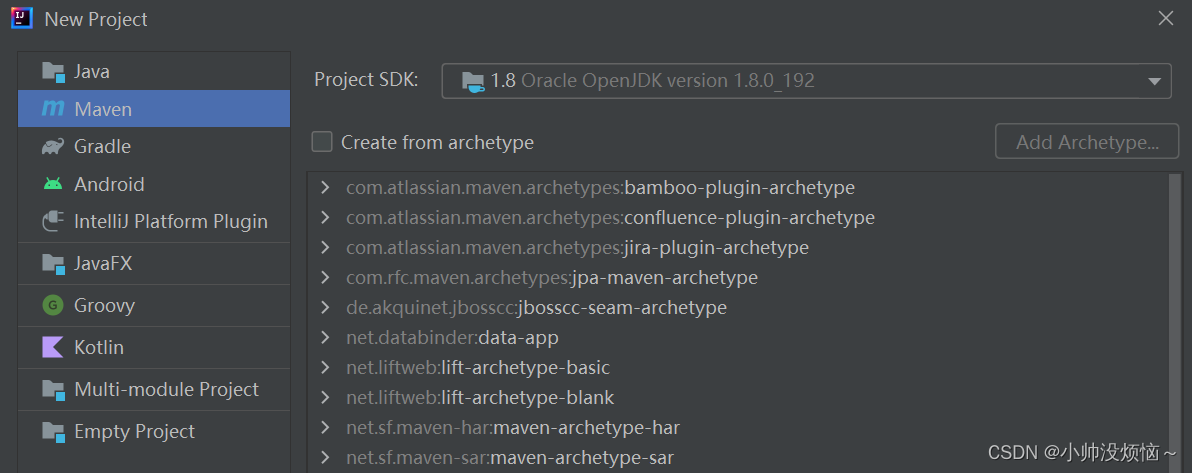
说了这么多,现在我们来了解Spring Cloud的项目怎么搭建吧,首先咱们在IDEA中创建一个Spring Cloud的项目吧:
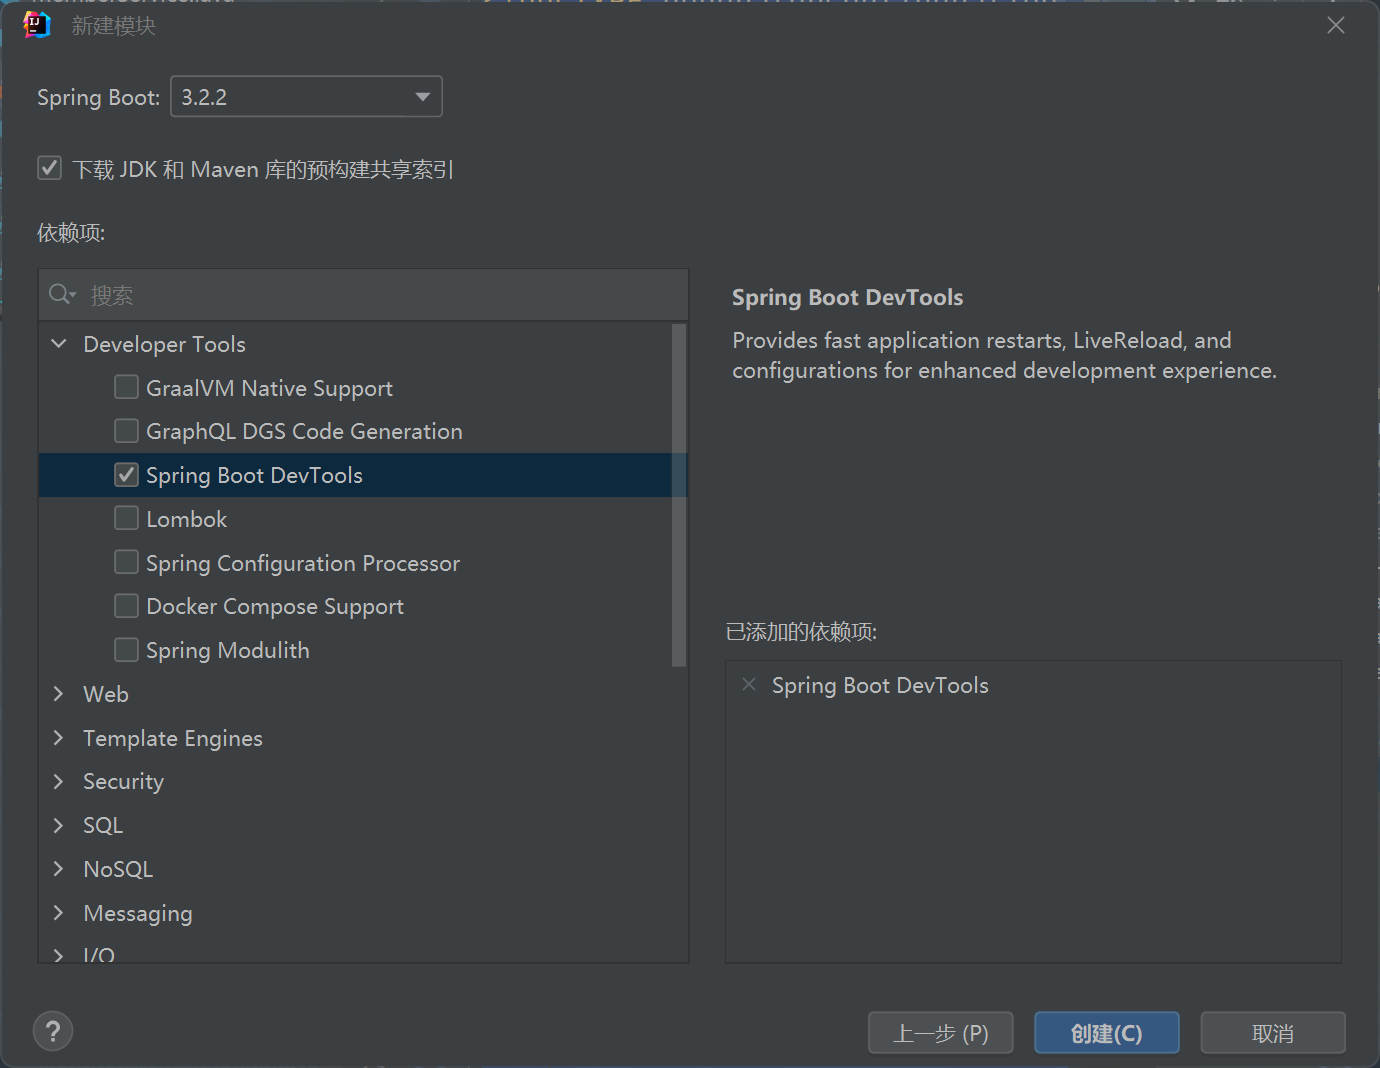
注意:如果你使用IDEA版本不是2022以上的,那么你的配置可能与我的有所差别。
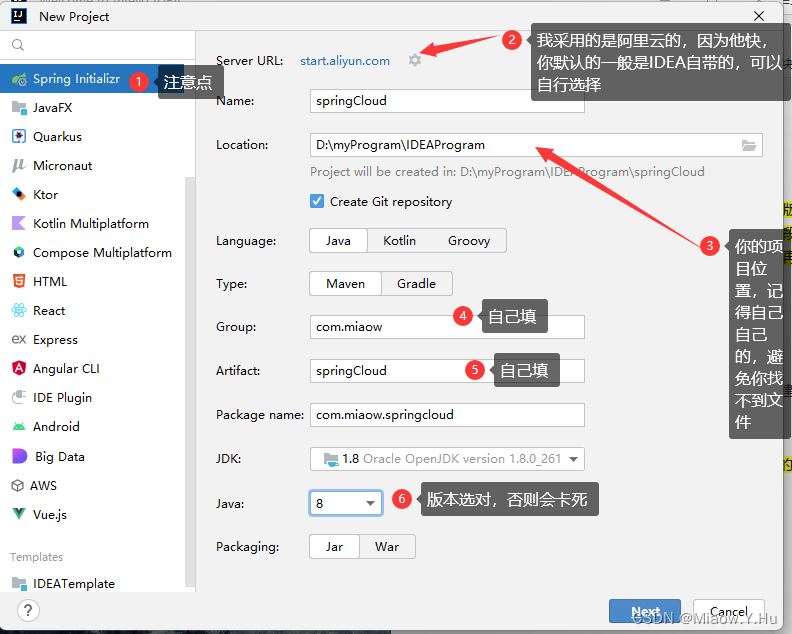
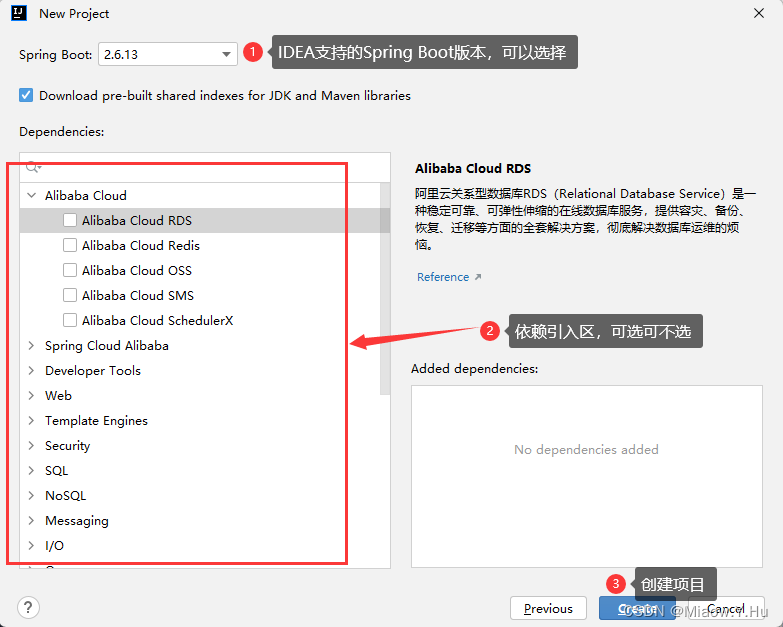
可以自行选择,对了提及一下,如果你不知道这个玩意是干啥的,推荐不要选择他,选了也没事,pom.xml文件中可以进行删除的。
我们确定好了相关依赖,那么我们看看搭建好的项目结构:
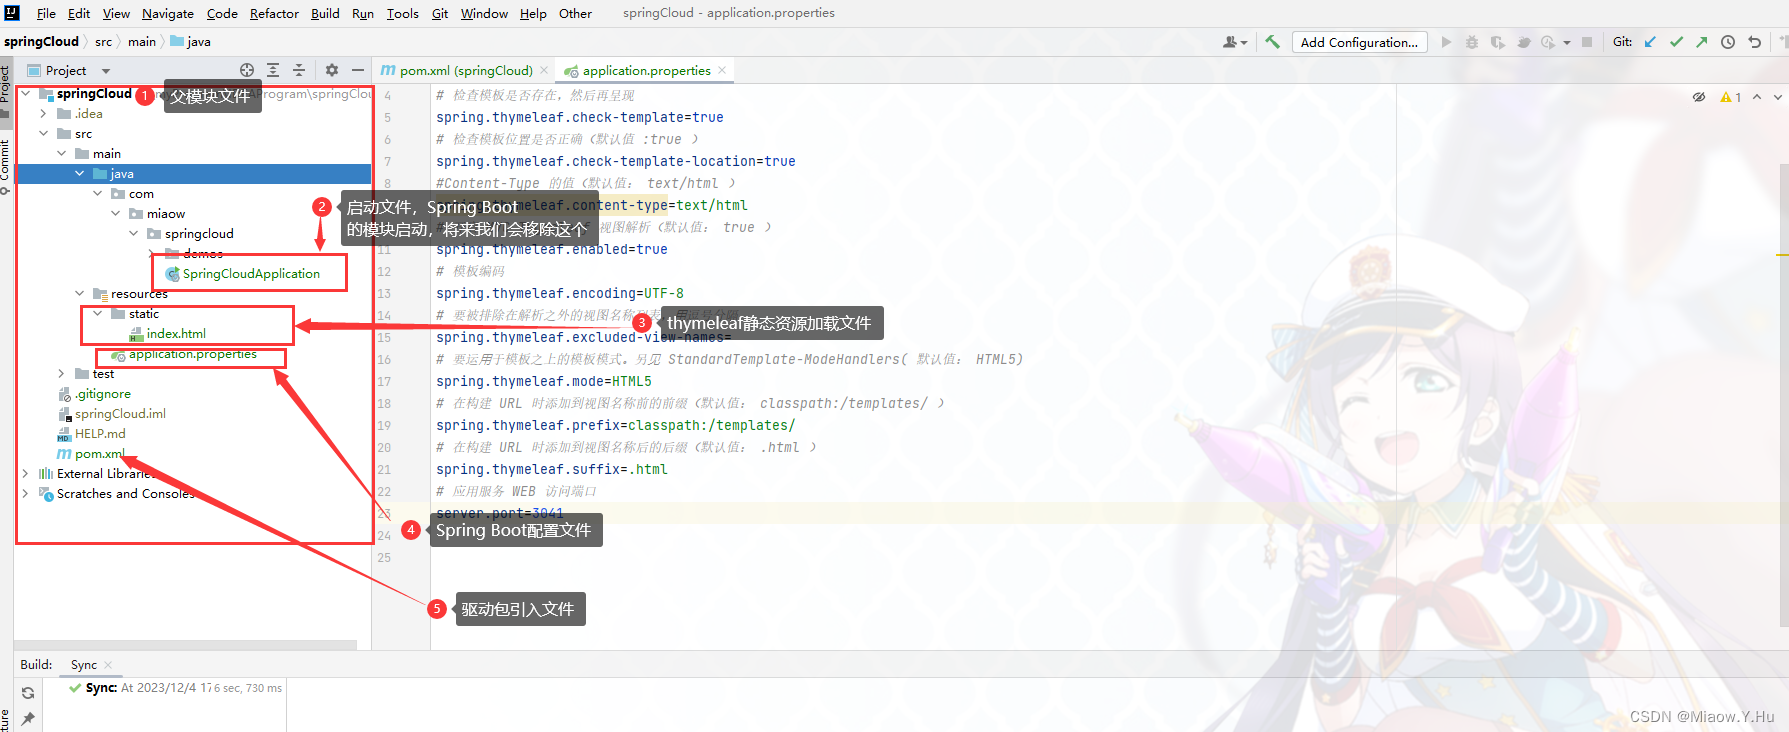
项目框架有了,那么继续往下看,我们需要手动引入Spring Cloud依赖,强调,Spring Boot的依赖和Spring Cloud的依赖有对应关系,这里重点强调一下。否则会出现报错或者项目启动不了的问题,影响后续步骤的正常进行。
具体的版本依赖参照Spring Boot官网: https://spring.io/
Spring Boot包文件:https://start.spring.io/
官网版本对应地址:https://start.spring.io/actuator/info
Spring Cloud官方文档直达:https://spring.io/projects/spring-cloud
| SpringCloud版本 | SpringBoot版本 |
|---|---|
| 2022.0.0-M2 | Spring Boot >=3.0.0-M2 and < 3.1.0-M1 |
| 2022.0.0-M1 | Spring Boot >=3.0.0-M1 and < 3.0.0-M2 |
| 2021.0.3 | Spring Boot >=2.6.1 and < 3.0.0-M1 |
| 2021.0.0-RC1 | Spring Boot >=2.6.0-RC1 and <2.6.1 |
| 2021.0.0-M3 | Spring Boot >=2.6.0-M3 and <2.6.0-RC1 |
| 2021.0.0-M1 | Spring Boot >=2.6.0-M1 and <2.6.0-M3 |
| 2020.0.5 | Spring Boot >=2.4.0.M1 and <2.6.0-M1 |
| Hoxton.SR 8,12系列 | Spring Boot >=2.2.0.RELEASE and <2.4.0.M1 |
| Hoxton.BUILD-SNAPSHOT | Spring Boot >=2.2.0.BUILD-SNAPSHOT |
| Hoxton.M2 | Spring Boot >=2.2.0.M4 and <=2.2.0.M5 |
| Greenwich.BUILD-SNAPSHO | Spring Boot >=2.1.9.BUILD-SNAPSHOT and <2.2.0.M4 |
| Greenwich.SR2 | Spring Boot >=2.1.0.RELEASE and <2.1.9.BUILD-SNAPSHOT |
| Greenwich.M1 | Spring Boot >=2.1.0.M3 and <2.1.0.RELEASE |
| Finchley.BUILD-SNAPSHOT | Spring Boot >=2.0.999.BUILD-SNAPSHOT and <2.1.0.M3 |
| Finchley.SR4 | Spring Boot >=2.0.3.RELEASE and <2.0.999.BUILD-SNAPSHOT |
| Finchley.RC2 | Spring Boot >=2.0.2.RELEASE and <2.0.3.RELEASE |
| Finchley.RC1 | Spring Boot >=2.0.1.RELEASE and <2.0.2.RELEASE |
| Finchley.M9 | Spring Boot >=2.0.0.RELEASE and <=2.0.0.RELEASE |
| Finchley.M7 | Spring Boot >=2.0.0.RC2 and <=2.0.0.RC2 |
| Finchley.M6 | Spring Boot >=2.0.0.RC1 and <=2.0.0.RC1 |
| Finchley.M5 | Spring Boot >=2.0.0.M7 and <=2.0.0.M7 |
| Finchley.M4 | Spring Boot >=2.0.0.M6 and <=2.0.0.M6 |
| Finchley.M3 | Spring Boot >=2.0.0.M5 and <=2.0.0.M5 |
| Finchley.M2 | Spring Boot >=2.0.0.M3 and <2.0.0.M5 |
| Edgware.SR5 | 1.5.20.RELEASE |
| Edgware.SR5 | 1.5.16.RELEASE |
| Edgware.RELEASE | 1.5.9.RELEASE |
| Dalston.RC1 | 1.5.2.RELEASE |
如果你使用的是最新的Spring Boot,3.0.x以上的,请参照如下:
{
    "git":{
        "branch":"05b5b0ec9cb75c61389471349454c86d0ce2d2e3",
        "commit":{
            "id":"05b5b0e",
            "time":"2023-12-01T08:49:20Z"
        }
    },
    "build":{
        "version":"0.0.1-SNAPSHOT",
        "artifact":"start-site",
        "versions":{
            "spring-boot":"3.2.0",
            "initializr":"0.21.0-SNAPSHOT"
        },
        "name":"start.spring.io website",
        "time":"2023-12-01T08:50:13.783Z",
        "group":"io.spring.start"
    },
    "bom-ranges":{
        "codecentric-spring-boot-admin":{
            "3.1.5":"Spring Boot >=3.1.0 and <3.2.0-M1"
        },
        "hilla":{
            "2.4.0":"Spring Boot >=3.1.0 and <3.2.0-M1"
        },
        "sentry":{
            "6.28.0":"Spring Boot >=2.7.0 and <3.2.0-M1"
        },
        "solace-spring-boot":{
            "2.0.0":"Spring Boot >=3.0.0"
        },
        "solace-spring-cloud":{
            "3.0.0":"Spring Boot >=3.0.0"
        },
        "spring-cloud":{
            "2022.0.4":"Spring Boot >=3.0.0 and <3.2.0-M1",
            "2023.0.0-RC1":"Spring Boot >=3.2.0-M1 and <3.2.1-SNAPSHOT",
            "2023.0.0-SNAPSHOT":"Spring Boot >=3.2.1-SNAPSHOT"
        },
        "spring-cloud-azure":{
            "5.7.0":"Spring Boot >=3.0.0 and <3.3.0-M1"
        },
        "spring-cloud-gcp":{
            "4.8.4":"Spring Boot >=3.0.0 and <3.2.0-M1"
        },
        "spring-cloud-services":{
            "4.0.3":"Spring Boot >=3.0.0 and <3.2.0-M1"
        },
        "spring-modulith":{
            "1.0.3":"Spring Boot >=3.1.0 and <3.2.0-M1",
            "1.1.0":"Spring Boot >=3.2.0-M1"
        },
        "spring-shell":{
            "3.1.6":"Spring Boot >=3.1.0 and <3.2.0-M1",
            "3.2.0-RC1":"Spring Boot >=3.2.0-M1"
        },
        "timefold-solver":{
            "1.3.0":"Spring Boot >=3.0.0 and <3.2.0-M1"
        },
        "vaadin":{
            "24.2.5":"Spring Boot >=3.0.0 and <3.2.0-M1"
        }
    },
    "dependency-ranges":{
        "dgs-codegen":{
            "6.0.3":"Spring Boot >=3.0.0-M1"
        },
        "okta":{
            "3.0.6":"Spring Boot >=3.0.0 and <3.3.0-M1"
        },
        "mybatis":{
            "3.0.3":"Spring Boot >=3.0.0"
        },
        "pulsar":{
            "0.2.0":"Spring Boot >=3.0.0 and <3.2.0-M3",
            "managed":"Spring Boot >=3.2.0-M3"
        },
        "pulsar-reactive":{
            "0.2.0":"Spring Boot >=3.0.0 and <3.2.0-M1",
            "managed":"Spring Boot >=3.2.0-M1"
        },
        "camel":{
            "4.2.0":"Spring Boot >=3.0.0 and <3.2.0-M1"
        },
        "picocli":{
            "4.7.5":"Spring Boot >=3.0.0 and <3.2.0-M1"
        }
    }
}
<?xml version="1.0" encoding="UTF-8"?>
<project xmlns="http://maven.apache.org/POM/4.0.0" xmlns:xsi="http://www.w3.org/2001/XMLSchema-instance"
         xsi:schemaLocation="http://maven.apache.org/POM/4.0.0 https://maven.apache.org/xsd/maven-4.0.0.xsd">
    <modelVersion>4.0.0</modelVersion>
    <groupId>com.miaow</groupId>
    <artifactId>springCloud</artifactId>
    <version>0.0.1-SNAPSHOT</version>
    <name>springCloud</name>
    <description>springCloud</description>

    <!-- 1 确定spring boot的版本-->
    <parent>
        <artifactId>spring-boot-starter-parent</artifactId>
        <groupId>org.springframework.boot</groupId>
        <version>2.3.12.RELEASE</version>
    </parent>

    <!--2  确定版本-->
    <properties>
        <java.version>1.8</java.version>
        <project.build.sourceEncoding>UTF-8</project.build.sourceEncoding>
        <project.reporting.outputEncoding>UTF-8</project.reporting.outputEncoding>
        <spring-cloud.version>Hoxton.SR8</spring-cloud.version>
    </properties>

    <dependencies>
        <dependency>
            <groupId>org.springframework.boot</groupId>
            <artifactId>spring-boot-starter-thymeleaf</artifactId>
        </dependency>
        <dependency>
            <groupId>org.springframework.boot</groupId>
            <artifactId>spring-boot-starter-web</artifactId>
        </dependency>
        <dependency>
            <groupId>com.mysql</groupId>
            <artifactId>mysql-connector-j</artifactId>
            <version>8.0.33</version>
            <scope>runtime</scope>
        </dependency>
        <dependency>
            <groupId>org.springframework.boot</groupId>
            <artifactId>spring-boot-starter-test</artifactId>
            <scope>test</scope>
            <exclusions>
                <exclusion>
                    <groupId>org.junit.vintage</groupId>
                    <artifactId>junit-vintage-engine</artifactId>
                </exclusion>
            </exclusions>
        </dependency>
    </dependencies>

    <!-- 3 锁定sprig cloud版本-->
    <dependencyManagement>
        <dependencies>
            <dependency>
                <groupId>org.springframework.cloud</groupId>
                <artifactId>spring-cloud-dependencies</artifactId>
                <version>${spring-cloud.version}</version>
                <type>pom</type>
                <scope>import</scope>
            </dependency>
        </dependencies>
    </dependencyManagement>
    <!-- 4 确定spring cloud私有仓库-->
    <repositories>
        <repository>
            <id>spring-milestones</id>
            <name>Spring Milestones</name>
            <url>https://repo.spring.io/milestone</url>
            <snapshots>
                <enabled>false</enabled>
            </snapshots>
        </repository>
    </repositories>

    <build>
        <plugins>
            <plugin>
                <groupId>org.apache.maven.plugins</groupId>
                <artifactId>maven-compiler-plugin</artifactId>
                <version>3.8.1</version>
                <configuration>
                    <source>1.8</source>
                    <target>1.8</target>
                    <encoding>UTF-8</encoding>
                </configuration>
            </plugin>
        </plugins>
    </build>
</project>
你可以拿着这个pom文件直接覆盖,对了jdk版本需要对应。
maven我的版本是3.8.x系列的。
好了基本框架搭建好了,那么我们具体实现一个微服务吧,完成Eureka组件完成注册中心的搭建吧,对了提及一下,网上对Eureka的使用持有不同的意见,毕竟Spring Cloud官方,是将那个时候主流的相关框架和组件整合在一起,他也没有考虑到Eureka框架会停止更新,所以你使用或者不使用,都由你自己决定,目前比较火的是阿里巴巴的nacos作为注册中心,用来取代Eureka,这也是可行的,还是那句话,你想用Eureka就用Eureka,前提条件你必须知道一点,否则这个出问题,你要找问题有点麻烦,毕竟别人停更许久了,并且还有个问题就是,你所用的技术栈支持Eureka不,使用Nacos的也可以,反正萝卜青菜各有所爱。
接下来,我们采用Eureka作为注册中心创建创建一个模块来具体实现我们的第一个微服务。
什么是Eureka?
Eureka是Netflix开源的一款服务注册与发现组件,它用于构建可水平扩展的微服务架构。Eureka的主要功能是允许服务实例(例如,微服务)在启动时向注册中心注册自己,并在运行时周期性地向注册中心发送心跳来更新其状态。其他服务可以通过查询注册中心来发现和调用这些可用的服务实例。
- 服务注册:服务实例在启动时向Eureka注册中心注册自己,包括服务名称、主机名、端口号等信息。
- 服务发现:其他服务可以通过查询Eureka注册中心来发现可用的服务实例,以便进行服务间的通信。
- 心跳与健康检查:服务实例通过发送心跳来告知Eureka注册中心自己的状态,如果一个服务实例长时间没有发送心跳,Eureka将从注册中心中移除该实例。
关于Eureka的停止更新问题,Netflix宣布在2018年停止对Eureka的主动开发和更新。虽然Netflix不再积极维护Eureka,但它仍然是一个成熟和可靠的服务注册与发现解决方案,并且在许多企业和开源项目中广泛使用。此外,Spring Cloud团队仍然提供对Eureka的支持和维护,确保其与Spring Cloud框架的兼容性。
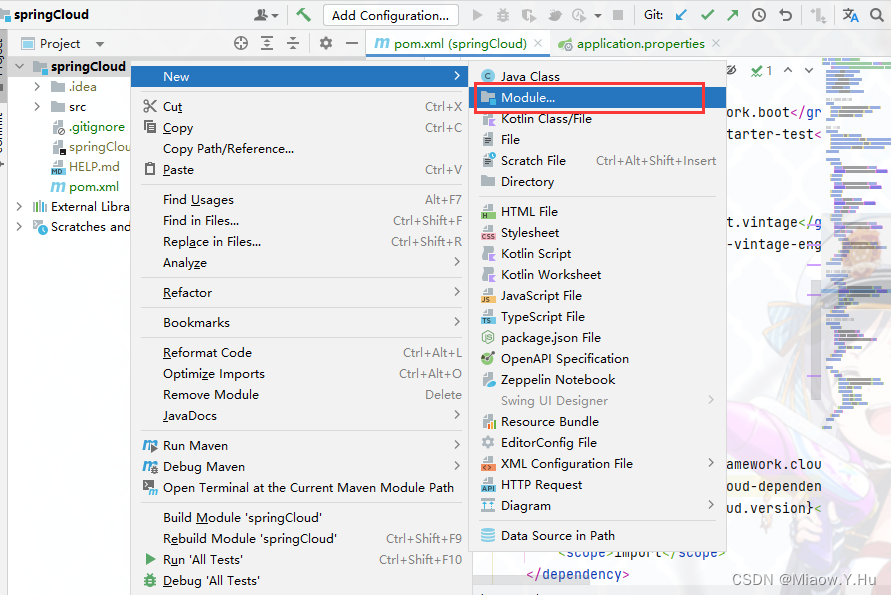
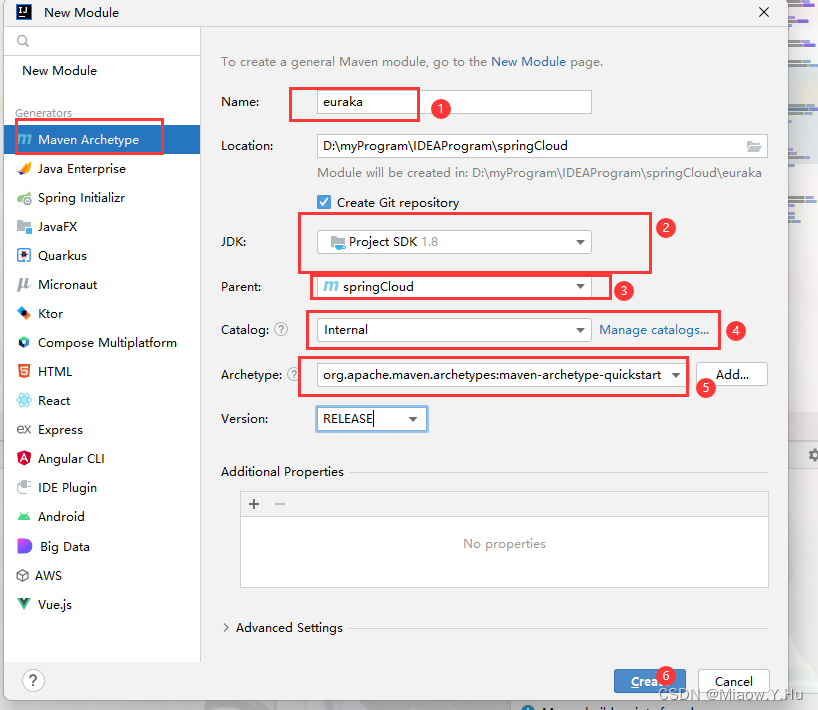
对了,看到我打错字了木有,Eureka我打成euraka去了。你记得该,我就懒得删除了,有错误的东西代表这玩意是我写的,哈哈哈。
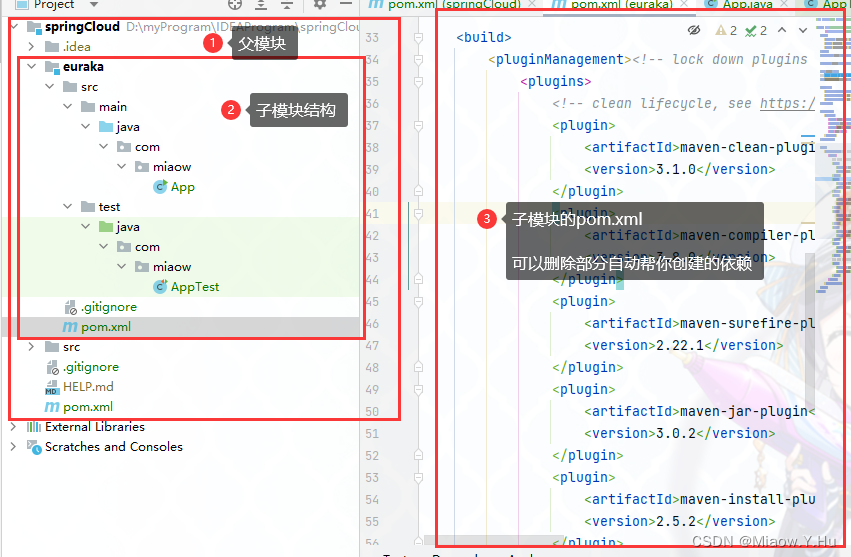
ok,我们在Eureka模块中添加Eureka依赖,这个是需要我们手动添加的哈。
<?xml version="1.0" encoding="UTF-8"?>

<project xmlns="http://maven.apache.org/POM/4.0.0" xmlns:xsi="http://www.w3.org/2001/XMLSchema-instance"
         xsi:schemaLocation="http://maven.apache.org/POM/4.0.0 http://maven.apache.org/xsd/maven-4.0.0.xsd">
    <parent>
        <artifactId>springCloud</artifactId>
        <groupId>com.miaow</groupId>
        <version>0.0.1-SNAPSHOT</version>
    </parent>
    <modelVersion>4.0.0</modelVersion>
    <artifactId>euraka</artifactId>

    <name>euraka</name>
    <!-- FIXME change it to the project's website -->
    <url>http://www.example.com</url>
    <properties>
        <project.build.sourceEncoding>UTF-8</project.build.sourceEncoding>
        <maven.compiler.source>1.8</maven.compiler.source>
        <maven.compiler.target>1.8</maven.compiler.target>
    </properties>

    <dependencies>
        <dependency>
            <groupId>junit</groupId>
            <artifactId>junit</artifactId>
            <version>4.11</version>
            <scope>test</scope>
        </dependency>
        <!--web起步依赖-->
        <dependency>
            <groupId>org.springframework.boot</groupId>
            <artifactId>spring-boot-starter-web</artifactId>
        </dependency>
        <!-- Eureka服务端 -->
        <dependency>
            <groupId>org.springframework.cloud</groupId>
            <artifactId>spring-cloud-starter-netflix-eureka-server</artifactId>
            <version>2.2.1.RELEASE</version>
        </dependency>

    </dependencies>
</project>
ok,修改好了这个pom.xml文件。
我们发现,我们创建的maven文件好像没有Spring Boot启动文件,并且也没有Resources文件夹,那怎么办呢?
很简单,没有就创建一个嘛!!!
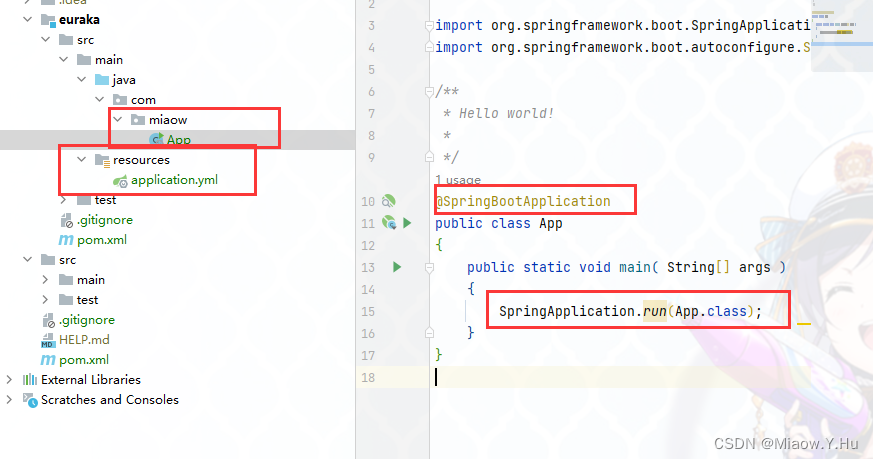
然后有童鞋发现,唉,我的这个和你的不一样呀?你说怎么做到的,我创建resources文件后,他没你的那个图标呀,我只能说小伙子,你还太年轻了
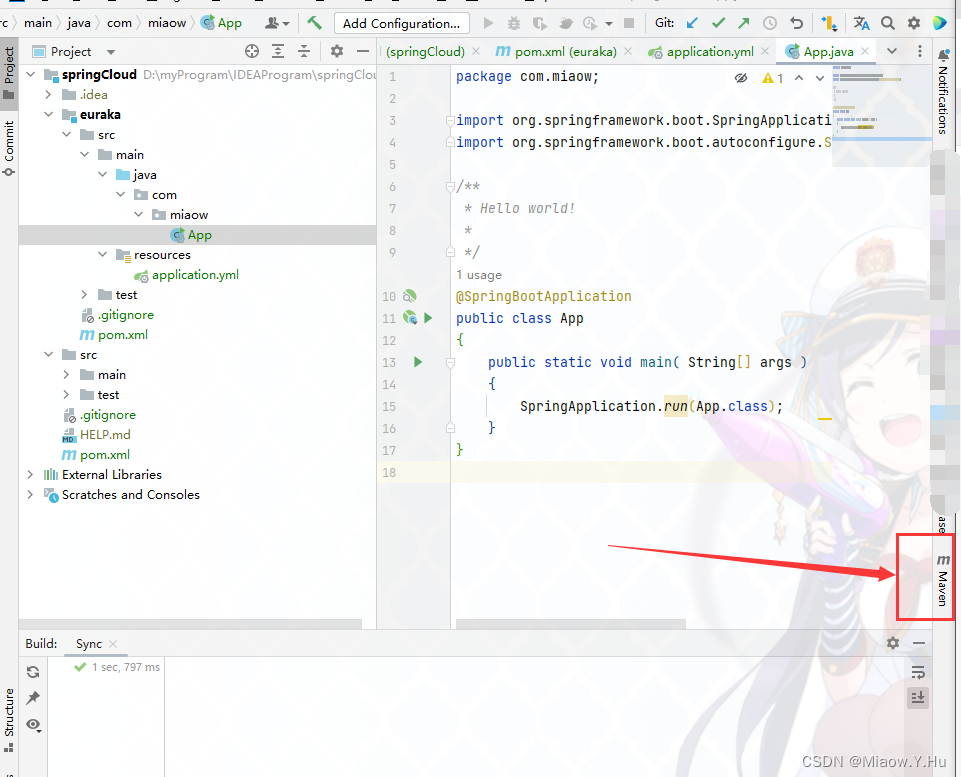
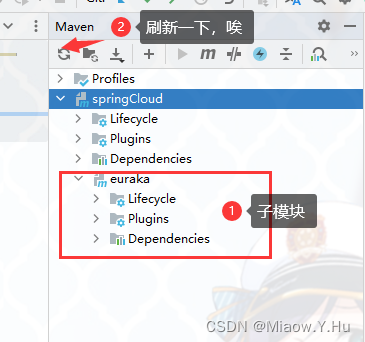
然后我们发现,可以了,对了强调一下,我们导入必须在依赖中引入父依赖的
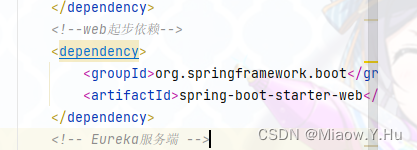
这里,不然你会失败的,请对准我上边的子模块的pom.xml文件进行。
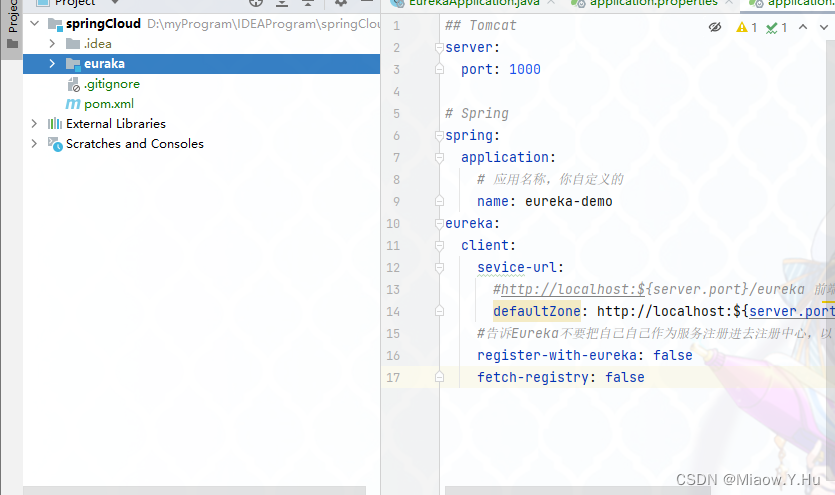
那么我们来创建一个application.yml文件,当然application.properties文件也行.
## Tomcat
server:
  port: 1000

# Spring
spring:
  application:
    # 应用名称,你自定义的
    name: eureka-demo
eureka:
  client:
    sevice-url:
      #http://localhost:${server.port}/eureka 前端访问Eureka的地址
      defaultZone: http://localhost:${server.port}/eureka
    #告诉Eureka不要把自己自己作为服务注册进去注册中心,以下代码需要注意填写
    register-with-eureka: false
    fetch-registry: false
或者在application.properties中配置也是一样的:
server.port=1000
# 应用名称,你自定义的
spring.application.name= eureka-demo
eureka.client.sevice-url.defaultZone= http://localhost:${server.port}/eureka
eureka.client.register-with-eureka= false
eureka.client.fetch-registry= false
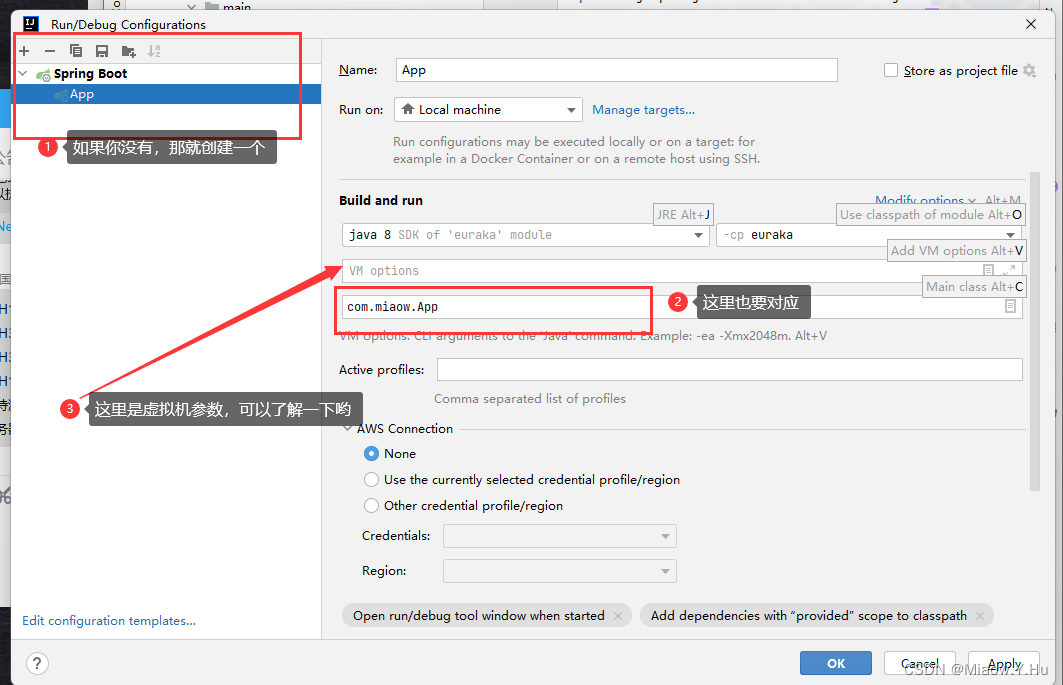
然后我们将我们的EurekaApplication中,别学我偷懒(我这里是App)启动文件添加到我们的Configuration文件中
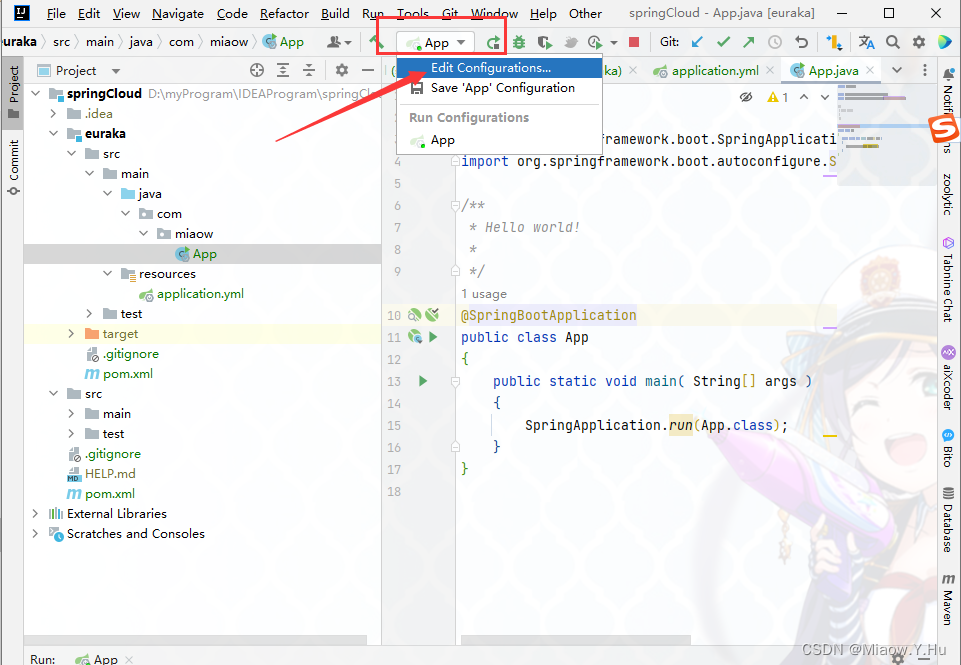

对了,在父模块中,我们不放任何代码,就只有一个pom.xml文件。其他的可以删除,如下图所示。
启动成功了,然后我们去访问:localhost:1000得到如下界面:
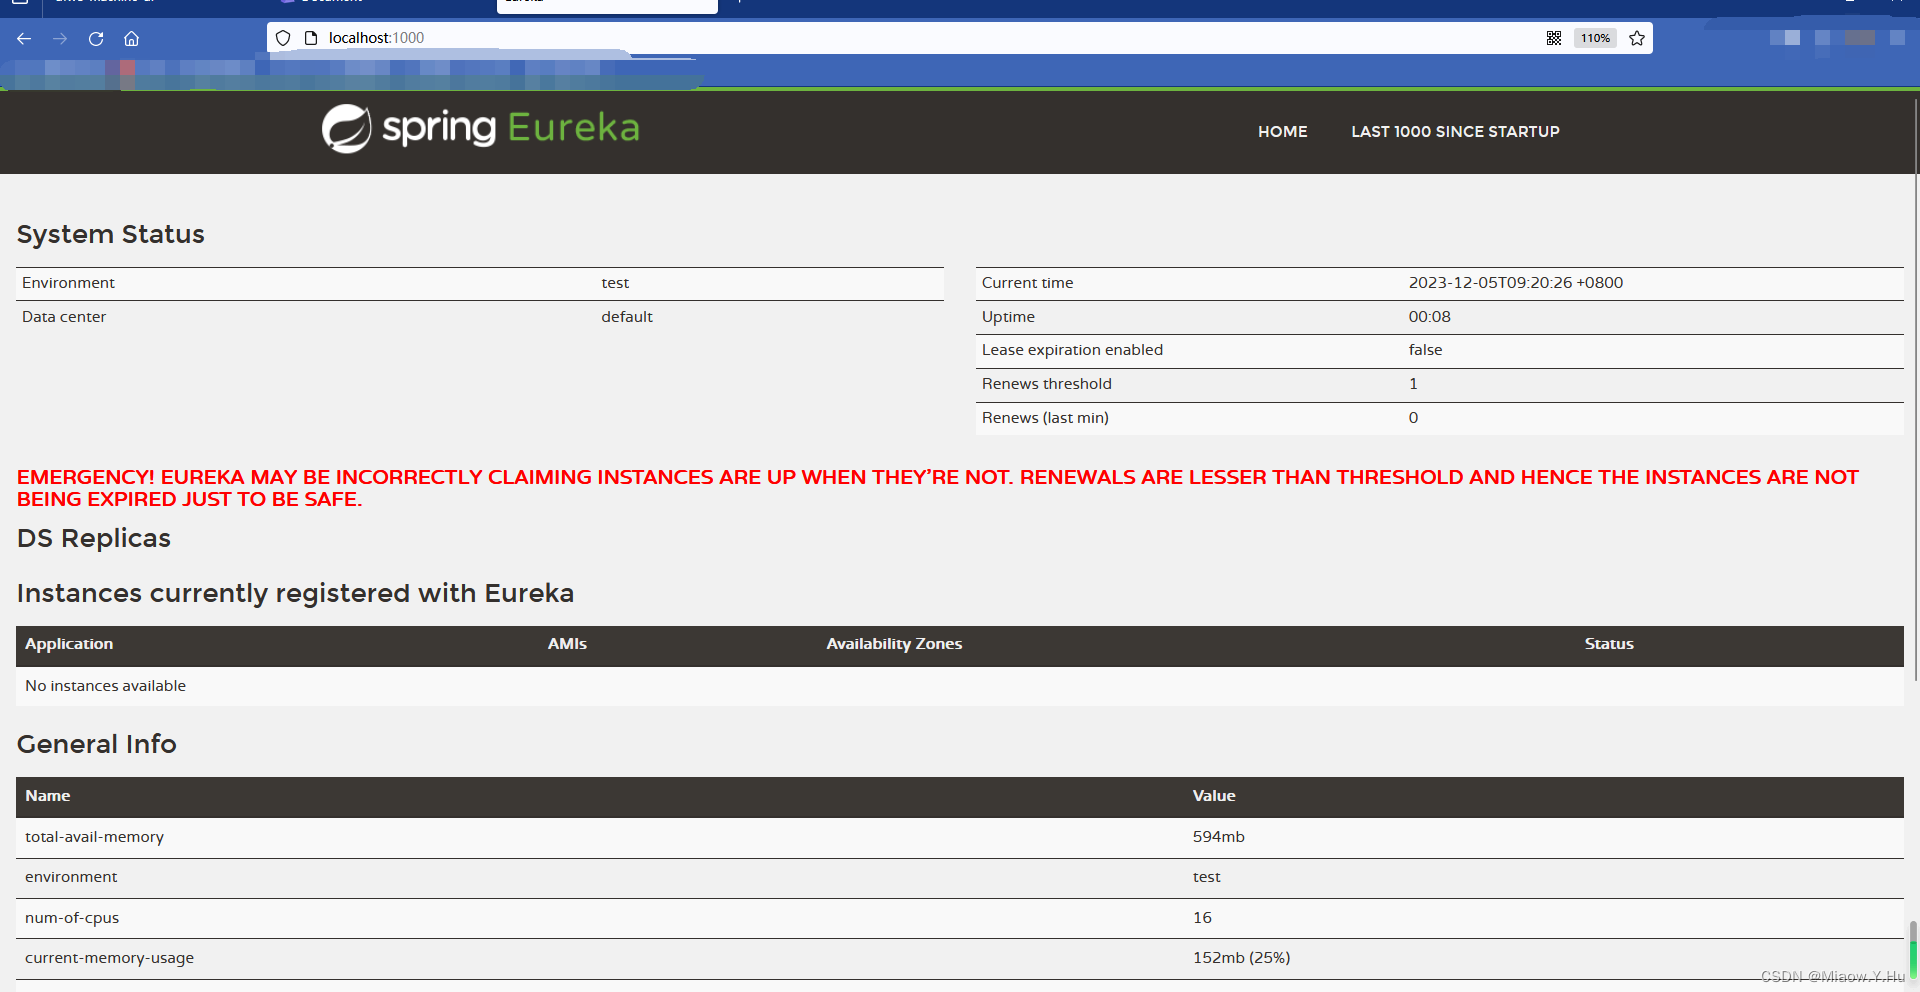
说明,我们的子模块顺利搭建成功了!可喜可贺。。。。
EMERGENCY! EUREKA MAY BE INCORRECTLY CLAIMING INSTANCES ARE UP WHEN THEY'RE NOT. RENEWALS ARE LESSER THAN THRESHOLD AND HENCE THE INSTANCES ARE NOT BEING EXPIRED JUST TO BE SAFE.
然后我们可能发现这个错误:
这个是Eureka的自我保护机制。Eureka Server在运行期间,会统计心跳失败的比例在15分钟之内是否低于85%,如果出现低于的情况(在单机调试的时候很容易满足,实际在生产环境上通常是由于网络不稳定导致),Eureka Server会将当前的实例注册信息保护起来,同时提示这个警告。
Eureka server和client之间每隔30秒会进行一次心跳通信,告诉server,client还活着。由此引出两个名词:
Renews threshold:server期望在每分钟中收到的心跳次数
Renews (last min):上一分钟内收到的心跳次数。
更为具体的解答请参照:https://blog.csdn.net/hadues/article/details/105023709
原文地址:https://blog.csdn.net/qq_45922256/article/details/134785178
本文来自互联网用户投稿,该文观点仅代表作者本人,不代表本站立场。本站仅提供信息存储空间服务,不拥有所有权,不承担相关法律责任。
如若转载,请注明出处:http://www.7code.cn/show_49709.html
如若内容造成侵权/违法违规/事实不符,请联系代码007邮箱:suwngjj01@126.com进行投诉反馈,一经查实,立即删除!

