本文介绍: uniapp 日历组件
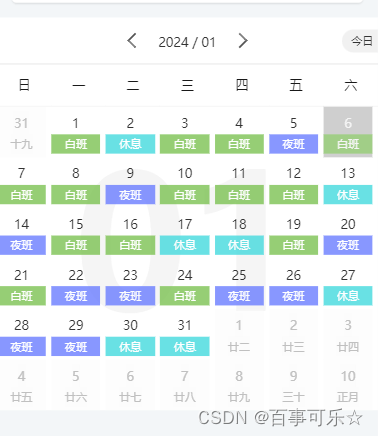
我们的需求是显示当前月和下个月的排班表
引入 uniapp 日历组件 uni-calendar

做法有两种,一种是直接去修改组件,还有就是文档中提供的 selected 方法
修改组件的就不写了
<uni-calendar :lunar=”true” :selected=”selected” :insert=”true” :start-date=”‘2015-1-1′” :end-date=”‘2090-12-31′” @change=”change” @monthSwitch=”monthSwitch”></uni-calendar>
onLoad() {
        //  进入页面获取年月
		this.year = Moment().year()
		this.month = Moment().format('MM')
        // 获取这个月和下个月的天数
		this.daysInatMonth = this.getMonthDay(0); // 获取这个月的天数
		this.daysInNextMonth = this.getMonthDay(1); // 获取下个月的天数
		this.dataInit(this.year, this.month, this.daysInatMonth, this.daysInNextMonth)
},
methods: {
		dataInit(year, month, at, next) {
			var randomType = [
				{ type: 'night', info: '夜班' },
				{ type: 'rest', info: '休息' },
				{ type: 'daytime', info: '白班' },
			  ]
			var arr1 = this.getNewArray(year, month, at, randomType)
			var arr2 = this.getNewArray(year, (Number(month) + 1), next, randomType)
			this.selected = [...arr1, ...arr2];
		},
        // 目前排班表是写死的
		getNewArray(year, month, day, randomType) {
            // 我们根据这个月多少天 生成多少条数据然后填充
			var list = new Array(day).fill('').map((item, index) => {
                // 让 randomType 这个数组中数据随机到这个月每天中
				const randomNum = Math.floor(Math.random() * randomType.length);
				const obj = { date: year + '-' + month + '-' + Number(index + 1).toString().padStart(2, '0'), info: randomType[randomNum].info, data: { type: randomType[randomNum].type } }

				return obj
			})
			return list
		},
		getMonthDay(type) {
			// 获取下个月的日期 0 是当月  1 下个月
			return Moment().add(type, 'month').daysInMonth();
		},

		change(res) {},

		monthSwitch(res) {
			this.dataInit(this.year, this.month, this.daysInatMonth, this.daysInNextMonth)
		},

	}
如果想给每月都添加下面的东西,在monthSwitch 方法下传的月和年修改即可,同时还需要去修改组件
原文地址:https://blog.csdn.net/m0_61672533/article/details/135421962
本文来自互联网用户投稿,该文观点仅代表作者本人,不代表本站立场。本站仅提供信息存储空间服务,不拥有所有权,不承担相关法律责任。
如若转载,请注明出处:http://www.7code.cn/show_53830.html
如若内容造成侵权/违法违规/事实不符,请联系代码007邮箱:suwngjj01@126.com进行投诉反馈,一经查实,立即删除!
声明:本站所有文章,如无特殊说明或标注,均为本站原创发布。任何个人或组织,在未征得本站同意时,禁止复制、盗用、采集、发布本站内容到任何网站、书籍等各类媒体平台。如若本站内容侵犯了原著者的合法权益,可联系我们进行处理。


