Spring复习更新中
更新中ing
JVM/GC复习已更新完
Bean的生命周期
 五步
五步
- 第一步:实例化Bean
- 第二步:Bean属性赋值
- 第三步:初始化Bean
- 第四步:使用Bean
- 第五步:销毁Bean

七步 - 第一步:实例化Bean
- 第二步:Bean属性赋值
- 第三步:执行“Bean后处理器”的before方法
- 第四步:初始化Bean
- 第五步:执行“Bean后处理器”的after方法
- 第六步:使用Bean
- 第七步:销毁Bean

十步
- 第一步:实例化Bean
- 第二步:Bean属性赋值
- 第三步:检查bean是否实现Aware的相关接口,并且设置依赖
- 第四步:执行“Bean后处理器”的before方法
- 第五步:检查Bean是否实现InitializingBean接口,并调用接口的方法
- 第六步:初始化Bean
- 第七步:执行“Bean后处理器”的after方法
- 第八步:使用Bean
- 第九步:检查Bean是否实现了DisposableBean接口,并且调用接口的方法
- 第十步:销毁Bean
举例:
//(1)在“Bean后处理器”before方法之前干了什么事儿?
//检查Bean是否实现了Aware相关的接口,如果实现了接口则调用这些接口中的方法;调用这些方法的目的是为了给你传递一些数据,让你更加方便使用。
//(2)在“Bean后处理器”before方法之后干了什么事儿?
//检查Bean是否实现了InitializingBean接口,如果实现了,则调用接口中的方法。
//(3)使用Bean之后,或者说销毁Bean之前干了什么事儿?
//检查Bean是否实现了DisposableBean接口,如果实现了,则调用接口中的方法。
//总结:添加的这三个点位的特点,都是在检查你这个Bean是否实现了某些特定的接口,如果实现了这些接口,则Spring容器会调用这个接口中的方法!
//Aware相关的接口包括:BeanNameAware、BeanClassLoaderAware、BeanFactoryAware
//①当Bean实现了BeanNameAware,Spring会将Bean的名字传递给Bean。
//②当Bean实现了BeanClassLoaderAware,Spring会将加载该Bean的类加载器传递给Bean。
//③当Bean实现了BeanFactoryAware,Spring会将Bean工厂对象传递给Bean。
//测试以上10步,可以让User类实现5个接口,并实现所有方法:
//①BeanNameAware
//②BeanClassLoaderAware
//③BeanFactoryAware
//④InitializingBean
//⑤DisposableBean
package com.bjpowernode.spring.bean;

import org.springframework.beans.BeansException;
import org.springframework.beans.factory.*;


public class User implements
        BeanNameAware, BeanClassLoaderAware, BeanFactoryAware,
        InitializingBean, DisposableBean{
    private String username;

    public void setUsername(String username) {
        System.out.println("第二步:给对象的属性赋值");
        this.username = username;
    }

    public User() {
        System.out.println("第一步:实例化Bean,无参数构造方法执行了");
    }

    // 初始化Bean,需要自己写,自己配,方法名随意
    public void initBean(){
        System.out.println("第四步:初始化Bean");
    }

    // 销毁Bean,需要自己写,自己配,方法名随意
    public void destroyBean(){
        System.out.println("第七步:销毁Bean");
    }

    @Override
    public String toString() {
        return "User{" +
                "username='" + username + ''' +
                '}';
    }

    @Override
    public void setBeanClassLoader(ClassLoader classLoader) {
        System.out.println("类加载器:" + classLoader);
    }

    @Override
    public void setBeanFactory(BeanFactory beanFactory) throws BeansException {
        System.out.println("Bean工厂:" + beanFactory);
    }

    @Override
    public void setBeanName(String name) {
        System.out.println("Bean的名字:" + name);
    }

    @Override
    public void destroy() throws Exception {
        System.out.println("DisposableBean destroy方法执行了");
    }

    @Override
    public void afterPropertiesSet() throws Exception {
        System.out.println("InitializingBean afterPropertiesSet方法执行了");
    }
}
打印结果

注解√指的是归属谁的注解
| 注解名称 | 位置 | 作用 | Spring | SpringBoot | SpringCloud | java |
|---|---|---|---|---|---|---|
| @Value | 属性/方法定义上方 | 设置对应属性的值或者对方法进行传参 | √ | – | – | – |
| @Component | 方法定义上方 | 设置该类为spring管理的bean | √ | – | – | – |
| @Controller | 方法定义上方 | 设置该类为spring管理的bean | √ | – | – | – |
| @Service | 方法定义上方 | 设置该类为spring管理的bean | √ | – | – | – |
| @Repository | 方法定义上方 | 设置该类为spring管理的bean | √ | – | – | – |
| @Scope | 类定义上方 | 设置该类作为bean对应的scope属性里面的value定义作用域 | √ | – | – | – |
| @PostConstruct | 方法定义上方 | 设置该类的对应bean的生命周期方法 | √ | – | – | – |
| @PreDestory | 方法定义上方 | 设置该类的对应bean的生命周期方法 | √ | – | – | – |
| @Bean | 方法定义上方 | 设置该方法的返回值作为spring管理的bean | √ | – | – | – |
| @Autowired@Qualifier | 属性/方法定义上方 | 设置对应属性的对象或对方法进行引用类型传参@Autowired默认按类型装配,指定@Qualifier后可以指定自动装配的bean的id | √ | – | – | – |
| @Resource | 方法定义上方 | 相当于@Autowired+@Qualifier,按照名称进行注入. JDK8以后的版本不支持 | – | – | – | √ |
| @Primary | 类定义上方 | 设置类对应的bean按类型装配时优先装配 | √ | – | – | – |
| @PropertySource | 类定义上方 | 加载properties文件中的属性值 | √ | – | – | – |
| @Configuration、@ComponentScan | 类定义上方 | 设置当前类为spring核心配置加载类 | √ | – | – | – |
| @Import | 类定义上方 | 导入第三方bean作为spring控制的资源 | √ | – | – | – |
| @DependsOn | bean定义的位置(类上或方法上) | 控制bean的加载顺序,使其在指定bean加载完毕后再加载 | √ | – | – | – |
| @Order | 配置类定义的位置(类上) | 控制配置类的加载顺序 | √ | – | – | – |
| @Lazy | bean定义的位置(类上或方法上) | 控制bean的加载时机,使其延迟加载 | √ | – | – | – |
| @ComponentScan | 类定义上方 | 设置spring配置加载类扫描规则 | √ | – | – | – |
| @Transactional | 类/方法定义上方 | 用于标识需要进行事务管理的方法或类 | √ | – | – | – |
| @Async | 方法定义上方 | 此注解使用在方法上,声明此方法会在一个单独的线程中执行。不同于Scheduled注解,此注解可以接受参数 | √ | – | – | – |
| @RestController | – | 类似于@Controller+@ResponseBody | – | √ | – | – |
| @ServletComponentScan | – | Servlet/Filter/Listener可以直接通过@WebServlet/@WebFilter/@WebListener注解自动注册,无需其他代码 | – | √ | – | – |
| @RequiredArgsConstructor | – | 写在类上可以代替@Autowired注解,需要注意的是在注入时需要用final定义,或者使用@notnull注解 | – | √ | – | – |
| @EnableAutoConfiguration | 类上 | 告诉Spring Boot自动基于当前包添加Bean、对bean的属性进行设置等 | – | √ | – | – |
| @SpringBootApplication | – | 注解用在Spring Boot项目的应用主类上(此类需要在base package中)。使用了此注解的类首先会让Spring Boot启动对base package以及其sub-pacakage下的类进行component scan。 | – | √ | – | – |
| 其他的注解占时不一一列举了后期补充太多了上方的注解是比较常用的注解REST的注解就不说了 |
上面的bean周期是通俗的说明此处是专业说明,后期待补充 TODO
| bean的生命周期 | 解释说明 |
|---|---|
| 实例化(Instantiation) | 当容器加载并解析Bean定义时,会创建Bean的实例对象。这一过程可以通过构造函数实例化,或者通过工厂方法实例化。 |
| 属性赋值(Property assignment) | 当实例化完成后,容器会为Bean的属性赋值。这可以通过使用setter方法进行属性注入,或者通过自动装配等方式进行属性赋值。 |
| 初始化(Initialization) | 在属性赋值完成后,容器会调用Bean的初始化方法,对Bean进行一些初始化操作。初始化方法可以通过实现InitializingBean接口的afterPropertiesSet()方法,或者使用@Bean注解的initMethod属性指定。 |
| 后处理(Post-processing) | 在初始化完成后,容器会对Bean进行一些后处理操作。这可以通过实现BeanPostProcessor接口来实现,例如对Bean进行代理等操作。 |
| 销毁(Destruction) | 当容器关闭或者销毁Bean时,会调用Bean的销毁方法来进行一些清理操作。销毁方法可以通过实现DisposableBean接口的destroy()方法,或者使用@Bean注解的destroyMethod属性指定。 |
| 容器回调(Container callback) | 在Bean的生命周期中,容器也会进行一些回调操作,例如Aware接口的回调,例如对BeanFactory、ApplicationContext等进行回调操作。 |
| 实例化(Instantiation) | 当容器加载并解析Bean定义时,会创建Bean的实例对象。这一过程可以通过构造函数实例化,或者通过工厂方法实例化。 |
| 错误处理(Exception handling) | 在Bean的生命周期中,如果发生错误,容器能够用适当的错误处理策略进行处理。这可以包括抛出异常、返回特定的错误结果等。 |
Spring
Ioc(Inversion of Control)
这个是一个非常重要的概念的设计思想,又叫控制反转
在java开发中,将你设计好的对象交给容器进行控制,而不是显示地用代码进行对象的创建
把创建和查找依赖对象的控制权交给 IoC 容器,由 IoC 容器进行注入、组合对象。这样对象与对象之间是松耦合、便于测试、功能可复用(减少对象的创建和内存消耗),使得程序的整个体系结构可维护性、灵活性、扩展性变高。
DI(Dependency Injection)实际上就是ioc的一种表示形式,又叫依赖注入,是IoC容器装配,注入对象的一种方式
通过依赖注入机制,简单的配置即可注入需要的资源,完成自身的业务逻辑,不需要关心资源的出处和具体实现。
| 好处 |
|---|
| 资源集中管理,实现资源的可配置和易管理 |
| 降低了资源的依赖程度,即松耦合 |
| 便于测试 |
| 功能可复用(减少对象的创建和内存消耗) |
| 使得程序的整个体系结构可维护性、灵活性、扩展性变高 |
注入方式有:
set注入
构造器注入
集合类型数据注入
注解
1.@Component@Controller/@Service/@Repository
实例化bean
举例:
@Component
public class ClassName{}
相关属性:
value:定义bean的访问id
2.@Scope
标注Bean的作用范围
举例:
@Scope
public class ClassName{}
相关属性:
value:
定义bean的作用域,默认为singleton
@Value
注入基本数据类型和 String 类型数据的
举例:
@Value("${jdbc.username}")
private String username;
value(默认):定义对应的属性值或参数值
1.value值仅支持非引用类型数据,赋值时对方法的所有参数全部赋值
2.value值支持读取properties文件中的属性值,通过类属性将properties中数据传入类中
3.value值支持SpEL
4.@value注解如果添加在属性上方,可以省略set方法(set方法的目的是为属性赋值)
@PostConstruct
使用在方法上标注该方法是Bean的初始化方法,设置该类作为bean对应的生命周期方法
举例:
@PostConstruct
public void init() {
    System.out.println("init...");
    }
1.被 @PostConstruct 修饰的方法会在服务器加载 Servlet 的时候运行,并且只会被服务器执行一次,并且在构造函数之后执行,init() 方法之前执行
2.该注解的方法在整个 Bean 初始化中的执行顺序:Constructor(构造方法) -> @Autowired(依赖注入) -> @PostConstruct(注释的方法)-> init()方法
3.如果想在生成对象时完成某些初始化操作,而偏偏这些初始化操作又依赖于依赖注入,为此,可以使用 @PostConstruct 注解的方法来完成初始化,@PostConstruct 注解的方法将会在依赖注入完成后被自动调用。
@PreDestory
该类作为bean对应的生命周期方法
举例:
    @PreDestroy
    public void preDestroy() {
        System.out.println("Cat的preDestroy()方法。。。");
    }
- 该注解被用来修饰一个非静态的 void() 方法。被 @PreDestroy 修饰的方法会在服务器卸载 Servlet 的时候运行,并且只会被服务器执行一次。
2.执行顺序:构造方法 -> @PostConstruct -> init()方法 -> @PreDestroy -> destroy() 方法 -> bean 销毁
@Bean
设置该方法的返回值作为spring管理的bean
@Bean("dataSource")
public DruidDataSource createDataSource() {
                return ……;
       }
1.因为第三方bean无法在其源码上进行修改,使用@Bean解决第三方bean的引入问题
2.该注解用于替代XML配置中的静态工厂与实例工厂创建bean,不区分方法是否为静态或非静态
3.@Bean所在的类必须被spring扫描加载,否则该注解无法生效
4.value(默认):定义bean的访问id
@Autowired@Qualifier
设置对应属性的对象或对方法进行引用类型传参
举例:
@Autowired(required = false)
@Qualifier("userDao")
private UserDao userDao;
1.@Autowired默认按类型装配,指定@Qualifier后可以指定自动装配的bean的id
2.required:定义该属性是否允许为null
3.spring的注解,一个属性,默认的注入方式为byType(根据类型进行匹配),type无法分辨时,可以根据name分辨,变量名称要与Bean名称一致,也可以通过@Qualifier 注解来显式指定Bean名称。
@Resource
类似@Autowired@Qualifier组合使用的作用
举例:
    @Resource(name = "a")
    private EmployeeService employeeService;
1.属性较多,默认的注入方式为byName(根据名称进行匹配),type无法分辨时,可以根据name分辨,通过name属性来显式指定Bean名称。
@Primary
设置类对应的bean按类型装配时优先装配
实例:
@Primary
public class ClassName{}
@Autowired默认按类型装配,当出现相同类型的bean,使用@Primary提高按类型自动装配的优先级,多个@Primary会导致优先级设置无效
@PropertySource
加载properties文件,加载properties文件中的属性值
举例:
@PropertySource(value = "classpath:filename.properties")
public class ClassName {
    @Value("${propertiesAttributeName}")
    private String attributeName;
}
1.不支持*通配格式,一旦加载,所有spring控制的bean中均可使用对应属性值
2.value(默认):设置加载的properties文件名
3.ignoreResourceNotFound:如果资源未找到,是否忽略,默认为false
@Configuration、@ComponentScan
@Configuration将想要的组件添加到容器中
使用注解@Configuration,告诉Spring Boot这是一个配置类。
@Configuration
@ComponentScan("scanPackageName")
public class SpringConfigClassName{
}
1.bean扫描工作使用注解@ComponentScan替代
2.@Configuration不可以是final类型;
3.@Configuration不可以是匿名类;
4.嵌套的configuration必须是静态类。
5.@Configuration标注在类上,相当于把该类作为spring的xml配置文件中的,作用为:配置spring容器(应用上下文)
6.@Configuration启动容器+@Bean注册Bean,@Bean下管理bean的生命周期,@Bean标注在方法上(返回某个实例的方法),等价于spring的xml配置文件中的,作用为:注册bean对象
用@Configuration加载spring
1.@Configuration配置spring并启动spring容器
2.@Configuration启动容器+@Bean注册Bean
3.@Configuration启动容器+@Component注册Bean
4.使用 AnnotationConfigApplicationContext 注册 AppContext 类的两种方法
5.配置Web应用程序(web.xml中配置AnnotationConfigApplicationContext)
组合多个配置类
1.在@configuration中引入spring的xml配置文件
2.在@configuration中引入其它注解配置
3.@configuration嵌套(嵌套的Configuration必须是静态类)
1.@ComponentScan 的作用就是根据定义的扫描路径,把符合扫描规则的类装配到spring容器中
2.spring会把指定路径下带有指定注解的类自动装配到bean容器里,会被自动装配的注解包括@Controller、@Service、@Component、@Repository等等。与ComponentScan注解相对应的XML配置就是context:component-scan/, 根据指定的配置自动扫描package,将符合条件的组件加入到IOC容器中
3.basePackages和value:指定要扫描的路径(package),如果为空则以@ComponentScan注解的类所在的包为基本的扫描路径
4.basePackageClasses:指定具体扫描的类
5.includeFilters:指定满足Filter条件的类。
6.excludeFilters:指定排除Filter条件的类。
7.seDefaultFilters=true/false:指定是否需要使用Spring默认的扫描规则:被@Component, @Repository, @Service, @Controller或者已经声明过@Component自定义注解标记的组件;
在过滤规则Filter中(指定过滤规则):
1.ANNOTATION:按照注解规则,过滤被指定注解标记的类(默认);
2.ASSIGNABLE_TYPE:按照给定的类型;
3.ASPECTJ:按照ASPECTJ表达式;
4.REGEX:按照正则表达式;
5.CUSTOM:自定义规则,自定义的Filter需要实现TypeFilter接口;
实例:
@ComponentScan(
    excludeFilters = {@Filter(
    type = FilterType.CUSTOM,
    classes = {TypeExcludeFilter.class}
), @Filter(
    type = FilterType.CUSTOM,
    classes = {AutoConfigurationExcludeFilter.class}
)}
)
 1. 扫描指定类文件
   @ComponentScan(basePackageClasses = Person.class)
 2. 扫描指定包,使用默认扫描规则,即被@Component, @Repository, @Service, @Controller或者已经声明过@Component自定义注解标记的组件;
   @ComponentScan(value = "com.example")
 3. 扫描指定包,加载被@Component注解标记的组件和默认规则的扫描(因为useDefaultFilters默认为true)
   @ComponentScan(value = "com.example", includeFilters = { @Filter(type = FilterType.ANNOTATION, value = Component.class) })
 4. 扫描指定包,只加载Person类型的组件
   @ComponentScan(value = "com.example", includeFilters = { @Filter(type = FilterType.ASSIGNABLE_TYPE, value = Person.class) }, useDefaultFilters = false)
 5. 扫描指定包,过滤掉被@Component标记的组件
   @ComponentScan(value = "com.example", excludeFilters = { @Filter(type = FilterType.ANNOTATION, value = Component.class) })
 6. 扫描指定包,自定义过滤规则
   @ComponentScan(value = "com.example", includeFilters = { @Filter(type = FilterType.CUSTOM, value = MtyTypeFilter.class) }, useDefaultFilters = true)
@Import
导入第三方bean作为spring控制的资源
举例:
@Configuration
@Import(OtherClassName.class)
public class ClassName {
}
1.@Import注解在同一个类上,仅允许添加一次,如果需要导入多个,使用数组的形式进行设定
2.在被导入的类中可以继续使用@Import导入其他资源
3.@Bean所在的类可以使用导入的形式进入spring容器,无需声明为bean
@DependsOn
控制bean的加载顺序,使其在指定bean加载完毕后再加载
举例:
@DependsOn("beanId")
public class ClassName {
}
1.配置在方法上,使@DependsOn指定的bean优先于@Bean配置的bean进行加载
2.配置在类上,使@DependsOn指定的bean优先于当前类中所有@Bean配置的bean进行加载
3.配置在类上,使@DependsOn指定的bean优先于@Component等配置的bean进行加载
3.value(默认):设置当前bean所依赖的bean的id
4.微信订阅号,发布消息和订阅消息的bean的加载顺序控制
5.双11活动期间,零点前是结算策略A,零点后是结算策略B,策略B操作的数据为促销数据。策略B加载顺序与促销数据的加载顺序
@Order
控制配置类的加载顺序
举例:
@Order(1)
public class SpringConfigClassName {
}
1.多个种类的配置出现后,优先加载系统级的,然后加载业务级的,避免细粒度的加载控制
@Lazy
控制bean的加载时机,使其延迟加载
举例:
@Lazy
public class ClassName {
}
1.程序灾难出现后对应的应急预案处理是启动容器时加载时机
SpringBoot
自动装配:Spring Boot的自动配置是一个运行时(更准确地说,是应用程序启动时)的过程,考虑了众多因素,才决定Spring配置应该用哪个,不该用哪个。该过程是SpringBoot自动完成的。
起步依赖:起步依赖本质上是一个Maven项目对象模型,定义了对其他库的传递依赖,这些东西加在一起即支持某项功能。简单的说,起步依赖就是将具备某种功能的坐标打包到一起,并提供一些默认的功能。
辅助功能:提供了一些大型项目中常见的非功能性特性,如嵌入式服务器、安全、指标,健康检测、外部配置等。
SpringMVC
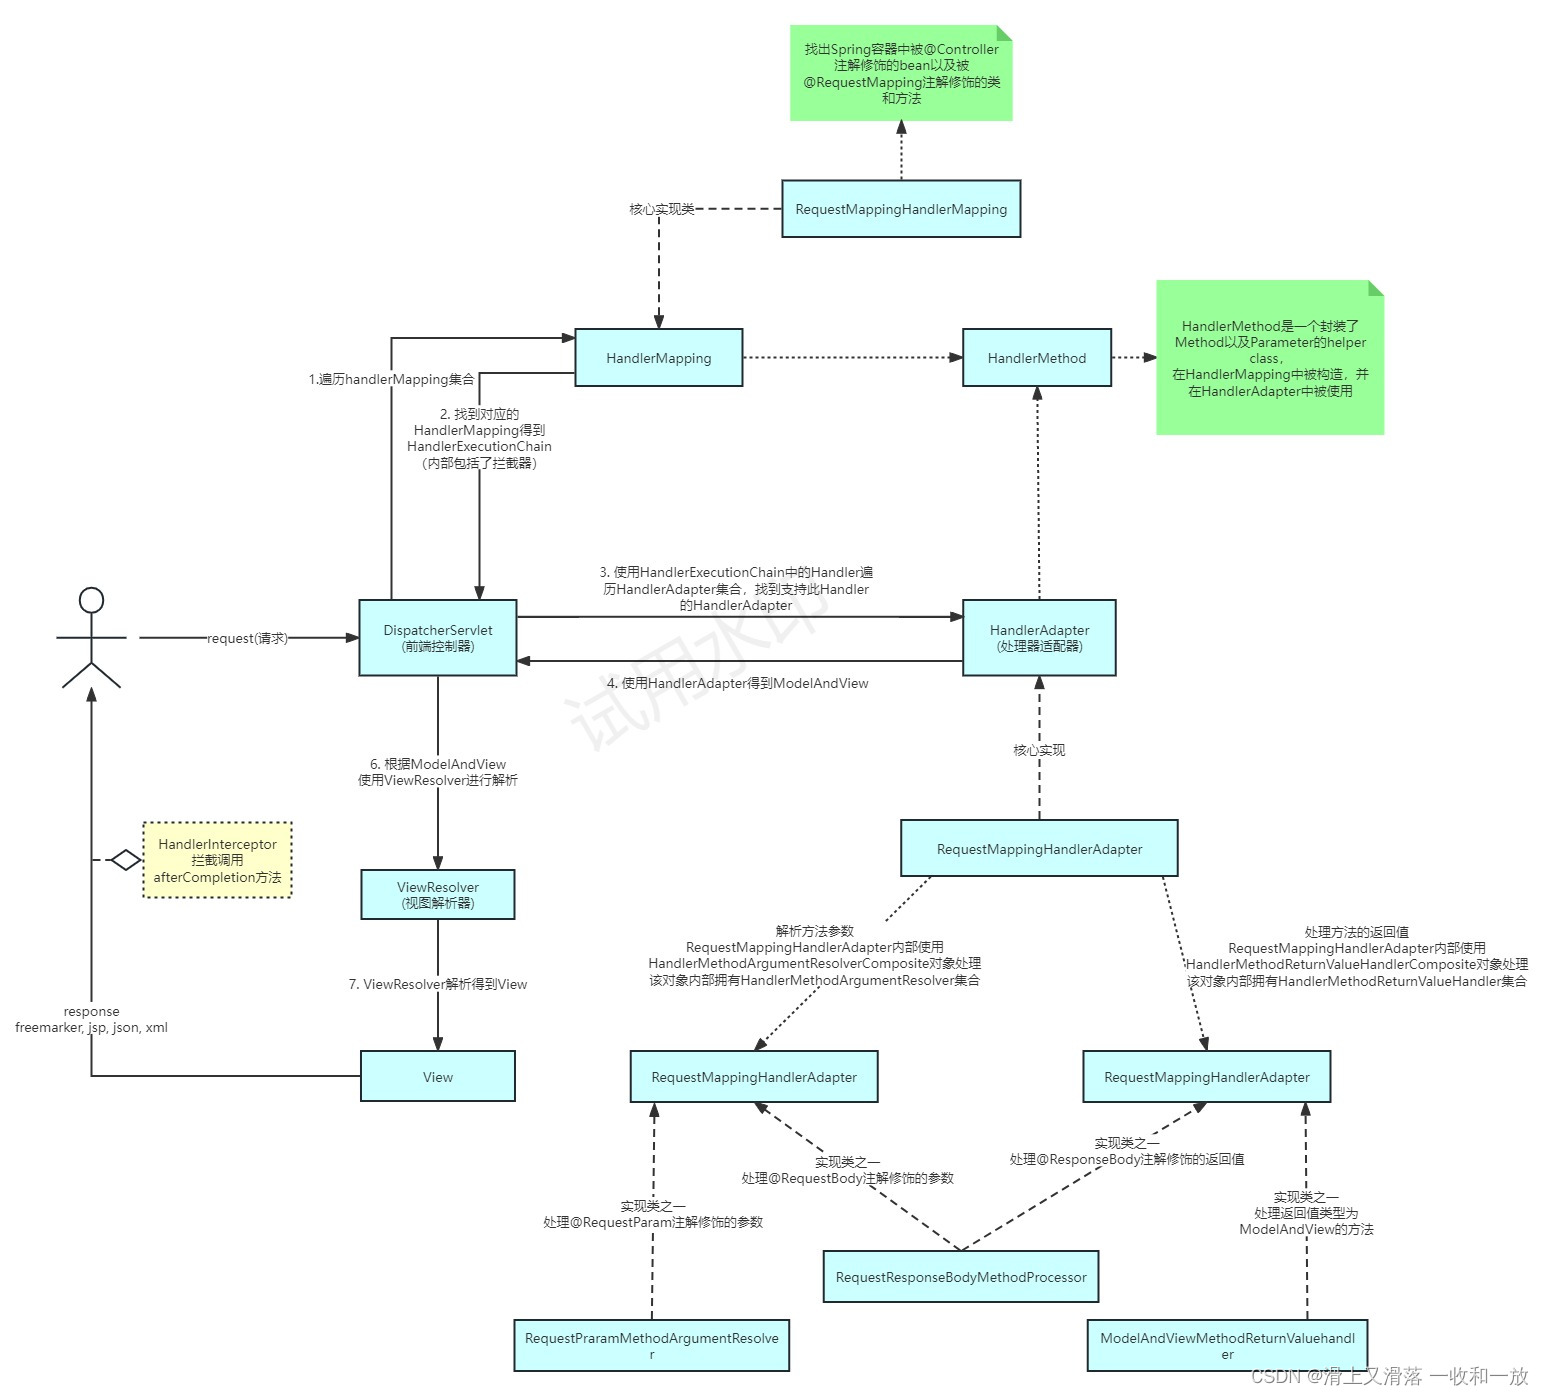
简单的可以理解为
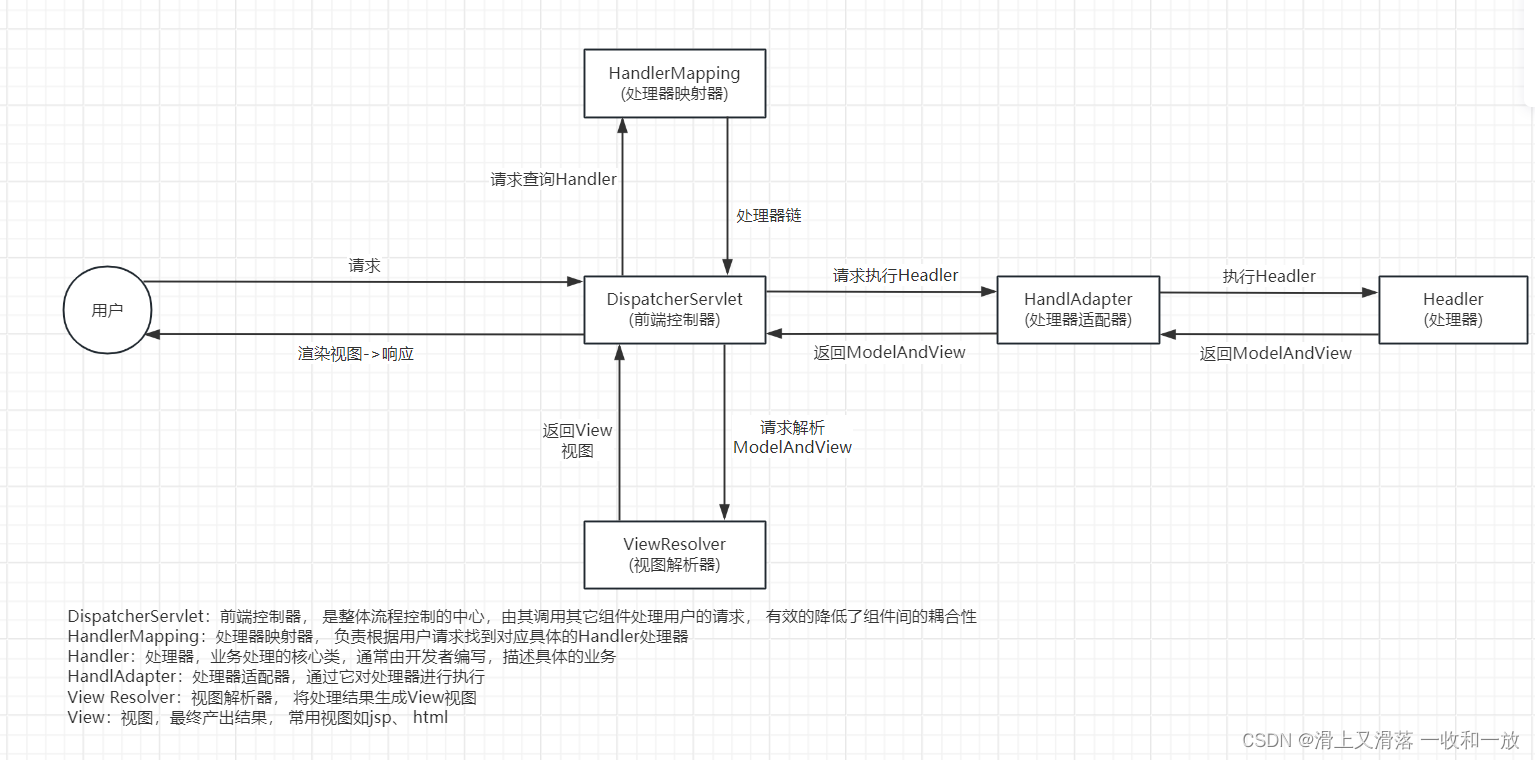
SpringCloud
Spring Cloud 是一系列框架的有序集合。
组件
注册中心(Eureka /Nacos)
Eureka配置
server:
  port: 8761

# eureka 配置
# eureka 一共有4部分 配置
# 1. dashboard:eureka的web控制台配置
# 2. server:eureka的服务端配置
# 3. client:eureka的客户端配置
# 4. instance:eureka的实例配置

eureka:
  instance:
    hostname: localhost # 主机名
  client:
    service-url:
      defaultZone: http://${eureka.instance.hostname}:${server.port}/eureka # eureka服务端地址,将来客户端使用该地址和eureka进行通信
    register-with-eureka: false # 是否将自己的路径 注册到eureka上。eureka server 不需要的,eureka provider client 需要
    fetch-registry: false # 是否需要从eureka中抓取路径。eureka server 不需要的,eureka consumer client 需要
  server:
    enable-self-preservation: false # 关闭自我保护机制
    eviction-interval-timer-in-ms: 3000 # 检查服务的时间间隔
eureka:
  instance:
    hostname: localhost # 主机名
    prefer-ip-address: true # 将当前实例的ip注册到eureka server 中。默认是false 注册主机名
    ip-address: 127.0.0.1 # 设置当前实例的ip
    instance-id: ${eureka.instance.ip-address}:${spring.application.name}:${server.port} # 设置web控制台显示的 实例id
    lease-renewal-interval-in-seconds: 3 # 每隔3 秒发一次心跳包
    lease-expiration-duration-in-seconds: 9 # 如果9秒没有发心跳包,服务器呀,你把我干掉吧~
@SpringBootApplication
// 启用EurekaServer
@EnableEurekaServer
public class EurekaApp {

    public static void main(String[] args) {
        SpringApplication.run(EurekaApp.class,args);

    }
}
启动类激活DiscoveryClient
@EnableDiscoveryClient // 激活DiscoveryClient
@EnableEurekaClient
@SpringBootApplication
public class ConsumerApp {
...........................
}
//演示discoveryClient 使用
//参数就是配置文件中设置的
/*  application.yml
spring:
  application:
    name: eureka-provider
*/
List<ServiceInstance> instances = discoveryClient.getInstances("EUREKA-PROVIDER");

//判断集合是否有数据
if(instances == null || instances.size() == 0){
     //集合没有数据
      return null;
}

ServiceInstance instance = instances.get(0);
String host = instance.getHost();//获取ip
int port = instance.getPort();//获取端口
nacos配置
server:
  port: 8000

spring:
  cloud:
    nacos:
      discovery:
        server-addr:  127.0.0.1:8848 # 配置nacos 服务端地址
  application:
    name: nacos-provider # 服务名称
负载均衡(Ribbon)
负载均衡配置
#配置的方式设置Ribbon的负载均衡策略
EUREKA-PROVIDER: #设置的服务提供方应用名称
  ribbon:
    NFloadBalancerRuleClassName: com.netflix.loadbalancer.RandomRule #策略类
负载均衡策略
- 随机: RandomRule
- 轮询: RandomRobinRule
- 最小并发: BestAvailableRule
- 过滤: AvailabilityFilteringRule
- 响应时间: WeightedResponseTimeRule
- 轮询重试:RetryRule
- 性能可用性: ZoneAvoidanceRule
远程调用feign/openFeign
熔断器Hystrix
主要功能 :隔离,降级,熔断,限流
隔离:
1.线程池隔离
2.信号量隔离
降级:异常,超时
熔断
限流
开启熔断器
# 开启feign对hystrix的支持
feign:
  hystrix:
    enabled: true
定义feign 调用接口实现类,复写方法,即 降级方法
/**
 * Feign 客户端的降级处理类
 * 1. 定义类 实现 Feign 客户端接口
 * 2. 使用@Component注解将该类的Bean加入SpringIOC容器
 */
@Component
public class GoodsFeignClientFallback implements GoodsFeignClient {
    @Override
    public Goods findGoodsById(int id) {
        Goods goods = new Goods();
        goods.setTitle("又被降级了~~~");
        return goods;
    }
}
在 @FeignClient 注解中使用 fallback 属性设置降级处理类。
@FeignClient(value = "HYSTRIX-PROVIDER",fallback = GoodsFeignClientFallback.class)
public interface GoodsFeignClient {

    @GetMapping("/goods/findOne/{id}")
    public Goods findGoodsById(@PathVariable("id") int id);

}
举例:
hystrix-provider的GoodsController中进行设置:
    public Goods findOne(@PathVariable("id") int id){
        //如果id == 1 ,则出现异常,id != 1 则正常访问
        if(id == 1){
            //1.造个异常
            int i = 3/0;
        }
可以通过@HystrixCommand注解的commandProperties属性进行配置:
    @GetMapping("/findOne/{id}")
    @HystrixCommand(fallbackMethod = "findOne_fallback",commandProperties = {
            //设置Hystrix的超时时间,默认1s
           @HystrixProperty(name="execution.isolation.thread.timeoutInMilliseconds",value = "3000"),
    //监控时间 默认5000 毫秒
    @HystrixProperty(name="circuitBreaker.sleepWindowInMilliseconds",value = "5000"),
    //失败次数。默认20次
     @HystrixProperty(name="circuitBreaker.requestVolumeThreshold",value = "20"),
     //失败率 默认50%
    @HystrixProperty(name="circuitBreaker.errorThresholdPercentage",value = "50")

    })
    public Goods findOne(@PathVariable("id") int id){
    ************************************************
    }
网关Gateway
有效的统一的API路由管理方式
作用:
路由
过滤
server:
  port: 80

spring:
  application:
    name: api-gateway-server

  cloud:
    # 网关配置
    gateway:
      # 路由配置:转发规则
      routes: #集合。
      # id: 唯一标识。默认是一个UUID
      # uri: 转发路径
      # predicates: 条件,用于请求网关路径的匹配规则

      - id: gateway-provider
        uri: http://localhost:8001/
        predicates:
        - Path=/goods/**
动态路由(让网关应用能够从注册中心中,动态的通过应用的名称来获取应用的地址)
@SpringBootApplication
@EnableEurekaClient
public class ApiGatewayApp {
}
- id: gateway-consumer
# uri: http://localhost:9000
  uri: lb://GATEWAY-CONSUMER
  predicates:
	- Path=/order/**


eureka:
  client:
    service-url:
      defaultZone: http://localhost:8761/eureka
过滤
对请求或响应进行拦截,完成一些通用操作
GatewayFilter:局部过滤器,针对单个路由
GlobalFilter :全局过滤器,针对所有路由
局部过滤器
      # filters:配置局部过滤器的

      - id: gateway-provider
        # 静态路由
        # uri: http://localhost:8001/
        # 动态路由
        uri: lb://GATEWAY-PROVIDER
        predicates:
        - Path=/goods/**
        filters:
        - AddRequestParameter=username,zhangsan
全局过滤器
全局过滤器,不需要在配置文件中配置,系统初始化时加载,并作用在每个路由上。
Spring Cloud Gateway 核心的功能也是通过内置的全局过滤器来完成
- 定义类实现 GlobalFilter 和 Ordered接口
- 复写方法
- 完成逻辑处理
@Component
public class MyFilter implements GlobalFilter, Ordered {
    @Override
    public Mono<Void> filter(ServerWebExchange exchange, GatewayFilterChain chain) {

        System.out.println("自定义全局过滤器执行了~~~");

        return chain.filter(exchange);//放行
    }

    /**
     * 过滤器排序
     * @return 数值越小 越先执行
     */
    @Override
    public int getOrder() {
        return 0;
    }
}
自定义全局过滤器无需配置,只需要实现接口中的方法就可以。
自定义的过滤器需要添加@Component交给spring容器管理。
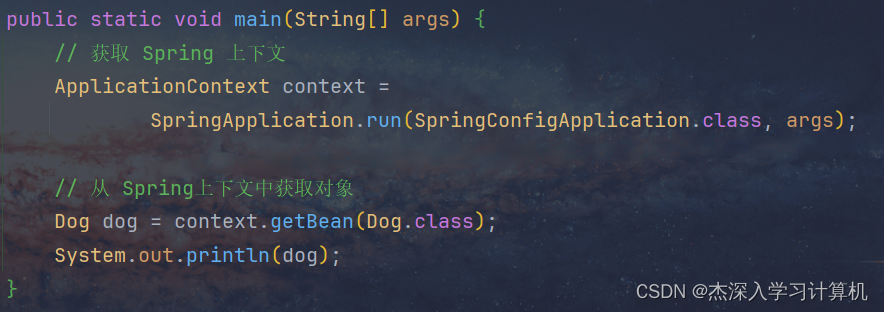
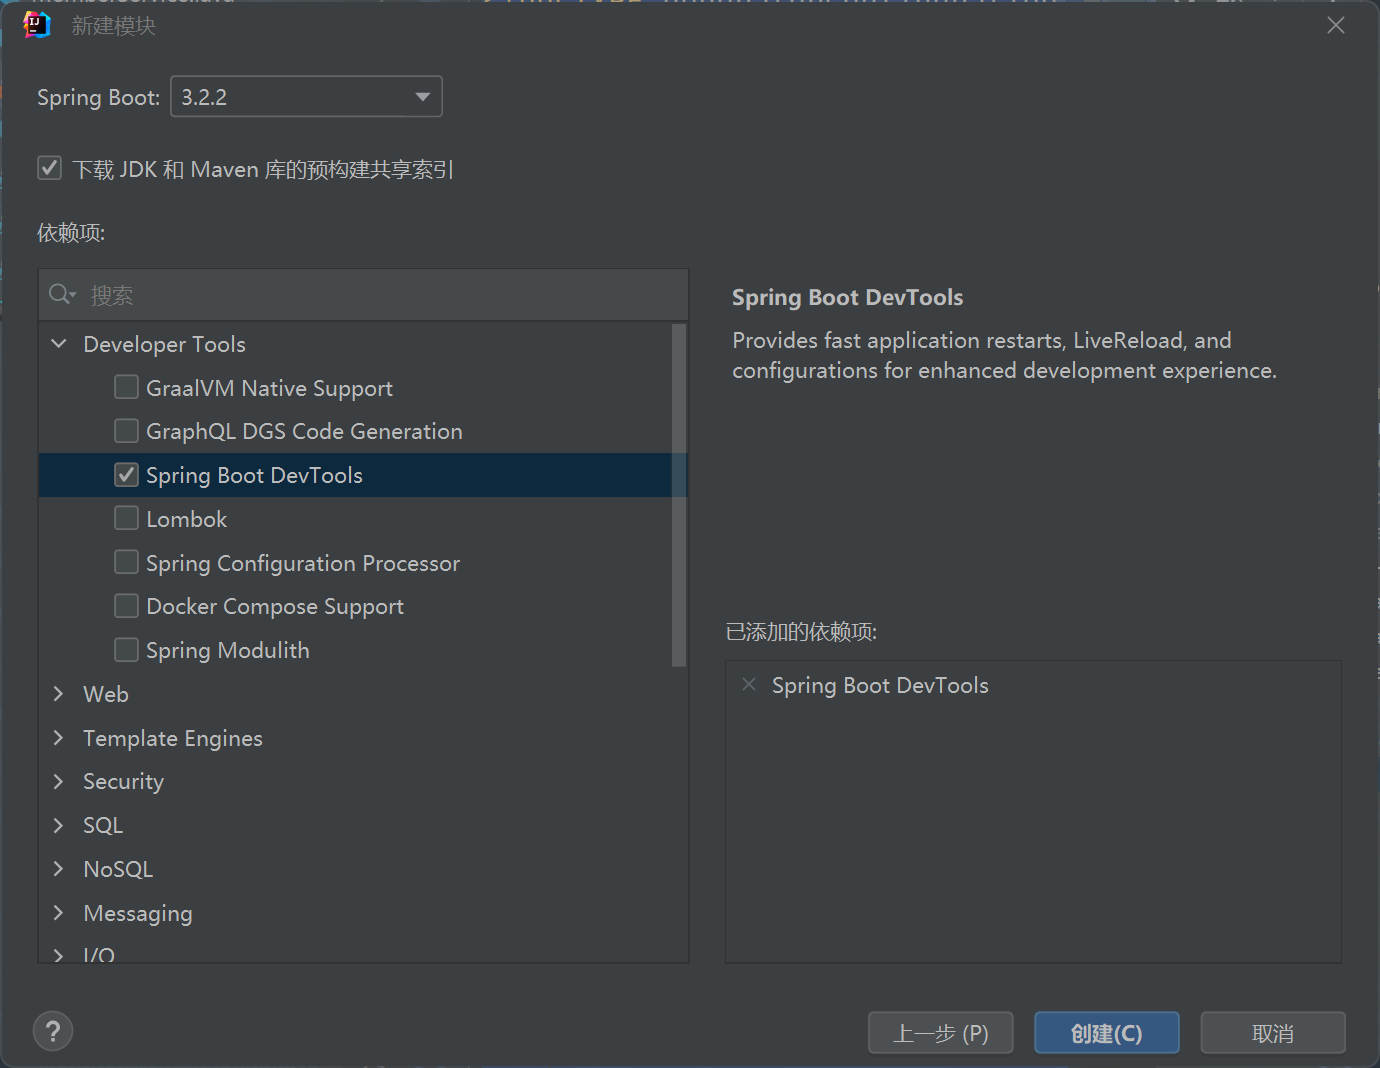
搭建一个springboot的项目
搭建一个springcloud的项目
搭建一个springMVC的项目
原文地址:https://blog.csdn.net/weixin_52352342/article/details/135851798
本文来自互联网用户投稿,该文观点仅代表作者本人,不代表本站立场。本站仅提供信息存储空间服务,不拥有所有权,不承担相关法律责任。
如若转载,请注明出处:http://www.7code.cn/show_62309.html
如若内容造成侵权/违法违规/事实不符,请联系代码007邮箱:suwngjj01@126.com进行投诉反馈,一经查实,立即删除!

