Ribbon 的介绍
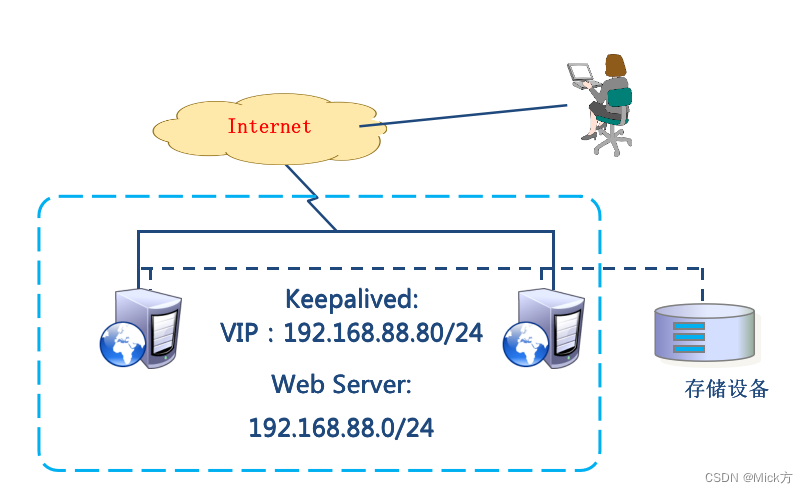
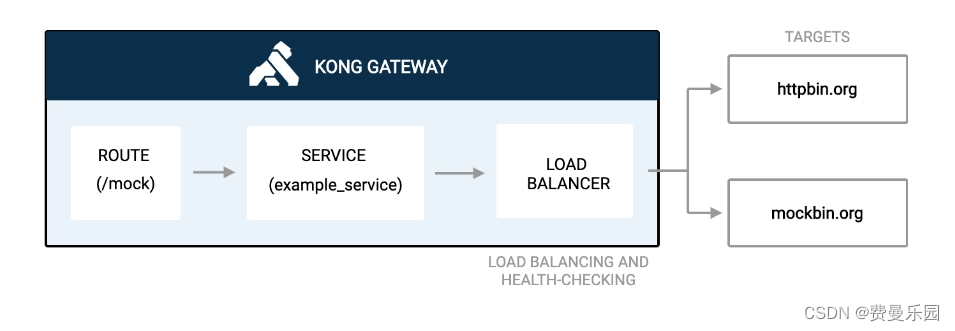
Spring Cloud Ribbon 是基于Netflix Ribbon 实现的一套客户端负载均衡的工具。主要功能是提供客户端的软件负载均衡和服务调用。Ribbon 客户端组件提供一系列完善的配置项如连接超时,重试等。简单的说,就是在配置文件中列出Load Balancer 后面的所有的及其,Ribbon会自动的帮助你基于某种规则(如简单轮询,随机连接等)去连接这些机器。我们很容易使用 Ribbon 实现自定义的负载均衡算法
Feign 的介绍
Feign 和 Ribbon 是 Spring Cloud 的 Netflix 中提供的两个实现软负载均衡的组件,Ribbon 和 Feign 都是用于调用其他服务的,方式不同,Feign 则是在 Ribbon 的基础上进行了一次改进,采用接口的方式,将需要调用的其他服务的方法定义成抽象方法即可,不需要自己构建 Http 请求,不过要注意的是抽象方法的注解,方法名要和提供服务的方法对应上。简单点说,Feign 是对 Ribbon 的封装,而且 Feign 和 Ribbon 的作用位置不同。
负载均衡
Ribbon 和 Feign 都是负载均衡技术,那么什么是负载均衡呢?简单点说负载均衡就是将用户的请求平摊的分配到多个服务上,从而达到系统的高可用。
Nginx 服务端负载均衡和 Ribbon 本地负载均衡的区别
Nignx 是服务器负载均衡,客户端所有的请求都会交给 Nginx ,然后由 Nginx 实现转发请求,即负载均衡是由服务端实现的。
Ribbon 本地负载均衡,在调用微服务接口时候,会在注册中心上获取注册信息服务列表之后缓存到 VM 本地,从而在本地实现 RPC 远程服务调用技术。
Ribbon 和 Feign 的区别
- 启动类使用的注解不同,Ribbon 用的是 @RibbonClient,Feign 用的是 @EnableFeignClients 。
- 服务的指定位置不同,Ribbon 是在 @RibbonClient 注解上声明,Feign 则是在定义抽象方法的接口中(service 层的接口上)使用 @FeignClient 声明。
- 调用方式不同,Ribbon 需要自己构建 http 请求,模拟 http 请求然后使用 RestTemplate 发送给其他服务,步骤相当繁琐,Feign 是直接通过接口方式调用。
Ribbon 的使用
项目是建立在springcloud技术篇一 Nacos 的基础上进行的。Ribbon 只是一个客户端的负载均衡器工具,实现起来非常简单,我们只需要注入 RestTemplate 的 Bean 上加上 @LoadBalanced 就可以了,内容如下:
@Configuration
public class WebConfig {
	public RestTemplate restTemplate() {
		@LoadBalanced//负载均衡,默认使用轮询规则
		@Bean
		return new RestTemplate();
	}
}
补充:在早期版本中,spring–cloud–starter–netflix–eureka–client 依赖已经引入了 Ribbon,则我们可以直接使用,但是因为自从 SpringCloud2020.0.1.0 版本是已经不需要 netflix 了,所以如果我们使用的是最新版本的 springcloud,则需要手动在服务消费方导入 spring–cloud–starter–loadbalancer 依赖支持
<dependency>
	<groupId>org.springframework.cloud</groupId>
	<artifactId>spring-cloud-starter-loadbalancer</artifactId>
	<version>3.1.1</version>
</dependency>
启动一个消费方,多个服务放进行测试
@RestController
@RequestMapping("user-consumer")
public class UserController {
	@Autowired
	private DiscoveryClient discoveryClient;//服务发现

	@Autowired
	private RestTemplate restTemplate;//用于发送网络请求

	// 服务方应该调用生产方的服务
	@RequestMapping("getUsers")
	public JsonResult getUsers() {
		// 由于在 WebConfig 中设置了轮询规则,这里通过服务的名称来发送网络请求
		String url = "http://micro-service-provider/user-provider/findAll";
		JsonResult jsonResult = restTemplate.getForObject(url,JsonResult.class);
		System.out.println(jsonResult);
		return jsonResult;
	}
}
@RestController
@RequestMapping("user-provider")
public class UserController {

	@RequestMapping("findAll")
	public JsonResult findAll() {
		// 使用并联启动的方式,启动多个服务提供方进行测试
		// 先输出 7070,然后修改 application.yml 配置文件,端口号设置为 7070 启动
		// System.out.println("7070")
		// 在输出 7071,然后修改 application.yml 配置文件,端口号设置为 7071 启动
		// System.out.println("7071")
		// 在输出 7072,然后修改 application.yml 配置文件,端口号设置为 7072 启动
		// System.out.println("7072")

		// 模拟数据库数据
		List<User> users = Arrays.asList(
		new User(1001, "张三", "123"),
		new User(1002, "李四", "456"),
		new User(1003, "王五", "789"),
		);
		JsonResult jsonResult = JsonResult.ok();
		jsonResult.setData(users);

		return jsonResult;
	}
}
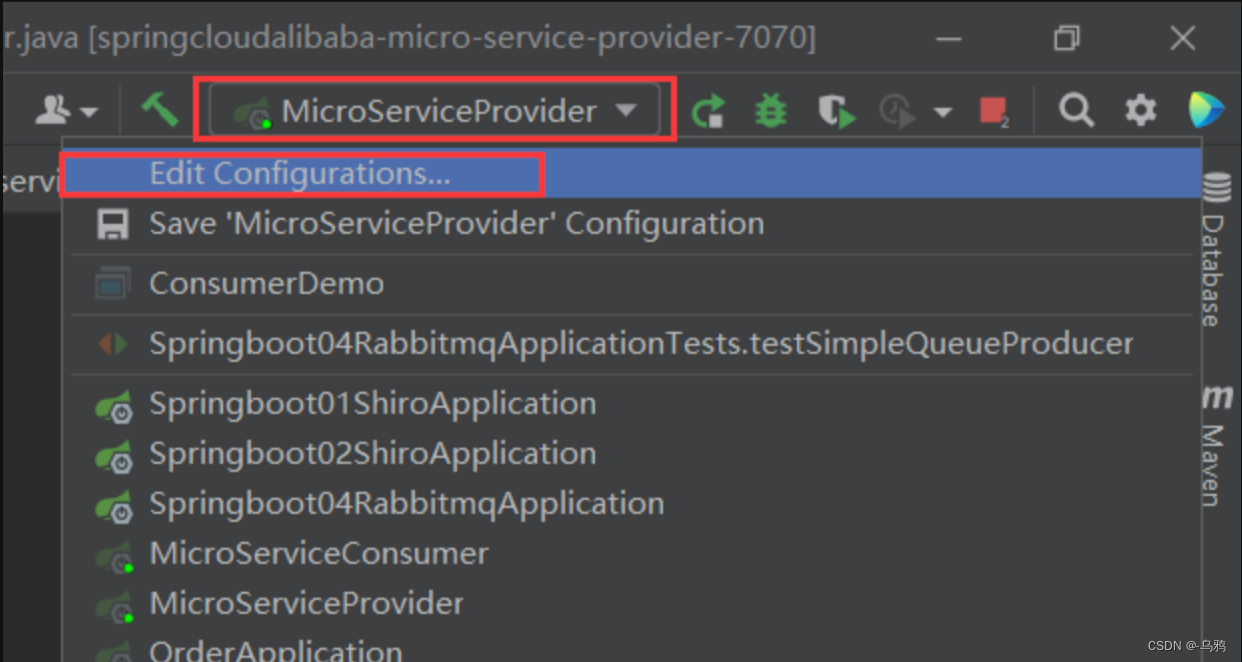
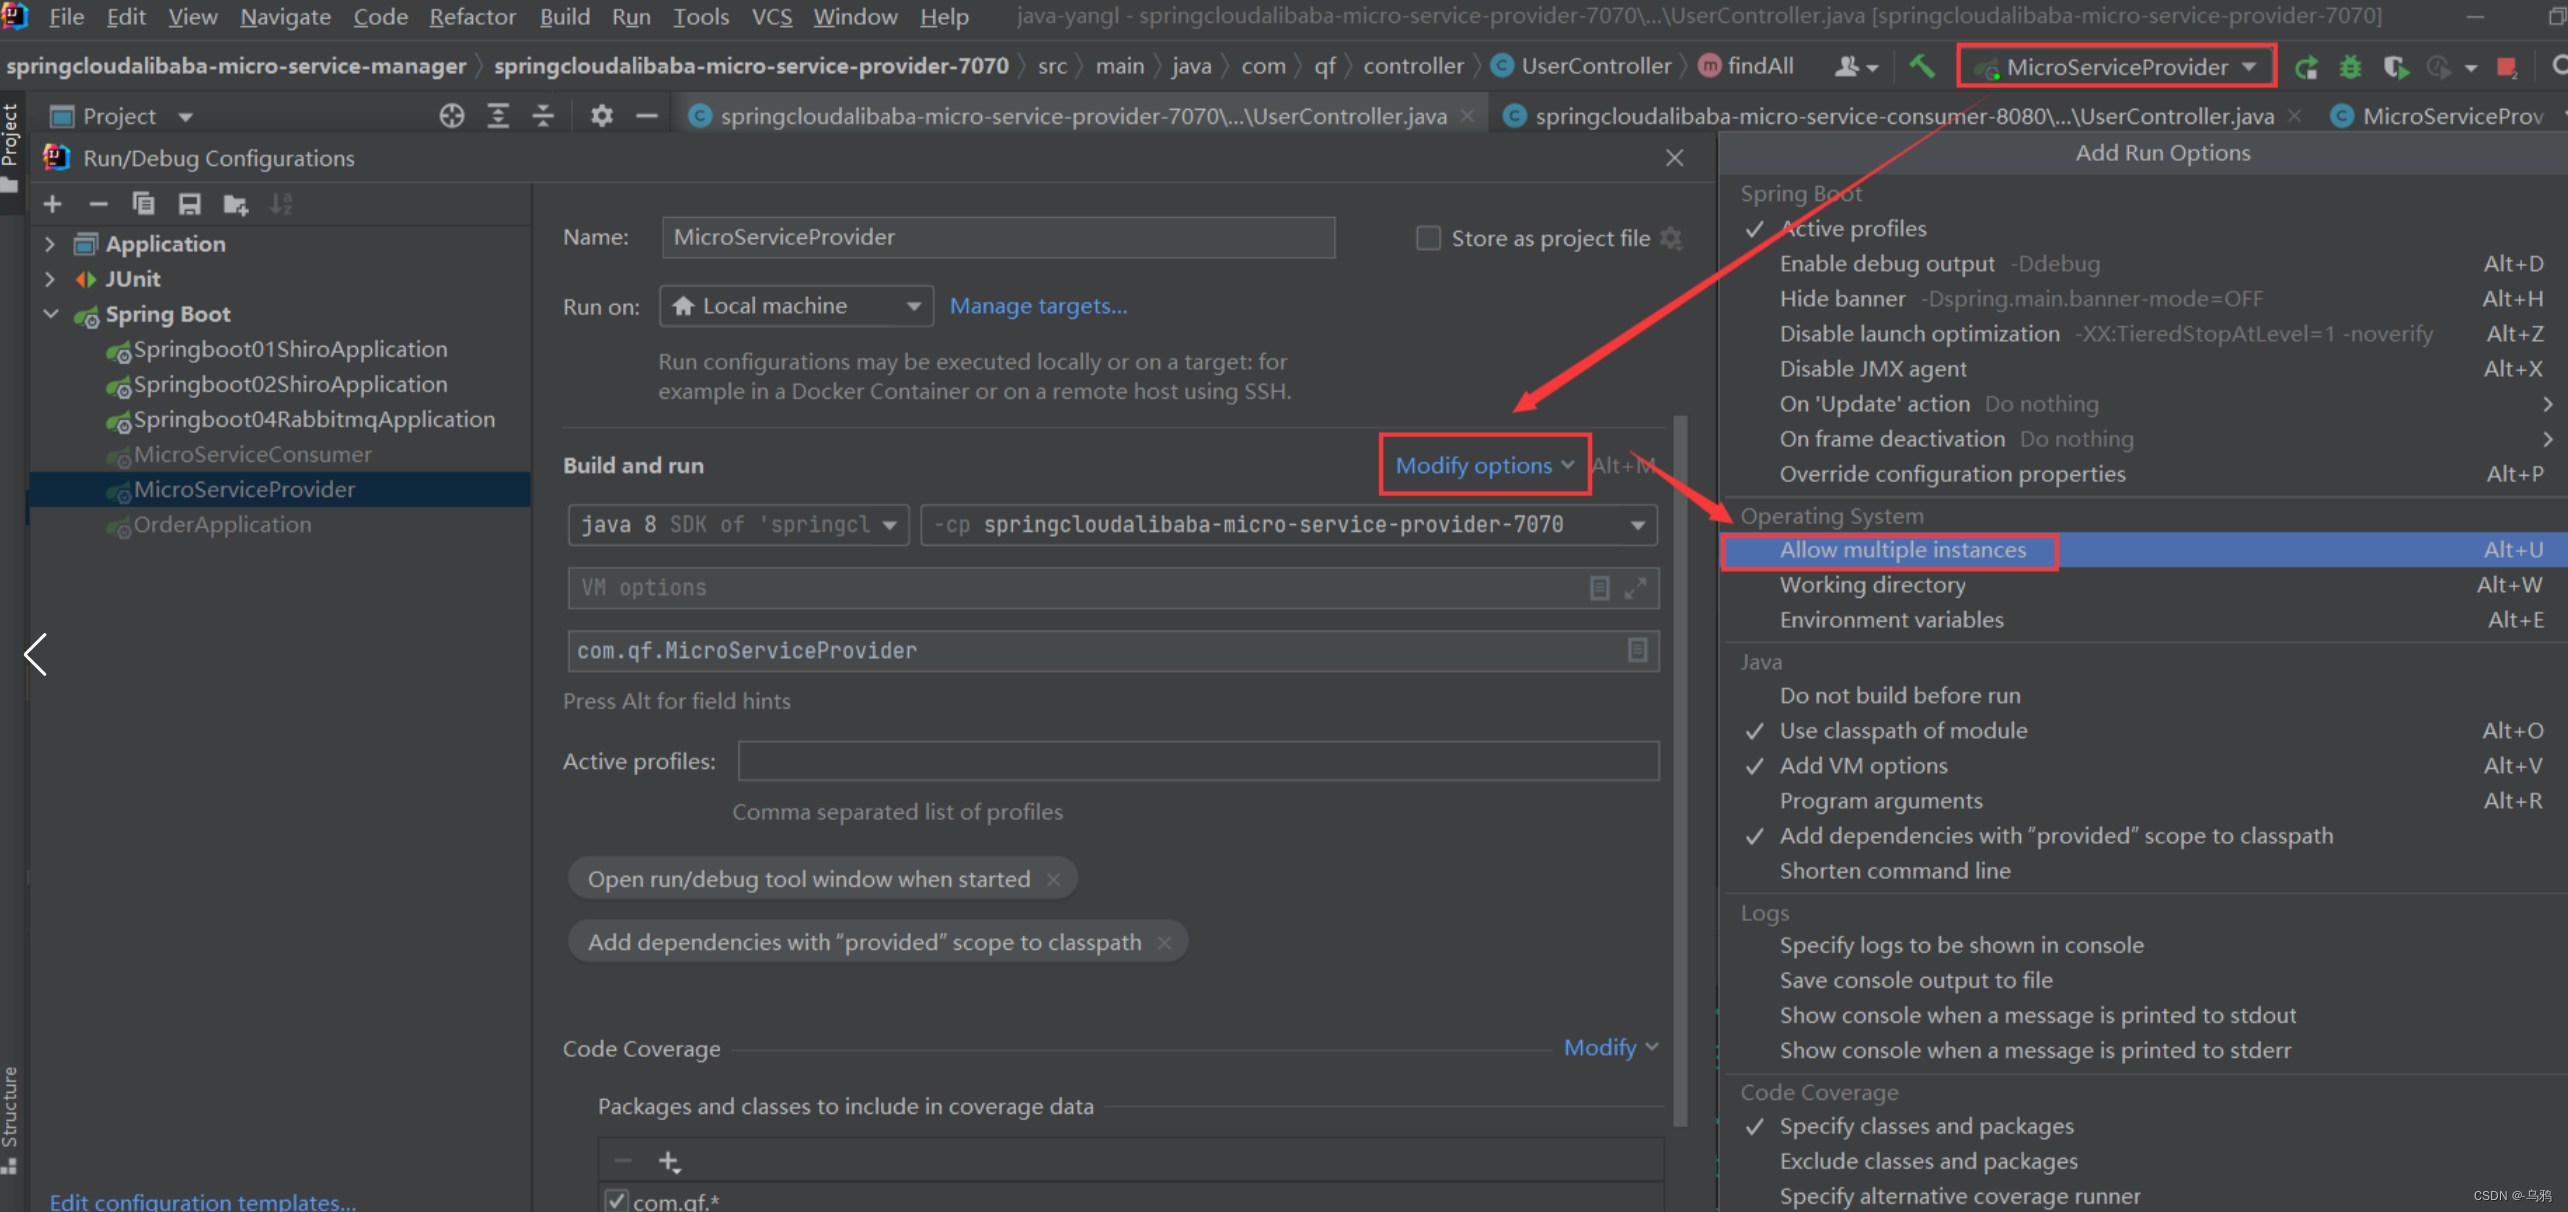
修改端口号,启动多个 provider,然后启动 consumer,访问浏览器进行测试
负载均衡的策略
Ribbon 提供了一个很重要的接口叫做 IRule,其中定义了很多的负载均衡策略,默认的是轮询的方式,一下是 Ribbon 的负载均衡策略
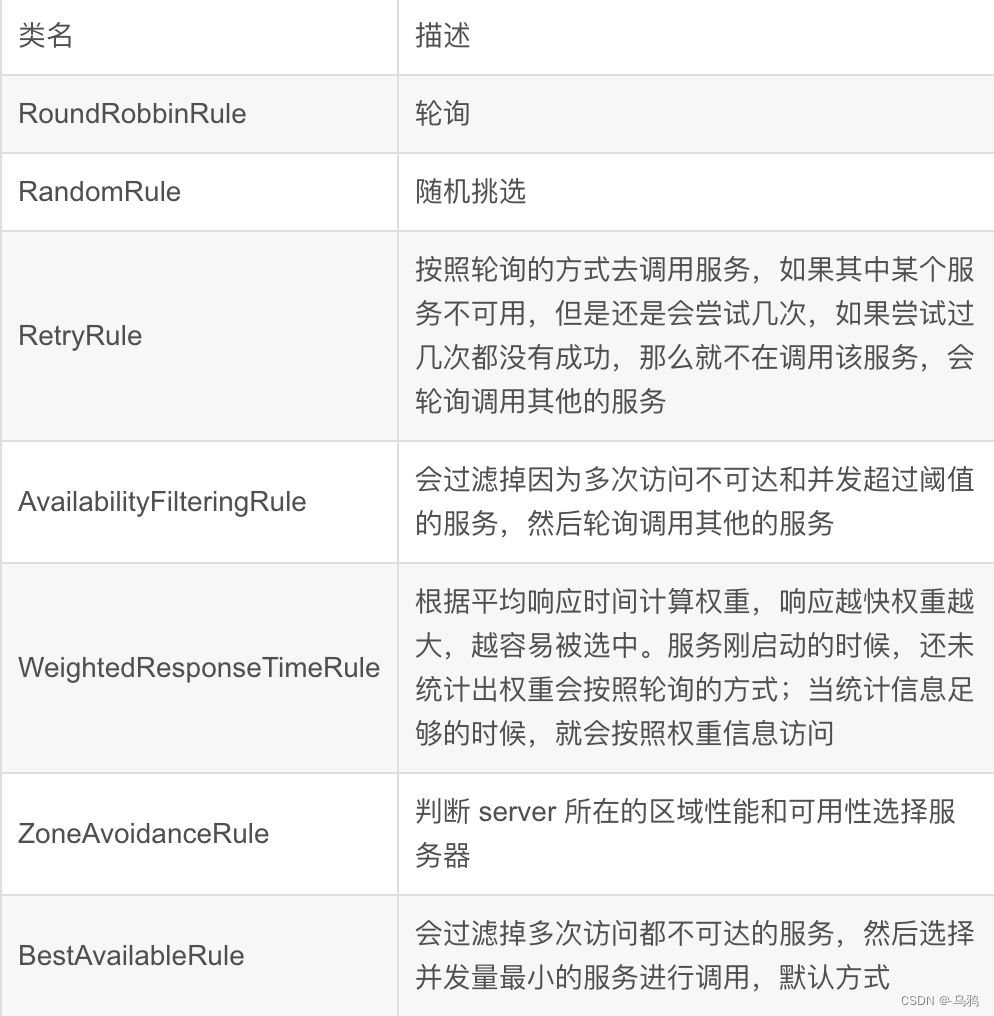
改变 Ribbon 的均衡策略(随机方式):
@Configuration
public class WebConfig {
	@LoadBalanced//负载均衡
	@Bean
	public RestTemplate restTemplate() {
		return new RestTemplate();
	}

	// 创建对象实现改变 Ribbon 的负载均衡策略,随机规则
	@Bean
	public IRule getRule() {
		return new RandomRule();
	}
}
自定义方式的均衡策略:
自定义的负载均衡策略需要继承 AbstractLoadBalancerRule 这个类,然后重写 choose 方法,然后将其注入到容器中。
创建 ServerInfo 类
public class ServerInfo {
	private Server server;
	private int num;

	public ServerInfo() {
    }

    public ServerInfo(Server server, int num) {
        this.server = server;
        this.num = num;
    }

    public Server getServer() {
        return server;
    }

    public void setServer(Server server) {
        this.server = server;
    }

    public int getNum() {
        return num;
    }

    public void setNum(int num) {
        this.num = num;
    }
}
创建 CustomizeRule 类:
// 自定义规则,每个服务最多访问 5 次,然后再继续访问下一个
public class CustomizeRule extends AbstractLoadBalancerRule {
	private int limit = 3;

	// map 的 key 是服务的名字,value 是该服务调用的次数
	private Map<String, ServerInfo> map = new ConcurrentHashMap<>();

	@Override
	public void initWithNiwsConfig(IClientConfig iClientConfig){}

	// 返回值的意思是,当该方法返回什么的时候,那么 Ribbon 或者 Feign 就调用谁。
	@Override
	public Server choose(Object key) {
		Server finalServer = null;
		ILoadBalancer loadBalancer = getLoadBalancer();
		// 获取所有的服务
		List<Server> servers = loadBalancer.getAllServers();
		// 获取所有的可用的服务
		List<Server> reachableServers = loadBalancer.getReachableServers();
		int allServiceSize = servers.size(); // 获取所有服务的长度
		int upCount = reachableServers.size(); // 获取所有的可用的服务的长度
		if(0 == allServicesSize || 0 == upCount) {
			return null;
		}

		for(int i = 0; i < allServiceSize; i++) {
			Server server = servers.get(i);//获取当前遍历的 server
			String instanceId = server.getMetaInfo().getInstanceId();
			String providerName = instanceId.split("@@")[1];//获取服务名
			ServerInfo serverInfo = map.get(providerName);//获取对应服务
			// 首次调用
			if(null == serverInfo) {
				serverInfo = new ServerInfo(server, 1);
				map.put(providerName, serverInfo);
				finalServer = server;
				break;
			} else {
				// 不为空,表示之前肯定调用过
				// 当前遍历的 server 与正在调用的 server 是同一个 server
				if(serverInfo.getServer().getId().equals(server.getId())) {
					// 如果没有满 3 次,接着走该服务。
					// 如果满了 3 次,接着下个
					int num = serverInfo.getNum();//获取已经调用的次数
					if(num >= limit) {
						// 超出了 3 次
						// 超出次数,要走下一个,需要判断是否有下一个,需要判断是否有下一个,如果没有下一个,就回到第一个
						if(i == (allServiceSize - 1)) {
							Server firstServer = servers.get(0);//如果为最后一个就拿第一个
							ServerInfo firstServerInfo = new ServerInfo(firstServer, 1);
							map.put(providerName, firstServerInfo);
							finalServer = firstServer;
						} else {
							Server nextServer = servers.get(i + 1);
							map.put(providerName, nextServerInfo);
							finalServer = nextServer;
						}
						break;
					} else {
						serverInfo.setNum(++num);
						finalServer = server;
						break;
					}
				}
			}
		}
		return finalServer;
	}
}
修改 WebConfig ,添加配置
@Configuration
public class WebConfig {
	@Bean
	@LoadBalanced//负载均衡,默认规则:轮询
	public RestTemplate getRestTemplate() {
		return new RestTemplate();
	}
	// 自定义均衡负载服务器
	@Bean
	public IRule getRule() {
		return new CustomizeRule();
	}
}
Feign 的使用
在 springcloudalibaba-micro-service-consumer 的 pom.xml 中导入依赖
<!-- Feign -->
<dependency>
    <groupId>org.springframework.cloud</groupId>
    <artifactId>spring-cloud-starter-openfeign</artifactId>
    <version>2.2.6.RELEASE</version>
</dependency>
在启动类上加入 @EnableFeignClients 的注解
@SpringBootApplication
@EnableDiscoveryClient
@EnableFeignClients
public class ConsumerApplication {
	public static void main(String[] args) {
		SpringApplication.run(ConsumerApplication.class,args);
	}
}
创建UserService
@Service
@FeignClient("micro-service-provider")
public interface UserService {
	@RequestMapping("/user-provider/findAll")
	public JsonResult findAll();
}
创建 FeignUserController
@RestController
@RequestMapping("feign")
public class FeignUserController {
	@Autowired
	private UserService userService;

	@RequestMapping("findAll)
	public JsonResult findAll() {
		return userService.findAll();
	}
}
启动多个 provider,然后启动 consumer,访问
http://localhost:8080/feign/findAll 进行测试
在 Feign 的基础上的服务之间的传参
在 springcloudalibaba-micro-service-provide 工程中的 UserController 添加 CRUD 方法
@RestController
@RequestMapping("user-provider")
public class UserController {

    @RequestMapping("findAll")
    public JsonResult findAll(){

        //使用并联启动的方式,启动多个服务提供方进行测试
        //先输出7070,然后修改application.yml配置文件,端口设置为7070启动
        //System.out.println("7070");
        //再输出7071,然后修改application.yml配置文件,端口设置为7071启动
        System.out.println("7071");
        //再输出7072,然后修改application.yml配置文件,端口设置为7072启动
        //System.out.println("7072");

        List<User> users = Arrays.asList(
                new User(1001, "张三", "123"),
                new User(1002, "李四", "456"),
                new User(1003, "王五", "789"));

        JsonResult jsonResult = JsonResult.ok();
        jsonResult.setData(users);

        return jsonResult;
    }

    //模拟数据库操作
    //查询单个
    @GetMapping("findById")
    public JsonResult findById(@RequestParam("id") Integer id){

        User user = new User(id, "jack", "123");

        JsonResult jsonResult = JsonResult.ok();
        jsonResult.setData(user);

        return jsonResult;
    }

    //删除单个-restful风格的开发
    @DeleteMapping("deleteById/{id}")
    public JsonResult deleteById(@PathVariable("id") Integer id){
        System.out.println("deleteById:"+id);
        return JsonResult.ok();
    }

    //添加
    @PostMapping("addUser")
    public JsonResult addUser(@RequestBody User user){
        System.out.println("addUser:"+user);
        return JsonResult.ok();
    }

    //修改  如果参数不一致 RequestParam(value = "")
    @PutMapping("updateUser")
    public JsonResult updateUser(@RequestParam Integer id,@RequestParam String username,@RequestParam String password){
        System.out.println("updateUser:"+id+"--"+username+"--"+password);
        return JsonResult.ok();
    }
}
在 springcloudalibaba-micro-service-consumer 工程中的 UserService 添加对应方法
@Service
@FeignClient("micro-service-provider")
public interface UserService {

    @RequestMapping("/user-provider/findAll")
    public JsonResult findAll();

    //模拟数据库操作
    //查询单个
    @GetMapping("/user-provider/findById")
    public JsonResult findById(@RequestParam("id") Integer id);

    //删除单个
    @DeleteMapping("/user-provider/deleteById/{id}")
    public JsonResult deleteById(@PathVariable("id") Integer id);

    //添加
    @PostMapping("/user-provider/addUser")
    public JsonResult addUser(@RequestBody User user);

    //修改
    @PutMapping("/user-provider/updateUser")
    public JsonResult updateUser(@RequestParam Integer id,@RequestParam String username,@RequestParam String password);

}
在 springcloudalibaba-micro-service-consumer 工程中的 FeignUserController 添加对应方法
@RestController
@RequestMapping("feign")
public class FeignUserController {

    @Autowired
    private UserService userService;

    @RequestMapping("findAll")
    public JsonResult findAll(){
        return userService.findAll();
    }

    //模拟数据库操作
    //查询单个
    @GetMapping("findById")
    public JsonResult findById(@RequestParam("id") Integer id){
        return userService.findById(id);
    }

    //删除单个
    @DeleteMapping("deleteById/{id}")
    public JsonResult deleteById(@PathVariable("id") Integer id){
        return userService.deleteById(id);
    }

    //添加  使用requestbody注解前端需要传送JSON数据
    @PostMapping("addUser")
    public JsonResult addUser(User user){
        return userService.addUser(user);
    }

    //修改
    @PutMapping("updateUser")
    public JsonResult updateUser(@RequestParam Integer id,@RequestParam String username,@RequestParam String password){
        return userService.updateUser(id,username,password);
    }
}
原文地址:https://blog.csdn.net/m0_49093968/article/details/134535760
本文来自互联网用户投稿,该文观点仅代表作者本人,不代表本站立场。本站仅提供信息存储空间服务,不拥有所有权,不承担相关法律责任。
如若转载,请注明出处:http://www.7code.cn/show_6831.html
如若内容造成侵权/违法违规/事实不符,请联系代码007邮箱:suwngjj01@126.com进行投诉反馈,一经查实,立即删除!


