最终效果
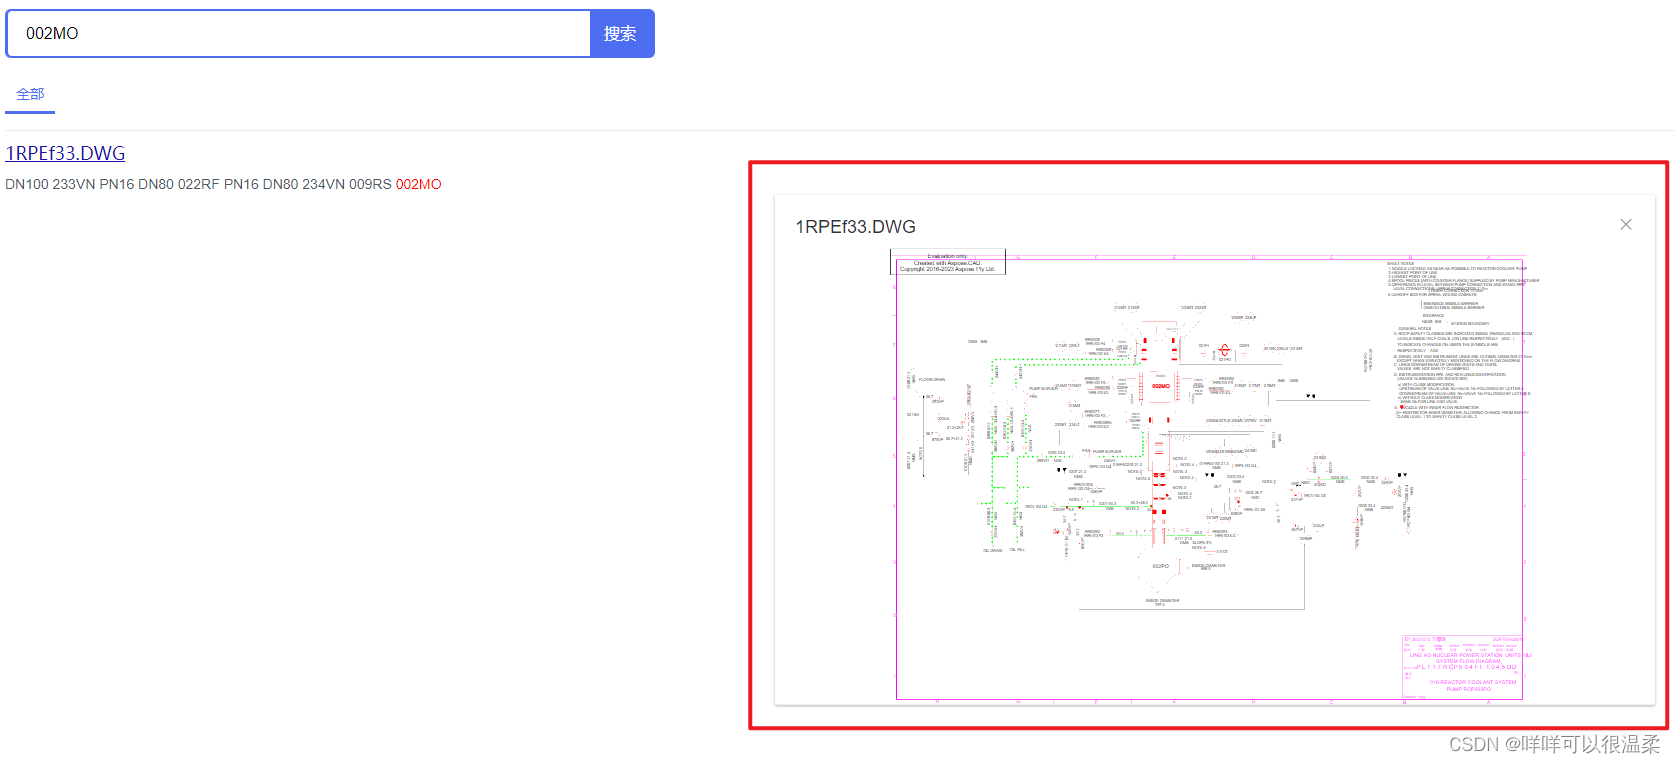
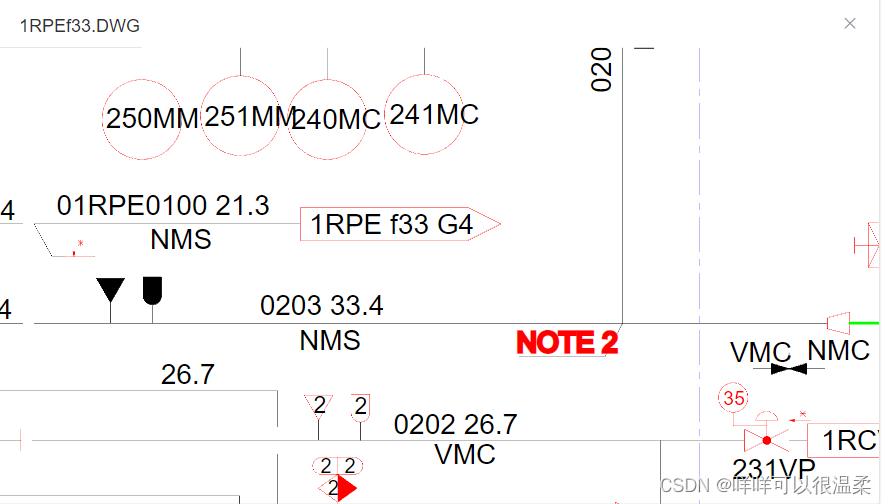
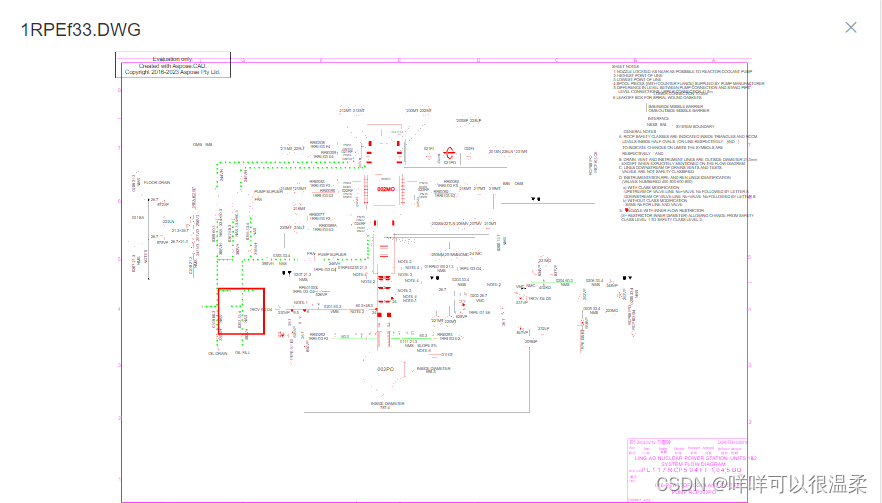
需求描述:
解决方法:
GitHub – bumbu/svg-pan-zoom:JavaScript 库,支持在 HTML 文档中平移和缩放 SVG,使用鼠标事件或自定义 JavaScript 钩子
一. 在页面中嵌入SVG文件,并解析。
基础代码:
安装插件: npm install —save svg–pan-zoom
引用插件: import svgPanZoom from ‘svg–pan-zoom‘
<template>
<div class="svg-box">
<div class="svg-dialog__header">
<!-- 标题部分 -->
<span class="svg-dialog__title"> {{ SVGTitle }}</span>
<button class="svg-dialog__headerBtn" @click="$emit('SVGClose')" >
<i class="el-icon-close svg-dialog__close"></i>
</button>
</div>
<div id="svg-dialog__body" v-loading="embedLoading">
<!-- SVG嵌入部分 -->
<embed type="image/svg+xml" id="svg-trigger" :src="currentSvg"/>
</div>
</div>
</template>
<script>
import svgPanZoom from 'svg-pan-zoom'
var panZoomTiger = null
var svgCon = null
var svgTiger = null
var svgDoc = null
export default {
name: 'SVGDialog',
data() {
return {
embedLoading: false, // 加载
SVGTitle: '', // 窗口标题
currentSvg: null, // SVG地址
oldTargetNode: [], // 记录点击的节点
jumpSVGData: {} // 记录跳转的数据
}
},
created() {
this.getData() // 获取窗口数据,显示SVG
},
methods: {
// 获取窗口数据,显示SVG
getData () {
// 这里根据后端的接口获取了SVG的地址,赋值给了currentSvg
.......... (接口赋值方法代码,无关,不展示了)
// 赋值后调用展示SVG方法
this.getZoomTiger()
},
// 获取SVG窗口
// 跳转时addEventListener必须移除load
getZoomTiger() {
panZoomTiger = document.getElementById('svg-trigger')
panZoomTiger.addEventListener('load', this.waitLoad)
},
// 定义svgPanZoom
// 跳转时addEventListener必须移除click
waitLoad() {
svgTiger = svgPanZoom('#svg-trigger', {
viewportSelector: '.svg-pan-zoom_viewport',
preventMouseEventsDefault: false
})
svgCon = panZoomTiger.getSVGDocument().querySelector('svg')
svgCon.style = 'cursor: pointer;'
svgCon.addEventListener('click', this.svgClick)
}
},
</script>
<style scoped lang="scss">
.svg-box {
width: 100%;
height: 100%;
}
.svg-dialog__header {
padding: 20px 20px 10px;
// border-bottom: 1px solid #909399;
.svg-dialog__title {
line-height: 24px;
font-size: 18px;
color: #303133;
}
.svg-dialog__headerBtn {
position: absolute;
width: 18px;
height: 18px;
top: 20px;
right: 20px;
padding: 0;
background: transparent;
border: none;
outline: none;
cursor: pointer;
font-size: 18px;
.svg-dialog__close {
color: #909399;
// color: black;
&:hover {
color: #409EFF!important;
}
}
}
}
#svg-dialog__body {
height: calc(100% - 54px);
#svg-trigger {
width: 100%;
height: 100%;
}
}
</style>
二. 点击SVG文件中节点时,高亮显示。
    // 点击SVG节点操作
    svgClick (evt) {
      var that_ = this
      let newObj = []
      if (evt.target.nodeName === 'text') {
        // 判断点击节点是否存在path
        if (evt.target.parentNode.children[0].nodeName !== 'text') {
          newObj.push(evt.target)
        } else if (evt.target.parentNode.children[0].nodeName === 'text') {
          newObj = evt.target.parentNode.children
        }
        // 记录点击的节点
        // 用于下次点击时取消上次点击节点的高亮
        if (that_.oldTargetNode.length === 0) {
          // 最开始记录
          that_.$set(that_, 'oldTargetNode', newObj)
        } else if (that_.oldTargetNode.length > 0) {
          // 高亮过取消,重新记录
          that_.resetHightLight(newObj)
        }
        // 高亮当前点击
        that_.hightLight(newObj, false)
      }
    },
    // 高亮SVG节点
    hightLight(ids, flag) {
      // let targetCon
      for (let i = 0; i < ids.length; i++) {
        ids[i].style.fill = 'rgb(255,0,0)'
        ids[i].style.stroke = 'rgb(255,0,0)'
        ids[i].style.strokeWidth = 0.3
        // if (i === 0) targetCon = ids[i].getBoundingClientRect()
      }
      // 可有可无,看自己个人感觉无效果,但也不影响代码和页面就先放着了
      // if (flag) {
      //  setTimeout(() => {
      //    svgTiger.zoomAtPoint(1.5, {x: targetCon.x, y: targetCon.y})
      //  }, 100)
      }
    },
    // 取消高亮
    resetHightLight(ids) {
      for (let i = 0; i < this.oldTargetNode.length; i++) {
        this.oldTargetNode[i].style.fill = 'rgb(0, 0, 0)'
        this.oldTargetNode[i].style.stroke = 'rgb(0, 0, 0)'
        this.oldTargetNode[i].style.strokeWidth = 0
      }
      this.$set(this, 'oldTargetNode', ids)
    }
- 首先判断所点击的是否是text,再判断和text同一级的兄弟元素是否包含path。
- evt.target返回所点击的信息,evt.target.nodeName返回所点击位置的标签名称,有:path、text、svg等。
- evt.target.parentNode.children[0].nodeName:根据经验及多次点击的结果验证,如果同一级别的兄弟元素包含path,那第一个元素的nodeName就是path,所以这里只判断了第一个兄弟元素,没有循环查找。
- oldTargetNode:记录上一次点击的元素,如果兄弟元素包含path,就只记录所点击的text元素,如果不包含则记录同一级的所有兄弟元素。第一次点击记录第一次,往后每次点击都记录上一次。主要用于高亮节点后再次点击时,取消上次高亮的节点。
三. 点击某些节点时,在页面中根据后端返回的坐标,框出位置信息。
- 点击某些特定的节点时,发送接口,根据接口返回的坐标信息,在SVG中动态插入元素。
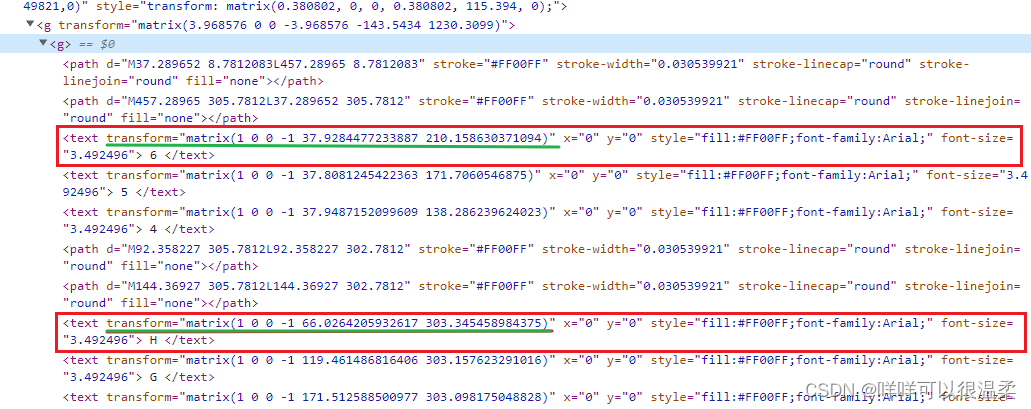
- 后端接口返回的是与SVG中的transform数据相吻合的数据。
- 如:H6,返回的就是transform=”matrix(1 0 0 -1 66.0264205932617 210.158630371094)”,如图所示,取坐标及算法返回。
    // 在SVG中创建并加入新的元素
    // full: matrix中前四位算法(后端返回)
    // X:横坐标(后端返回)
    // Y:纵坐标(后端返回)
    addSVGElement(full, x, y) {
      svgDoc = panZoomTiger.getSVGDocument().getElementsByClassName("svg-pan-zoom_viewport")[0].getElementsByTagName("g")[0]
      const newRect = document.createElementNS('http://www.w3.org/2000/svg', 'rect') // 创建一个svg元素
      const tMatrix = `matrix(${full} ${x} ${y})`
      newRect.setAttribute('transform', tMatrix)
      newRect.setAttribute('width', '30')
      newRect.setAttribute('height', '30')
      newRect.setAttribute('fill', 'rgb(0,0,0)')
      newRect.setAttribute('fill-opacity', '0')
      newRect.setAttribute('stroke', 'rgb(255,0,0)')
      newRect.setAttribute('stroke-width', 1)
      newRect.setAttribute('x', -15) // 宽度的一半
      newRect.setAttribute('y', -15) // 高度的一半
      svgDoc.appendChild(newRect)
    },
- 代码中没有写特定节点的筛选和发送接口后返回的信息,每个项目的触发条件不同,根据自己的适当调整然后调用该方法即可。参数full, x, y都是后端返回的信息。
- full: matrix中前四位算法。x:横坐标。y:纵坐标。
svgDoc:获取元素时,一定要找到真正的<g>标签。在浏览器解析时,在源文件的<svg>标签与<g>标签中,多创建了一层<g>标签。插入的层级不对,显示的位置就不对。
元素插入的正确位置
    // 在SVG中移除某个元素元素
    removeSVGElement() {
      const removeRect = svgDoc.getElementsByTagName('rect')
      while (removeRect.length > 0) {
        const SVGRect = removeRect[0]
        removeRect[0].parentNode.removeChild(SVGRect)
      }
    }
四.根据搜索的内容,高亮SVG的节点(高亮与搜索内容匹配的第一个元素节点)
    // 获取搜索节点
    getSearchText(text) {
      const con = panZoomTiger.getSVGDocument().getElementsByClassName("svg-pan-zoom_viewport")[0].getElementsByTagName("g")[0].getElementsByTagName("g")[0]
      let objText = []
      const returnVal = this.recSearch(con.children, text)
      // 如果有就高亮
      if (returnVal) {
        objText.push(returnVal)
        this.oldTargetNode = objText
        this.hightLight(objText, false)
      }
    },
    // 循环查找,找到第一个匹配的则不继续查找
    recSearch(lists, text) {
      const hasChildrenAttr = function (obj) {
        return obj.children.length !== 0
      }
      for(let i = 0; i < lists.length; i++) {
        if (lists[i].innerHTML.trim().toLowerCase() === text.toLowerCase()) {
          return lists[i]
        } else if (hasChildrenAttr(lists[i])) {
          const result = this.recSearch(lists[i].children, text)
          if (result) {
            return result;
          }
        }
      }
      return null
    },
补充:对搜索节点高亮的同时并放大
评论区有一个小伙伴也提供了类似的方法,但使用transform存在直接改变原始文件种G标签transform值的问题,从而导致图纸放大后,后面有关于图纸显示、鼠标移动等操作也同时放大的问题,改进后方法如下:
    enlargeSVGEmbed(targetCon) {
      // 获取SVG窗口宽高
      const svgBoxWidth = this.$refs.svgDialog.offsetWidth // 窗口宽
      const svgBoxHeight = this.$refs.svgDialog.offsetHeight // 窗口高
      // 节点相对中心位置偏移度数
      const targetCenterHeight = (svgBoxHeight / 2) - targetCon.top - (targetCon.height / 2) * 3
      const targetCenterWidth = (svgBoxWidth / 2) - targetCon.left + targetCon.width * 3
      svgTiger.pan({ x: targetCenterWidth, y: targetCenterHeight })
      svgTiger.zoom(3)
},总结:
从确定客户提出需求到实现后演示,用了22个小时完成,但之前从来没有接触过SVG这方面,所以做的不是很完美,比如搜索到的节点虽然高亮了,但没有放大显示。
后期会不断完善,再做补充~
原文地址:https://blog.csdn.net/weixin_50482977/article/details/130215422
本文来自互联网用户投稿,该文观点仅代表作者本人,不代表本站立场。本站仅提供信息存储空间服务,不拥有所有权,不承担相关法律责任。
如若转载,请注明出处:http://www.7code.cn/show_33850.html
如若内容造成侵权/违法违规/事实不符,请联系代码007邮箱:suwngjj01@126.com进行投诉反馈,一经查实,立即删除!
声明:本站所有文章,如无特殊说明或标注,均为本站原创发布。任何个人或组织,在未征得本站同意时,禁止复制、盗用、采集、发布本站内容到任何网站、书籍等各类媒体平台。如若本站内容侵犯了原著者的合法权益,可联系我们进行处理。


