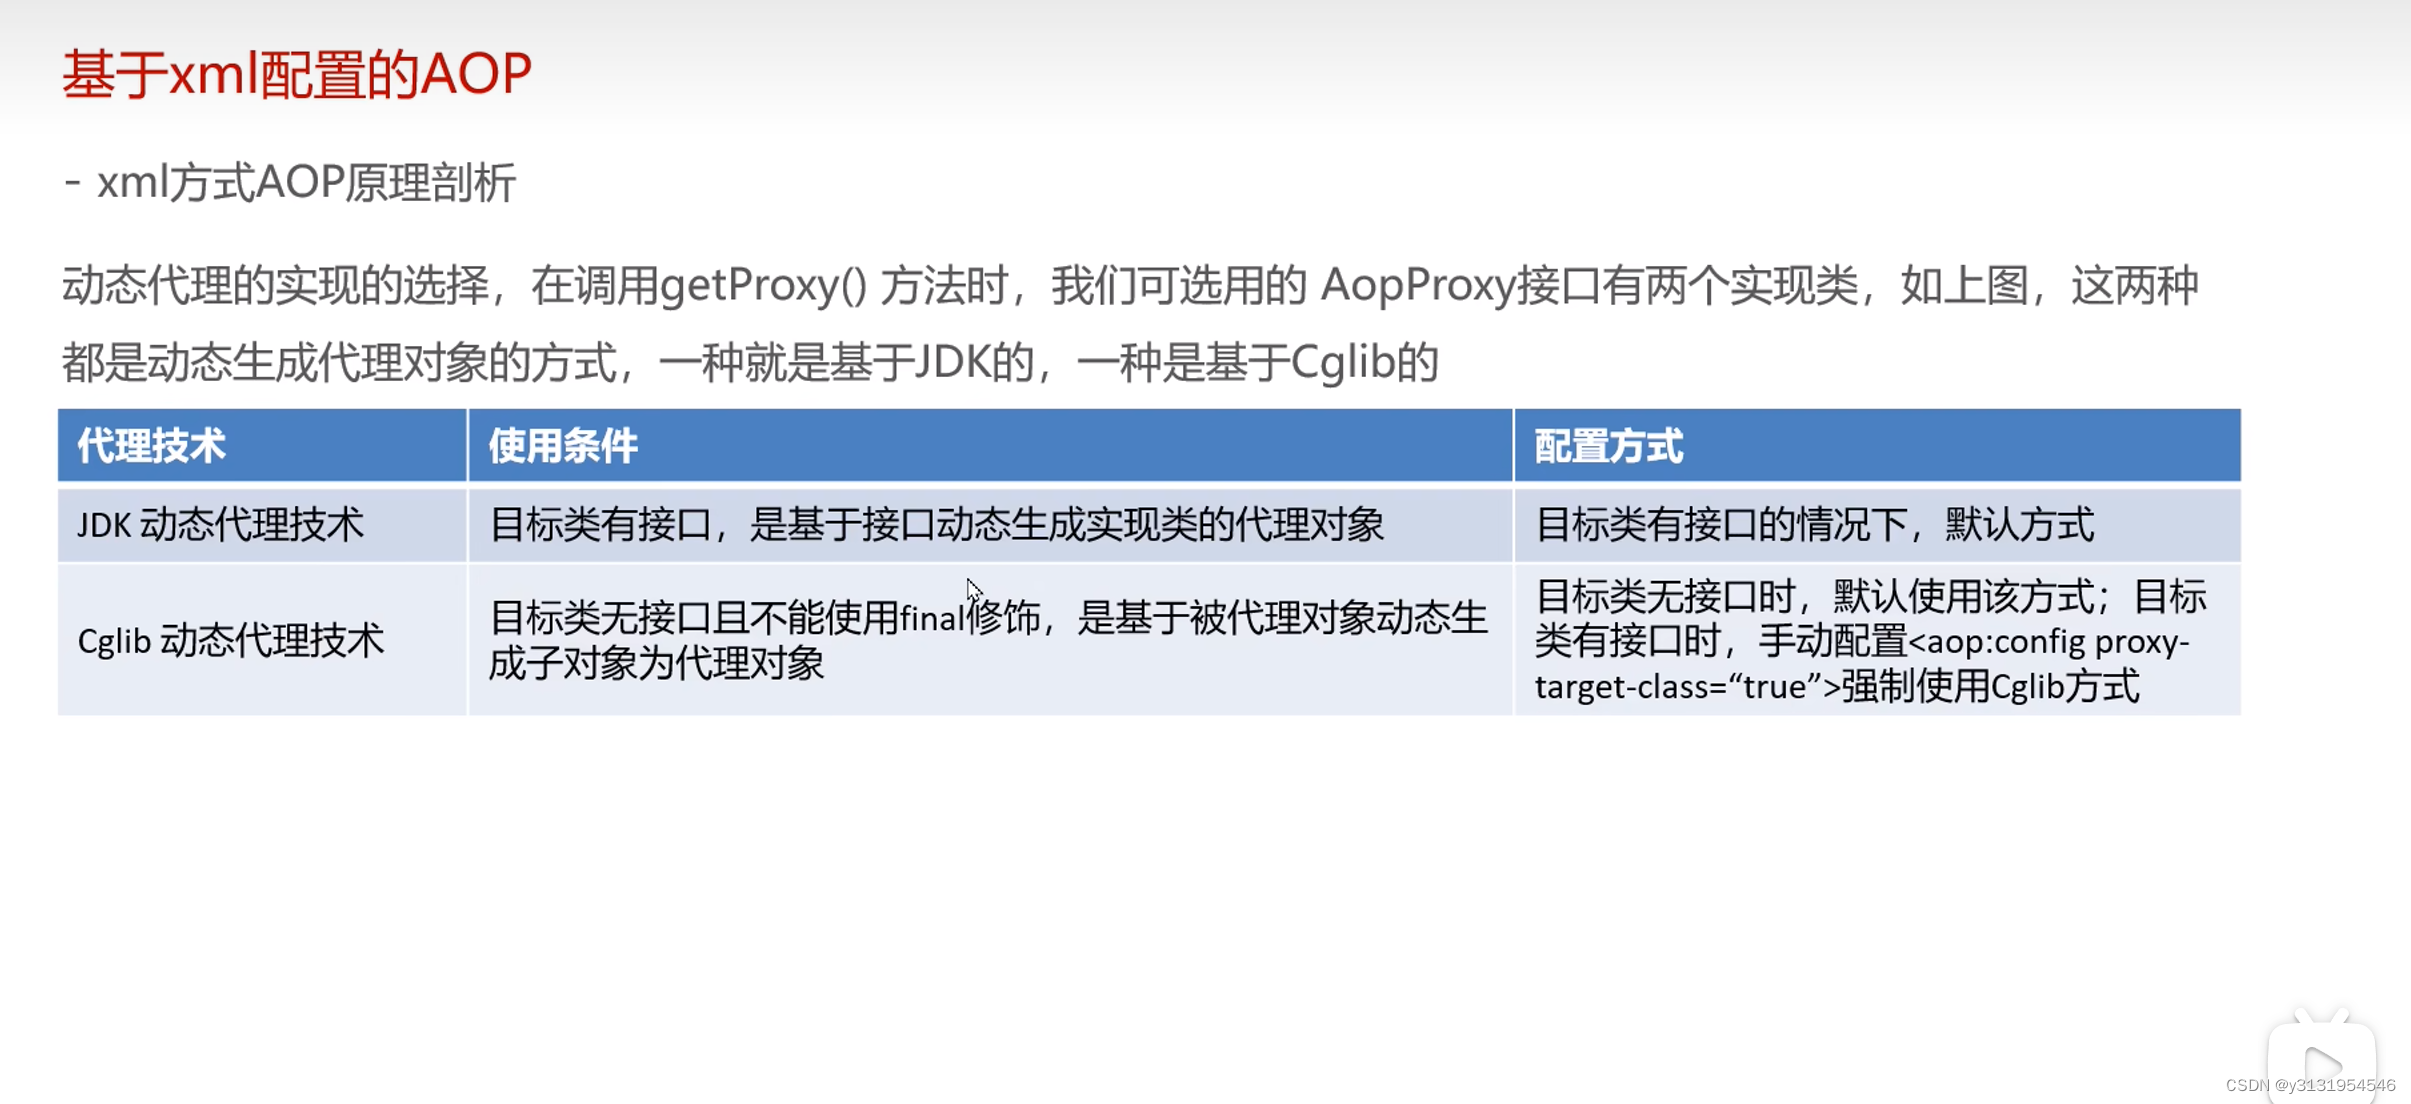
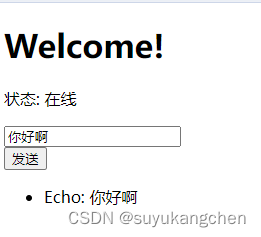
1.SpringBoot
1.1springboot是什么
1.2springboot的优点
2.Springboot入门
2.1版本控制
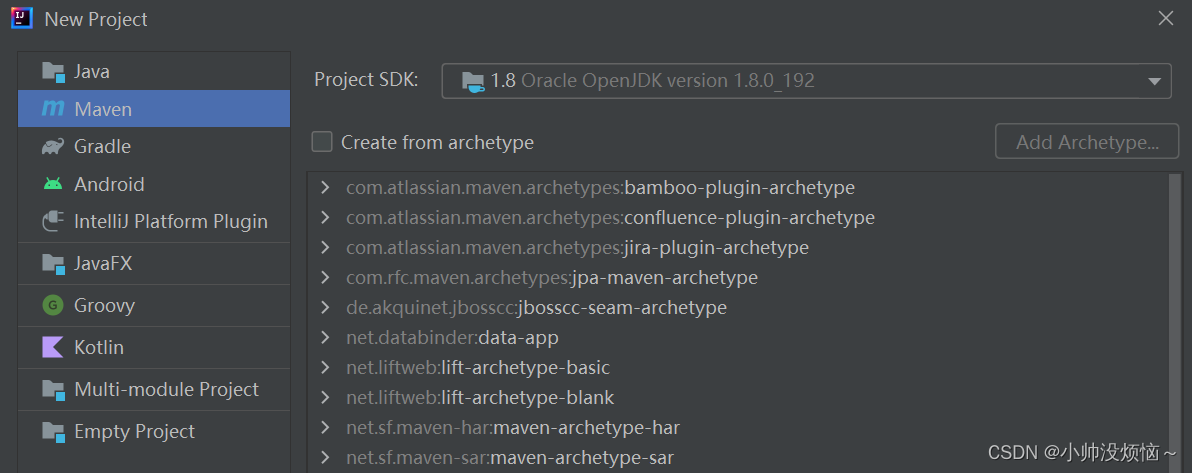
2.2创建maven工程

2.3导入父工程依赖
   <parent>
        <groupId>org.springframework.boot</groupId>
        <version>2.7.14</version>
        <artifactId>spring-boot-starter-parent</artifactId>
</parent>2.4添加springboot依赖
        <dependency>
            <groupId>org.springframework.boot</groupId>
            <artifactId>spring-boot-starter-web</artifactId>
</dependency>2.5创建主程序类
@SpringBootApplication
public class MainApplication {
    public static void main(String[] args) {
        SpringApplication.run(MainApplication.class,args);
    }
}2.6controller
@RestController
public class HelloController {

    @RequestMapping("/hello")
    public String hello(){
        return "hello,SprigBoot";
    }
}2.7测试结果

2.8总结
2.SpringBoot帮我们配置好了所有的web开发的常用场景
@SpringBootConfiguration、@EnableAutoConfiguration、ComponentScan
3.相关注解的使用
3.1.@Configuration+@Bean
注意:
@Configuration(proxyBeanMethods = false)
public class MyConfig {

    @Bean
    public User user01() {
        return new User("张三", "123456");
    }
}3.2.@Import
@Import({User.class})
@Configuration
public class MyConfig {

    @Bean
    public User user01() {
        return new User("张三", "123456");
    }
} 
3.3.@ImprotResource
@ImportResource("classpath:bean.xml")
@Configuration
public class MyConfig {

    @Bean
    public User user01() {
        return new User("张三", "123456");
    }
}3.4.@ConfigurationProperties


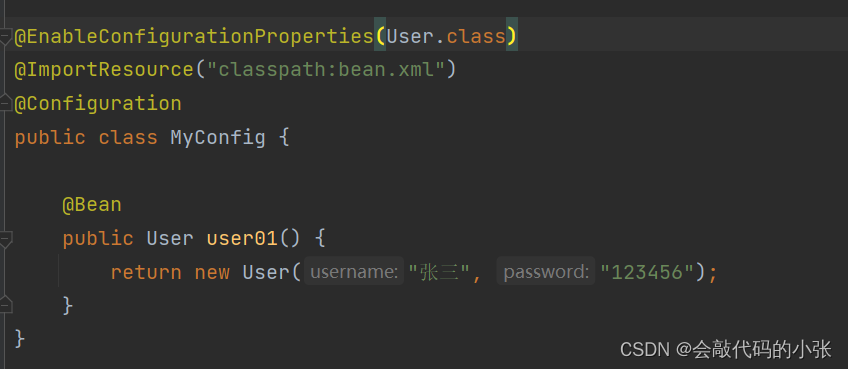
3.5.@EnableConfigurationProperties
4.自动配置原理
@SpringBootApplication等价于:@SprignBootConfiguration+@EnableAutoConfiguration+@ComponentScan

4.1@SpringBootConfiguration
@Configuration
@Indexed
public @interface SpringBootConfiguration {
    @AliasFor(
        annotation = Configuration.class
    )
    boolean proxyBeanMethods() default true;
}4.2@ComponentScan
4.3@EnableAutoConfiguration
- 1.@Import:利用getAutoConfigurationEntry(annotationMetadata)給容器中批量导入一些组件.
- 2.调用List<String> configurations = getCandidateConfigurations(annotationMetadata, attributes)获取到所有导入到容器中的配置类.
- 3.利用工厂加载Map<String, List<String>> loadSpringFactories(@Nullable ClassLoader classLoader):得到所有的组件.
- 4.从META-INF/spring.factories位置来加载一个文件。默认扫描我们当前系统里面所有META-INF/spring.factories位置的文件spring–boot–autoconfigure-2.3.4.RELEASE.jar包里面也有META-INF/spring.factories.
@AutoConfigurationPackage
@Import({AutoConfigurationImportSelector.class})
public @interface EnableAutoConfiguration {
    String ENABLED_OVERRIDE_PROPERTY = "spring.boot.enableautoconfiguration";

    Class<?>[] exclude() default {};

    String[] excludeName() default {};
}
4.4总结
5.简化开发
5.1Lombok
5.1.1导入依赖
        <dependency>
            <groupId>org.projectlombok</groupId>
            <artifactId>lombok</artifactId>
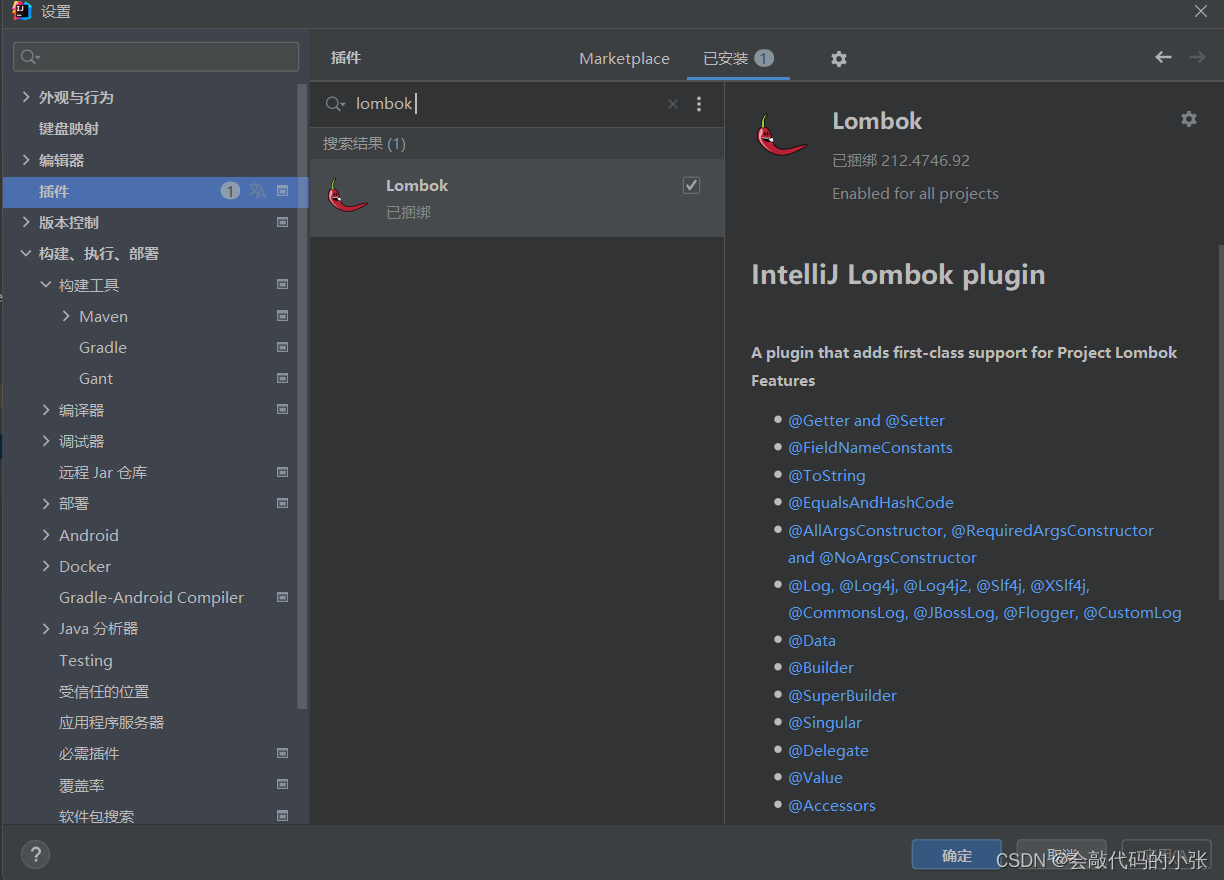
</dependency>5.1.2安装lombok插件
5.1.3实例
@Data
@ToString
@NoArgsConstructor
@AllArgsConstructor
public class User {

    private String username;
    private String password;


    public User(String username) {
        this.username = username;
    }
}5.2dev–tools
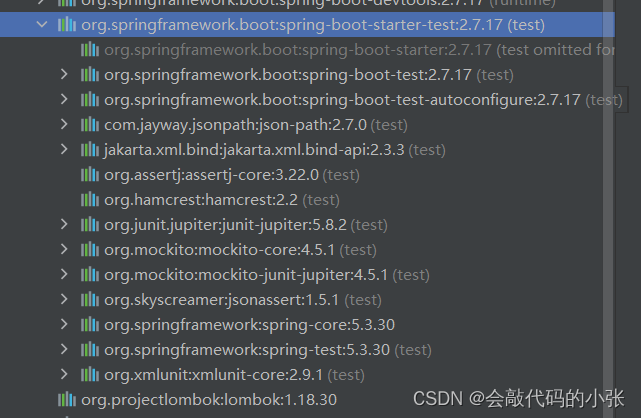
spring为开发者提供了一个名为spring-boot-devtools的模块来使Spring Boot应用支持热部署。
5.2.1引入依赖
        <dependency>
            <groupId>org.springframework.boot</groupId>
            <artifactId>spring-boot-devtools</artifactId>
            <optional>true</optional>
</dependency>说明:ctrl+F9–重启,只要请求路径或类变化,无需重新部署。
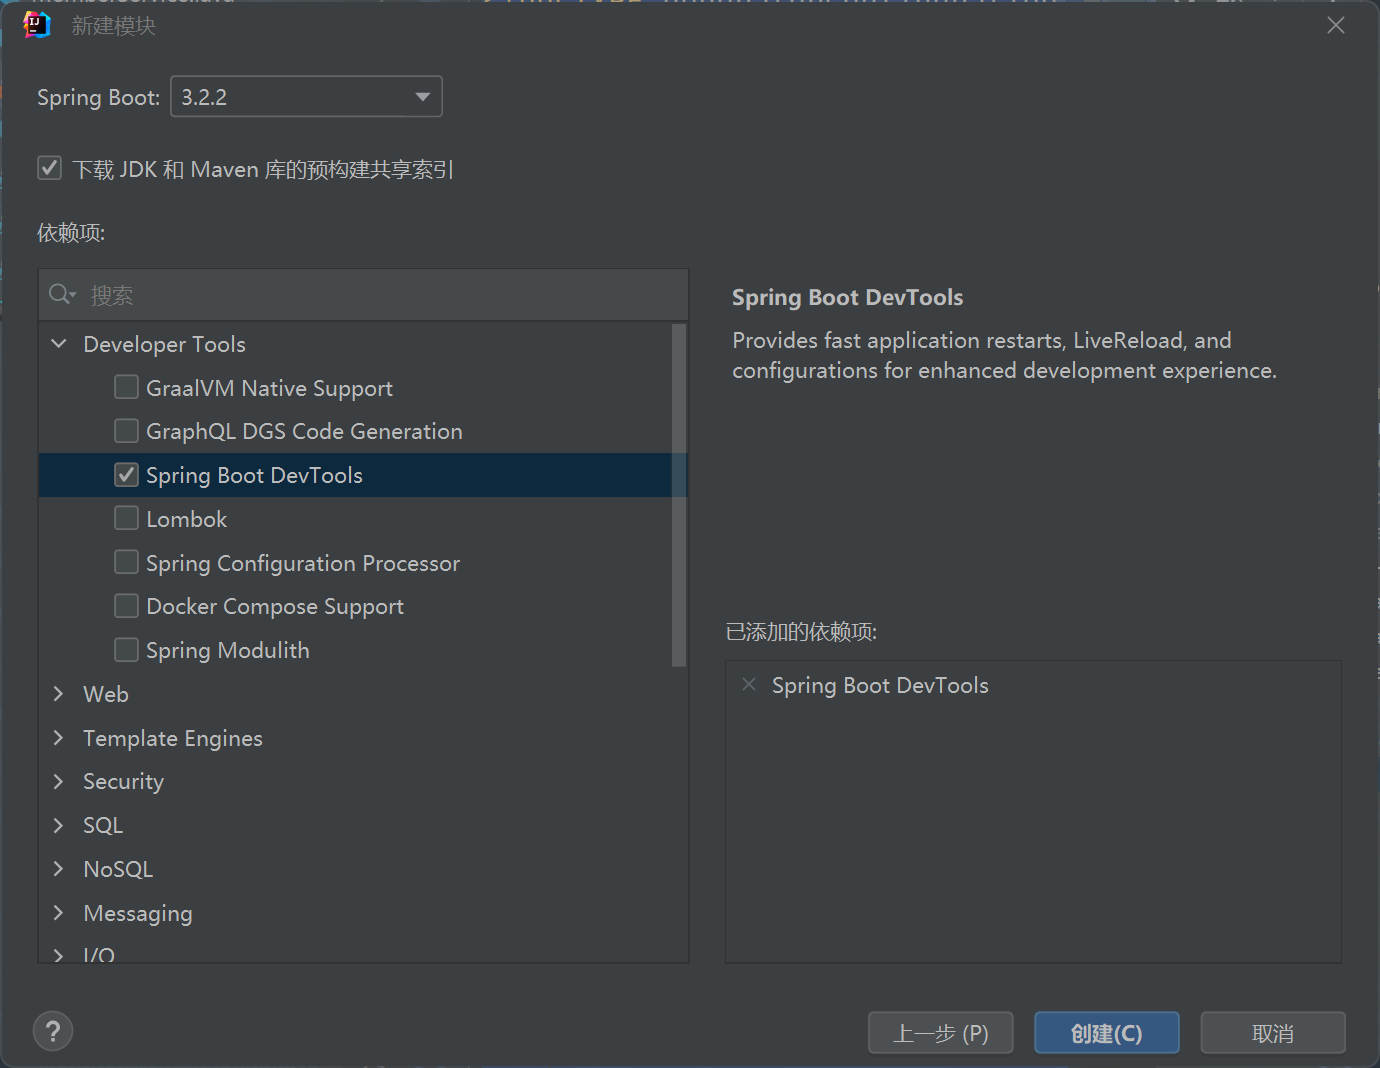
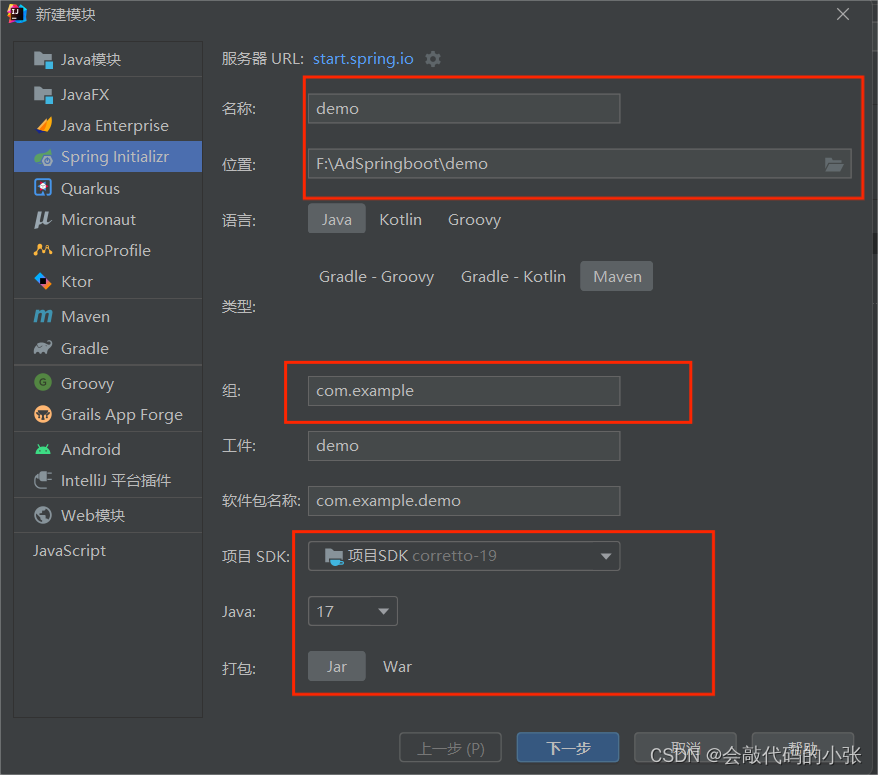
5.3Spring Initailizr
5.3.1新建模块
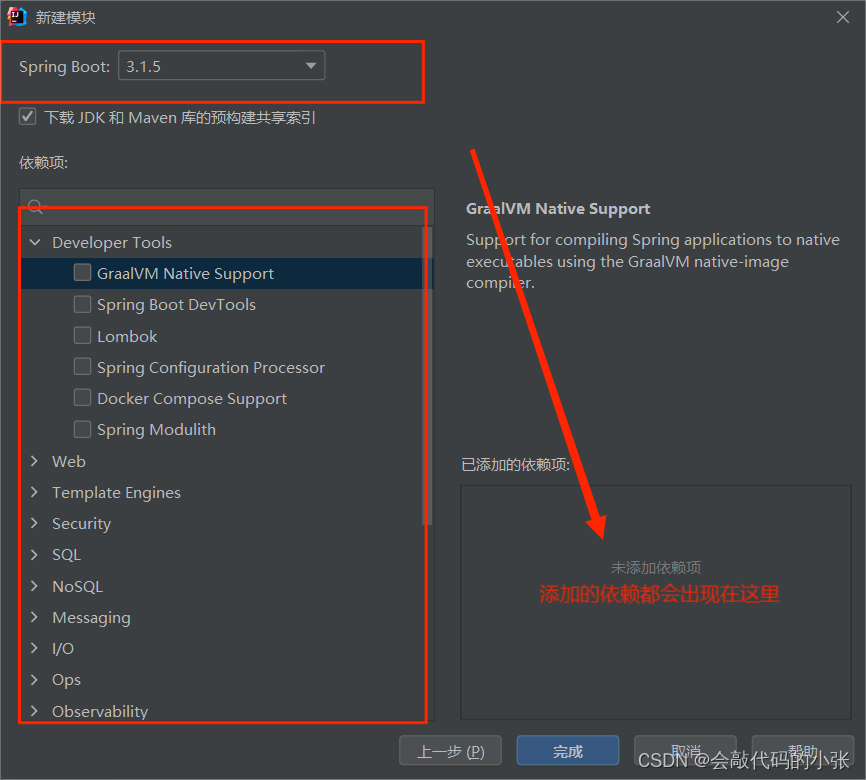
5.3.2添加依赖项
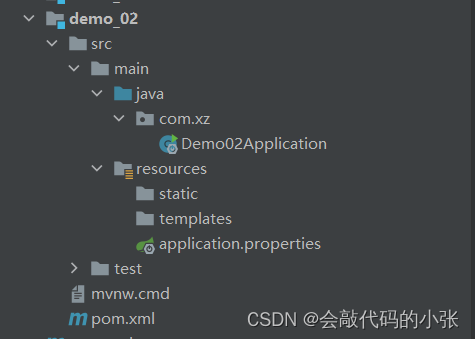
5.3.3模块结构
5.4yaml
YAML 是 “YAML Ain’t Markup Language” (YAML 不是一种标记语言)的递归缩写。在开发的这种语言时,YAML 的意思其实是: “Yet Another Markup Language” (仍是一种标记语言)。
5.4.1基本语法
5.4.2数据类型
#或
k:
k1: v1
k2: v2
k3: v3
#或
k:
– v1
– v2
– v3
5.4.3实例
@ConfigurationProperties(prefix = "user")//与配置文件进行绑定
@Component //放到容器中
@Data
@ToString
@NoArgsConstructor
@AllArgsConstructor
public class User {
    private String username;
    private String pwd;
    private String sex;
    private Integer age;
    private Pet pet;
}@ConfigurationProperties(prefix = "pet")
@Component
@Data
@ToString
@NoArgsConstructor
@AllArgsConstructor
public class Pet {
private String pName;
private Integer age;
}user:
username: jack
pwd: 123
sex: man
age: 18
loves:
- sql
- php
- java
pet:
pName: tom
age: 2
@RestController
public class HelloController {

    @Autowired
    private User user;

    @RequestMapping("/user")
    public User user(){
        return  user;
    }
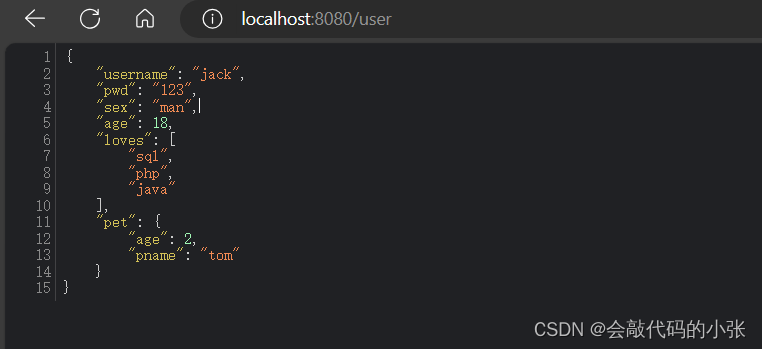
}结果:
        <dependency>
            <groupId>org.springframework.boot</groupId>
            <artifactId>spring-boot-configuration-processor</artifactId>
        </dependency>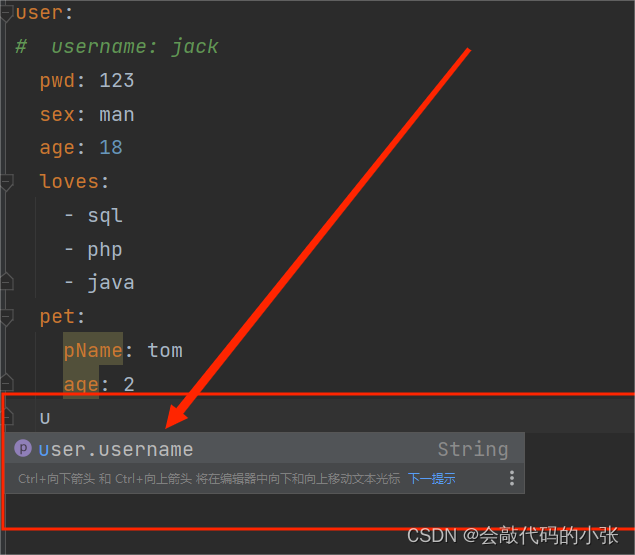
注意:
 <build>
        <plugins>
            <plugin>
                <groupId>org.springframework.boot</groupId>
                <artifactId>spring-boot-maven-plugin</artifactId>
                <configuration>
                    <excludes>
                        <exclude>
                            <groupId>org.projectlombok</groupId>
                            <artifactId>lombok</artifactId>
                        </exclude>
                        <exclude>
                            <groupId>org.springframework.boot</groupId>
                            <artifactId>spring-boot-configuration-processor</artifactId>
                        </exclude>
                    </excludes>
                </configuration>
            </plugin>
        </plugins>
    </build>
6.Web开发
6.1静态资源访问
6.1.1.静态资源目录
6.1.2.静态资源访问前缀
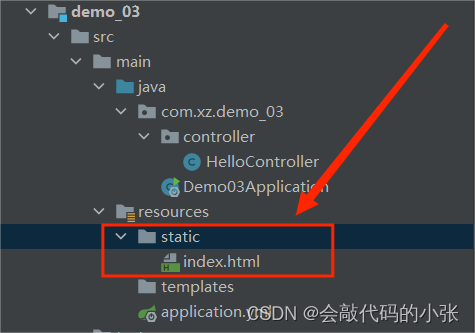
6.1.3.欢迎页
6.1.4静态配置原理
@AutoConfiguration(
    after = {DispatcherServletAutoConfiguration.class, TaskExecutionAutoConfiguration.class, ValidationAutoConfiguration.class}
)
@ConditionalOnWebApplication(
    type = Type.SERVLET
)
@ConditionalOnClass({Servlet.class, DispatcherServlet.class, WebMvcConfigurer.class})
@ConditionalOnMissingBean({WebMvcConfigurationSupport.class})
@AutoConfigureOrder(-2147483638)
public class WebMvcAutoConfiguration {
    public static final String DEFAULT_PREFIX = "";
    public static final String DEFAULT_SUFFIX = "";
    public static final PathPatternParser pathPatternParser = new PathPatternParser();
private static final String SERVLET_LOCATION = "/";WebMvcAutoConfiguration生效给容器中配置了什么呢?
  @Configuration(
        proxyBeanMethods = false
    )
    @Import({WebMvcAutoConfiguration.EnableWebMvcConfiguration.class})
    @EnableConfigurationProperties({WebMvcProperties.class, WebProperties.class})
    @Order(0)
    public static class WebMvcAutoConfigurationAdapter implements WebMvcConfigurer, ServletContextAware {
        private static final Log logger = LogFactory.getLog(WebMvcConfigurer.class);
        private final Resources resourceProperties;
        private final WebMvcProperties mvcProperties;
        private final ListableBeanFactory beanFactory;
        private final ObjectProvider<HttpMessageConverters> messageConvertersProvider;
        private final ObjectProvider<DispatcherServletPath> dispatcherServletPath;
        private final ObjectProvider<ServletRegistrationBean<?>> servletRegistrations;
        private final WebMvcAutoConfiguration.ResourceHandlerRegistrationCustomizer resourceHandlerRegistrationCustomizer;
        private ServletContext servletContext;
配置类只有一个有参构造器:有参构造器所有参数的值都会从容器中找
   public WebMvcAutoConfigurationAdapter(WebProperties webProperties, WebMvcProperties mvcProperties, ListableBeanFactory beanFactory, ObjectProvider<HttpMessageConverters> messageConvertersProvider, ObjectProvider<WebMvcAutoConfiguration.ResourceHandlerRegistrationCustomizer> resourceHandlerRegistrationCustomizerProvider, ObjectProvider<DispatcherServletPath> dispatcherServletPath, ObjectProvider<ServletRegistrationBean<?>> servletRegistrations) {
            this.resourceProperties = webProperties.getResources();
            this.mvcProperties = mvcProperties;
            this.beanFactory = beanFactory;
            this.messageConvertersProvider = messageConvertersProvider;
            this.resourceHandlerRegistrationCustomizer = (WebMvcAutoConfiguration.ResourceHandlerRegistrationCustomizer)resourceHandlerRegistrationCustomizerProvider.getIfAvailable();
            this.dispatcherServletPath = dispatcherServletPath;
            this.servletRegistrations = servletRegistrations;
            this.mvcProperties.checkConfiguration();
        }
- ResourceProperties resourceProperties;获取和spring.resources绑定的所有的值的对象
- WebMvcProperties mvcProperties获取和spring.mvc绑定的所有的值的对象
- ListableBeanFactory beanFactory Spring的beanFactory
- HttpMessageConverters 找到所有的HttpMessageConverters6 ResourceHandlerRegistrationCustomizer 找到 资源处理器的自定义器
- DispatcherServletPath8 //ServletRegistrationBean给应用注册Servlet、FilterI
public void addResourceHandlers(ResourceHandlerRegistry registry) { if (!this.resourceProperties.isAddMappings()) { logger.debug("Default resource handling disabled"); } else { this.addResourceHandler(registry, "/webjars/**", "classpath:/META-INF/resources/webjars/"); this.addResourceHandler(registry, this.mvcProperties.getStaticPathPattern(), (registration) -> { registration.addResourceLocations(this.resourceProperties.getStaticLocations()); if (this.servletContext != null) { ServletContextResource resource = new ServletContextResource(this.servletContext, "/"); registration.addResourceLocations(new Resource[]{resource}); } }); } }spring: web: resources: add-mappings: false
6.1.5rest风格
默认不开起
@Bean @ConditionalOnMissingBean({HiddenHttpMethodFilter.class}) @ConditionalOnProperty( prefix = "spring.mvc.hiddenmethod.filter", name = {"enabled"} ) public OrderedHiddenHttpMethodFilter hiddenHttpMethodFilter() { return new OrderedHiddenHttpMethodFilter(); }spring: mvc: hiddenmethod: filter: enabled: true
- 表单提交会带上_method=PUT
- 请求过来被HiddenHttpMethodFilter拦截
- 请求是否正常,并且是POST
- 获取到_method的值。兼容以下请求:PUT,DELETE,PATCH
- 原生request (post),包装模式requesWrapper重写了getMethod方法,返回的是传入的值。
- 过滤器链放行的时候用wrapper,以后的方法调用getMethod是调用requesWrapper的。
<a href="/car/3/user/jack">测试@PathVarable</a>
6.2普通参数与基本注解
6.2.1@PathVarable
<a href="/car/3/user/jack">测试@PathVarable</a>@GetMapping("/car/{id}/user/{username}")
public Map<String, Object> getCar(@PathVariable("id") Integer id, @PathVariable("username") String username,) {
Map<String, Object> map = new HashMap<>();
map.put("id", id);
map.put("username", username);
return map;
}
6.2.2@RequestBody
<form action="/testPost" method="post">
    用户名:<input type="text" name="username"><br>
     密码: <input type="text" name="pwd"><br>
          <input type="submit" value="提交"><br>
</form>@PostMapping("/testPost")
public Map<String,Object> postMethod(@RequestBody String content){
Map<String,Object> map=new HashMap<>();
map.put("content",content);
return map;
}
6.2.3@RequestAttribute
@RequestAttribute 获取请求域中的值
   @GetMapping("/goTo")
    public String goToPage(HttpServletRequest request) {
        request.setAttribute("msg","小张");
        request.setAttribute("code",200);
        return "forward:/success";
    }

    @GetMapping("/success")
    @ResponseBody
    public Map<String, Object> success(@RequestAttribute("msg") String msg, @RequestAttribute("code") Integer code){
        Map<String,Object> map=new HashMap<>();
        map.put("msg",msg);
        map.put("code",code);
        return map;
    }
6.2.4@MatrixVaribale
1.方式一:使用@Bean注解,给容器注入WebMvcConfigurer
@Configuration(proxyBeanMethods = false)
public class WebConfig {


    @Bean
    public WebMvcConfigurer webMvcConfigurer() {
        return new WebMvcConfigurer() {
            @Override
            public void configurePathMatch(PathMatchConfigurer configurer) {
                UrlPathHelper urlPathHelper = new UrlPathHelper();
                //设置为不移除分号后面的内容,矩阵变量生效
                urlPathHelper.setRemoveSemicolonContent(false);
                configurer.setUrlPathHelper(urlPathHelper);
            }
        };
    }
}2.方式二:实现接口WebMvcConfigurer
@Configuration(proxyBeanMethods = false)
public class WebConfig implements WebMvcConfigurer {
    @Override
    public void configurePathMatch(PathMatchConfigurer configurer) {
        UrlPathHelper urlPathHelper = new UrlPathHelper();
        //设置为不移除分号后面的内容,矩阵变量生效
        urlPathHelper.setRemoveSemicolonContent(false);
        configurer.setUrlPathHelper(urlPathHelper);
    }
}3.测试情况一:无相同的请求属性
<a href="/cars/sell;low=34;brand=byd,bm,bc">测试@MatrixVarable</a> @ResponseBody
@GetMapping("/cars/{path}")
public Map<String, Object> carsSell(@MatrixVariable("low") Integer low,
@MatrixVariable("brand") List<String> brand,
@PathVariable("path") String path) {
Map<String, Object> map = new HashMap<>();
map.put("low", low);
map.put("brand", brand);
map.put("path", path);
return map;
}
3.测试情况二:相同的请求属性
<a href="/boss/1;id=10/2;id=20">测试@MatrixVarable=====情况二</a><br> @ResponseBody
@RequestMapping("/boss/{bossId}/{empId}")
public Map<String, Object> boss(@MatrixVariable(value = "id", pathVar = "bossId") Integer bossId,
@MatrixVariable(value = "id", pathVar = "empId") Integer empId) {
Map<String, Object> map = new HashMap<>();
map.put("bossId",bossId);
map.put("empId",empId);
return map;
}
6.3视图解析与模板引擎
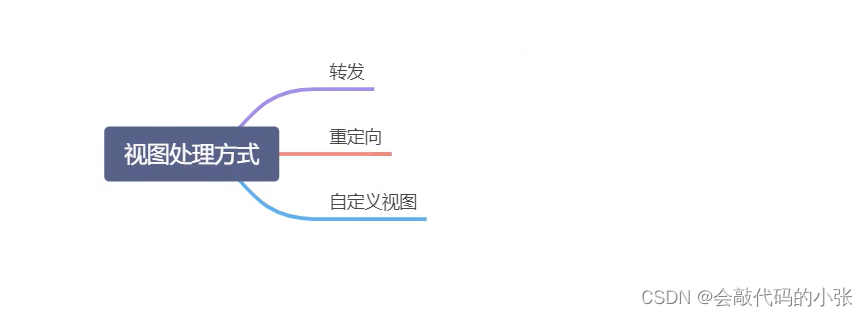
6.3.1视图解析
6.3.2Thymeleaf使用
1.引入依赖
        <dependency>
            <groupId>org.springframework.boot</groupId>
            <artifactId>spring-boot-starter-thymeleaf</artifactId>
</dependency>2.springboot已经自动配置好了thymeleaf
@AutoConfiguration(
    after = {WebMvcAutoConfiguration.class, WebFluxAutoConfiguration.class}
)
@EnableConfigurationProperties({ThymeleafProperties.class})
@ConditionalOnClass({TemplateMode.class, SpringTemplateEngine.class})
@Import({ReactiveTemplateEngineConfiguration.class, DefaultTemplateEngineConfiguration.class})
public class ThymeleafAutoConfiguration {3.开发的页面存放位置
public class ThymeleafProperties {
    private static final Charset DEFAULT_ENCODING;
    public static final String DEFAULT_PREFIX = "classpath:/templates/";
public static final String DEFAULT_SUFFIX = ".html";4.实例
@Controller
public class ViewController {

    @RequestMapping("/view")
    public String view(Model model){
        model.addAttribute("mgs","小张呀");
        return "success";
    }
}<html lang="en" xml:th="http://www.thymeleaf.org">
<!DOCTYPE html>
<html lang="en" xml:th="http://www.thymeleaf.org">
<head>
    <meta charset="UTF-8">
    <title>success</title>
</head>
<body>
<h1 th:text="${mgs}"></h1>
</body>
</html>
6.4拦截器
6.4.1.编写拦截器实现Handlerceptor接口
public class LoginInterceptor implements HandlerInterceptor {
    /**
     * 目标方法执行之前
     */
    @Override
    public boolean preHandle(HttpServletRequest request, HttpServletResponse response, Object handler) throws Exception {
        System.out.println("控制器方法执行前");
        return false;
    }

    /**
     * 目标方法执行以后
     */
    @Override
    public void postHandle(HttpServletRequest request, HttpServletResponse response, Object handler, ModelAndView modelAndView) throws Exception {
        System.out.println("控制器方法执行后");
    }

    /**
     * 页面渲染以后
     */
    @Override
    public void afterCompletion(HttpServletRequest request, HttpServletResponse response, Object handler, Exception ex) throws Exception {
        System.out.println("视图渲染后");
    }
}
6.4.2.拦截器注册到容器中
@Configuration
public class WebConfig {

    /**
     * 拦截器
     */
    @Bean
    public WebMvcConfigurer addInterceptors() {
        return new WebMvcConfigurer() {
            @Override
            public void addInterceptors(InterceptorRegistry registry) {
                registry.addInterceptor(new LoginInterceptor())
                        .addPathPatterns("/**")//所有请求都会被拦截,包括静态资源
                        .excludePathPatterns("/");//放行的请求
            }
        };
}6.5文件上传
spring:
  servlet:
    multipart:
      max-file-size: 10MB
      max-request-size: 100MB
<form th:action="@{/form}" method="post" enctype="multipart/form-data">
    头像:<input type="file" name="photo"><br>
    <input type="submit" value="上传">
</form>
@Controller
public class FormController {
@RequestMapping("/form")
public String form(@RequestPart("photo") MultipartFile photo) throws IOException {
if (!photo.isEmpty()) {
String filename = photo.getOriginalFilename();
photo.transferTo(new File("F:\" + filename));
}
return "form";
}
}6.6Web原生组件
2.使用@WebServlet注解
@WebServlet(urlPatterns = "/mv")
public class MyServlet extends HttpServlet {
    @Override
    protected void doGet(HttpServletRequest req, HttpServletResponse resp) throws ServletException, IOException {
        resp.getWriter().write("9999");
    }
}@ServletComponentScan(basePackages = "com.xz.demo_03")
@SpringBootApplication
public class Demo03Application {
public static void main(String[] args) {
SpringApplication.run(Demo03Application.class, args);
}
}7.数据访问
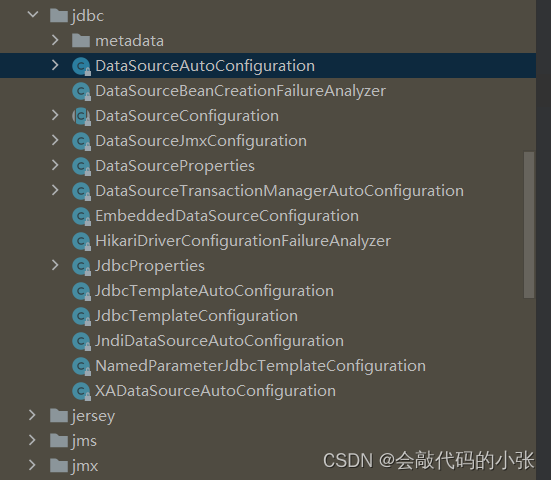
7.1数据源自动配置
自动配置的类:
- DataSourceAutoConfiguration:数据源的自动配置
1.导入jdbc场景
       <dependency>
            <groupId>org.springframework.boot</groupId>
            <artifactId>spring-boot-starter-data-jdbc</artifactId>
        </dependency>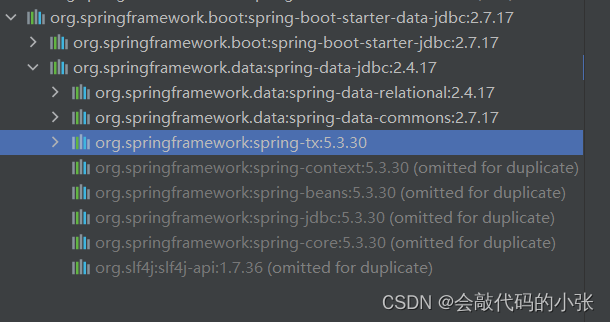
2.导入Mysql驱动
        <dependency>
            <groupId>mysql</groupId>
            <artifactId>mysql-connector-java</artifactId>
            <version>8.0.33</version>
</dependency>3.application.yml配置
spring:
  datasource:
    url: jdbc:mysql://localhost:3306/mybatis
    password: 123456
    username: root
    driver-class-name: com.mysql.cj.jdbc.Driver
7.2使用Druid数据源
1.引入依赖
        <dependency>
            <groupId>com.alibaba</groupId>
            <artifactId>druid-spring-boot-starter</artifactId>
            <version>1.2.16</version>
</dependency>2.自动配置分析
- 扩展配置项 spring.datasource.druid
- DruidSpringAopConfiguration.class,监控SpringBean的;配置项: spring.datasource.druid.aop–patterns
- DruidStatViewServletConfiguration.class,监控页的配置: spring.datasource.druid.stat-view–servlet;默认开启
- DruidWebStatFilterConfiguration.class, web监控配置; spring.datasource.druid.web-stat-filter;默认开启
- DruidFilterConfiguration.class))所有Druid自己filter的配置
3.application.yml
spring:
  datasource:
    url: jdbc:mysql://localhost:3306/mybatis
    password: 123456
    username: root
    driver-class-name: com.mysql.cj.jdbc.Driver

    druid:
      stat-view-servlet:
        enabled: true
        login-username: admin
        login-password: admin
        reset-enable: false

      web-stat-filter:
        enabled: true
        url-pattern: /*
        exclusions: '*.jsp,*.gif,*.jpg,*.png,*.css,*.ioc,/druid/*'
7.3整合mybatis
1.引入依赖
       <dependency>
            <groupId>org.mybatis.spring.boot</groupId>
            <artifactId>mybatis-spring-boot-starter</artifactId>
            <version>2.3.1</version>
</dependency>2.配置模式
3.配置流程
#配置mybatis
mybatis:
  #  config-location: classpath:mybatis/mybatis-config.xml #全局配置文件位置,
  #映射文件位置
  mapper-locations: classpath:mybatis/mapper/*.xml
  #指定 mybatis全局配置文件的相关配置
  configuration:
    #开启驼峰映射
map-underscore-to-camel-case: true4.实例
@Controller
@ResponseBody
public class UserController {


    @Autowired
    private UserService userService;


    @GetMapping("/getAllUser")
    public List<User> getUser(){
        return userService.getAllUser();
    }
}@Service
public class UserServiceImpl implements UserService {
@Autowired
private UserMapper userMapper;
@Override
public List<User> getAllUser() {
return userMapper.getAllUser();
}
}
dao:
注意@Mapper注解
@Mapper
public interface UserMapper {


    /**
     * 查询所有用户
     * @return
     */
    List<User> getAllUser();
}
映射文件:
<mapper namespace="com.xz.mapper.UserMapper">
    <select id="getAllUser" resultType="com.xz.pojo.User">
        select * from t_user
    </select>

</mapper>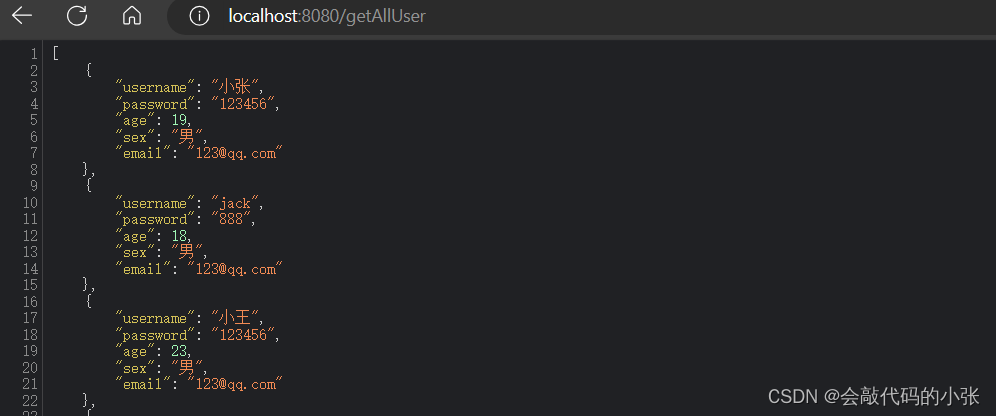
5.纯注解Mybatis
mapper:直接在mapper的方法使用查询类型的注解@Select即可
@Mapper
public interface EmpMapper {

    @Select("select * from t_emp")
    List<Emp> getAllEmp();
}6.总结
@MapperScan("com.xz.mapper")
@SpringBootApplication
public class Demo04Application {

    public static void main(String[] args) {
        SpringApplication.run(Demo04Application.class, args);
    }

}原文地址:https://blog.csdn.net/dfdg345/article/details/134174496
本文来自互联网用户投稿,该文观点仅代表作者本人,不代表本站立场。本站仅提供信息存储空间服务,不拥有所有权,不承担相关法律责任。
如若转载,请注明出处:http://www.7code.cn/show_50429.html
如若内容造成侵权/违法违规/事实不符,请联系代码007邮箱:suwngjj01@126.com进行投诉反馈,一经查实,立即删除!


