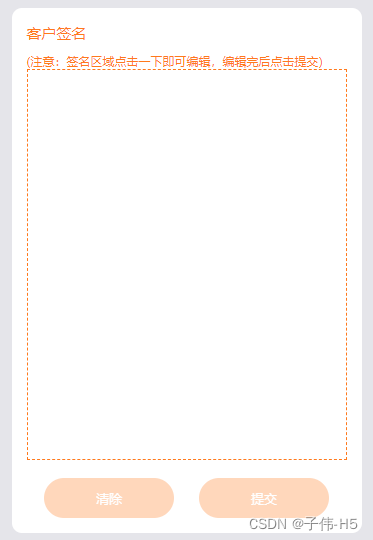
本文介绍: uniapp写微信小程序实现电子签名。写电子签名一定要注意的是一切全部按照手机上的适配来,为啥这么说呢,因为你在微信开发者工具中调试的时候认为是好的,正常的非常nice,当你发布版本的时候你会发现问题出来了。我下边的写法你可以直接用很简单。就是要记住canvas的几个属性和用法。实现签名我们用的是画布,不可能知道100%完美。所以这里我已经很合适的在设计了有啥问题可以留言。我把我的效果图看下看下希望对大家有帮助。
写电子签名一定要注意的是一切全部按照手机上的适配来,为啥这么说呢,因为你在微信开发者工具中调试的时候认为是好的,正常的非常nice,当你发布版本的时候你会发现问题出来了。我下边的写法你可以直接用很简单。就是要记住canvas的几个属性和用法。
直接上干货
1.签名样式页面
      <!-- 签名 -->
      <view class="wrapper n-sign">
        <view class="h3">人员签字</view>
        <view class="handCenter">
          <canvas class="handWriting" :disable-scroll="true" @touchstart="uploadScaleStart" @touchmove="uploadScaleMove"
            canvas-id="handWriting"></canvas>
        </view>
        <view class="footer">
          <view :class="{ button: 1, 'n-sign-disabled': (startX == null && startY == null) }" @tap="retDraw">清除</view>
          <view :class="{ button: 1, 'n-sign-disabled': (startX == null && startY == null) }" @tap="saveCanvasAsImg">提交
          </view>
        </view>
      </view>
2.记得定义
  data() {
    return {
      canvasName: 'handWriting',
      ctx: '',
      startX: null,
      startY: null,
      canvasWidth: 0,
      canvasHeight: 0,
      selectColor: 'black',
      lineColor: '#1A1A1A', // 颜色
      lineSize: 5, // 笔记倍数
      name: '', //用来区分多个签字

    };
  },
3.事件
  methods: {
// 笔迹开始
    uploadScaleStart(e) {
      this.startX = e.changedTouches[0].x
      this.startY = e.changedTouches[0].y
      //设置画笔参数
      //画笔颜色
      this.ctx.setStrokeStyle(this.lineColor)
      //设置线条粗细
      this.ctx.setLineWidth(this.lineSize)
      //设置线条的结束端点样式
      this.ctx.setLineCap("round") //'butt'、'round'、'square'
      //开始画笔
      this.ctx.beginPath()
    },
    // 笔迹移动
    uploadScaleMove(e) {
      //取点
      let temX = e.changedTouches[0].x
      let temY = e.changedTouches[0].y
      //画线条
      this.ctx.moveTo(this.startX, this.startY)
      this.ctx.lineTo(temX, temY)
      this.ctx.stroke()
      this.startX = temX
      this.startY = temY
      this.ctx.draw(true)
    },
    /**
     * 重写
     */
    retDraw() {
      if (this.startX == null && this.startY == null) {
        return;
      }
      this.ctx.clearRect(0, 0, 700, 730);
      this.ctx.draw();
      //设置canvas背景
      this.setCanvasBg('#fff');
      this.startX = null;
      this.startY = null;
    },


    //生成图片
    async saveCanvasAsImg() {
      if (this.startX == null && this.startY == null) {
        return;
      }
      uni.showLoading({
        mask: true
      })
      var res = await uni.canvasToTempFilePath({
        canvasId: 'handWriting',
        fileType: 'png',
        quality: 1, //图片质量

      });
      for (var i = 0; i < res.length; i++) {
        if (res[i] && res[i].tempFilePath) {
          res = await this.nupload(res[i].tempFilePath, 14);
          break;
        }
      }
      // res = await this.nupload(path, 13);
      uni.hideLoading();
      uni.showToast({ title: "已上传" })
    },

    //设置canvas背景色  不设置  导出的canvas的背景为透明
    //@params:字符串  color
    setCanvasBg(color) {

      /* 将canvas背景设置为 白底,不设置  导出的canvas的背景为透明 */
      //rect() 参数说明  矩形路径左上角的横坐标,左上角的纵坐标, 矩形路径的宽度, 矩形路径的高度
      //这里是 canvasHeight - 4 是因为下边盖住边框了,所以手动减了写
      this.ctx.rect(0, 0, this.canvasWidth, this.canvasHeight - 4);
      // ctx.setFillStyle('red')
      this.ctx.setFillStyle(color);
      this.ctx.fill(); //设置填充
      this.ctx.draw(); //开画
    },
    // 上传图片并返回上传结果
    async nupload(filePath, imgType) {
      if (!filePath) return; //如果 filePath 不存在,直接返回

      // 调用 postWaitWorkImage 方法发送 POST 请求上传图片,并传递了文件路径、参数等信息。
      // 若上传成功,将返回结果解析为 JSON 格式(如果不是JSON格式,则直接使用原始结果)。


      const res = await postWaitWorkImage({
        filePath,
        name: "file",
        params: { imgType, id: this.merInfo.id, },
      }).catch((e) => (console.log(e), false));
      let res_;
      try {
        res_ = JSON.parse(res);
      } catch {
        res_ = res;
      }

      if (res_.code === 200) {
        return res_;
      } else {
        uni.showToast({ title: "上传失败", icon: "error" });
        return false;
      }
    },
  },
4.页面触发
  onReady() {
    this.$nextTick(() => {
      this.name = 'handWriting1'
      this.ctx = uni.createCanvasContext("handWriting");
      this.$nextTick(() => {
        uni.createSelectorQuery().select('.handCenter').boundingClientRect(rect => {
          this.canvasWidth = rect.width;
          this.canvasHeight = rect.height;
          /* 将canvas背景设置为 白底,不设置  导出的canvas的背景为透明 */
          this.setCanvasBg('#fff');
        })
          .exec();
      });
    })
  },
5.样式
.handWriting {
  background: #fff;
  width: 640rpx;
  height: 783rpx;
  border-radius: 20rpx;
  border: 1px solid #ff791c;
  overflow: hidden;
}

.handCenter {
  margin-bottom: 36rpx;

}
6.需要注意的是
实现签名我们用的是画布,不可能知道100%完美。所以这里我已经很合适的在设计了有啥问题可以留言。我把我的效果图看下看下希望对大家有帮助

原文地址:https://blog.csdn.net/weixin_57031986/article/details/135595926
本文来自互联网用户投稿,该文观点仅代表作者本人,不代表本站立场。本站仅提供信息存储空间服务,不拥有所有权,不承担相关法律责任。
如若转载,请注明出处:http://www.7code.cn/show_57986.html
如若内容造成侵权/违法违规/事实不符,请联系代码007邮箱:suwngjj01@126.com进行投诉反馈,一经查实,立即删除!
声明:本站所有文章,如无特殊说明或标注,均为本站原创发布。任何个人或组织,在未征得本站同意时,禁止复制、盗用、采集、发布本站内容到任何网站、书籍等各类媒体平台。如若本站内容侵犯了原著者的合法权益,可联系我们进行处理。


