在异步任务执行的时候,我们知道其背后都有一个线程池来执行任务,但是为了控制异步任务的并发不影响到应用的正常运作,我们需要对线程池做好相关的配置,以防资源过度使用。这个时候我们就考虑将线程池进行隔离了。
-
控制资源:通过隔离异步任务的线程池,可以更好地控制系统的资源使用。不同类型的异步任务可能对系统资源的需求不同,例如某些任务可能需要更多的线程数或更大的队列容量。通过隔离线程池,可以为每种类型的任务分配适当的资源,避免资源争用和过度消耗。
-
优化性能:隔离异步任务的线程池可以帮助优化系统的性能。如果所有的异步任务共享同一个线程池,当某个任务出现阻塞或执行时间过长时,可能会影响其他任务的执行。通过隔离线程池,可以确保每个任务都有独立的线程池资源,提高系统的并发能力和响应性能。
-
业务隔离:有时候,不同的业务逻辑可能需要不同的异步任务处理方式。通过隔离线程池,可以为每个业务逻辑定义独立的线程池,以满足不同业务的需求。例如,某些任务可能需要更高的优先级或更短的超时时间,而另一些任务可能需要更大的线程池容量。通过隔离线程池,可以更好地管理和调整每个业务逻辑的异步任务执行环境。
下面看一个demo:
demo
-
创建自定义的线程池:首先,你可以创建一个自定义的线程池,用于处理
@Async注解标记的异步任务。可以使用ThreadPoolTaskExecutor类来创建线程池。@Configuration @EnableAsync public class AsyncConfig implements AsyncConfigurer { @Bean(name = "asyncTaskExecutor") public Executor asyncTaskExecutor() { ThreadPoolTaskExecutor executor = new ThreadPoolTaskExecutor(); // 配置线程池属性 executor.setCorePoolSize(10); executor.setMaxPoolSize(20); executor.setQueueCapacity(100); executor.setThreadNamePrefix("AsyncTask-"); executor.initialize(); return executor; } @Override public Executor getAsyncExecutor() { return asyncTaskExecutor(); } }在上述示例中,我们创建了一个名为
asyncTaskExecutor的线程池,并配置了核心线程数、最大线程数、队列容量等属性。 -
在异步任务方法上指定线程池:接下来,你可以在需要异步执行的方法上使用
@Async注解,并通过value属性指定要使用的线程池。@Service public class MyService { @Async("asyncTaskExecutor") public void asyncMethod() { // 异步任务的具体逻辑 } }在上述示例中,我们使用
@Async("asyncTaskExecutor")注解将asyncMethod()方法标记为异步任务,并指定了使用名为asyncTaskExecutor的线程池。
实际案例
@EnableAsync
@Configuration
public class TaskPoolConfig {

    @Bean
    public Executor taskExecutor1() {
        ThreadPoolTaskExecutor executor = new ThreadPoolTaskExecutor();
        executor.setCorePoolSize(2);
        executor.setMaxPoolSize(2);
        executor.setQueueCapacity(10);
        executor.setKeepAliveSeconds(60);
        //使用线程名前缀,可以用来观察顺序
        executor.setThreadNamePrefix("executor-1-");
        executor.setRejectedExecutionHandler(new ThreadPoolExecutor.CallerRunsPolicy());
        return executor;
    }

    @Bean
    public Executor taskExecutor2() {
        ThreadPoolTaskExecutor executor = new ThreadPoolTaskExecutor();
        executor.setCorePoolSize(2);
        executor.setMaxPoolSize(2);
        executor.setQueueCapacity(10);
        executor.setKeepAliveSeconds(60);
        executor.setThreadNamePrefix("executor-2-");
        executor.setRejectedExecutionHandler(new ThreadPoolExecutor.CallerRunsPolicy());
        return executor;
    }
}
@Slf4j
@Component
public class AsyncTasks {
public static Random random = new Random();
@Async("taskExecutor1")
public CompletableFuture<String> doTaskOne(String taskNo) throws Exception {
log.info("开始任务:{}", taskNo);
long start = System.currentTimeMillis();
Thread.sleep(random.nextInt(10000));
long end = System.currentTimeMillis();
log.info("完成任务:{},耗时:{} 毫秒", taskNo, end - start);
return CompletableFuture.completedFuture("任务完成");
}
@Async("taskExecutor2")
public CompletableFuture<String> doTaskTwo(String taskNo) throws Exception {
log.info("开始任务:{}", taskNo);
long start = System.currentTimeMillis();
Thread.sleep(random.nextInt(10000));
long end = System.currentTimeMillis();
log.info("完成任务:{},耗时:{} 毫秒", taskNo, end - start);
return CompletableFuture.completedFuture("任务完成");
}
}
@Slf4j
@SpringBootTest
public class ApplicationTests {

    @Autowired
    private AsyncTasks asyncTasks;

    @Test
    public void test() throws Exception {
        long start = System.currentTimeMillis();

        // 线程池1
        CompletableFuture<String> task1 = asyncTasks.doTaskOne("1");
        CompletableFuture<String> task2 = asyncTasks.doTaskOne("2");
        CompletableFuture<String> task3 = asyncTasks.doTaskOne("3");

        // 线程池2
        CompletableFuture<String> task4 = asyncTasks.doTaskTwo("4");
        CompletableFuture<String> task5 = asyncTasks.doTaskTwo("5");
        CompletableFuture<String> task6 = asyncTasks.doTaskTwo("6");

        // 一起执行
        CompletableFuture.allOf(task1, task2, task3, task4, task5, task6).join();

        long end = System.currentTimeMillis();

        log.info("任务全部完成,总耗时:" + (end - start) + "毫秒");
    }

}
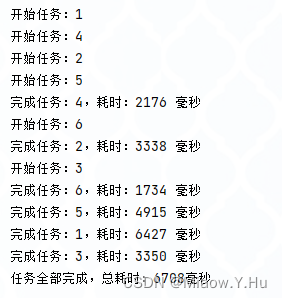
在上面的单元测试中,一共启动了6个异步任务,前三个用的是线程池1,后三个用的是线程池2。
先不执行,根据设置的核心线程2和最大线程数2,我们来猜猜线程的执行顺序。
-
任务task3会在task1或task2完成之后,开始执行
-
任务task6会在task4或task5完成之后,开始执行
执行结果:
通过以上步骤,你可以实现对@Async异步任务的线程池进行隔离。这样可以根据需要创建多个线程池,并为不同的异步任务指定不同的线程池,以实现任务之间的隔离和资源控制。通过隔离@Async异步任务的线程池,可以实现对系统资源的控制、性能的优化和业务逻辑的隔离。这样可以提高系统的稳定性、可伸缩性和灵活性,更好地满足不同业务场景下的需求。
原文地址:https://blog.csdn.net/qq_45922256/article/details/134653466
本文来自互联网用户投稿,该文观点仅代表作者本人,不代表本站立场。本站仅提供信息存储空间服务,不拥有所有权,不承担相关法律责任。
如若转载,请注明出处:http://www.7code.cn/show_14453.html
如若内容造成侵权/违法违规/事实不符,请联系代码007邮箱:suwngjj01@126.com进行投诉反馈,一经查实,立即删除!