系统ViewGroup原理解析
常见的布局容器: FrameLayout, LinearLayout,RelativeLayoout,GridLayout
后起之秀:ConstraintLayout,CoordinateLayout
@Override
    protected void onMeasure(int widthMeasureSpec, int heightMeasureSpec) {
        if (mOrientation == VERTICAL) {
            measureVertical(widthMeasureSpec, heightMeasureSpec);
        } else {
            measureHorizontal(widthMeasureSpec, heightMeasureSpec);
        }
    }
onMeasure(int widthMeasureSpec, int heightMeasureSpec) 源码如上所示,通过 mOrientation 分别处理垂直和水平两个方向的测量,其中的 mOrientation 变量则是我们在 xml 布局文件中通过 android:orientation=“vertical” 或者直接通过 setOrientation(@OrientationMode int orientation) 方法设置的 LinearLayout 文件方向变量
我们仅分析垂直方向的测量方法,也就是 measureVertical(int widthMeasureSpec, int heightMeasureSpec)(水平方向的测量方法 measureHorizontal(int widthMeasureSpec, int heightMeasureSpec) 是类似的原理,有兴趣的朋友可以自己分析)
初始化变量
需要初始化一些类变量 & 声明一些重要的局部变量
void measureVertical(int widthMeasureSpec, int heightMeasureSpec) {
//第一阶段,主要是一些变量的初始化
mTotalLength = 0;// 所有 childView 的高度和 + 本身的 padding,注意:它和 LinearLayout 本身的高度是不同的
int maxWidth = 0;// 所有 childView 中宽度的最大值
int childState = 0;
int alternativeMaxWidth = 0;// 所有 layout_weight <= 0 的 childView 中宽度的最大值
int weightedMaxWidth = 0;// 所有 layout_weight >0 的 childView 中宽度的最大值
boolean allFillParent = true;
float totalWeight = 0;// 所有 childView 的 weight 之和
final int count = getVirtualChildCount();
final int widthMode = MeasureSpec.getMode(widthMeasureSpec);
final int heightMode = MeasureSpec.getMode(heightMeasureSpec);
boolean matchWidth = false;
boolean skippedMeasure = false;
final int baselineChildIndex = mBaselineAlignedChildIndex;
final boolean useLargestChild = mUseLargestChild;
int largestChildHeight = Integer.MIN_VALUE;
int consumedExcessSpace = 0;
int nonSkippedChildCount = 0;
}
第一次测量
在测量第一阶段会计算那些没有设置 weight 的 childView 的高度、计算 mTotleLength,并且计算三个宽度相关的变量的值
void measureVertical(int widthMeasureSpec, int heightMeasureSpec) {
//第二阶段,第一次测量,接上面代码
// See how tall everyone is. Also remember max width.
//第一遍循环,看看每个childview的高度,并且记录最大宽度
for (int i = 0; i < count; ++i) {//一层for循环
final View child = getVirtualChildAt(i);//获取到每一个childview
if (child == null) {
mTotalLength += measureNullChild(i);
continue;
}
if (child.getVisibility() == View.GONE) {
i += getChildrenSkipCount(child, i);
continue;
}
nonSkippedChildCount++;
if (hasDividerBeforeChildAt(i)) {
mTotalLength += mDividerHeight;
}
final LayoutParams lp = (LayoutParams) child.getLayoutParams();
totalWeight += lp.weight;//计算总权重
final boolean useExcessSpace = lp.height == 0 && lp.weight > 0;//使用了权重才会满足
// 我们都知道,测量模式有三种:
// * UNSPECIFIED:父控件对子控件无约束
// * Exactly:父控件对子控件强约束,子控件永远在父控件边界内,越界则裁剪。如果要记忆的话,可以记忆为有对应的具体数值或者是Match_parent
// * AT_Most:子控件为wrap_content的时候,测量值为AT
if (heightMode == MeasureSpec.EXACTLY && useExcessSpace) {//确切高度,且height=0 权重>0
// Optimization: don't bother measuring children who are only
// laid out using excess space. These views will get measured
// later if we have space to distribute.
//先跳过测量模式为EXACTLY并且需要权重计算的childview
// 在后面第三个 for 循环重新计算此 childView 大小
final int totalLength = mTotalLength;
mTotalLength = Math.max(totalLength, totalLength + lp.topMargin + lp.bottomMargin);
skippedMeasure = true;//后面跳过Measure
} else {//高度不是确定可能是AT_MOST/UNSPECIFIED
if (useExcessSpace) {
// The heightMode is either UNSPECIFIED or AT_MOST, and
// this child is only laid out using excess space. Measure
// using WRAP_CONTENT so that we can find out the view's
// optimal height. We'll restore the original height of 0
// after measurement.
//把使用权重的childview的高度设置为wrap_content
lp.height = LayoutParams.WRAP_CONTENT;
}
// Determine how big this child would like to be. If this or
// previous children have given a weight, then we allow it to
// use all available space (and we will shrink things later
// if needed).
//这是非常重要的一个方法,将会决定每个 childView 的大小
//如果此 childView 及在此 childView 之前的 childView 中使用了 weight 属性,
// 我们允许此 childView 使用所有的空间(后续如果需要,再做调整)
final int usedHeight = totalWeight == 0 ? mTotalLength : 0;
//调用viewgroup中方法测量子view
measureChildBeforeLayout(child, i, widthMeasureSpec, 0,
heightMeasureSpec, usedHeight);
// 得到测量之后的 childView 的 childHeight
final int childHeight = child.getMeasuredHeight();
if (useExcessSpace) {
// Restore the original height and record how much space
// we've allocated to excess-only children so that we can
// match the behavior of EXACTLY measurement.
lp.height = 0;
consumedExcessSpace += childHeight;
}
// 将此 childView 的 childHeight 加入到 mTotalLength 中
// 并加上 childView 的 topMargin 和 bottomMargin
// getNextLocationOffset 方法返回 0,方便以后扩展使用
final int totalLength = mTotalLength;
mTotalLength = Math.max(totalLength, totalLength + childHeight + lp.topMargin +
lp.bottomMargin + getNextLocationOffset(child));
if (useLargestChild) {
largestChildHeight = Math.max(childHeight, largestChildHeight);//记录最大子view高度
}
}
// 下面两个 if 判断都和 `android:baselineAlignedChildIndex` 属性有关,这里不展开分析
/**
* If applicable, compute the additional offset to the child's baseline
* we'll need later when asked {@link #getBaseline}.
*/
if ((baselineChildIndex >= 0) && (baselineChildIndex == i + 1)) {
mBaselineChildTop = mTotalLength;
}
// if we are trying to use a child index for our baseline, the above
// book keeping only works if there are no children above it with
// weight. fail fast to aid the developer.
if (i < baselineChildIndex && lp.weight > 0) {
throw new RuntimeException("A child of LinearLayout with index "
+ "less than mBaselineAlignedChildIndex has weight > 0, which "
+ "won't work. Either remove the weight, or don't set "
+ "mBaselineAlignedChildIndex.");
}
boolean matchWidthLocally = false;//该子view是否需要测量宽度
// 所有 widthMode 是 `MeasureSpec.EXACTLY`,不会进入此 if 判断
if (widthMode != MeasureSpec.EXACTLY && lp.width == LayoutParams.MATCH_PARENT) {
// The width of the linear layout will scale, and at least one
// child said it wanted to match our width. Set a flag
// indicating that we need to remeasure at least that view when
// we know our width.
// 当父类(LinearLayout)不是match_parent或者精确值的时候,但子控件却是一个match_parent
// 那么matchWidthLocally和matchWidth置为true
// 意味着这个控件将会占据父类(水平方向)的所有空间
matchWidth = true;
matchWidthLocally = true;
}
// 计算三个和宽度相关的变量值
final int margin = lp.leftMargin + lp.rightMargin;
final int measuredWidth = child.getMeasuredWidth() + margin;
maxWidth = Math.max(maxWidth, measuredWidth);
childState = combineMeasuredStates(childState, child.getMeasuredState());//获取子viewmeasure后的state状态
allFillParent = allFillParent && lp.width == LayoutParams.MATCH_PARENT;
if (lp.weight > 0) {
//需要计算权重的
/*
* Widths of weighted Views are bogus if we end up
* remeasuring, so keep them separate.
* alternative 可供选择的
*/
weightedMaxWidth = Math.max(weightedMaxWidth,
matchWidthLocally ? margin : measuredWidth);
} else {
//如果不需要计算权重走这里
alternativeMaxWidth = Math.max(alternativeMaxWidth,
matchWidthLocally ? margin : measuredWidth);
}
i += getChildrenSkipCount(child, i);
}//for循环结束
// 如果存在没有跳过的 childView 并且需要绘制 end divider 则需要加上 end 位置的 divider 的高度
if (nonSkippedChildCount > 0 && hasDividerBeforeChildAt(count)) {
mTotalLength += mDividerHeight;
}
measureChildBeforeLayout()
在此方法中将会计算每个 childView 的大小,调用 ViewGroup 的 measureChildWithMargins() 方法计算每个 childView 的大小,在测量垂直方向的 childView 时,有一个非常重要的参数需要注意,即:heightUsed,根据英文注释,heightUsed 是指在垂直方向,已经被 parentView 或者 parentView 的其他 childView 使用了的空间
void measureChildBeforeLayout(View child, int childIndex,
            int widthMeasureSpec, int totalWidth, int heightMeasureSpec,
            int totalHeight) {
        measureChildWithMargins(child, widthMeasureSpec, totalWidth,
                heightMeasureSpec, totalHeight);
    }
第二次测量
如果进入这个 if 条件,会进行第二次的 for 循环遍历 childView,重新计算 mTotalLength
void measureVertical(int widthMeasureSpec, int heightMeasureSpec) {
//接上面代码
if (useLargestChild &&
                (heightMode == MeasureSpec.AT_MOST || heightMode == MeasureSpec.UNSPECIFIED)) {
            mTotalLength = 0;

            //重新计算总高度:每个非gone的view的高度都按 上次循环记录的最大子view的高度计算,再加上margin
            for (int i = 0; i < count; ++i) {
                final View child = getVirtualChildAt(i);
                if (child == null) {
                    mTotalLength += measureNullChild(i);
                    continue;
                }

                if (child.getVisibility() == GONE) {
                    i += getChildrenSkipCount(child, i);
                    continue;
                }

                final LinearLayout.LayoutParams lp = (LinearLayout.LayoutParams)
                        child.getLayoutParams();
                // Account for negative margins
                final int totalLength = mTotalLength;
                mTotalLength = Math.max(totalLength, totalLength + largestChildHeight +
                        lp.topMargin + lp.bottomMargin + getNextLocationOffset(child));
            }
        }
测量第三阶段
针对设置了 android:layout_weight 属性的布局,重新计算 mTotalLength
void measureVertical(int widthMeasureSpec, int heightMeasureSpec) {
//接上面代码
        // Add in our padding
        mTotalLength += mPaddingTop + mPaddingBottom;

        int heightSize = mTotalLength;

        // Check against our minimum height

        // 通过 getSuggestedMinimumHeight() 得到建议最小高度,并和计算得到的
        // mTotalLength 比较取最大值
        heightSize = Math.max(heightSize, getSuggestedMinimumHeight());

        // Reconcile our calculated size with the heightMeasureSpec
       // 通过 heightMeasureSpec,调整 heightSize 的大小
        int heightSizeAndState = resolveSizeAndState(heightSize, heightMeasureSpec, 0);
        heightSize = heightSizeAndState & MEASURED_SIZE_MASK;
        // Either expand children with weight to take up available space or
        // shrink them if they extend beyond our current bounds. If we skipped
        // measurement on any children, we need to measure them now.

        // 重新计算有 weight 属性的 childView 大小,
        // 如果还有可用的空间,则扩展 childView,计算其大小
        // 如果 childView 超出了 LinearLayout 的边界,则收缩 childView
        int remainingExcess = heightSize - mTotalLength
                + (mAllowInconsistentMeasurement ? 0 : consumedExcessSpace);
        if (skippedMeasure
                || ((sRemeasureWeightedChildren || remainingExcess != 0) && totalWeight > 0.0f)) {
            // 根据 mWeightSum 计算得到 remainingWeightSum,mWeightSum 是通过
            // `android:weightSum` 属性设置的,totalWeight 是通过第一次 for 循环计算得到的
            float remainingWeightSum = mWeightSum > 0.0f ? mWeightSum : totalWeight;
            // 将 mTotalLength 复位为 0
            mTotalLength = 0;
            // 权重childview的测量,开始真正的第二次 for 循环遍历每一个 childView,重新测量每一个 childView
            for (int i = 0; i < count; ++i) {
                final View child = getVirtualChildAt(i);
                if (child == null || child.getVisibility() == View.GONE) {
                    continue;
                }

                final LayoutParams lp = (LayoutParams) child.getLayoutParams();
                final float childWeight = lp.weight
               // 如果该 childView 设置了 `weight` 值,则进入 if 语句块
                if (childWeight > 0) {
                    // 这是设置了 weight 的情况下,最重要的一行代码
                    // remainingExcess 剩余高度 * ( childView 的 weight / remainingWeightSum)
                    // share 便是此 childView 通过这个公式计算得到的高度,
                    // 并重新计算剩余高度 remainingExcess 和剩余权重总和 remainingWeightSum
                    final int share = (int) (childWeight * remainingExcess / remainingWeightSum);
                    remainingExcess -= share;
                    remainingWeightSum -= childWeight;

                   // 通过下面的 if 条件重新计算,childHeight 是最终 childView 的真正高度
                    final int childHeight;
                    if (mUseLargestChild && heightMode != MeasureSpec.EXACTLY) {
                        childHeight = largestChildHeight;
                    } else if (lp.height == 0 && (!mAllowInconsistentMeasurement
                            || heightMode == MeasureSpec.EXACTLY)) {
                        // This child needs to be laid out from scratch using
                        // only its share of excess space.
                        childHeight = share;
                    } else {
                        // This child had some intrinsic height to which we
                        // need to add its share of excess space.
                        childHeight = child.getMeasuredHeight() + share;
                    }

                    // 计算 childHeightMeasureSpec & childWidthMeasureSpec,并调用 child.measure() 方法
                    final int childHeightMeasureSpec = MeasureSpec.makeMeasureSpec(
                            Math.max(0, childHeight), MeasureSpec.EXACTLY);
                    final int childWidthMeasureSpec = getChildMeasureSpec(widthMeasureSpec,
                            mPaddingLeft + mPaddingRight + lp.leftMargin + lp.rightMargin,
                            lp.width);
                    child.measure(childWidthMeasureSpec, childHeightMeasureSpec);

                    // Child may now not fit in vertical dimension.
                    childState = combineMeasuredStates(childState, child.getMeasuredState()
                            & (MEASURED_STATE_MASK>>MEASURED_HEIGHT_STATE_SHIFT));
                }

                final int margin =  lp.leftMargin + lp.rightMargin;
                final int measuredWidth = child.getMeasuredWidth() + margin;
                maxWidth = Math.max(maxWidth, measuredWidth);

                boolean matchWidthLocally = widthMode != MeasureSpec.EXACTLY &&
                        lp.width == LayoutParams.MATCH_PARENT;

                alternativeMaxWidth = Math.max(alternativeMaxWidth,
                        matchWidthLocally ? margin : measuredWidth);

                allFillParent = allFillParent && lp.width == LayoutParams.MATCH_PARENT;

                // 考虑 childView.topMargin & childView.bottomMargin,重新计算 mTotalLength
                final int totalLength = mTotalLength;
                mTotalLength = Math.max(totalLength, totalLength + child.getMeasuredHeight() +
                        lp.topMargin + lp.bottomMargin + getNextLocationOffset(child));
            }

            // Add in our padding
           // 完成 for 循环之后,加入 LinearLayout 本身的 mPaddingTop & mPaddingBottom
            mTotalLength += mPaddingTop + mPaddingBottom;
            // TODO: Should we recompute the heightSpec based on the new total length?
        } else {
            // 重新计算 alternativeMaxWidth
            alternativeMaxWidth = Math.max(alternativeMaxWidth,
                                           weightedMaxWidth);


            // We have no limit, so make all weighted views as tall as the largest child.
            // Children will have already been measured once.
            if (useLargestChild && heightMode != MeasureSpec.EXACTLY) {
                for (int i = 0; i < count; i++) {
                    final View child = getVirtualChildAt(i);
                    if (child == null || child.getVisibility() == View.GONE) {
                        continue;
                    }

                    final LinearLayout.LayoutParams lp =
                            (LinearLayout.LayoutParams) child.getLayoutParams();

                    float childExtra = lp.weight;
                    if (childExtra > 0) {
                        child.measure(
                                MeasureSpec.makeMeasureSpec(child.getMeasuredWidth(),
                                        MeasureSpec.EXACTLY),
                                MeasureSpec.makeMeasureSpec(largestChildHeight,
                                        MeasureSpec.EXACTLY));
                    }
                }
            }
        }

        if (!allFillParent && widthMode != MeasureSpec.EXACTLY) {
            maxWidth = alternativeMaxWidth;
        }

        // 调整 width 大小
        maxWidth += mPaddingLeft + mPaddingRight;

        // Check against our minimum width
        maxWidth = Math.max(maxWidth, getSuggestedMinimumWidth());

        // 调用 setMeasuredDimension() 设置 LinearLayout 的大小
        setMeasuredDimension(resolveSizeAndState(maxWidth, widthMeasureSpec, childState),
                heightSizeAndState);

        //最后,设置LinearLayout的size大小和状态,如果LinearLayout有设置width为match_parent的话,将会调用forceUniformWidth再测量一次所有的subchild,这里主要是测量subchild的width大小
        if (matchWidth) {
            forceUniformWidth(count, heightMeasureSpec);
        }
假如一共有3个subchild且都有设置weight ,分别为3、2、1,我们假设剩余的space为120,则第一个view的大小为120 * 3/(3+2+1)=60,第二个view的大小为(120-60)*2/(2+1)=40,第3个view的大小为(60-40)*1/1 = 20
resolveSizeAndState
public static int resolveSizeAndState(int size, int measureSpec, int childMeasuredState) {
        final int specMode = MeasureSpec.getMode(measureSpec);
        final int specSize = MeasureSpec.getSize(measureSpec);
        final int result;
        switch (specMode) {
            case MeasureSpec.AT_MOST:
                if (specSize < size) {
                    result = specSize | MEASURED_STATE_TOO_SMALL;
                } else {
                    result = size;
                }
                break;
            case MeasureSpec.EXACTLY:
                result = specSize;
                break;
            case MeasureSpec.UNSPECIFIED:
            default:
                result = size;
        }
        return result | (childMeasuredState & MEASURED_STATE_MASK);
    }
总结
1.LinearLayout针对设置weight与不设置weight的情况分别处理
2.在 LinearLayout 中总共有 3 个 for 循环,分别处理不同的流程
- 第一个 for 循环,只会在不使用 weight 属性时进入,并有可能会测量每个 childView 的大小
- 第二个 for 循环,在使用 android:measureWithLargestChild 时才会进入,并且即使进入也不会调用 childView 的测量方法,只会更新 mTotalLength 变量
- 第三个 for 循环,只会在使用 weight 属性时进入,并测量每个 childView 的大小
自定义View总结
自定义UI基础
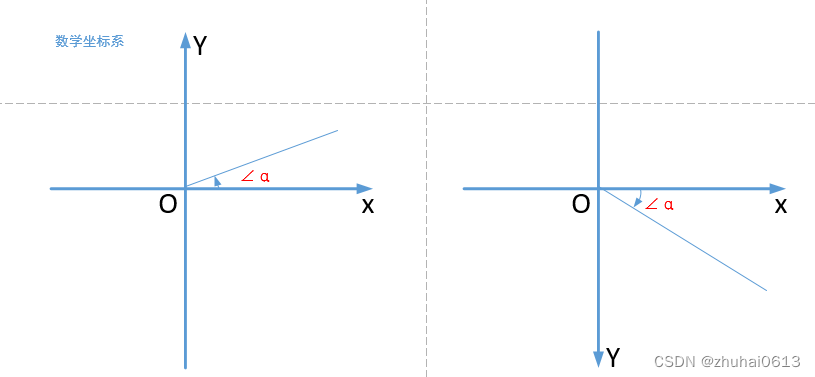
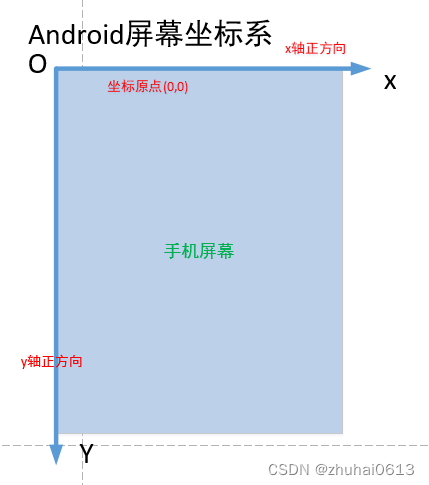
Android的坐标系

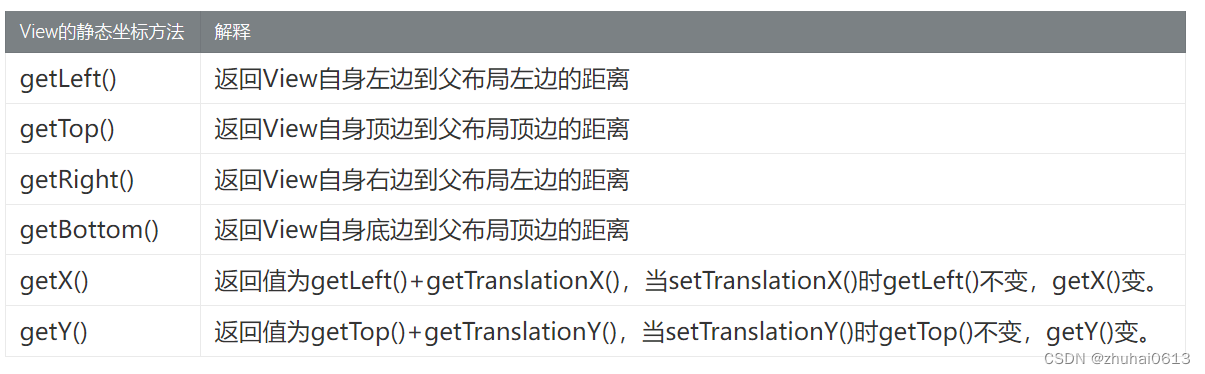

获取view位置

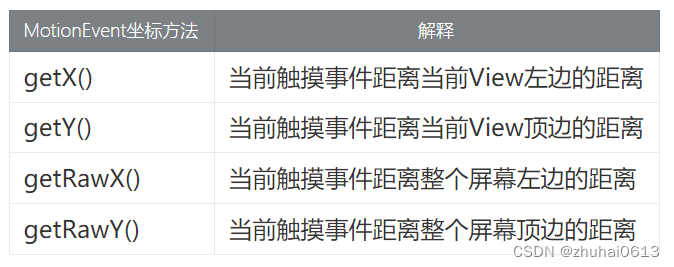
View滑动相关坐标系
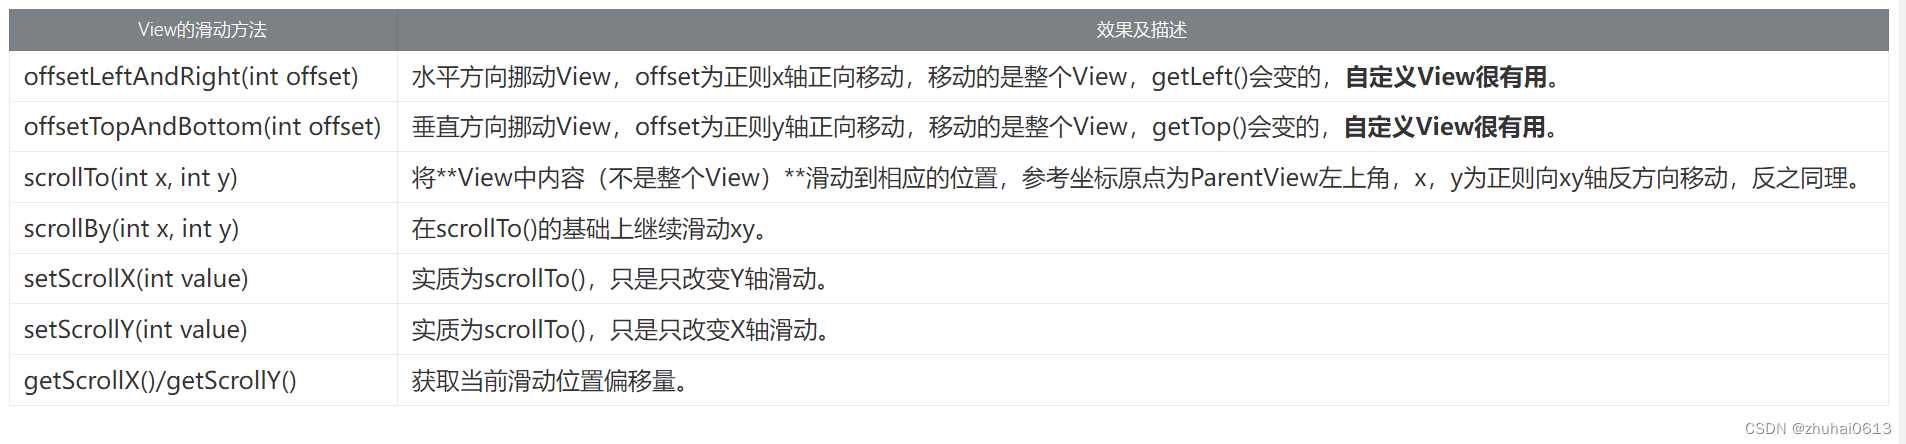
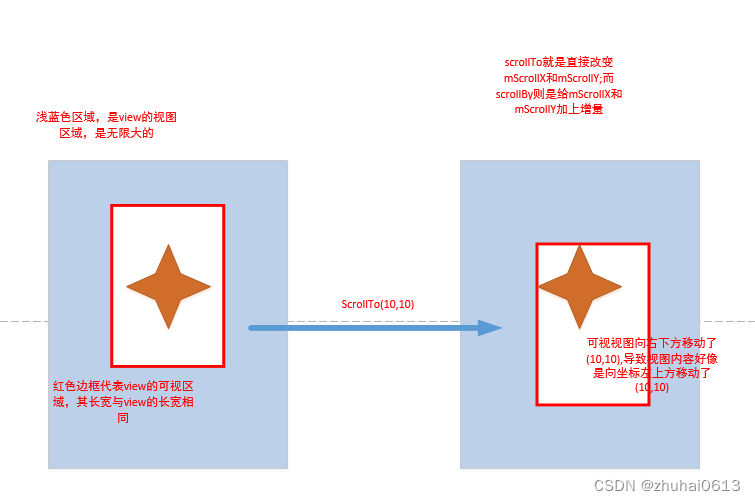
View的scrollTo()和scrollBy()是用于滑动View中的内容,而不是改变View的位置;改变View在屏幕中的位置可以使用offsetLeftAndRight()和offsetTopAndBottom()方法,他会导致getLeft()等值改变
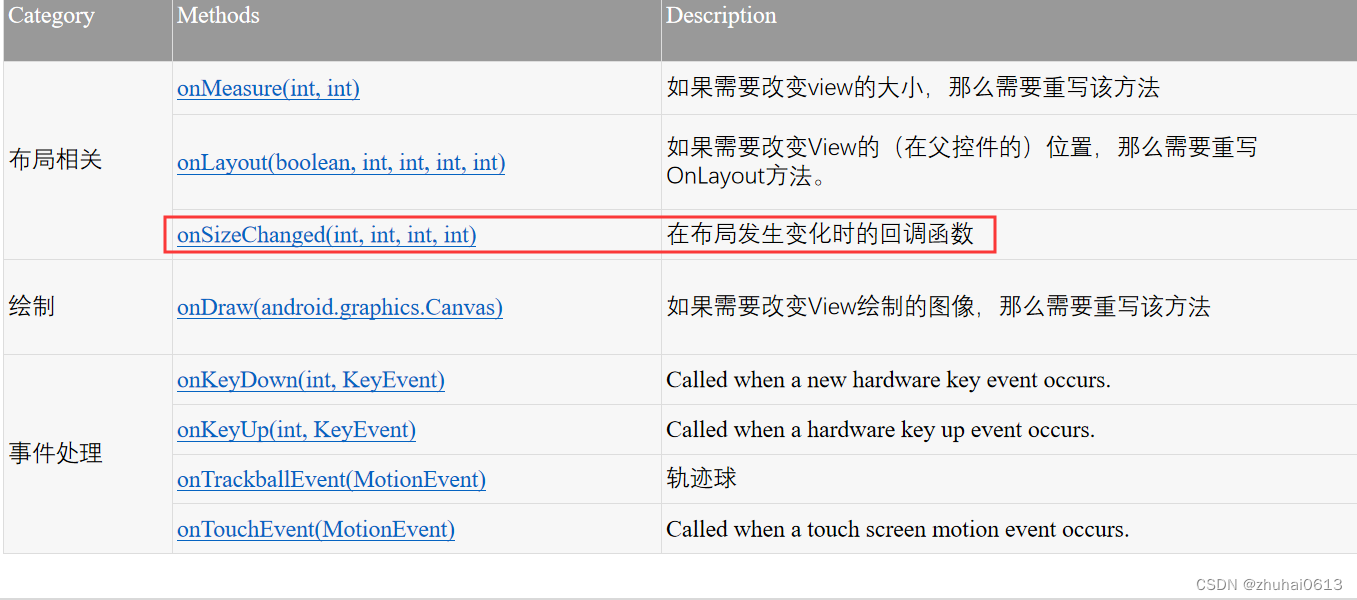
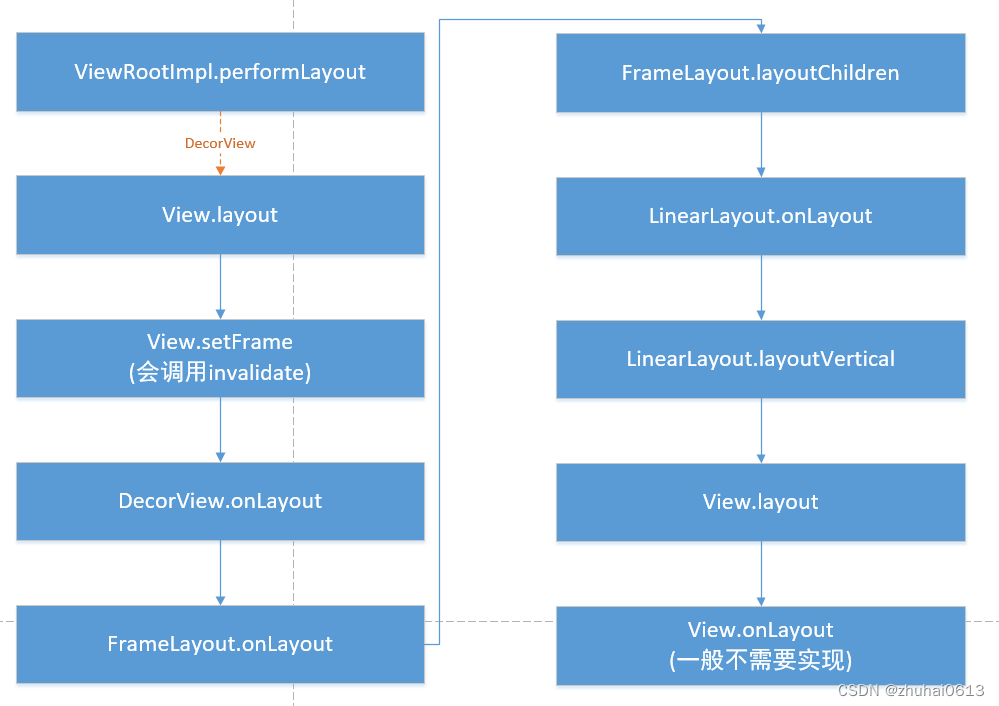
- 自定义View的基本方法
自定义View的最基本的三个方法分别是: onMeasure()、onLayout()、onDraw();
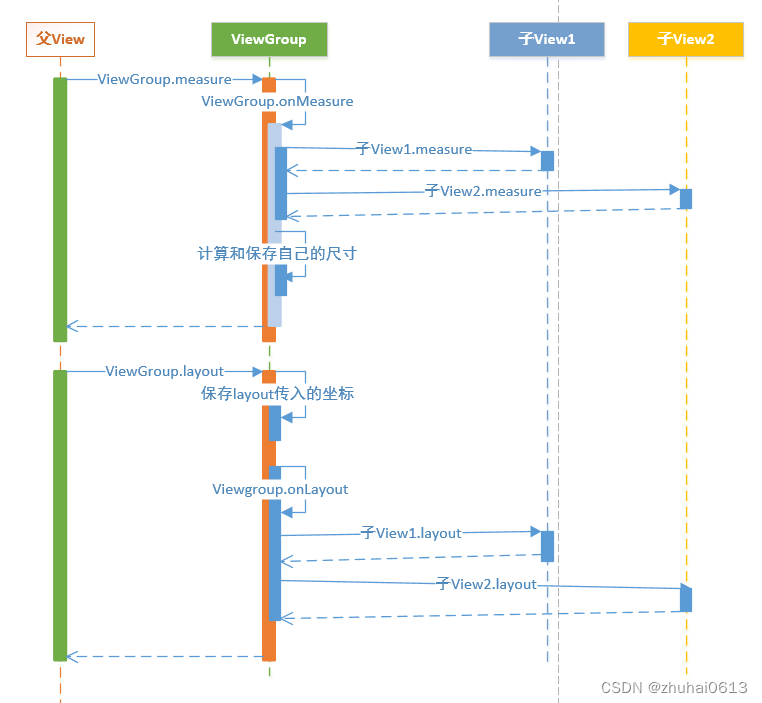
View在Activity中显示出来,要经历测量、布局和绘制三个步骤,分别对应三个动作:measure、layout和draw。
测量:onMeasure()决定View的大小;
布局:onLayout()决定View在ViewGroup中的位置;
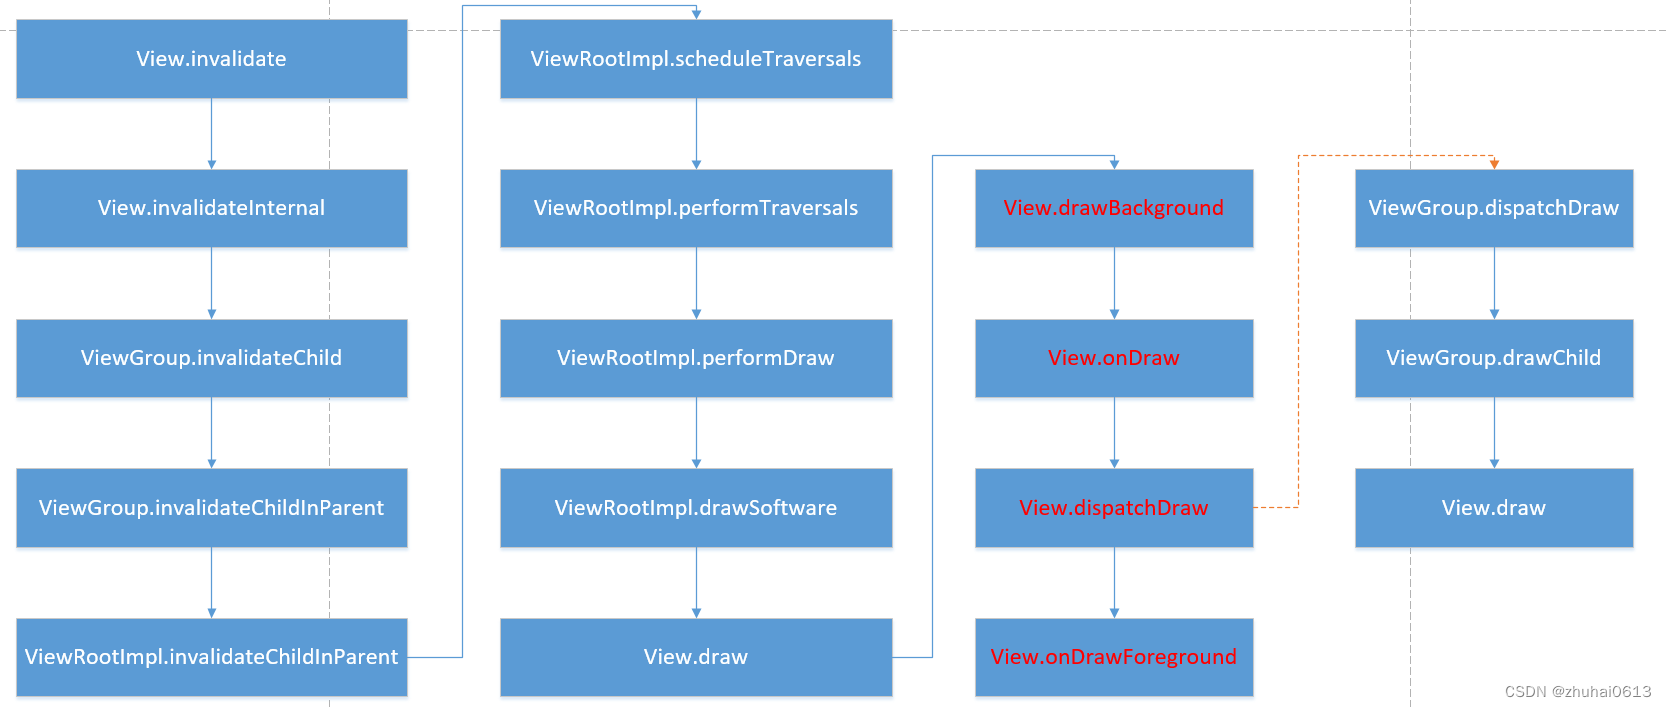
绘制:onDraw()决定绘制这个View。
自定义View: 只需要重写onMeasure()和onDraw()
自定义ViewGroup: 则只需要重写onMeasure()和onLayout()
- 视图View主要分为两类

View类简介
View类是Android中各种组件的基类,如View是ViewGroup基类
View表现为显示在屏幕上的各种视图
Android中的UI组件都由View、ViewGroup组成。
View的构造函数:共有4个
// 如果View是在Java代码里面new的,则调用第一个构造函数
   public CustomView(Context context) {
          super(context);
      }

  // 如果View是在.xml里声明的,则调用第二个构造函数
  // 自定义属性是从AttributeSet参数传进来的
      public  CustomView(Context context, AttributeSet attrs) {
          super(context, attrs);
      }

  // 不会自动调用
  // 一般是在第二个构造函数里主动调用
  // 如View有style属性时
      public  CustomView(Context context, AttributeSet attrs, int defStyleAttr) {
          super(context, attrs, defStyleAttr);
      }

      //API21之后才使用
      // 不会自动调用
      // 一般是在第二个构造函数里主动调用
      // 如View有style属性时
      public  CustomView(Context context, AttributeSet attrs, int defStyleAttr, int defStyleRes) {
          super(context, attrs, defStyleAttr, defStyleRes);
      }
- AttributeSet与自定义属性
系统自带的View可以在xml中配置属性,对于写的好的自定义View同样可以在xml中配置属性,为了使自定义的View的属性可以在xml中配置,需要以下4个步骤:
通过为自定义View添加属性
在xml中为相应的属性声明属性值
在运行时(一般为构造函数)获取属性值
将获取到的属性值应用到View
1 PhoneWindow是Android系统中最基本的窗口系统,继承自Windows类,负责管理界面显示以及事件响应。它是Activity与View系统交互的接口
2 DecorView是PhoneWindow中的起始节点View,继承于View类,作为整个视图容器来使用。用于设置窗口属性。它本质上是一个FrameLayout
3 ViewRoot在Activtiy启动时创建,负责管理、布局、渲染窗口UI等等
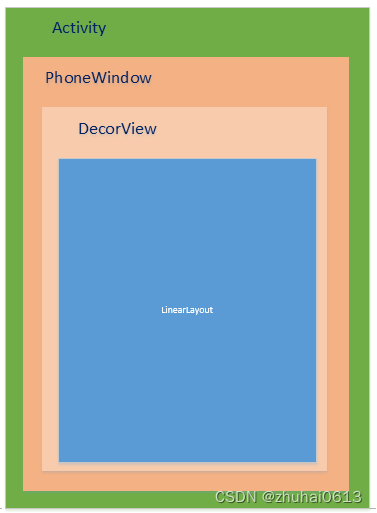
上图是 Activity 的结构。我们先进行大致的描述,然后在进入源码体会这一过程。
我们可以清晰的知道一个 Activity 会对应着有一个 Window,而 Window 的唯一实现类为 PhoneWindow,PhoneWindow 的初始化是在 Activity 的 attach 方法中,我们前面也有提到 attach 方法。
在往下一层是一个 DecorView,被 PhoneWindow 持有着,DecorView 的初始化在 setContentView 中,这个我们待会会进行详细分析。DecorView 是我们的顶级View,我们设置的布局只是其子View。
DecorView 是一个 FrameLayout。但在 setContentView 中,会给他加入一个线性的布局(LinearLayout)。该线性布局的子View 则一般由 TitleBar 和 ContentView 进行组成。TitleBar 我们可以通过 requestWindowFeature(Window.FEATURE_NO_TITLE); 进行去除,而 ContentView 则是来装载我们设置的布局文件的 ViewGroup 了
对于多View的视图,结构是树形结构:最顶层是ViewGroup,ViewGroup下可能有多个ViewGroup或View,如下图:
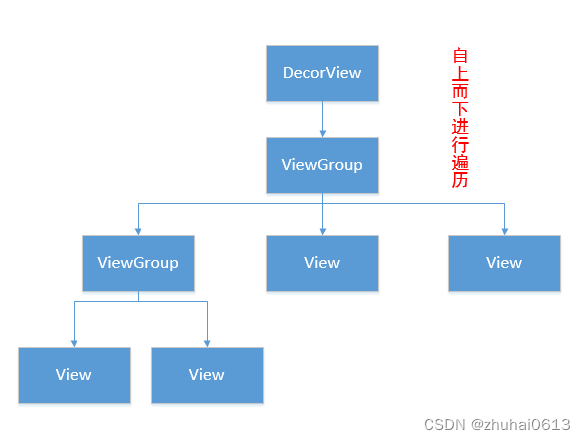
一定要记住:无论是measure过程、layout过程还是draw过程,永远都是从View树的根节点开始测量或计算(即从树的顶端开始),一层一层、一个分支一个分支地进行(即树形递归),最终计算整个View树中各个View,最终确定整个View树的相关属性
view的生命周期
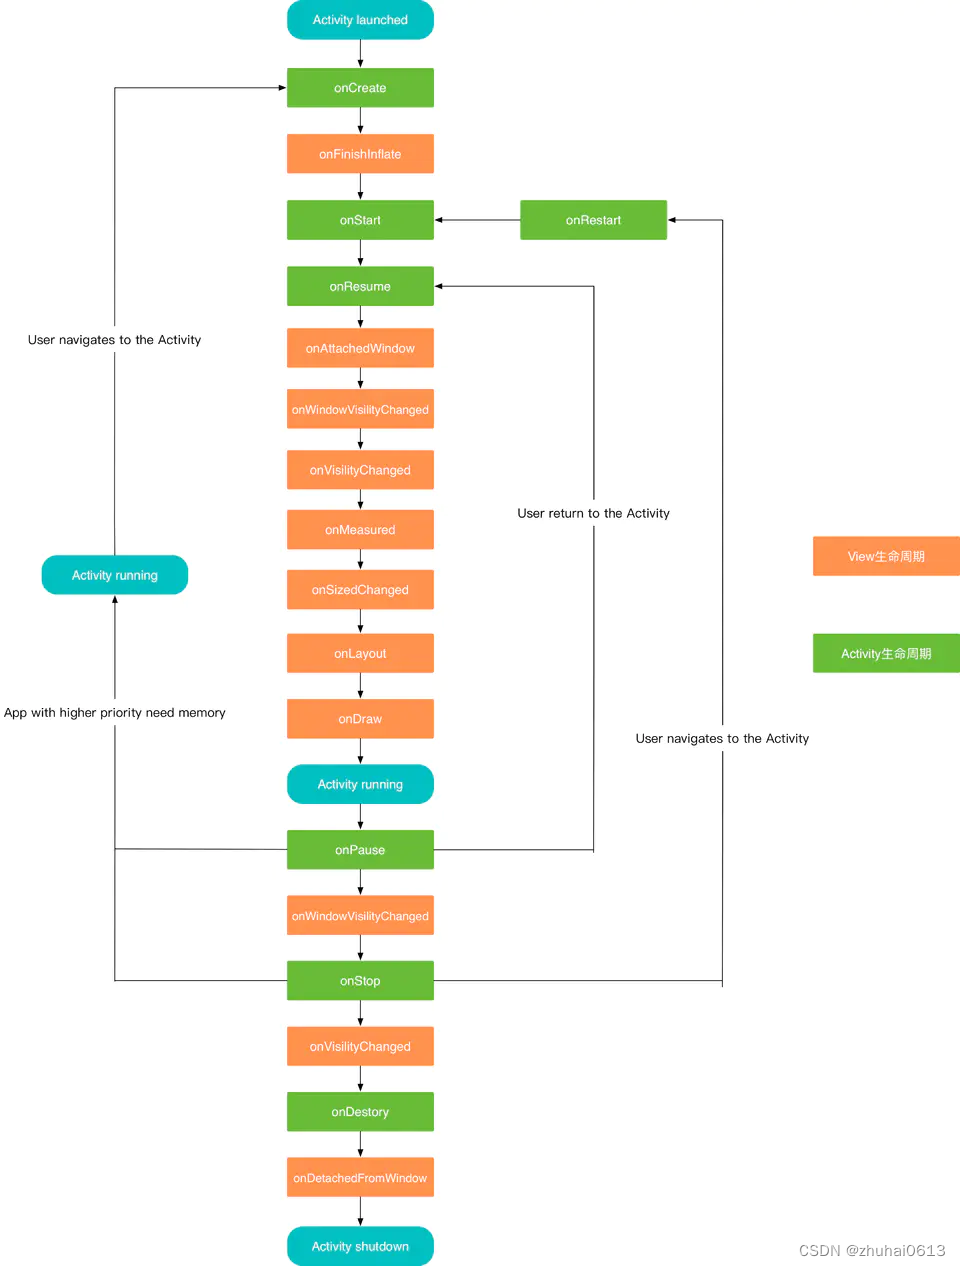
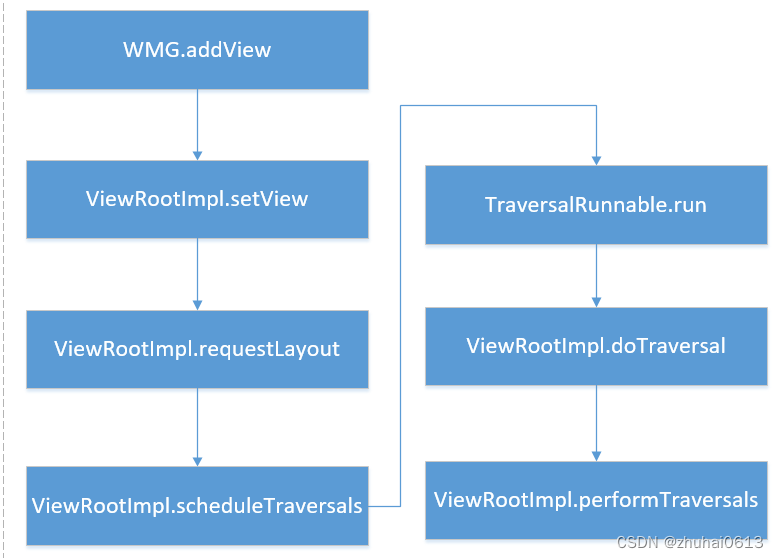
绘制流程从何而起
我们一说到绘制流程,就会想到或是听过onMeasure、onLayout、onDraw这三个方法,但是有没想过为什么我们开启一个App或是点开一个Activity,就会触发这一系列流程呢?想知道绘制流程从何而起,我们就有必要先解释 App启动流程 和 Activity的启动流程。我们都知道
ActivityThread 的 main 是一个App的入口。我们来到 main 方法看看他做了什么启动操作。ActivityThread 的 main方法是由 ZygoteInit 类中最终通过 RuntimeInit类的invokeStaticMain 方法进行反射调用

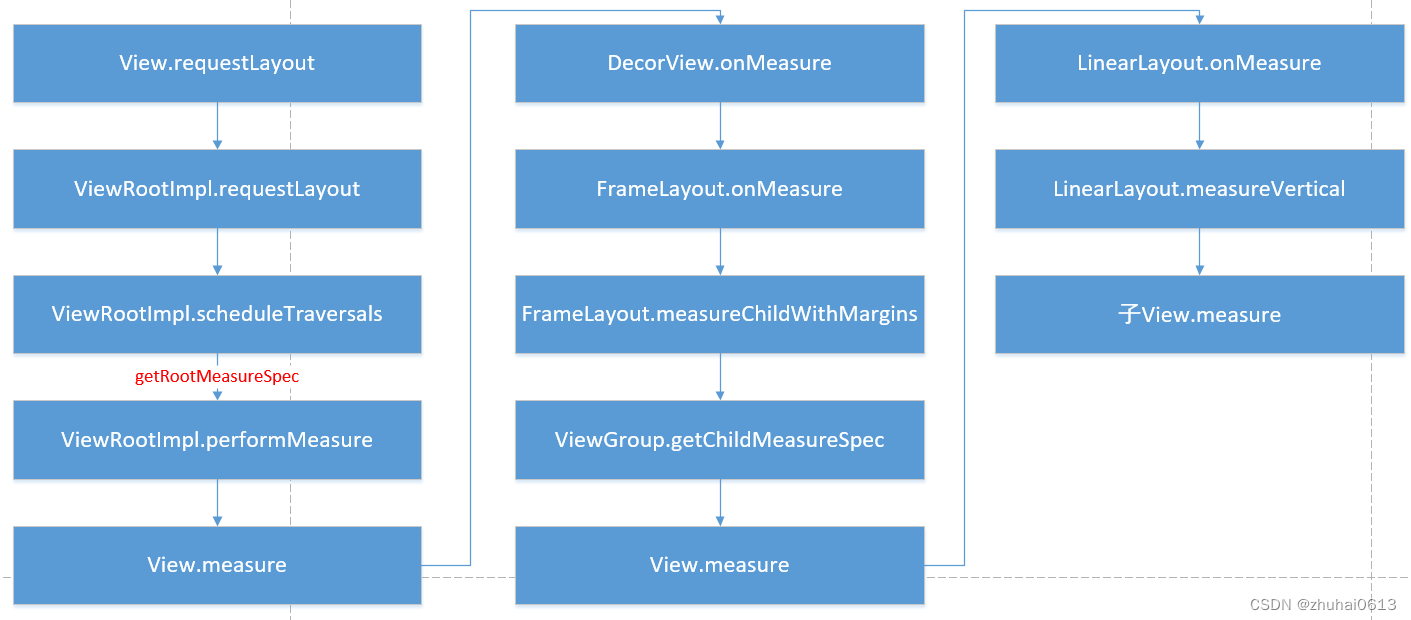
measure流程
layout流程
draw流程
测量是如何进行的
-
测量遍历在 measure(int, int) 中实现,是 View 树的自上而下遍历。在递归过程中,每个 View
都会将维度规范下推到布局树。在测量遍历结束时,每个 View 均存储了其测量值。第二次遍历发生在 layout(int, int,
int, int) 中,也是自上而下遍历。在此次遍历中,每个父级负责使用测量遍历中计算的尺寸来定位其所有的子级。当返回 View 对象的
measure() 方法时,必须设置其 getMeasuredWidth() 和 getMeasuredHeight() 值,以及该
View 对象的所有子级的值。View 对象的测量宽度值和测量高度值必须遵守 View
对象的父级所施加的限制。这就保证了在测量遍历结束时,所有父级都会接受其子级的所有测量值。父级 View 可以对其子级多次调用
measure()。例如,父级可以使用未指定的维度测量每个子级一次,以确定它们希望的大小;然后,如果所有子级不受限制的尺寸的总和过大或过小,则再次使用实际的数字对它们调用
measure()(即,如果子级未就各自获得多少空间达成一致,则父级将会介入并针对第二次遍历设置规则)。 -
测量遍历使用两个类来传达维度。View 对象使用 ViewGroup.LayoutParams 类来告知父级它们想要如何测量和定位。基本的
ViewGroup.LayoutParams 类仅描述了 View 希望的宽度和高度。针对每个维度,它可以指定以下某一项: -
一个确切的数字
-
MATCH_PARENT,该参数意味着 View 想要和它的父级一样大(负填充)
-
WRAP_CONTENT,该参数意味着 View 想要足够大,以包含其内容(正填充)。
有适用于 ViewGroup 的不同子类的 ViewGroup.LayoutParams 子类。例如,RelativeLayout 有自己的 ViewGroup.LayoutParams 子类,其中包括使子级 View 对象水平和垂直居中的功能。
MeasureSpec 对象用于在树中将要求从父级下推到子级。MeasureSpec 可以为以下三种模式之一:
- UNSPECIFIED:父级使用该模式来确定子级 View 所需的维度。例如,LinearLayout 可能会对其高度设置为 UNSPECIFIED 和宽度设置为 EXACTLY 240 的子级调用 measure(),从而确定宽度为 240 像素的子级 View 所需的高度。
- EXACTLY:父级使用该模式来强制子级使用某个确切尺寸。子级必须使用该尺寸,并保证其所有的子项都能放入该尺寸。
- AT MOST:父级使用该模式来强制规定子级的最大尺寸。子级必须保证它及其所有的子项都能放入该尺寸

// ViewGroup 类
public static int getChildMeasureSpec(int spec, int padding, int childDimension) {
    int specMode = MeasureSpec.getMode(spec);
    int specSize = MeasureSpec.getSize(spec);

    int size = Math.max(0, specSize - padding);

    int resultSize = 0;
    int resultMode = 0;

    switch (specMode) {
        // 父视图为确定的大小的模式
        case MeasureSpec.EXACTLY:
            /**
             * 根据子视图的大小,进行不同模式的组合:
             * 1、childDimension 大于 0,说明子视图设置了具体的大小
             * 2、childDimension 为 {@link LayoutParams.MATCH_PARENT},说明大小和其父视图一样大
             * 3、childDimension 为 {@link LayoutParams.WRAP_CONTENT},说明子视图想为其自己的大小,但
             * 不能超过其父视图的大小。
             */
            if (childDimension >= 0) {
                resultSize = childDimension;
                resultMode = MeasureSpec.EXACTLY;
            } else if (childDimension == LayoutParams.MATCH_PARENT) {
                // Child wants to be our size. So be it.
                resultSize = size;
                resultMode = MeasureSpec.EXACTLY;
            } else if (childDimension == LayoutParams.WRAP_CONTENT) {
                // Child wants to determine its own size. It can't be
                // bigger than us.
                resultSize = size;
                resultMode = MeasureSpec.AT_MOST;
            }
            break;
        // 父视图已经有一个最大尺寸限制
        case MeasureSpec.AT_MOST:
            /**
             * 根据子视图的大小,进行不同模式的组合:
             * 1、childDimension 大于 0,说明子视图设置了具体的大小
             * 2、childDimension 为 {@link LayoutParams.MATCH_PARENT},
             * -----说明大小和其父视图一样大,但是此时的父视图还不能确定其大小,所以只能让子视图不超过自己
             * 3、childDimension 为 {@link LayoutParams.WRAP_CONTENT},
             * -----说明子视图想为其自己的大小,但不能超过其父视图的大小。
             */
            if (childDimension >= 0) {
                // Child wants a specific size... so be it
                resultSize = childDimension;
                resultMode = MeasureSpec.EXACTLY;
            } else if (childDimension == LayoutParams.MATCH_PARENT) {
                // Child wants to be our size, but our size is not fixed.
                // Constrain child to not be bigger than us.
                resultSize = size;
                resultMode = MeasureSpec.AT_MOST;
            } else if (childDimension == LayoutParams.WRAP_CONTENT) {
                // Child wants to determine its own size. It can't be
                // bigger than us.
                resultSize = size;
                resultMode = MeasureSpec.AT_MOST;
            }
            break;
        case MeasureSpec.UNSPECIFIED:
            if (childDimension >= 0) {
                // Child wants a specific size... let him have it
                resultSize = childDimension;
                resultMode = MeasureSpec.EXACTLY;
            } else if (childDimension == LayoutParams.MATCH_PARENT) {
                // Child wants to be our size... find out how big it should
                // be
                resultSize = View.sUseZeroUnspecifiedMeasureSpec ? 0 : size;
                resultMode = MeasureSpec.UNSPECIFIED;
            } else if (childDimension == LayoutParams.WRAP_CONTENT) {
                // Child wants to determine its own size.... find out how
                // big it should be
                resultSize = View.sUseZeroUnspecifiedMeasureSpec ? 0 : size;
                resultMode = MeasureSpec.UNSPECIFIED;
            }
            break;
    }
    return MeasureSpec.makeMeasureSpec(resultSize, resultMode);}
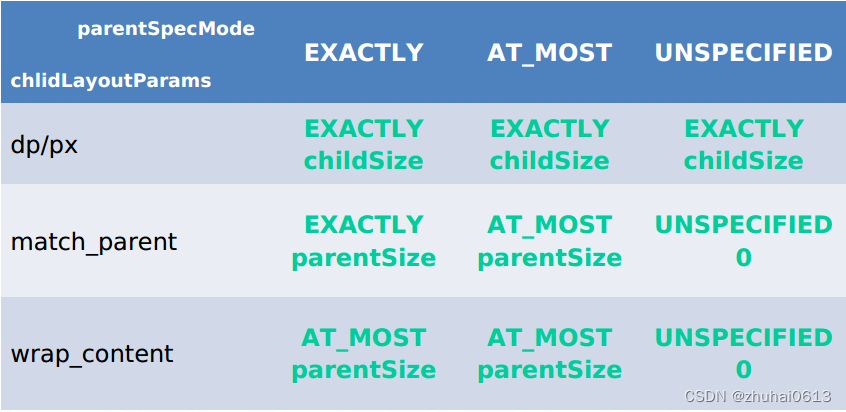
- 对于应用层 View ,其 MeasureSpec 由父容器的 MeasureSpec 和自身的 LayoutParams 来共同决定
- 对于不同的父容器和view本身不同的LayoutParams,view就可以有多种MeasureSpec。
- 当view采用固定宽高的时候,不管父容器的MeasureSpec是什么,view的MeasureSpec都是精确模式并且其大小遵循Layoutparams中的大小;
- 当view的宽高是match_parent时,这个时候如果父容器的模式是精准模式,那么view也是精准模式并且其大小是父容器的剩余空间,如果父容器是最大模式,那么view也是最大模式并且其大小不会超过父容器的剩余空间;
- 当view的宽高是wrap_content时,不管父容器的模式是精准还是最大化,view的模式总是最大化并且大小不能超过父容器的剩余空间。
- Unspecified模式,这个模式主要用于系统内部多次measure的情况下,一般来说,我们不需要关注此模式(这里注意自定义View放到ScrollView的情况 需要处理)。
onMeasure()方法中常用的方法 - getChildCount():获取子View的数量;
- getChildAt(i):获取第i个子控件;
- subView.getLayoutParams().width/height:设置或获取子控件的宽或高;
- measureChild(child, widthMeasureSpec, heightMeasureSpec):测量子View的宽高;
- child.getMeasuredHeight/width():执行完measureChild()方法后就可以通过这种方式获取子View的宽高值;
- getPaddingLeft/Right/Top/Bottom():获取控件的四周内边距;
- setMeasuredDimension(width, height):重新设置控件的宽高
自定义View需要注意的地方
- 让View支持wrap_conent
- 让View支持padding
- 尽量避免使用Handler,一般都可以用View自带的post方法代替
- 在onDeatchFromWindow时,停止View的动画或线程(如果有的话)
- 如果存在嵌套滑动,处理好滑动冲突
自定义View如何测量
自定义绘制
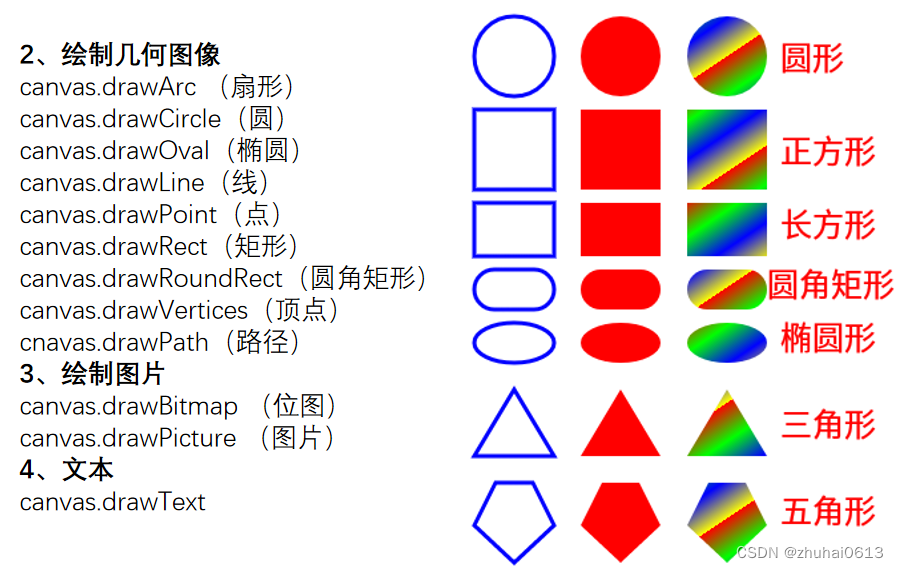
1.Canvas常用方法
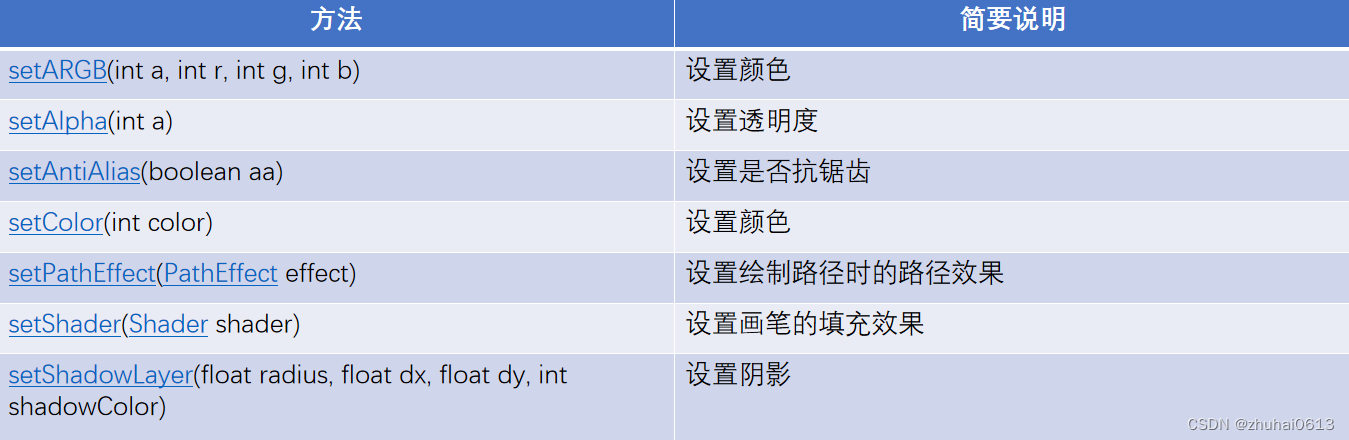
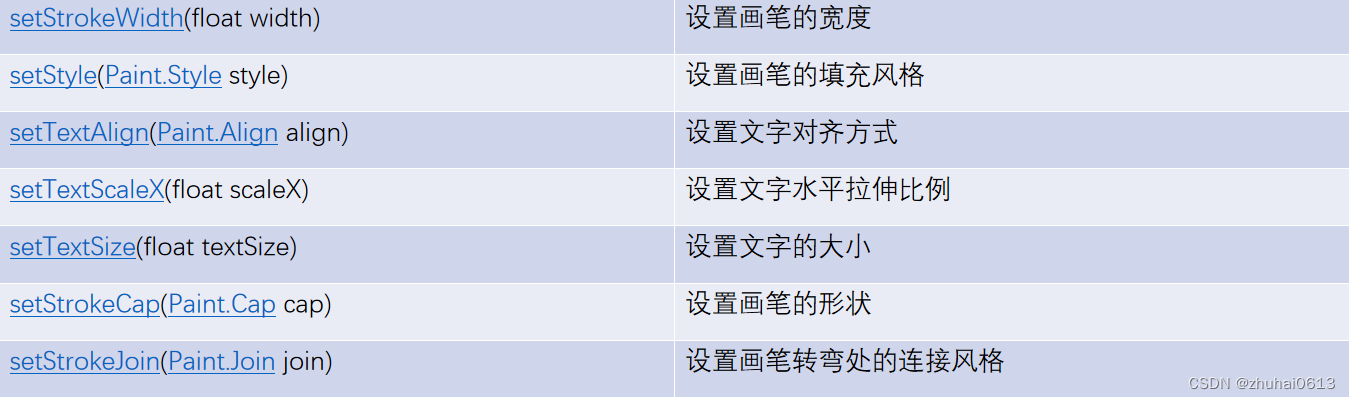
2.Paint类主要用于设置绘制风格:包括画笔的颜色画笔触笔粗细、填充风格及文字的特征
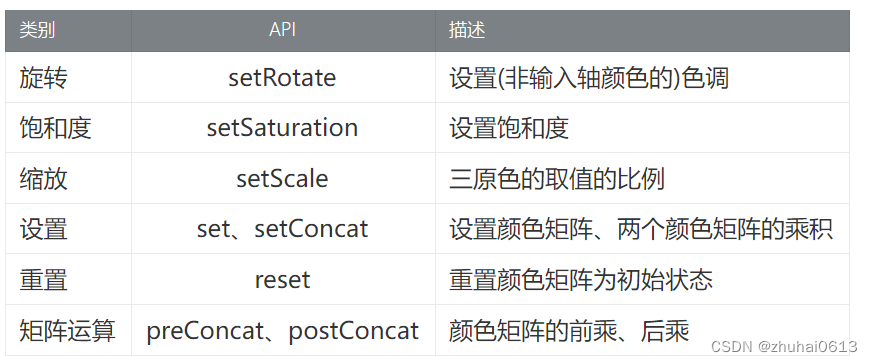
4 动画
-
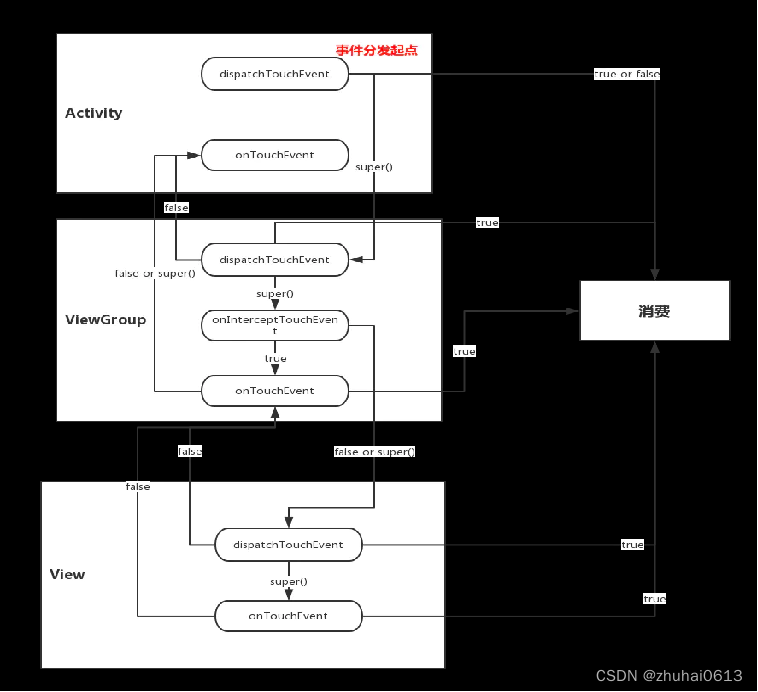
父容器调用哪个方法可以拦截子View的事件?为什么?
– 调用onInterceptTouchEvent()并返回true。因为该方法返回true后,会导致变量 intercepted =
true,从而导致不会走后面分发事件的代码。 -
子View调用哪个方法可以请求父容器不拦截自己?为什么?
– requestDisallowInterceptTouchEvent(true)。因为 onInterceptTouchEvent()
方法的执行条件是disallowIntercept = false,而子View调用requestDisallowInterceptTouchEvent(true)方法可以导致disallowIntercept
= true,从而onInterceptTouchEvent方法不会执行,父容器就不能拦截自己了。 -
父容器一旦在down事件拦截子View,就算子View调用了requestDisallowInterceptTouchEvent方法还是拿不到事件,为什么?
-
- A.MotionEvent.ACTION_UP
- B.MotionEvent.ACTION_DOWN
- C.MotionEvent.ACTION_MOVE
-
- 内部拦截法、外部拦截法
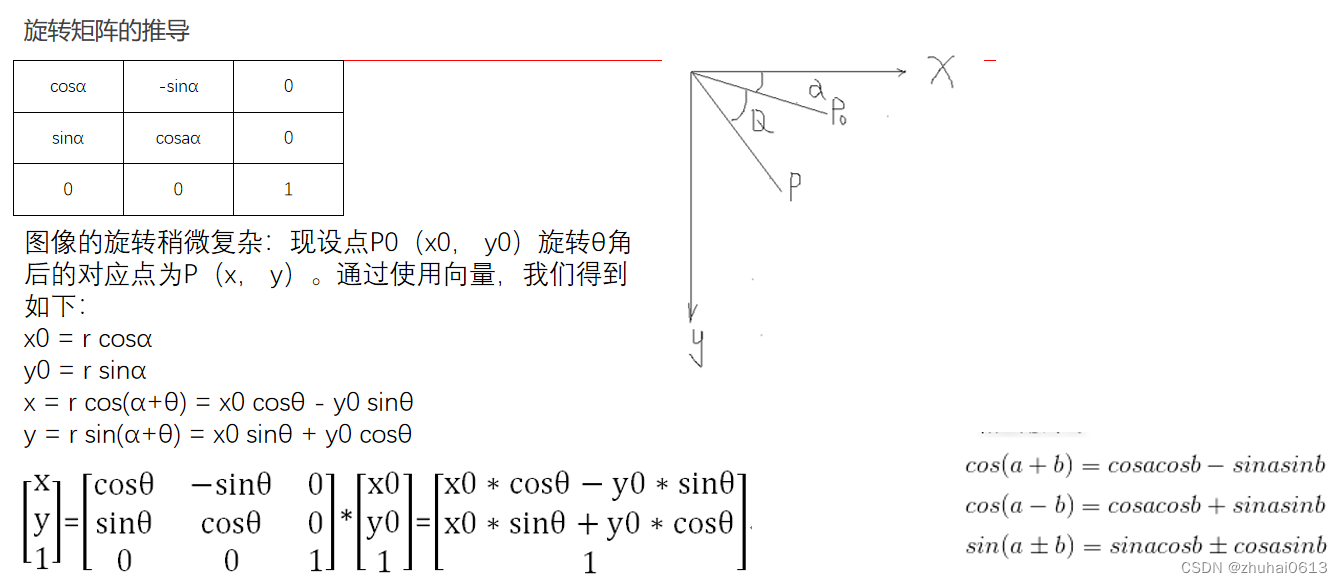
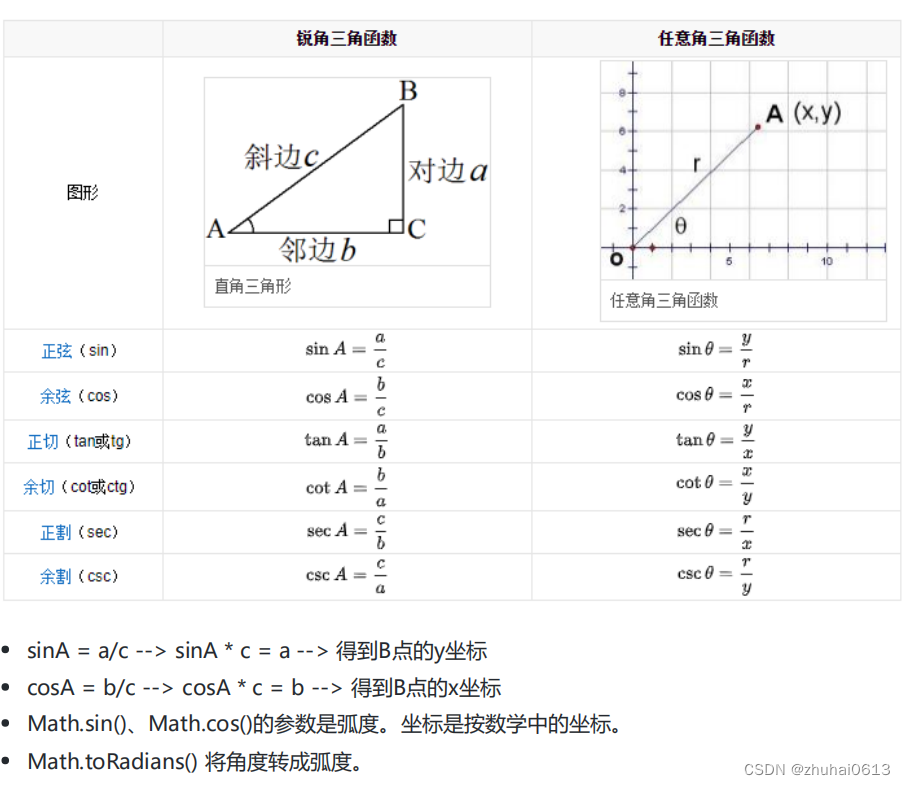
三角函数
Android底层绘制原理:
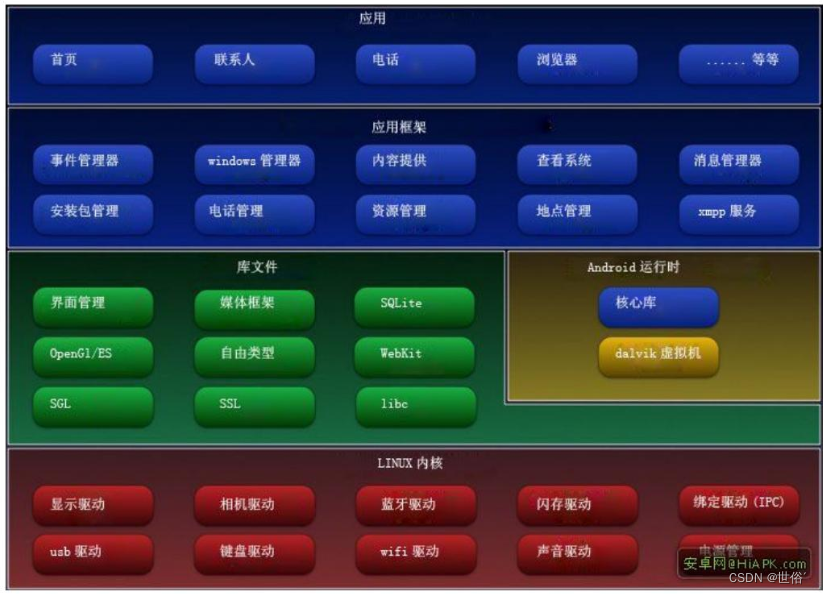
1.Linux Kernel(Linux内核) :
Graphics Driver(图形驱动):Linux内核包含用于管理硬件资源的图形驱动,如GPU(图形处理单元)。它负责底层的图形渲染和硬件加速。
2.Hardware Abstraction Layer (HAL)(硬件抽象层):
Graphics HAL:这一层抽象了硬件的细节,为上层提供统一的接口。在这里,Android系统与具体的硬件设备进行交互,例如图形和显示硬件。
3.Android Runtime and Libraries(Android运行时和库):
Skia:Android中用于2D图形绘制的库。它被用于处理形状、文本、图像等基本绘图操作。
OpenGL ES:用于3D图形渲染的库。Android应用通过OpenGL ES API进行复杂的3D绘图。
SurfaceFlinger:Android的合成器,负责将多个应用的图形内容合成到屏幕上。它管理应用创建的Surface(绘图表面)。
4.Android Framework(Android框架):
View System:Android框架的一部分,负责布局和绘制用户界面。每个View负责绘制自身。
Canvas API:提供了一个绘图表面,开发者可以在上面绘制图形(如线条、圆形、文本等)。
Hardware Acceleration(硬件加速):自Android 3.0(Honeycomb)起,UI的绘制可以通过GPU进行加速。
5.Android Applications(Android应用):
Application Code(应用代码):开发者编写的代码,使用Android提供的API(如View、Canvas)来创建和管理用户界面。
Rendering(渲染):应用通过View系统进行界面布局,然后通过Canvas或OpenGL ES绘制内容。完成的绘制内容传递给SurfaceFlinger进行合成。
在整个过程中,从应用发起的绘制请求(如一个按钮或图像的显示),首先通过Android框架层处理,然后通过硬件抽象层和Linux内核中的驱动与实际的硬件(如GPU)交互,最终将内容渲染到屏幕上。
最后给大家带来一个好玩的公式:
e
i
π
+
1
=
0
e ^{iπ}+1=0
eiπ+1=0
- e 是自然对数的底数。
- i 是虚数单位。
- π是圆周率。
原文地址:https://blog.csdn.net/zhuhai0613/article/details/134630616
本文来自互联网用户投稿,该文观点仅代表作者本人,不代表本站立场。本站仅提供信息存储空间服务,不拥有所有权,不承担相关法律责任。
如若转载,请注明出处:http://www.7code.cn/show_14669.html
如若内容造成侵权/违法违规/事实不符,请联系代码007邮箱:suwngjj01@126.com进行投诉反馈,一经查实,立即删除!