1 需求
之前编过1个曲线编辑器,但有几个问题,1是加载太慢,2是没法保存工程。
现在将需求重新整理一下,再开发个曲线编辑器。此外也总结了三点技术问题,分别为:
(1)曲线空间QCustomPlot和表格控件TableView的联动,目的是实现曲线编辑;
(2)数据分类显示,目的是数据按不同分类来绘图,避免叠合在一起看不清。
2 开发流程
1 搭建框架
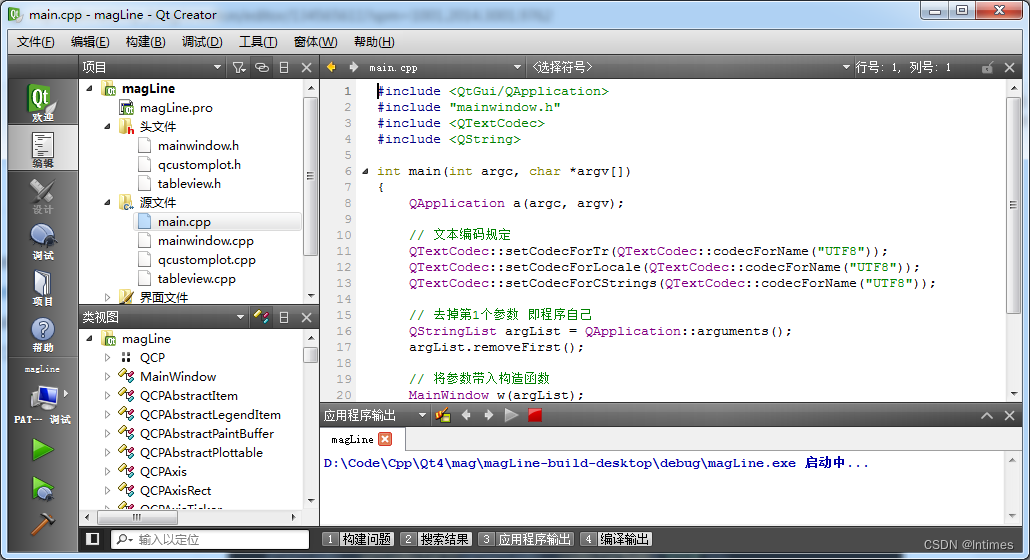
#include <QtGui/QApplication>
#include "mainwindow.h"
#include <QTextCodec>

int main(int argc, char *argv[])
{
    QApplication a(argc, argv);

    // 文本编码规定
    QTextCodec::setCodecForTr(QTextCodec::codecForName("UTF8"));
    QTextCodec::setCodecForLocale(QTextCodec::codecForName("UTF8"));
    QTextCodec::setCodecForCStrings(QTextCodec::codecForName("UTF8"));

    MainWindow w;
    w.show();

    return a.exec();
}
2 构造函数
MainWindow::MainWindow(QWidget *parent) :
    QMainWindow(parent),
    ui(new Ui::MainWindow)
{
    ui->setupUi(this);
    winName = "磁测剖面编辑器 V1.0";
    setWindowTitle(winName);

    // 默认编辑开关为否
    customEditOn = false;

    // 默认曲线范围为自适应
    curveXfit = true;
    curveYfit = true;

    // 表格模型视图
    model = new QStandardItemModel(0,22);
    model->setHorizontalHeaderLabels(QStringList()<<"Line"<<"Point"<<"PLon"<<"PLat"<<"DiuCorr"
                                     <<"Read"<<"Sq"<<"Lon"<<"Lat"<<"Elevation"
                                     <<"Date"<<"Time"<<"Instr"<<"GeoMag"<<"ΔT"
                                     <<"Note"<<"PX"<<"PY"<<"X"<<"Y"<<"Pdistance"<<"Anomaly");

    connect(model,SIGNAL(dataChanged(QModelIndex,QModelIndex)),this,SLOT(slotDataChanged(QModelIndex,QModelIndex)));

    proxyModel = new QSortFilterProxyModel(this);
    proxyModel->setSourceModel(model);
    proxyModel->setFilterKeyColumn(0);
    ui->tableView->setModel(proxyModel);
    ui->tableView->resizeColumnsToContents();
    ui->tableView->resizeRowsToContents();


    // 列表模型视图
    lines = new QStringListModel;
    ui->listView->setModel(lines);
    ui->listView->setEditTriggers(false);

    // plot点击事件
    connect(ui->curveView, SIGNAL(plottableClick(QCPAbstractPlottable*,int,QMouseEvent*)),
            this, SLOT(graphClicked(QCPAbstractPlottable*,int)));

    // 进度条
    ui->progressBar->setRange(0,100);
    ui->progressBar->setValue(0);
    ui->progressBar->hide();

}
3 打开工程
4 实现应用程序参数加载
为在主程序中调用曲线编辑器,可采用QProcess来调用,这时候需要改造构造函数,并重写打开action。具体代码如下:
// 打开line文件
void MainWindow::on_actionOpen_triggered()
{
    // 1指定文件
    QString tmpName = QFileDialog::getOpenFileName(this,"Open","","*.txt");
    if(tmpName.isEmpty())
        return;
    fileName = tmpName;
    open(QStringList()<<fileName);

}所有的第3步提到的业务逻辑全部打包至open函数中,这样就可以实现在构造函数中调用,代码如下:
 if(!inNameList.isEmpty())
open(inNameList);这里要注意的是,传入参数是个list,需要取第0个值作为文件名。
5 QCustomPlot和TableView的联动
由于QCustomPlot仅仅为绘图库,不是MVC结构,因此只能实现2个单向的联动,以此来模拟MVC机制。
主要实现2个流程:
void MainWindow::graphClicked(QCPAbstractPlottable *plottable, int dataIndex)
{
    // plot中只有QCPGraphs,因此可以立即调用interface1D()
    // 建议先检查interface1D()是否返回非零
    double dataValue = plottable->interface1D()->dataMainValue(dataIndex);
    QString message = QString("Clicked on graph '%1' at data point #%2 with value %3.").arg(plottable->name()).arg(dataIndex).arg(dataValue);
    ui->statusBar->showMessage(message);
    // 少数据的话就不准了
    ui->tableView->setCurrentIndex(proxyModel->index(dataIndex,19,QModelIndex()));
}
/* 数据改动回调 */
void MainWindow::slotDataChanged(QModelIndex ind1, QModelIndex ind2)
{
    Q_UNUSED(ind1)
    Q_UNUSED(ind2)
    if(customEditOn == true)
        plot();
}代码解析:1个是绘图库控件单击事件,并不修改表格数据;1个是表格数据的修改事件槽函数,调用重新绘图方法。因此两个并不是咬合的关系,但却恰恰实现了需求的功能。
6 数据的可视化修改
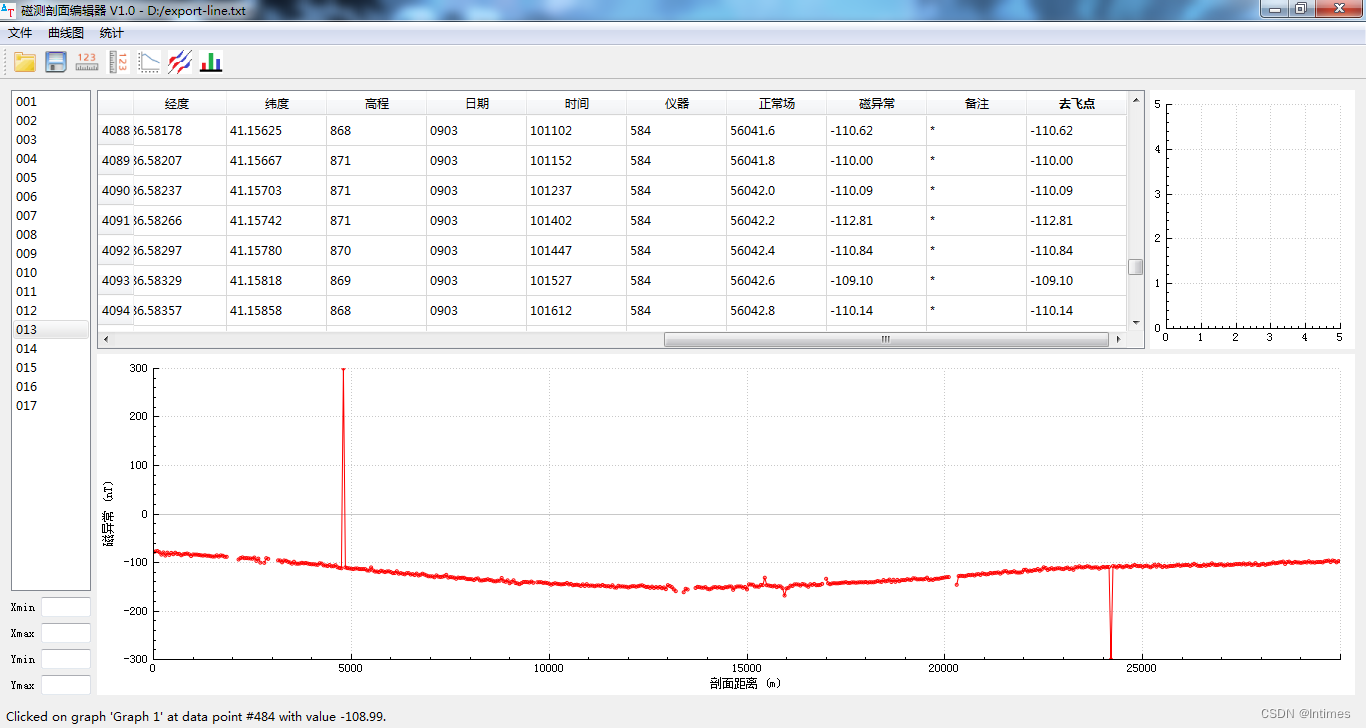
文件加载了数十条曲线,上图显示的第13条。这条曲线明显被一些废点所影响了,如果单纯看表格是很难找到的,毕竟有上千个数据。而曲线则可以轻易的找到废点位置。
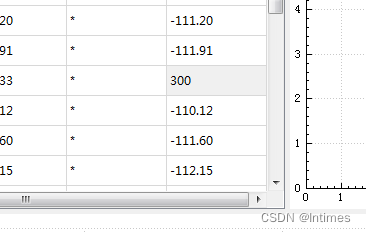
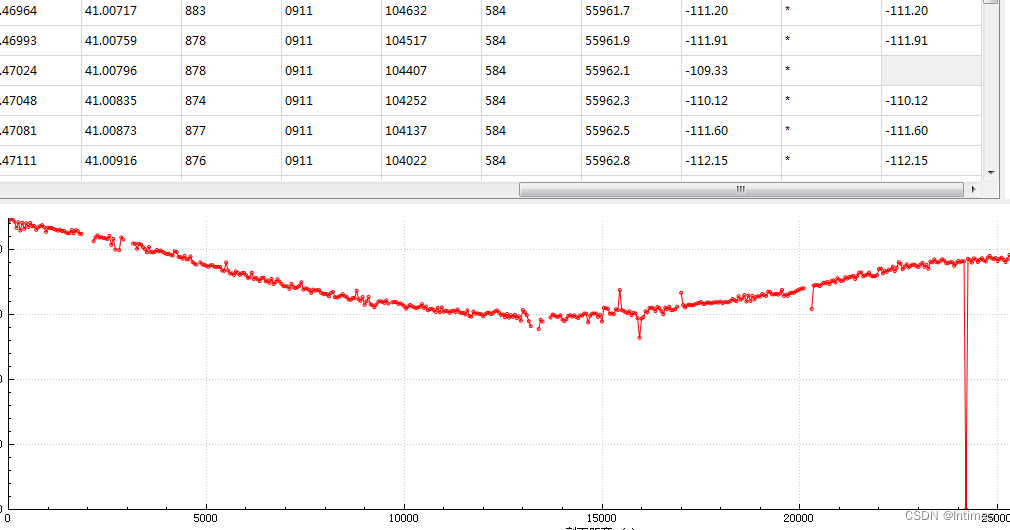
可见删除之后,绘图库控件即时进行了刷新。曲线恢复了正常形态。其余的废点也可以按照这种放方法进行处理。
7 列表点击事件事先键盘控制
在切换曲线时,需要鼠标逐个选择列表项,这相当的麻烦,因此需要实现键盘事件,以此来加速曲线的切换操作。
具体的代码为:
// 方向键上下加回车可调用点击事件
void MainWindow::on_listView_activated(const QModelIndex &index)
{
    on_listView_clicked(index);
}// 测线列表 单击事件
void MainWindow::on_listView_clicked(const QModelIndex &index)
{
// 模型过滤后绘图
int row = index.row();
QString ln = lines->stringList().at(row);
// 关闭编辑标记后再修改代理模型 避免在修改时频繁调用plot
customEditOn = false;
proxyModel->setFilterRegExp(QRegExp(ln, Qt::CaseInsensitive, QRegExp::FixedString));
plot();
customEditOn = true;
}具体逻辑为:先获取选中行的序号,再找到字符串,之后设置proxymodel的正则化过滤器,刷新绘图后,打开修改开关。
通过上述2个函数配合,就可以实现回车与点击事件的同步操作。简化了曲线切换的麻烦。
8 表格实现复制,粘贴,删除等一系列功能
表格数据需要实现复制,粘贴,删除等一系列功能,这就涉及到tableview的子类化问题,上一篇博文我们用mainwindow来实现复制粘贴,本节则采用对qtableview子类化的方式,重写event函数来达到此目的。
下面是代码:
/*  实现多选的复制粘贴 */
void TableView::keyPressEvent(QKeyEvent *keyEvent)
{
    if(keyEvent->matches(QKeySequence::Copy))//复制
    {
        QModelIndexList indexList = selectionModel()->selectedIndexes();
        if(indexList.isEmpty())
            return;
        int startRow = indexList.first().row();
        int endRow = indexList.last().row();
        int startCol = indexList.first().column();
        int endCol = indexList.last().column();
        QStringList clipboardTextList;
        for(int i = startRow;i <= endRow;i++)
        {
            QStringList rowText;
            for(int j = startCol;j <= endCol;j++)
            {
                rowText.append(model()->data(model()->index(i,j)).toString());

            }
            clipboardTextList.append(rowText.join("t"));
        }
        QString clipboardText = clipboardTextList.join("n" );
        QApplication::clipboard()->setText(clipboardText);
    }
    else if (keyEvent->matches(QKeySequence::Paste))
    {
        QString clipboardText = QApplication::clipboard()->text();
        if(clipboardText.isEmpty())
            return;
        QStringList rowTextList = clipboardText.split('n');
        if(rowTextList.last().isEmpty())//从word或者excel复制的内容后面可能会带'n',导致split出来后面有个空字符串。
            rowTextList.removeLast();
        QModelIndexList indexList = selectionModel()->selectedIndexes();
        if(indexList.isEmpty())
            return;
        QModelIndex startIndex = indexList.first();
        for(int i = 0;i < rowTextList.size();i++)
        {
            QStringList itemTextList = rowTextList.at(i).split('t');
            for(int j = 0;j < itemTextList.size();j++)
            {
                QModelIndex curIndex = model()->index(i + startIndex.row(),j + startIndex.column());
                if(curIndex.isValid())
                {
                    model()->setData(curIndex,itemTextList.at(j));
                }
            }
        }
    }
    else if (keyEvent->matches(QKeySequence::Delete))
    {
        // 获取选中行
        QItemSelectionModel *selections = selectionModel();
        QModelIndexList selected = selections->selectedIndexes();
        // 循环选中的各个index并写为空
        foreach(QModelIndex index,selected)
        {
            model()->setData(index,"");
        }
    }
    else if (keyEvent->matches(QKeySequence::SelectAll))
    {
        QModelIndex topLeft;
        QModelIndex bottomRight;
        topLeft = model()->index(0,0);
        bottomRight = model()->index(model()->rowCount()-1,model()->columnCount()-1);
        QItemSelection selection(topLeft,bottomRight);
        selectionModel()->select(selection,QItemSelectionModel::Select);
    }
    else if (keyEvent->matches(QKeySequence::MoveToNextLine))
    {
        if(currentIndex().row()>-1)
        {
            if(currentIndex().row()<model()->rowCount()-1)
                setCurrentIndex(model()->index(currentIndex().row()+1,currentIndex().column()));
        }
    }
    else if (keyEvent->matches(QKeySequence::MoveToPreviousLine))
    {
        if(currentIndex().row()>0)
        {
            setCurrentIndex(model()->index(currentIndex().row()-1,currentIndex().column()));
        }
    }
    else if (keyEvent->matches(QKeySequence::MoveToNextChar))
    {
        if(currentIndex().column()>-1)
        {
            if(currentIndex().column()<model()->columnCount()-1)
                setCurrentIndex(model()->index(currentIndex().row(),currentIndex().column()+1));
        }
    }
    else if (keyEvent->matches(QKeySequence::MoveToPreviousChar))
    {
        if(currentIndex().column()>0)
        {
            setCurrentIndex(model()->index(currentIndex().row(),currentIndex().column()-1));
        }
    }
    else if (keyEvent->matches(QKeySequence::MoveToNextPage))
    {
        int row = currentIndex().row();
        if(row>-1)
        {
            int col = currentIndex().column();
            int step = 20;
            int count = model()->rowCount();
            if(row+step<count-1)
                setCurrentIndex(model()->index(row+step,col));
            else
                setCurrentIndex(model()->index(count-1,col));
        }
    }
    else if (keyEvent->matches(QKeySequence::MoveToPreviousPage))
    {
        int row = currentIndex().row();
        if(row>-1)
        {
            int col = currentIndex().column();
            int step = 20;
            if(row-step>0)
                setCurrentIndex(model()->index(row-step,col));
            else
                setCurrentIndex(model()->index(0,col));
        }
    }
}代码外层是比较简单的判断语句,分别实现了ctrl+c,ctrl+v,ctrl+a,delete等功能。这样就可以对表格实现较多的单选,多选,指定区域的复制,粘贴,删除等操作。
9 曲线实现自适应范围和统一范围
主要用lineEdit控件和绘图库控件配合完成。
// 横坐标范围模式切换
void MainWindow::on_actionXlim_toggled(bool arg1)
{
    if(arg1==true)
        curveXfit = false;
    else
        curveXfit = true;
}

// 纵坐标范围模式切换
void MainWindow::on_actionYlim_toggled(bool arg1)
{
    if(arg1==true)
        curveYfit = false;
    else
        curveYfit = true;
}
通过切换自适应开关来实现绘图范围的控制。在绘图plot中实现:
   // 设置绘图范围
    QString xmin = ui->xmin->text();
    QString xmax = ui->xmax->text();
    if(curveXfit==true || xmin=="" || xmax=="")
        ui->curveView->xAxis->rescale();
    else
        ui->curveView->xAxis->setRange(xmin.toDouble(),xmax.toDouble());

    QString ymin = ui->ymin->text();
    QString ymax = ui->ymax->text();
    if(curveYfit==true || ymin=="" || ymax=="")
        ui->curveView->yAxis->rescale();
    else
        ui->curveView->yAxis->setRange(ymin.toDouble(),ymax.toDouble());
用一个判断来实现绘图范围控制的切换,以此来实现曲线的对比和显示。
原文地址:https://blog.csdn.net/zjjsd195/article/details/134565611
本文来自互联网用户投稿,该文观点仅代表作者本人,不代表本站立场。本站仅提供信息存储空间服务,不拥有所有权,不承担相关法律责任。
如若转载,请注明出处:http://www.7code.cn/show_18783.html
如若内容造成侵权/违法违规/事实不符,请联系代码007邮箱:suwngjj01@126.com进行投诉反馈,一经查实,立即删除!


