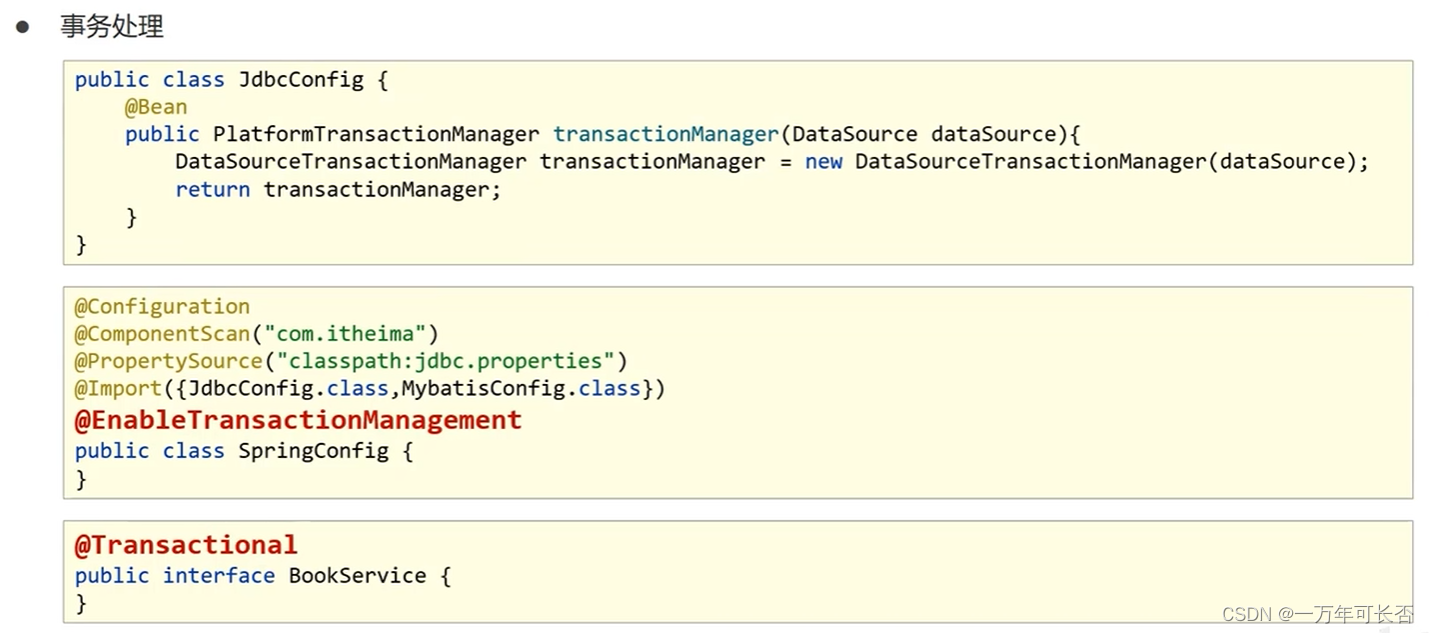
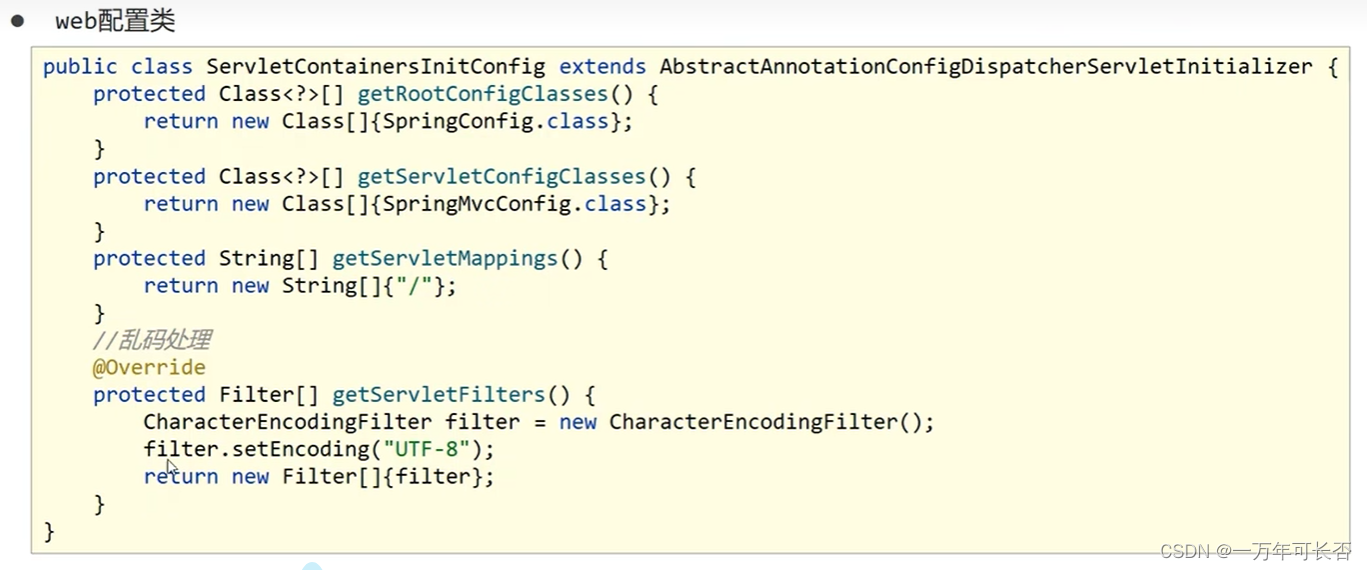
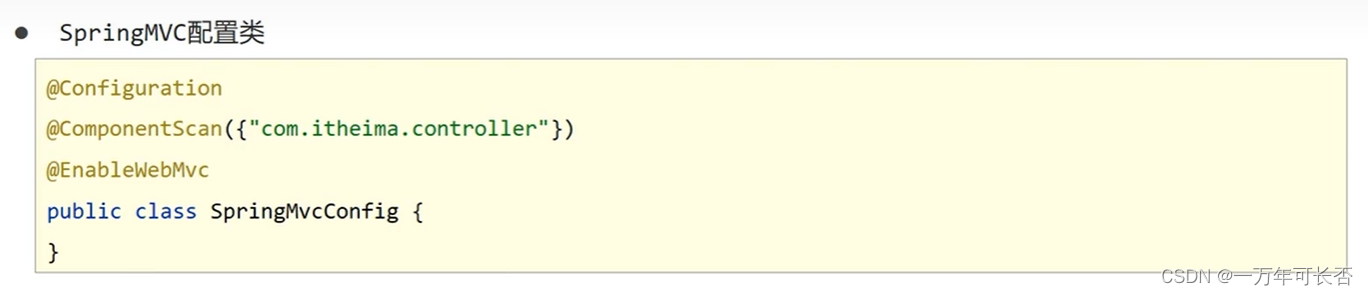
一、整合流程图
1.1 Spring整合Mybatis
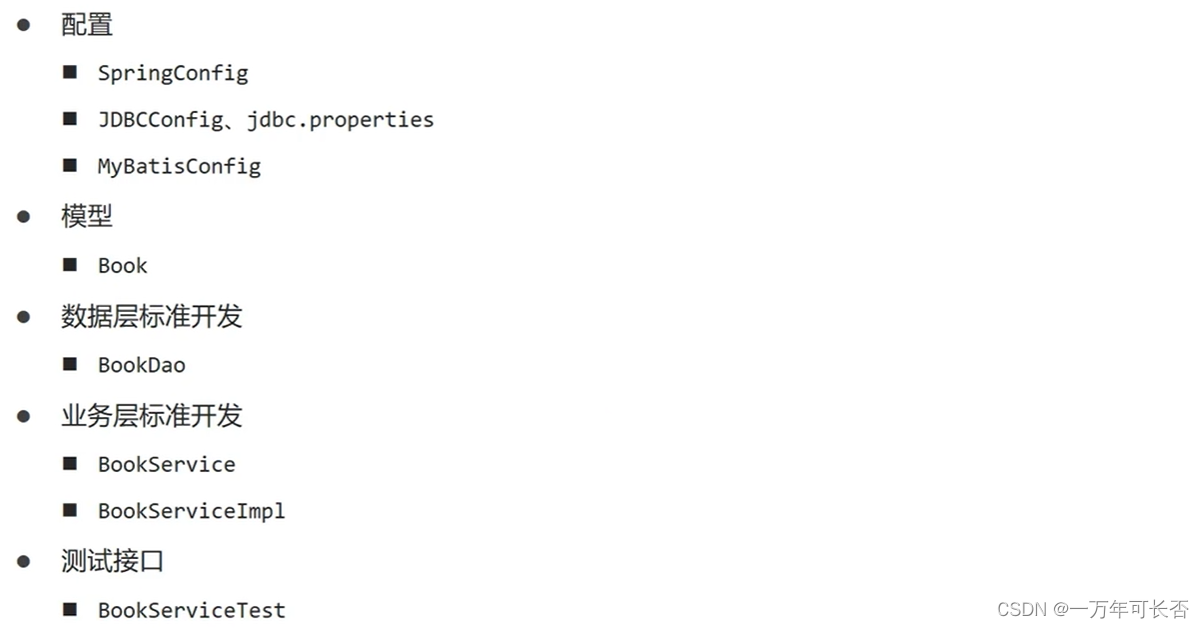
1.2 Spring整合SpringMVC
二、表现层数据封装
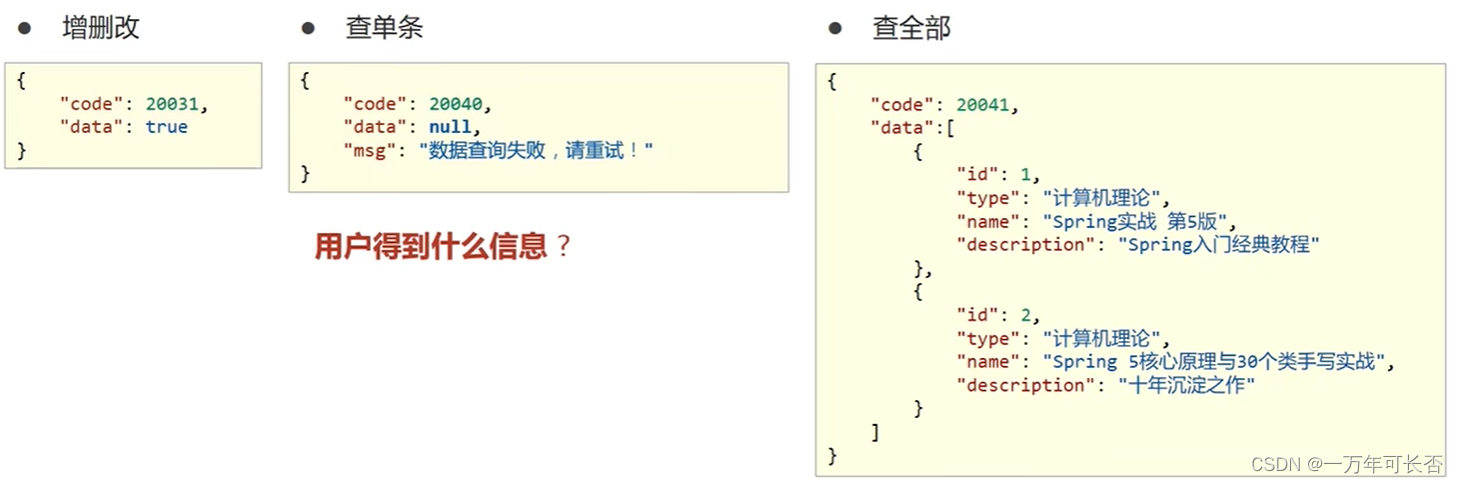
2.1 问题引出
前端人员接收到很多不同数据格式,如下图:
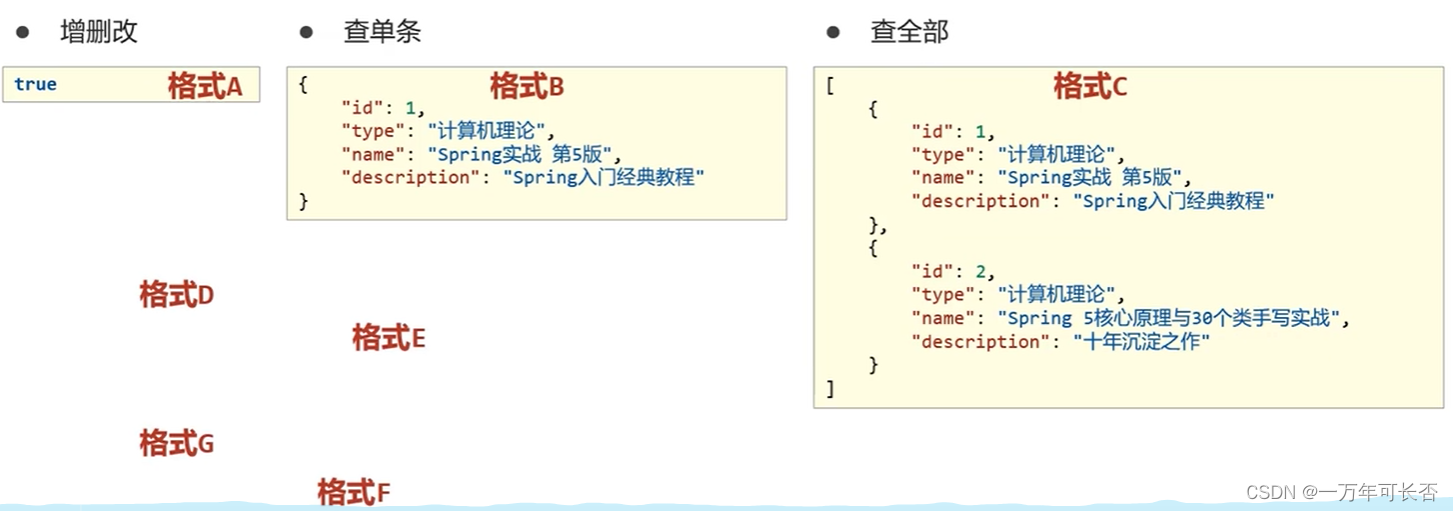
不便于操作,因此,前端操作人员需要与后端人员统一数据格式
设计一个统一的数据返回结果类,如下:

2.2 统一返回结果数据格式 代码设计
package com.itheima.controller;

//状态码
public class Code {
    public static final Integer SAVE_OK = 20011;
    public static final Integer DELETE_OK = 20021;
    public static final Integer UPDATE_OK = 20031;
    public static final Integer GET_OK = 20041;

    public static final Integer SAVE_ERR = 20010;
    public static final Integer DELETE_ERR = 20020;
    public static final Integer UPDATE_ERR = 20030;
    public static final Integer GET_ERR = 20040;
}
package com.itheima.controller;

public class Result {
    //描述统一格式中的数据
    private Object data;
    //描述统一格式中的编码,用于区分操作,可以简化配置0或1表示成功失败
    private Integer code;
    //描述统一格式中的消息,可选属性
    private String msg;

    // 提供不同的构造方法
    public Result() {
    }

    public Result(Integer code,Object data) {
        this.data = data;
        this.code = code;
    }

    public Result(Integer code, Object data, String msg) {
        this.data = data;
        this.code = code;
        this.msg = msg;
    }

    public Object getData() {
        return data;
    }

    public void setData(Object data) {
        this.data = data;
    }

    public Integer getCode() {
        return code;
    }

    public void setCode(Integer code) {
        this.code = code;
    }

    public String getMsg() {
        return msg;
    }

    public void setMsg(String msg) {
        this.msg = msg;
    }
}
BookController.java修改controller类,统一返回数据格式
package com.itheima.controller;

import com.itheima.domain.Book;
import com.itheima.service.BookService;
import org.springframework.beans.factory.annotation.Autowired;
import org.springframework.web.bind.annotation.*;

import java.util.List;

//统一每一个控制器方法返回值
@RestController
@RequestMapping("/books")
public class BookController {

    @Autowired
    private BookService bookService;

    @PostMapping
    public Result save(@RequestBody Book book) {
        boolean flag = bookService.save(book);
        return new Result(flag ? Code.SAVE_OK:Code.SAVE_ERR,flag);
    }

    @PutMapping
    public Result update(@RequestBody Book book) {
        boolean flag = bookService.update(book);
        return new Result(flag ? Code.UPDATE_OK:Code.UPDATE_ERR,flag);
    }

    @DeleteMapping("/{id}")
    public Result delete(@PathVariable Integer id) {
        boolean flag = bookService.delete(id);
        return new Result(flag ? Code.DELETE_OK:Code.DELETE_ERR,flag);
    }

    @GetMapping("/{id}")
    public Result getById(@PathVariable Integer id) {
        Book book = bookService.getById(id);
        Integer code = book != null ? Code.GET_OK : Code.GET_ERR;
        String msg = book != null ? "" : "数据查询失败,请重试!";
        return new Result(code,book,msg);
    }

    @GetMapping
    public Result getAll() {
        List<Book> bookList = bookService.getAll();
        Integer code = bookList != null ? Code.GET_OK : Code.GET_ERR;
        String msg = bookList != null ? "" : "数据查询失败,请重试!";
        return new Result(code,bookList,msg);
    }
}
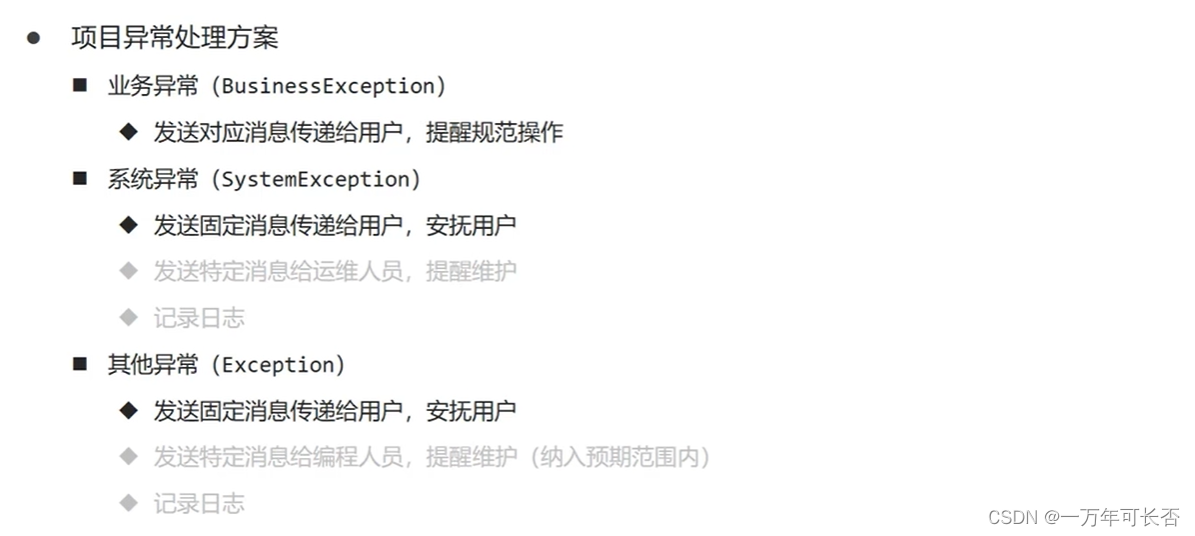
三、异常处理器
3.1 概述

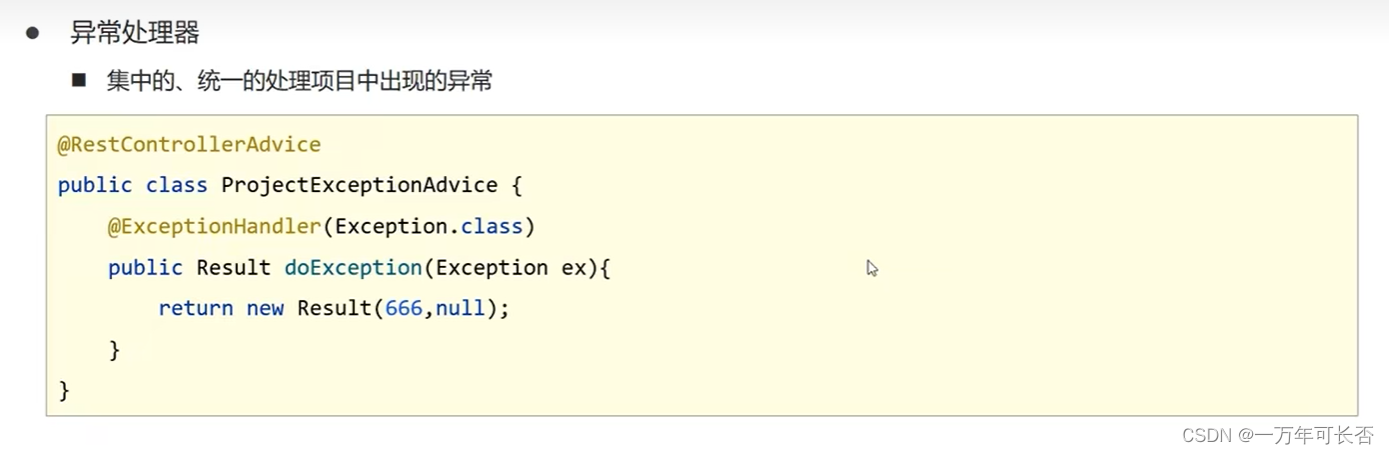
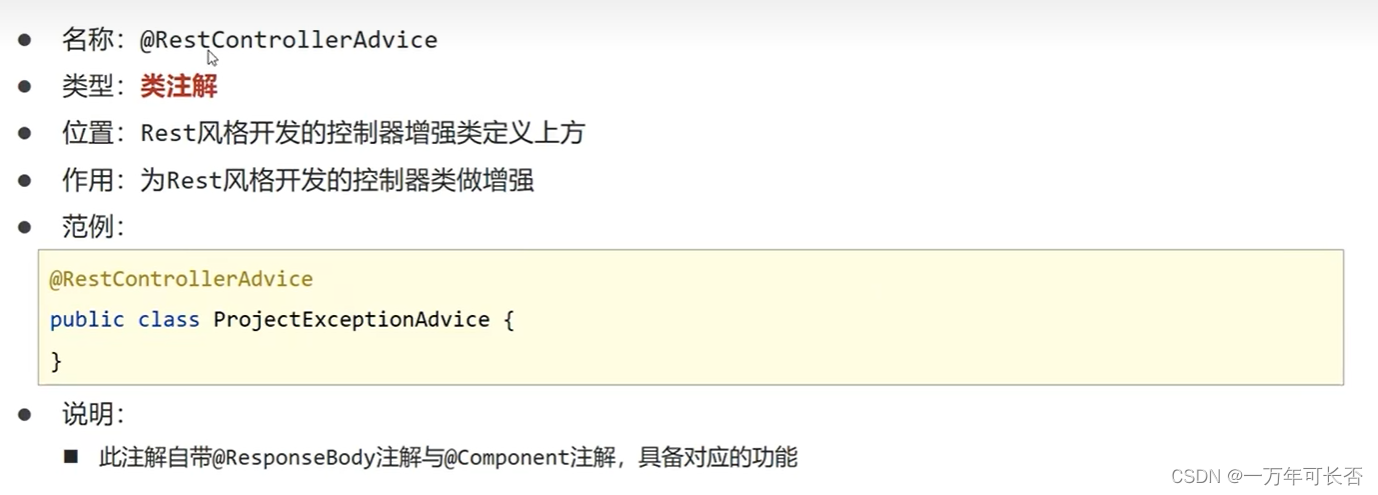
3.2 异常处理方案
package com.itheima.controller;

//状态码
public class Code {
    public static final Integer SAVE_OK = 20011;
    public static final Integer DELETE_OK = 20021;
    public static final Integer UPDATE_OK = 20031;
    public static final Integer GET_OK = 20041;

    public static final Integer SAVE_ERR = 20010;
    public static final Integer DELETE_ERR = 20020;
    public static final Integer UPDATE_ERR = 20030;
    public static final Integer GET_ERR = 20040;

    public static final Integer SYSTEM_ERR = 50001;
    public static final Integer SYSTEM_TIMEOUT_ERR = 50002;
    public static final Integer SYSTEM_UNKNOW_ERR = 59999;

    public static final Integer BUSINESS_ERR = 60002;
}
package com.itheima.exception;
//自定义异常处理器,用于封装异常信息,对异常进行分类
public class BusinessException extends RuntimeException{
    private Integer code;

    public Integer getCode() {
        return code;
    }

    public void setCode(Integer code) {
        this.code = code;
    }

    public BusinessException(Integer code, String message) {
        super(message);
        this.code = code;
    }

    public BusinessException(Integer code, String message, Throwable cause) {
        super(message, cause);
        this.code = code;
    }

}
定义系统异常SystemExceptionException.class
package com.itheima.exception;

//自定义异常处理器,用于封装异常信息,对异常进行分类
public class SystemException extends RuntimeException{
    private Integer code;

    public Integer getCode() {
        return code;
    }

    public void setCode(Integer code) {
        this.code = code;
    }

    // 构造方法
    public SystemException(Integer code, String message) {
        super(message);
        this.code = code;
    }

    public SystemException(Integer code, String message, Throwable cause) {
        super(message, cause);
        this.code = code;
    }

}
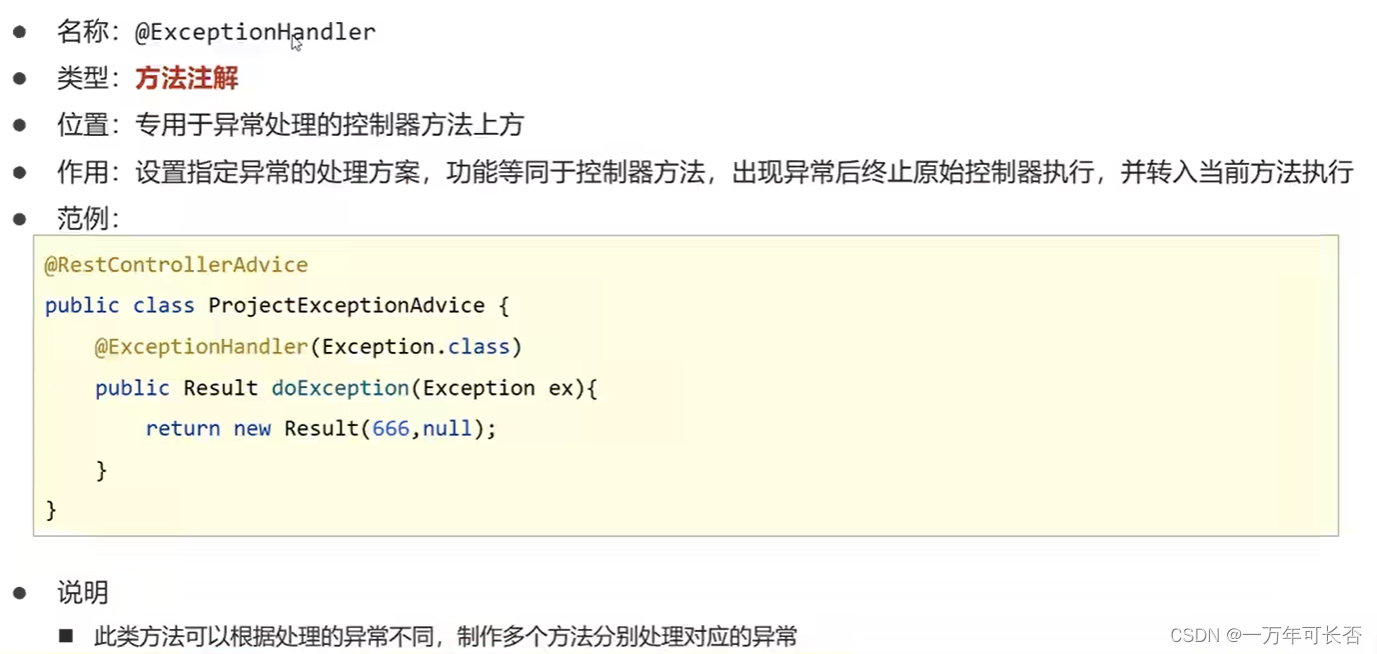
拦截异常并处理SystemExceptionException.class
package com.itheima.controller;


import com.itheima.exception.BusinessException;
import com.itheima.exception.SystemException;
import org.springframework.web.bind.annotation.ExceptionHandler;
import org.springframework.web.bind.annotation.RestControllerAdvice;

//@RestControllerAdvice用于标识当前类为REST风格对应的异常处理器
@RestControllerAdvice
public class ProjectExceptionAdvice {
    //@ExceptionHandler用于设置当前处理器类对应的异常类型
    @ExceptionHandler(SystemException.class)
    public Result doSystemException(SystemException ex){
        //记录日志
        //发送消息给运维
        //发送邮件给开发人员,ex对象发送给开发人员
        return new Result(ex.getCode(),null,ex.getMessage());
    }

    @ExceptionHandler(BusinessException.class)
    public Result doBusinessException(BusinessException ex){
        return new Result(ex.getCode(),null,ex.getMessage());
    }

    //除了自定义的异常处理器,保留对Exception类型的异常处理,用于处理非预期的异常
    @ExceptionHandler(Exception.class)
    public Result doOtherException(Exception ex){
        //记录日志
        //发送消息给运维
        //发送邮件给开发人员,ex对象发送给开发人员
        return new Result(Code.SYSTEM_UNKNOW_ERR,null,"系统繁忙,请稍后再试!");
    }
}
书写异常
package com.itheima.controller;

import com.itheima.domain.Book;
import com.itheima.exception.BusinessException;
import com.itheima.exception.SystemException;
import com.itheima.service.BookService;
import org.springframework.beans.factory.annotation.Autowired;
import org.springframework.web.bind.annotation.*;

import java.util.List;

//统一每一个控制器方法返回值
@RestController
@RequestMapping("/books")
public class BookController {

    @Autowired
    private BookService bookService;

    @GetMapping("/{id}")
    public Result getById(@PathVariable Integer id) {
        if(id == 1){
            throw new BusinessException(Code.BUSINESS_ERR,"写错了噢");
        }

        try {
            int i = 1 / 0;
        }catch(Exception e){
            throw new SystemException(Code.SYSTEM_TIMEOUT_ERR,"访问超时");
        }

        Book book = bookService.getById(id);
        Integer code = book != null ? Code.GET_OK : Code.GET_ERR;
        String msg = book != null ? "" : "数据查询失败,请重试!";
        return new Result(code,book,msg);
    }

}
四、前端
编写处理前端路径的配置器SpringMvcSupport.class
package com.itheima.config;

import org.springframework.context.annotation.Configuration;
import org.springframework.web.servlet.config.annotation.ResourceHandlerRegistry;
import org.springframework.web.servlet.config.annotation.WebMvcConfigurationSupport;

@Configuration
public class SpringMvcSupport extends WebMvcConfigurationSupport {
    @Override
    protected void addResourceHandlers(ResourceHandlerRegistry registry) {
        registry.addResourceHandler("/pages/**").addResourceLocations("/pages/");
        registry.addResourceHandler("/css/**").addResourceLocations("/css/");
        registry.addResourceHandler("/js/**").addResourceLocations("/js/");
        registry.addResourceHandler("/plugins/**").addResourceLocations("/plugins/");
    }
}
<!DOCTYPE html>

<html>

    <head>

        <!-- 页面meta -->

        <meta charset="utf-8">

        <meta http-equiv="X-UA-Compatible" content="IE=edge">

        <title>SpringMVC案例</title>

        <meta content="width=device-width,initial-scale=1,maximum-scale=1,user-scalable=no" name="viewport">

        <!-- 引入样式 -->

        <link rel="stylesheet" href="../plugins/elementui/index.css">

        <link rel="stylesheet" href="../plugins/font-awesome/css/font-awesome.min.css">

        <link rel="stylesheet" href="../css/style.css">

    </head>

    <body class="hold-transition">

        <div id="app">

            <div class="content-header">

                <h1>图书管理</h1>

            </div>

            <div class="app-container">

                <div class="box">

                    <div class="filter-container">

                        <el-input placeholder="图书名称" v-model="pagination.queryString" style="width: 200px;" class="filter-item"></el-input>

                        <el-button @click="getAll()" class="dalfBut">查询</el-button>

                        <el-button type="primary" class="butT" @click="handleCreate()">新建</el-button>

                    </div>

                    <el-table size="small" current-row-key="id" :data="dataList" stripe highlight-current-row>

                        <el-table-column type="index" align="center" label="序号"></el-table-column>

                        <el-table-column prop="type" label="图书类别" align="center"></el-table-column>

                        <el-table-column prop="name" label="图书名称" align="center"></el-table-column>

                        <el-table-column prop="description" label="描述" align="center"></el-table-column>

                        <el-table-column label="操作" align="center">

                            <template slot-scope="scope">

                                <el-button type="primary" size="mini" @click="handleUpdate(scope.row)">编辑</el-button>

                                <el-button type="danger" size="mini" @click="handleDelete(scope.row)">删除</el-button>

                            </template>

                        </el-table-column>

                    </el-table>

                    <!-- 新增标签弹层 -->

                    <div class="add-form">

                        <el-dialog title="新增图书" :visible.sync="dialogFormVisible">

                            <el-form ref="dataAddForm" :model="formData" :rules="rules" label-position="right" label-width="100px">

                                <el-row>

                                    <el-col :span="12">

                                        <el-form-item label="图书类别" prop="type">

                                            <el-input v-model="formData.type"/>

                                        </el-form-item>

                                    </el-col>

                                    <el-col :span="12">

                                        <el-form-item label="图书名称" prop="name">

                                            <el-input v-model="formData.name"/>

                                        </el-form-item>

                                    </el-col>

                                </el-row>


                                <el-row>

                                    <el-col :span="24">

                                        <el-form-item label="描述">

                                            <el-input v-model="formData.description" type="textarea"></el-input>

                                        </el-form-item>

                                    </el-col>

                                </el-row>

                            </el-form>

                            <div slot="footer" class="dialog-footer">

                                <el-button @click="dialogFormVisible = false">取消</el-button>

                                <el-button type="primary" @click="handleAdd()">确定</el-button>

                            </div>

                        </el-dialog>

                    </div>

                    <!-- 编辑标签弹层 -->

                    <div class="add-form">

                        <el-dialog title="编辑检查项" :visible.sync="dialogFormVisible4Edit">

                            <el-form ref="dataEditForm" :model="formData" :rules="rules" label-position="right" label-width="100px">

                                <el-row>

                                    <el-col :span="12">

                                        <el-form-item label="图书类别" prop="type">

                                            <el-input v-model="formData.type"/>

                                        </el-form-item>

                                    </el-col>

                                    <el-col :span="12">

                                        <el-form-item label="图书名称" prop="name">

                                            <el-input v-model="formData.name"/>

                                        </el-form-item>

                                    </el-col>

                                </el-row>

                                <el-row>

                                    <el-col :span="24">

                                        <el-form-item label="描述">

                                            <el-input v-model="formData.description" type="textarea"></el-input>

                                        </el-form-item>

                                    </el-col>

                                </el-row>

                            </el-form>

                            <div slot="footer" class="dialog-footer">

                                <el-button @click="dialogFormVisible4Edit = false">取消</el-button>

                                <el-button type="primary" @click="handleEdit()">确定</el-button>

                            </div>

                        </el-dialog>

                    </div>

                </div>

            </div>

        </div>

    </body>

    <!-- 引入组件库 -->

    <script src="../js/vue.js"></script>

    <script src="../plugins/elementui/index.js"></script>

    <script type="text/javascript" src="../js/jquery.min.js"></script>

    <script src="../js/axios-0.18.0.js"></script>

    <script>
        var vue = new Vue({

            el: '#app',
            data:{
                pagination: {},
				dataList: [],//当前页要展示的列表数据
                formData: {},//表单数据
                dialogFormVisible: false,//控制表单是否可见
                dialogFormVisible4Edit:false,//编辑表单是否可见
                rules: {//校验规则
                    type: [{ required: true, message: '图书类别为必填项', trigger: 'blur' }],
                    name: [{ required: true, message: '图书名称为必填项', trigger: 'blur' }]
                }
            },

            //钩子函数,VUE对象初始化完成后自动执行
            created() {
                this.getAll();
            },

            methods: {
                //列表
                getAll() {
                    //发送ajax请求
                    axios.get("/books").then((res)=>{
                        this.dataList = res.data.data;
                    });
                },
                //弹出添加窗口
                handleCreate() {
                    this.dialogFormVisible = true;
                    this.resetForm();
                },

                //重置表单
                resetForm() {
                    this.formData = {};
                },

                //添加
                handleAdd () {
                    //发送ajax请求
                    axios.post("/books",this.formData).then((res)=>{
                        console.log(res.data);
                        //如果操作成功,关闭弹层,显示数据
                        if(res.data.code == 20011){
                            this.dialogFormVisible = false;
                            this.$message.success("添加成功");
                        }else if(res.data.code == 20010){
                            this.$message.error("添加失败");
                        }else{
                            this.$message.error(res.data.msg);
                        }
                    }).finally(()=>{
                        this.getAll();
                    });
                },

                //弹出编辑窗口
                handleUpdate(row) {
                    // console.log(row);   //row.id 查询条件
                    //查询数据,根据id查询
                    axios.get("/books/"+row.id).then((res)=>{
                        // console.log(res.data.data);
                        if(res.data.code == 20041){
                            //展示弹层,加载数据
                            this.formData = res.data.data;
                            this.dialogFormVisible4Edit = true;
                        }else{
                            this.$message.error(res.data.msg);
                        }
                    });
                },

                //编辑
                handleEdit() {
                    //发送ajax请求
                    axios.put("/books",this.formData).then((res)=>{
                        //将信息打印在控制台上
                        console.log(res.data)
                        //如果操作成功,关闭弹层,显示数据
                        if(res.data.code == 20031){
                            this.dialogFormVisible4Edit = false;
                            this.$message.success("修改成功");
                        }else if(res.data.code == 20030){
                            this.$message.error("修改失败");
                        }else{
                            this.$message.error(res.data.msg);
                        }
                    }).finally(()=>{
                        this.getAll();
                    });
                },

                // 删除
                handleDelete(row) {
                    //1.弹出提示框
                    this.$confirm("此操作永久删除当前数据,是否继续?","提示",{
                        type:'info'
                    }).then(()=>{
                        //2.做删除业务
                        axios.delete("/books/"+row.id).then((res)=>{
                            if(res.data.code == 20021){
                                this.$message.success("删除成功");
                            }else{
                                this.$message.error("删除失败");
                            }
                        }).finally(()=>{
                            this.getAll();
                        });
                    }).catch(()=>{
                        //3.取消删除
                        this.$message.info("取消删除操作");
                    });
                }
            }
        })

    </script>

</html>
五、拦截器
5.1 概念


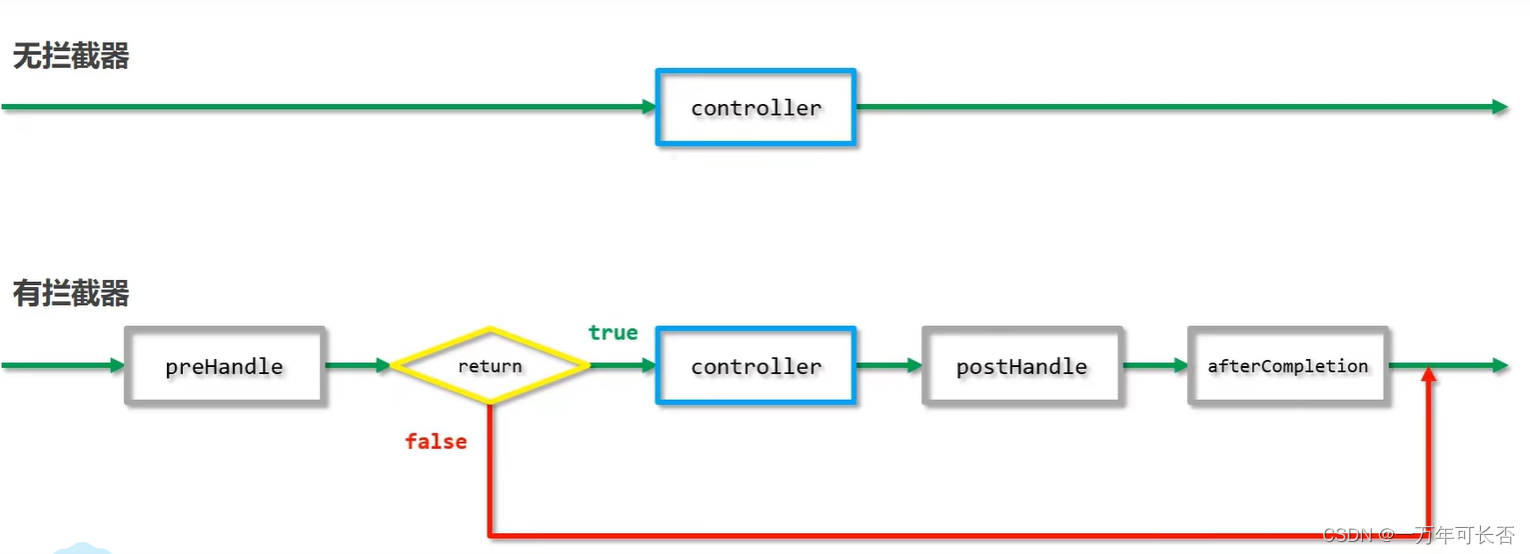
5.2 入门案例
第一步:声明拦截器的bean,并实现HandlerInterceptor接口,拦截器Intercepter一般放在controller(业务层)包下,需要在类前添加@Component注解。
当preHandle返回值类型可以拦截控制的执行,true放行,false终止。
@Component
//定义拦截器类,实现HandlerInterceptor接口
//注意当前类必须受Spring容器控制
public class ProjectInterceptor implements HandlerInterceptor {
@Override
//原始方法调用前执行的内容
//返回值类型可以拦截控制的执行,true放行,false终止
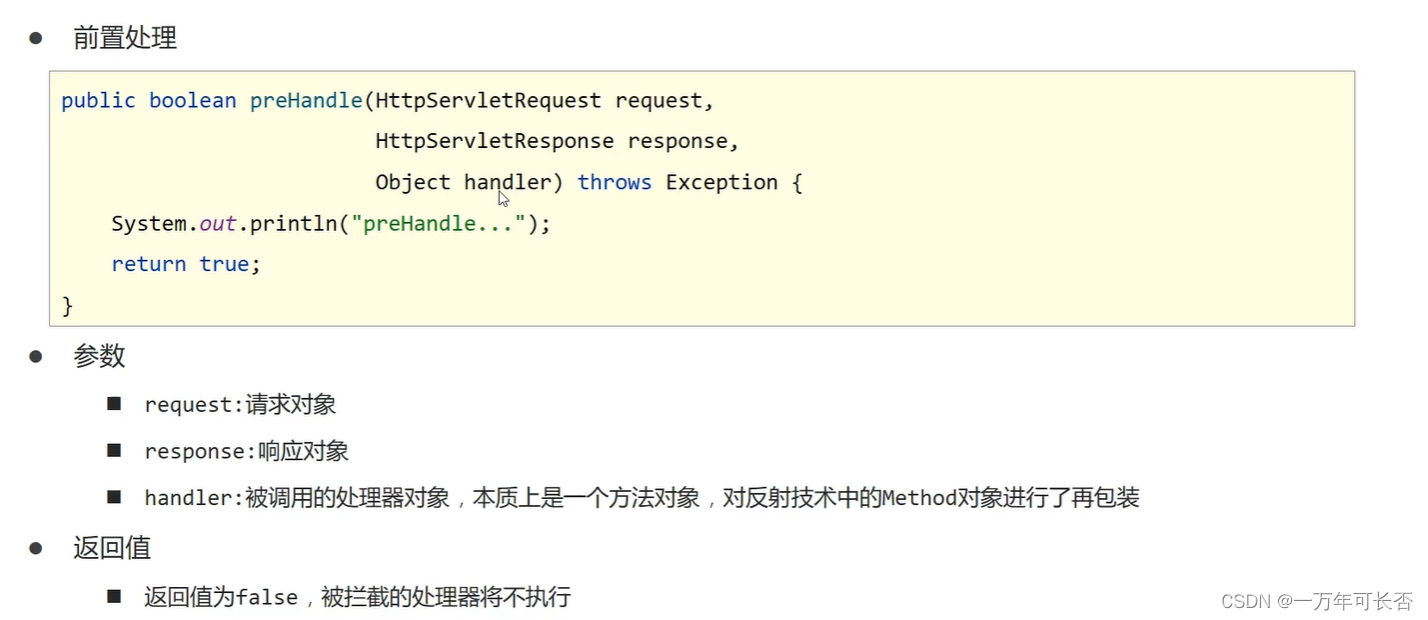
public boolean preHandle(HttpServletRequest request, HttpServletResponse response, Object handler) throws Exception {
String contentType = request.getHeader("Content-Type");
HandlerMethod hm = (HandlerMethod)handler;
System.out.println("preHandle..."+contentType);
return true;
}
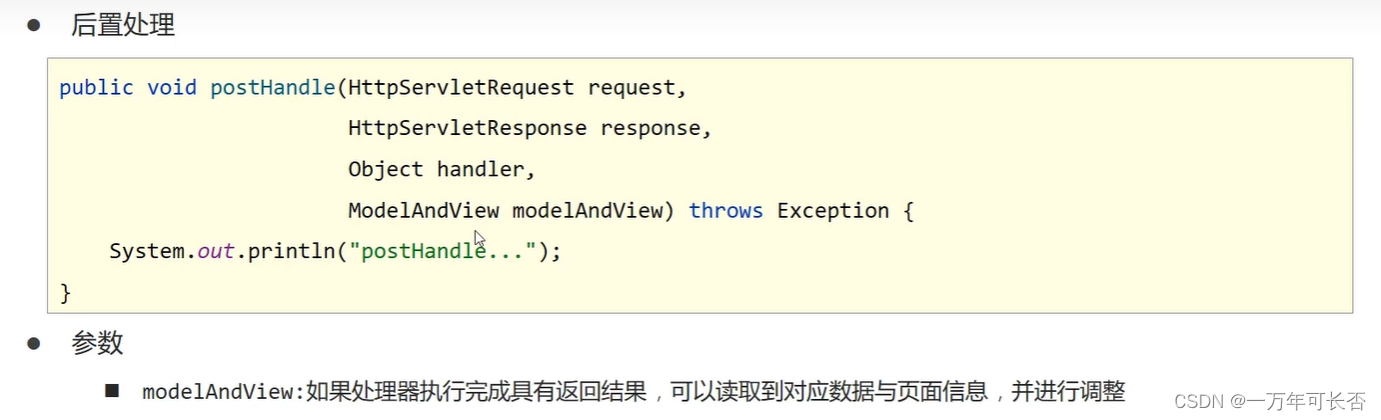
@Override
//原始方法调用后执行的内容
public void postHandle(HttpServletRequest request, HttpServletResponse response, Object handler, ModelAndView modelAndView) throws Exception {
System.out.println("postHandle...");
}
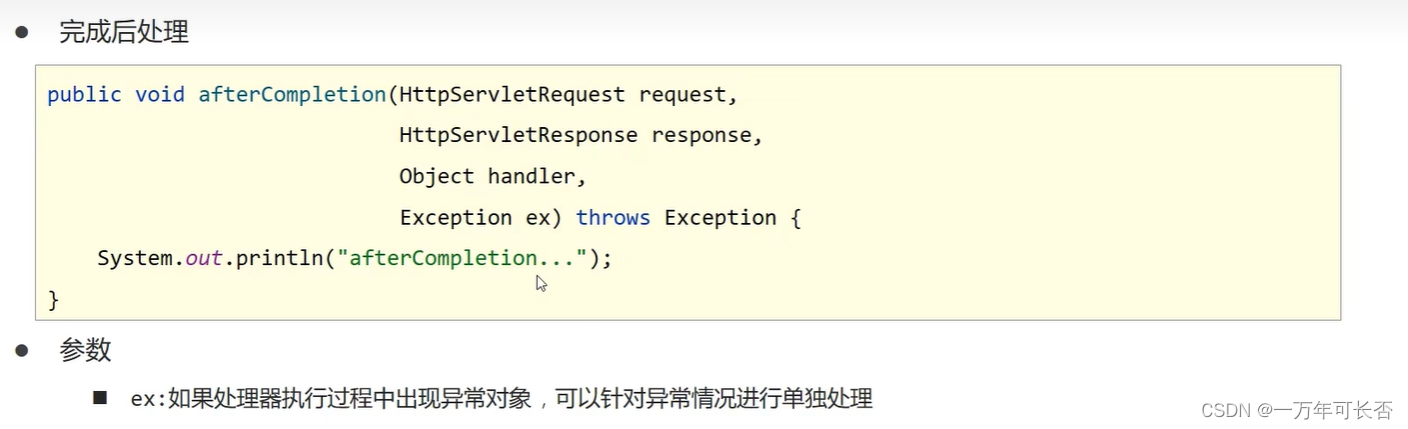
@Override
//原始方法调用完成后执行的内容
public void afterCompletion(HttpServletRequest request, HttpServletResponse response, Object handler, Exception ex) throws Exception {
System.out.println("afterCompletion...");
}
}
第二步:定义配置类,继承WebMvcConfigurationSupport,实现方法addInterceptors,需要在类前添加@Configuration注解
@Configuration
public class SpringMvcSupport extends WebMvcConfigurationSupport {
    @Autowired
    private ProjectInterceptor projectInterceptor;

    @Override
    protected void addResourceHandlers(ResourceHandlerRegistry registry) {
        registry.addResourceHandler("/pages/**").addResourceLocations("/pages/");
    }

    @Override
    protected void addInterceptors(InterceptorRegistry registry) {
        //配置拦截器
        registry.addInterceptor(projectInterceptor).addPathPatterns("/books","/books/*");
    }
}
第三步:在SpringMvc的配置类前添加@ComponentScan({“com.itheima.controller”,“com.itheima.config”}),以便拦截器ProjectInterceptor和配置类SpringMvcSupport被SpringMvc扫描到。
@Configuration
@ComponentScan({"com.itheima.controller"})
@EnableWebMvc
public class SpringMvcConfig{
}
@Configuration
@ComponentScan({"com.itheima.controller","com.itheima.config"})
@EnableWebMvc
//实现WebMvcConfigurer接口可以简化开发,但具有一定的侵入性
public class SpringMvcConfig implements WebMvcConfigurer {
    @Autowired
    private ProjectInterceptor projectInterceptor;
    @Autowired
    private ProjectInterceptor2 projectInterceptor2;

    @Override
    public void addInterceptors(InterceptorRegistry registry) {
        //配置多拦截器
        registry.addInterceptor(projectInterceptor).addPathPatterns("/books","/books/*");
        registry.addInterceptor(projectInterceptor2).addPathPatterns("/books","/books/*");
    }
}
5.3 拦截器参数
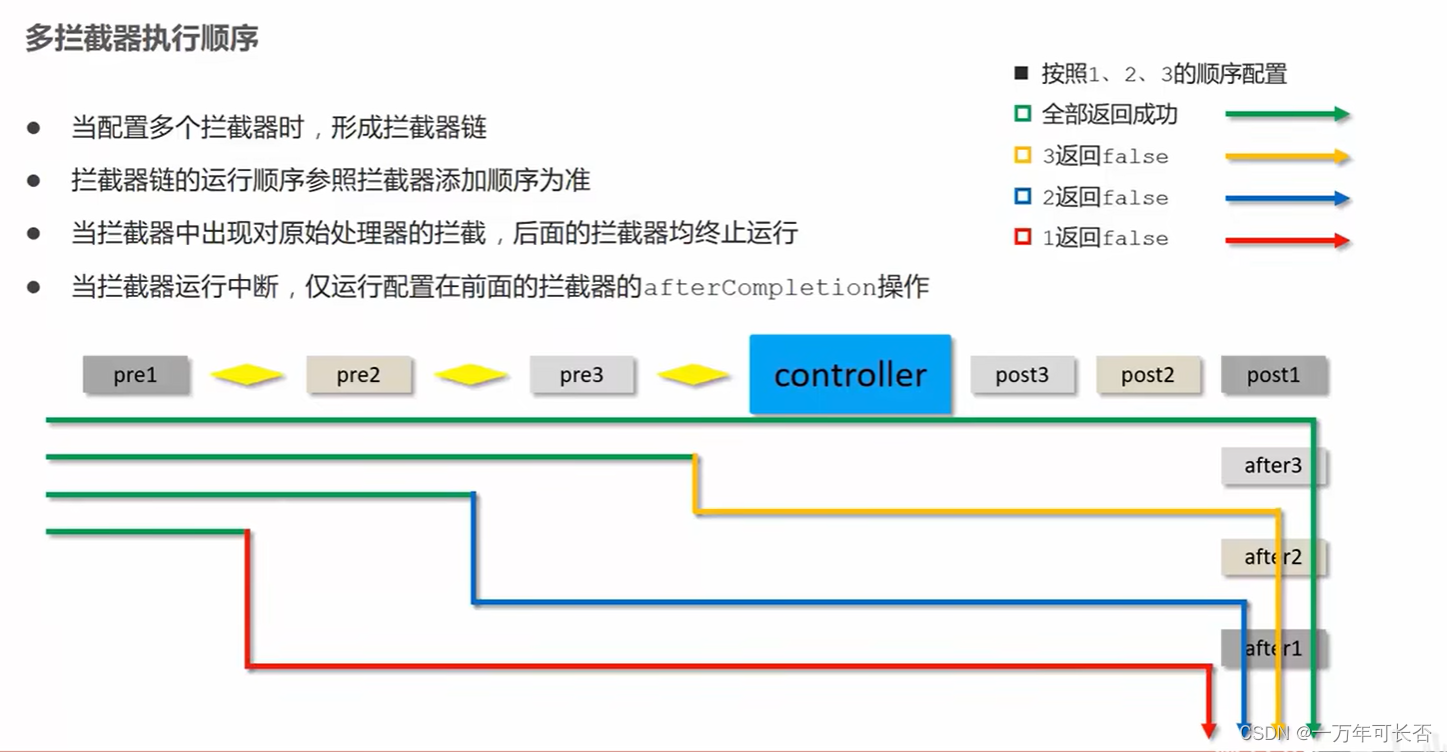
5.4 拦截器链
原文地址:https://blog.csdn.net/shendaiyan/article/details/134678236
本文来自互联网用户投稿,该文观点仅代表作者本人,不代表本站立场。本站仅提供信息存储空间服务,不拥有所有权,不承担相关法律责任。
如若转载,请注明出处:http://www.7code.cn/show_20402.html
如若内容造成侵权/违法违规/事实不符,请联系代码007邮箱:suwngjj01@126.com进行投诉反馈,一经查实,立即删除!