4、使用vue3 + vite + TypeScript 搭建新项目
3、遇到的坑:vue中给点击事件@click 使用三元运算符
1. uni.navigateTo(object) 保留当前页面,跳转到应用中其他页面(同router.push)
2. uni.redirectTo(object) 关闭当前页面,跳转到应用中其他页面(同router.replace)
3. uni.switchTab(object) 跳转到tabBar页面,关闭其他所有非tabBar页面
4. uni.navigateBack(object) 关闭当前页面,返回上一级或多级页面(同router.go(-1))
5. uni.reLaunch(object) 关闭所有页面,打开到应用内的某个页面
1. uni.showToast(object) 和 uni.hideToast()
2. uni.showLoading(object) 和 uni.hideLoading()
4. uni.showActionSheet(object)
1、uni-app view相当于div,text相当于span,image=img
2. 原生js写法:window.location.reload()
4、uni-app easycom组件模式:无需引入、注册组件,直接使用
1、遇到的坑:uni-app 跳转路径时前面自动拼接pages/xxx/,导致路由跳转失败
2、uni-app vue2的uni.request(object)封装
3、遇到的坑:vue3无法使用splice删除数组中某个对象
3、vue3 对银行卡号位数进行格式化(每隔4位自动补一个空格)
4、input 输入金额格式化,只能输入一个小数点,只能输入两位小数
5、遇到的坑:ts 联合类型->类型“xxx”的参数不能赋给类型“string”的参数
6、ts console报错:类型“any”的参数不能赋给类型“never”的参数
1、vant组件库中的List列表:瀑布流滚动加载,用于展示长列表
2、遇到的坑:try…catch…机制,后端传来的错误信息只在catch里获取
1、遇到的坑:vant组件库中的轮播图、tab标签页显示第二张图片后面会有第三张图片的边边
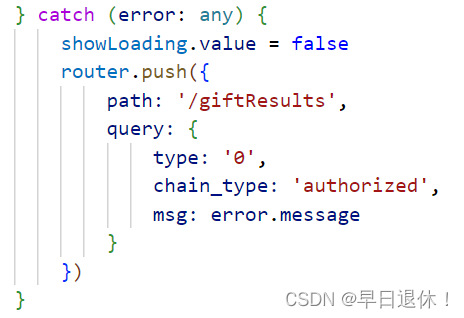
2、遇到的坑:在catch到错误之后,路由一直跳转不了失败结果提示页
3、padding 三位数表示什么?第二位表示左右的padding
1、在vue3、ts中使用three.js展示3D(glb)模型
1、vue3、ts使用three.js加载glb模型(加载完成就显示模型)
2、vue3、ts使用three.js加载glb模型(模型显示不出来的问题)
2. 实在不行,就加上 requestAnimationFrame()
2022.09.01
1、overflow:auto;
2、封装通用axios返回值类型
import axios from 'axios'

declare module 'axios' {
    interface AxiosInstance {
        (data: AxiosRequestConfig): Promise<{
            code: number
            data: any
            message: string
        }>
    }
}3、vite构建的vue3项目适配移动端
npm i lib-flexible postcss-pxtorem -Dimport postCssPxToRem from "postcss-pxtorem"在vite.config.ts中找到css部分,添加以下代码
css:{
	// 此代码为适配移动端px2rem
    postcss: {
      plugins: [
        postCssPxToRem({
          rootValue: 37.5, // 1rem的大小
          propList: ['*'], // 需要转换的属性,这里选择全部都进行转换
        })
      ]
    }
  }
import 'lib-flexible'<meta name="viewport" content="width=device-width, initial-scale=1, minimum-scale=1, maximum-scale=1, user-scalable=no, viewport-fit=cover">4、使用vue3 + vite + TypeScript 搭建新项目
1. 新建项目
npm init vite project(项目名称)cd project(项目路径)npm installnpm run dev2. 配置vue–router 4
npm install vue-router@4.0.12在项目src下新建router目录,然后添加index.ts文件
import { createRouter, createWebHistory, RouteRecordRaw } from "vue-router";
const routes: Array<RouteRecordRaw> = [
// {
// name: 'Home',
// path: '/home',
// component: () => import('../views/home/index.vue')
// }
];
const router = createRouter({
history: createWebHistory(),
routes,
});
export default router;
import { createApp } from 'vue'
import App from './App.vue'
import router from './router'

createApp(App).use(router).mount('#app')
3. 配置vuex 4
npm install vuex@4在项目src下新建store目录,然后添加index.ts文件
import { createStore } from 'vuex'

import modules from './modules'

export const store = createStore({
    modules
})在store目录下,添加modules文件夹,在modules文件夹下新建index.ts文件以及其他模块文件
import base from './base'
import home from './home'
import order from './order'
import my from './my'

export default {
    base,
    home,
    order,
    my
}其他模块文件
export default {
    namespaced: true,
    state: {},
    mutations: {},
    actions: {},
    getters: {}
}
5、 深拷贝和浅拷贝
1. 浅拷贝
let obj1 = Object.assign({}, obj);let obj1 = {...obj};第三种方法:Array.prototype.concat()
let arr1 = arr.concat([]);let arr1 = arr.slice();2. 深拷贝
let obj1 = JSON.parse(JSON.stringify(obj))const deepClone = target => {
if(typeof target === 'object') {
const cloneTarget = Array.isArray(target) ? [] : {};
for (const key in target) {
cloneTarget[key] = deepClone(target[key]);
};
return cloneTarget;
} else {
return target;
}
}第四种方法:jQuery.extend()方法,需引入jQuery库
let obj1 = jQuery.extend(true, {}, obj); //第一个参数为true才是深拷贝2022.09.02
1、同步与异步
同步:一个进程在执行某个请求的时候,若该请求需要一段时间才能返回信息,那么这个进程将会一直等待下去,直到收到返回信息才继续执行下去,这样就称为同步,同步代码会按照一定的顺序去执行。
异步:进程不需要一直等下去,而是继续执行下面的操作,不管其他进程的状态。
解决异步:通过回调的方式去调用函数,来控制函数执行的先后顺序。
回调函数嵌套过多,容易造成回调地狱。使用Promise方法避免了回调地狱。
//Promise语法
let myPromise = new Promise(function(resolve, reject) {
    resolve(); // 成功时
    reject();  // 出错时
});

myPromise.then(
    function(value) { /* 成功时的代码 */ },
    function(error) { /* 出错时的代码 */ }
);2、事件循环 event loop
console.log('start');

setTimeout(function(){
    console.log('setTimeout');
},0)

new Promise(resolve =>{
    console.log('Promise');
    resolve();
})
    .then(function(){
        console.log('promise1');
    })
    .then(function(){
        console.log('promise2');
    })

console.log('end');结果: start -> Promise -> end -> promise1 -> promise2 -> setTimeout
执行栈:一个用来存放函数的执行上下文环境的一个栈结构,遵循着先进后出的规则。
宏任务队列包括:script、setTimeout、setInterval、setImmediate (node环境下是,而浏览器环境下不是)、I/O、UI-rendering、requestAnimationFrame (在浏览器环境是,而node环境不是)。
微任务队列包括:process.nextTick、promise.then、MutationObserver。
事件循环:等待宿主环境分配宏观任务,反复等待 – 执行即为Event-Loop(事件循环)。
第二步:当执行完所有的同步代码后,执行栈为空,检查是否有异步代码要执行。(注意只是检查,并非此刻检查出来就执行,而是看它是第几层次的异步代码在第几次循环执行,引擎在找到异步代码的时候会将其挂起,即装起来放在一边)
第三步:执行微任务。
第五步:开启下一轮Event-Loop,执行宏任务中的代码。(这就算是下次事件循环的开始第一步,上一次的异步,在此刻也将变为这一次执行的同步)
第一步找出同步代码:
console.log('start');

new Promise(resolve =>{
    console.log('Promise');
    resolve();
})

console.log('end');

将其执行完;于是优先打印出了start -> Promise -> end第二步就在执行完所有同步代码后,检查是否有异步代码,
我们很快就能找到定时器所在异步代码(即便定时器定时为0,那也是属于异步代码)
setTimeout(function(){
console.log('setTimeout');
},0)
将其挂起,放到一边先不要管。第三步则是找到微任务并将其执行:
.then(function(){
console.log('promise1');
})
.then(function(){
console.log('promise2');
})
那么继上一次打印结果之后再次打印出了:promise1 -> promise2第四步,执行完微任务后,有必要将会渲染页面,但是这里我们是纯原生JS,
并没有需要渲染的DOM结构,可以跳过这个环节,同时,这一轮Event-Loop结束。第五步,开启下一轮Event-Loop,我们刚才挂起的异步代码已然成为了这一轮的第一个步骤中的同步代码
那么它将会成为这一轮Event-Loop的第一步首先执行。
setTimeout(function(){
console.log('setTimeout');
},0)
那么我们将会继续打印出setTimeout
本来我们在执行完这个操作应该继续循环Event-Loop操作,但是我们知道所有代码都已经执行完,
后续也没有可执行代码,也就不用执行下去了。转载于:十分钟带你了解javascript里的面试“常客”——Event-Loop,async-await – 掘金 (juejin.cn)
3、遇到的坑:vue中给点击事件@click 使用三元运算符
@click="!userInfo.account ? createAccount : ''"@click="!userInfo.account ? createAccount() : ''"要给事件加上()括号。
4、将用户信息通过vuex存入localStorage中
只要一请求actions中的函数接口,就会把获取到的数据随时存入localStorage中。
import { ActionContext } from 'vuex'

// IStore为每个vuex模块的总数据type
import { IStore } from '../types'

export type IUser = {
    userInfo: IUserInfo
}

export interface IUserInfo {
    token: string
    id: string
    name: string
    mobile: string
    avatar: string
}

// 先定义空数据
const userInfo = {
    token: '',
    id: '',
    name: '',
    mobile: '',
    avatar: ''
}

// 定义一个user,从本地获取数据 或者 赋值userInfo的空数据
const user = JSON.parse(localStorage.getItem('userInfo') || JSON.stringify(userInfo))

export default {
    namespaced: true,
    state: {
        userInfo: user
    },
    mutations: {
        ['SET_USER_INFO'](state: IUser, payload: IUserInfo) {
            state.userInfo = { ...state.userInfo, ...payload }
            // 将数据 或者 空对象存入localStorage中
            localStorage.setItem('userInfo', JSON.stringify(state.userInfo || {}))
        }
    },
    actions: {
        async getUserInfo({ commit }: ActionContext<IUser, IStore>, payload: {}) {
            const res = await getUserInfoApi()
            if (res.code === 200) {
                // 触发mutations中的函数
                commit('SET_USER_INFO', res.data || {})
            }
        }
    }
}5、项目中凌乱的各种TS类型注解
treee -L 4 -I "node_modules|.idea|objects|.git" -a --dirs-first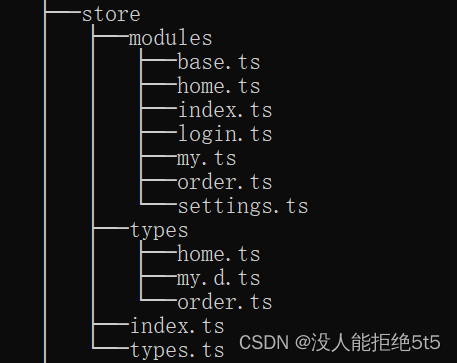
// 全部状态的订单数据

export interface IMyOrder {
// 状态:pending 待发货,shipped 已发货,received 已收货,completed 已完成,canceled 已取消
    [pending: string]: IMyOrderData
    shipped: IMyOrderData
    received: IMyOrderData
    completed: IMyOrderData
    canceled: IMyOrderData
}
// 订单数据,查到共有多少条
export interface IMyOrderData {
total: number
list: IMyOrderList[]
}// 订单里详细的数据字段
export interface IMyOrderList {
id: string
buyer_name: string
price: string
......
}import { IMyOrder, IMyOrderData, IMyOrderList } from '../types/order'
// IOrderState对象里的属性都与state里的一致
// 定义state的type:IOrderState
export type IOrderState = {
myOrder: IMyOrder // 全部的订单数据
orderDetail: IMyOrderList // 订单里详细的数据字段
ActiveTab: number
}
state: {
myOrder: {},
orderDetail: {},
ActiveTab: 0
},// mutations
// state 的类型注解为 state的type
// payload 的类型注解为 actions中传的数据类型(定义接口Interface)
['SET_ORDER_DETAIL'](state: IOrderState, payload: IMyOrderList) {
state.orderDetail = payload
},// actions
// {commit} 的类型注解为 ActionContext<state的type, vuex总的type>
// payload 的类型注解为 传给后端的数据类型
async myOrderDetail({ commit }: ActionContext<IOrderState, IStore>, payload: string) {
const res = await myOrderDetailApi(payload)
commit('SET_ORDER_DETAIL', res.data || {})
},api/order.ts文件
// 要求以什么参数查询订单

export interface IMyOrderApi {
    limit: number  // 查询数量
    skip: number  // 开始索引
    sort: number  // -1倒叙,1正序
    state?: string
    sortBy: string  // 按什么分类查
}
// 订单接口
// data 的类型注解为 传给后端的数据类型(定义接口Interface)
export const myOrderApi = (data: IMyOrderApi) => {
return service({
url: '/me/order',
method: 'POST',
data // 传给后端的数据
})
}// 引入所有vuex模块的state的type
import { IOrderState } from './modules/order'
......
export interface IStore {
order: IOrderState
......
}2022.09.05
1、css实现常见的卡片圆弧
border-bottom-left-radius: 30rpx;
border-bottom-right-radius: 30rpx;
2、uni–app 路由与页面跳转API
1. uni.navigateTo(object) 保留当前页面,跳转到应用中其他页面(同router.push)
使用uni.navigateBack(object)可以返回到原页面
//在起始页面跳转到test.vue页面并传递参数
uni.navigateTo({
	url: 'test?id=1&name=uniapp'
});
// vue2

// 在test.vue页面接受参数
onLoad: function (option) { //option为object类型,会序列化上个页面传递的参数
	console.log(option.id);
	console.log(option.name);
}
// vue3

// 通过 props 来获取上一个页面参数
<script setup lang="ts">
  // 页面可以通过定义 props 来直接接收 url 传入的参数
  const props = defineProps({
    id: String,
    name: String
  });
  console.log(props.id);
  console.log(props.name);
</script>
// vue3

// 在页面 <script setup> 中
<script setup>
  import {
    onLoad,
    onShow
  } from "@dcloudio/uni-app";

  // onLoad 接受上一个页面传递的参数
  onLoad((option) => {
    console.log("新页面 onLoad:", option); //新页面 onLoad: {id: '1', name: 'uniapp'}
  });

  onShow(() => {
    console.log("新页面 onShow");
  });
</script>
2. uni.redirectTo(object) 关闭当前页面,跳转到应用中其他页面(同router.replace)
3. uni.switchTab(object) 跳转到tabBar页面,关闭其他所有非tabBar页面
4. uni.navigateBack(object) 关闭当前页面,返回上一级或多级页面(同router.go(-1))
uni.navigateBack({
	delta: 2  // 返回的页面数,如果 delta 大于现有页面数,则返回到首页
});
5. uni.reLaunch(object) 关闭所有页面,打开到应用内的某个页面
6. 总结
navigateTo,redirectTo 只能打开非tabBar页面。
3、uni-app 界面——交互反馈API
1. uni.showToast(object) 和 uni.hideToast()
uni.showToast({
	title: '登录成功',
	duration: 2000
});
2. uni.showLoading(object) 和 uni.hideLoading()
显示 loading 提示框, 需主动调用 uni.hideLoading 才能关闭提示框。
uni.showLoading({
	title: '加载中...'
});
3. uni.showModal(object)
显示模态弹窗,可以只有一个确定按钮,也可以同时有确定和取消按钮。
uni.showModal({
	title: '退出登录',
	content: '您确定退出登录吗?',
	success(res => {
		if (res.confirm) {
            // 弹框显示退出成功
			uni.showToast({
                 title: '退出成功'
            });
		} else if (res.cancel) {
			console.log('取消');
		}
    })
});
4. uni.showActionSheet(object)
uni.showActionSheet({
	itemList: ['A', 'B', 'C'],
	success: function (res) {
		console.log('选中了第' + (res.tapIndex + 1) + '个按钮');
	},
	fail: function (res) {
		console.log(res.errMsg);
	}
});
2022.09.06
1、uni-app view相当于div,text相当于span,image=img
image组件:页面结构复杂,css样式太多的情况,使用 image 可能导致样式生效较慢,出现 “闪一下” 的情况,此时设置 image{will-change: transform} ,可优化此问题。
2、刷新当前页面
1. vue2写法:this.$router.go(0)
2. 原生js写法:window.location.reload()
3、将2022-09-06转化为2022.09.06
var time = '2022-09-06'
var time1 = time.replace(/(-)/g,".")
console.log(time1)4、uni-app easycom组件模式:无需引入、注册组件,直接使用
只要组件安装在项目的 components 目录下,并符合 components/组件名称/组件名称.vue 的目录结构,就可以不用引入、注册,直接在页面中使用。
<template>
  <view>
    <!-- 无需引入、注册,直接使用组件即可-->
    <tab-bar></tab-bar>
  </view>
</template>

<script setup lang="ts">

</script>5、uni-app 滚动穿透
弹窗遮罩显示时,底层页面仍可滚动。给遮罩最外层 view 增加事件 @touchmove.stop.prevent
<view class="pop-box" @touchmove.stop.prevent>
    // 弹窗组件
    <pop></pop>
</view>6、uni-app IOS底部安全区
问题:iOS 全面屏设备的屏幕底部有黑色横条显示,会对页面造成遮挡,影响事件点击和视觉效果。Android 没有横条,不受影响。
解决方法:使用 css 样式 constant(safe-area-inset-bottom)和 env(safe-area-inset-bottom) 来处理。
<template>
    <view class="bottomBar"></view>
</template>

<style lang="less" scoped>
.bottomBar {
    /*
        两个方法都写,会自动选择能够生效的来使用
        可以使用calc方法来计算,根据实际情况灵活使用
    */
    padding-bottom: calc(0rpx + constant(safe-area-inset-bottom));
    padding-bottom: calc(0rpx + env(safe-area-inset-bottom));
}
</style>
2022.09.08
1、遇到的坑:uni-app 跳转路径时前面自动拼接pages/xxx/,导致路由跳转失败
pages/call/index?query=”” 前面加上 / 如果不加,就会出现这个问题。
正确写法:/pages/call/index?query=”” 或者 ../call/index?query=””
2、uni-app vue2的uni.request(object)封装
转载于:uni.request封装_乾卦三爻的博客-CSDN博客_uni.request封装
3、遇到的坑:vue3无法使用splice删除数组中某个对象
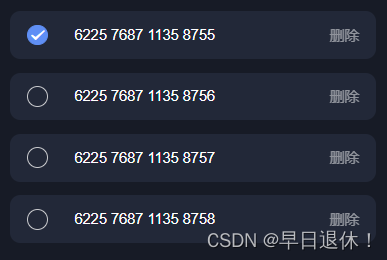
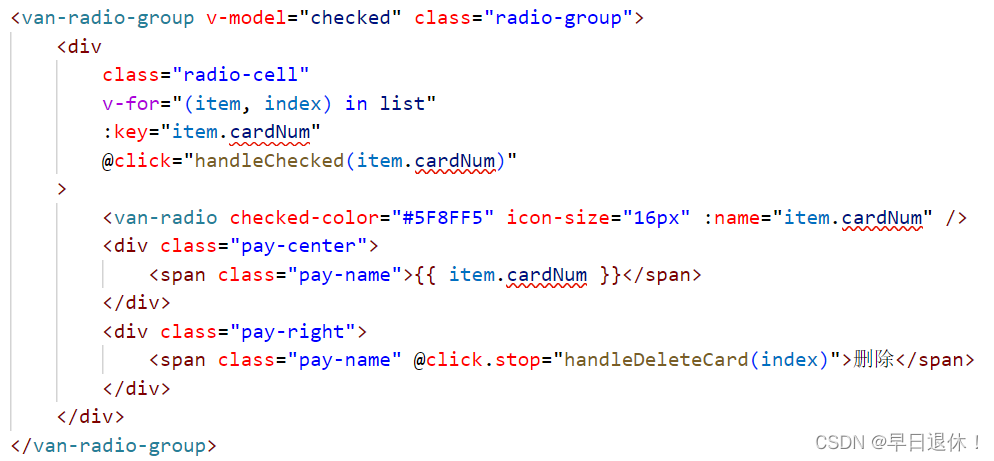
说明:出现这种情况的主要原因在于key的绑定问题,v-for只负责循环组件,而组件的唯一标识却是用key来确定的。而我这里只是单纯的使用index来指定每一个组件的key,而没有与数组中元素挂钩,因此当删除数组元素时,vue会采用一种叫做‘就地复用’的原则,将旁边的元素直接拿过来使用,从而看起来就像是栈弹出元素一样。而js中对象属于地址索引,因此key绑定对象的属性,当删除数组中某个对象时,能抓住是哪个对象被删除掉了,从而删除指定的节点。
错误:之前我代码是:key=”index”的,点击删除按钮的时候其余项全被删了,只剩下一项。
正确写法:


2022.09.09
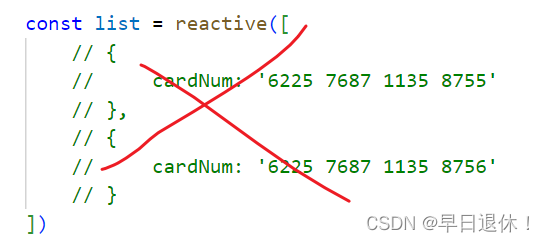
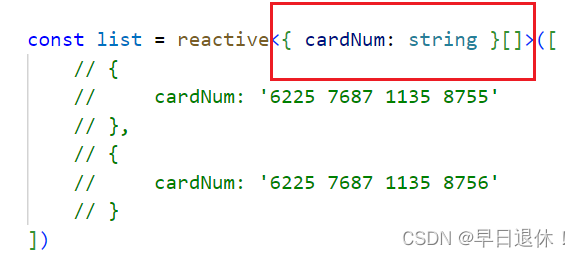
1、遇到的坑:ts 空数组的类型注解
错误:虽然页面可以正常显示,但是代码报红,而且项目打包的时候也可能过不了。
正确写法:
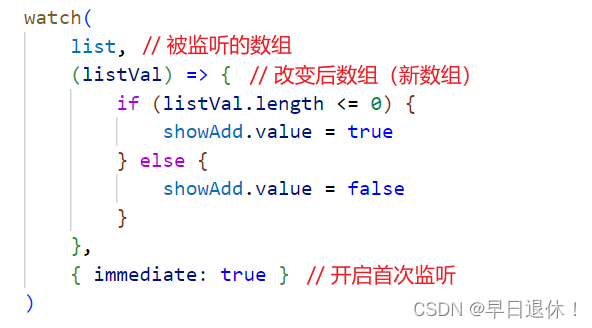
2、vue3 watch监听器
const showAdd = ref(”) 一定要写在watch前面,不然会报没有showAdd的错
3、vue3 对银行卡号位数进行格式化(每隔4位自动补一个空格)
ts中:
const cardFormat = (cardID: string) => {
    return cardID.toString().replace(/(d{4})/g, '$1 ')
}
页面中:
<div>{{ cardFormat(item.cardNum) }}</div>效果:

ts中:
const formatCardNumber = (e: any) => {
    // 获取input的dom对象
    const input = e.target
    // 获取当前光标的位置
    const cursorIndex = input.selectionStart
    // 字符串中光标之前空格的个数
    const lineNumOfCursorLeft = (e.target.value.slice(0, cursorIndex).match(/s/g) || []).length
    // 去掉所有空格的字符串
    const noLine = e.target.value.replace(/s/g, '')
    // 去除格式不对的字符并重新插入空格的字符串
    const newCardNum = noLine
        .replace(/D+/g, '')
        .replace(/(d{4})/g, '$1 ')
        .replace(/s$/, '')
    // 改后字符串中原光标之前空格的个数
    const newLineNumOfCursorLeft = (newCardNum.slice(0, cursorIndex).match(/s/g) || []).length
    // 光标在改后字符串中应在的位置
    const newCursorIndex = cursorIndex + newLineNumOfCursorLeft - lineNumOfCursorLeft
    // 赋新值,nextTick保证空格不能手动输入或删除,只能按照规则自动填入
    nextTick(() => {
        cardNum.value = newCardNum
        // 修正光标位置,nextTick保证在渲染新值后定位光标
        nextTick(() => {
            // selectionStart、selectionEnd分别代表选择一段文本时的开头和结尾位置
            input.selectionStart = newCursorIndex
            input.selectionEnd = newCursorIndex
        })
    })
}
页面中:
<input
    type="text"
    placeholder="请输入您的银行卡号"
    class="input"
    v-model.trim="cardNum"
    autofocus="true"
    oninput="if(value.length>35)value=value.slice(0,35)"
    @click="handleInput"
    @input="formatCardNumber"
/>
效果:

4、input 输入金额格式化,只能输入一个小数点,只能输入两位小数
<input type="text" @input="handleAmountChange" v-model.number.trim="cardNum" />const handleAmountChange = (e: any) => {
//过滤e字符
e.target.value = e.target.value.replace('e', '')
//判断输入是数字和.
e.target.value = e.target.value.replace(/[^d.]/g, '')
cardNum.value = e.target.value
// 必须保证第一个为数字而不是.
cardNum.value = cardNum.value.replace(/^./g, '0.')
// 保证只有出现一个.而没有多个.
cardNum.value = cardNum.value.replace(/.{2,}/g, '.')
// 保证.只出现一次,而不能出现两次以上
e.target.value = e.target.value.replace('.', '$#$').replace(/./g, '').replace('$#$', '.')
//只能输入两个小数
cardNum.value = cardNum.value.replace(/^()*(d+).(dd).*$/, '$1$2.$3')
}转载于:Vue输入金额格式_luckdolphin的博客-CSDN博客_vue的input金额格式化
5、遇到的坑:ts 联合类型->类型“xxx”的参数不能赋给类型“string”的参数
报错:“LocationQueryValue | LocationQueryValue[]”的参数不能赋给类型“string”的参数。不能将类型“null”分配给类型“string”
说明:cardNum可以是null,它的类型可能是string | null,这是一种联合类型。要消除掉它为null的情况。

正确写法:

或者:直接用 any大法

6、ts console报错:类型“any”的参数不能赋给类型“never”的参数
错误:
const cardLists = reactive({
  list: []
});

cardLists.list.push(res.data); //error
解决方法:
const cardLists = reactive({
  list: [] as any[] //属性需要做类型断言处理
});

cardLists.list.push(res.data); //success
2022.09.14
1、vant组件库中的List列表:瀑布流滚动加载,用于展示长列表
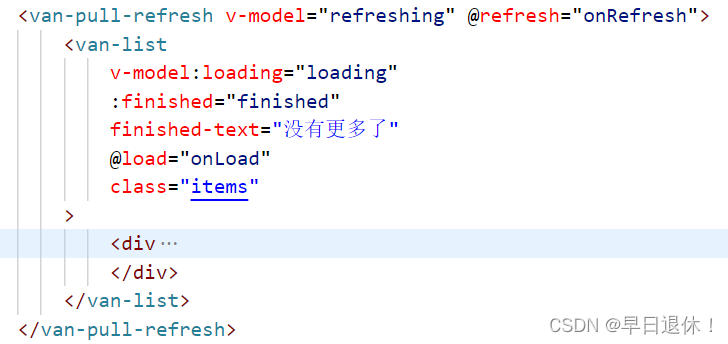
ts代码:
const onLoad = () => {
    if (items.length < count) {
        loading.value = false
    } else {
        finished.value = true
        loading.value = true
    }
}

const parameter = reactive({
    page: 0,
    size: 20 //向后端请求一页20个数据
})

const onRefresh = async () => {
    if ( items.length === 0 || items.length < count ) {
        parameter.page = parameter.page + 1
        await store.dispatch('base/getListData', parameter)
    }
    //  + parameter.size 为一开始页面加载完,在页面上显示的数据
    // (不知道为什么一开始要加,后来第二天又试了一下,发现加上又不对了!!)
    if (items.length + parameter.size >= count) {
        finished.value = true
    } else {
        finished.value = false
    }

    refreshing.value = false
    loading.value = false
}
2022.09.15
1、apply、call、bind的区别
bind 是返回对应函数,便于稍后调用;apply 、call 则是立即调用 。
apply 和 call 都是为了改变某个函数运行时的上下文(context)而存在的。简言之,就是为了改变函数体内部 this 的指向。
apply 和 call 的作用完全一样,只是接受参数的方式不太一样。
func.call(this, arg1, arg2) //参数按顺序
func.apply(this, [arg1, arg2]) //以数组的形式
2、遇到的坑:try…catch…机制,后端传来的错误信息只在catch里获取
我好像个傻子,写了一个多小时吧那个显示后端返回来的错误信息在页面上。我还想了两种方法。
第一种:在前一个页面发送请求的时候,把message存到vuex中,在结果页获取vuex中的msg。
结果:可能获取不到数据,因为没有在这个页面发送请求(这玩意儿有时灵有时不灵,我也不懂)
第二种:在跳转到结果页时,把前一个页面发送请求获得的message一起发送到结果页,在结果页以route.query.msg获取。
结果:感觉会成功(不用感觉了,一定可以)结果啪啪打脸,数据一直传不过去,想了两种可能,第一种我还以为浏览器缓存问题,清除缓存重新运行页面,还是接收不到数据,又换了个浏览器还是不行。第二种心想不会code为500,后端没给我传数据吧,但是在浏览器的网络里明明看到响应了呀!
// actions中
// 用try...catch...

async getDataList(
    { commit }: ActionContext<IMy, IStore>,
    payload: { list: string[] }
) {
    try {
        const res = await getDataApi(payload)
        return Promise.resolve(res || {})
    } catch (error) {
        return Promise.reject()
    }
}
// 页面中
// 也用try...catch...
// 定义res接收结果
try {
const res = await store.dispatch('my/getDataList', { list: lists.value })
router.push({
path: '/results',
query: {
type: res.code === 200 ? '1' : '0'
}
})
} catch (error: any) { // 从后端接收到code为500的数据,错误信息要放在catch里
router.push({
path: '/results',
query: {
type: '0',
msg: error.message
}
})
}2022.09.16
1、遇到的坑:vant组件库中的轮播图、tab标签页显示第二张图片后面会有第三张图片的边边
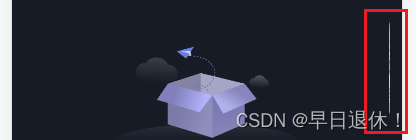
说明:不要让它的宽度加上padding和margin后超出设定的滑块宽度。
我的做法是把padding加大一点点。

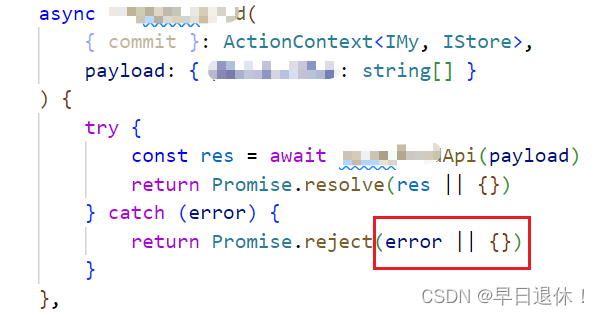
2、遇到的坑:在catch到错误之后,路由一直跳转不了失败结果提示页
错误原因:因为我在actions中没有return它的error。
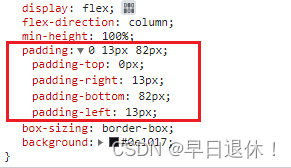
3、padding 三位数表示什么?第二位表示左右的padding
2022.09.19
1、css3实现柔和的线条,两边模糊到中间清晰
<div class="box"></div>
.box {
  margin: 200px auto;
  width: 500px;
  height: 2px;
  background: -webkit-linear-gradient(
    left,
    #fff 14%,
    #333 50%,
    #fff 100%
  );
}
效果:

2、css实现圆弧形的呼吸灯效果
<div class="father"><div class="one"></div></div>.father {
position: relative;
top: 200px;
left: 0;
box-sizing: border-box;
width: 204px;
height: 204px;
background-color: transparent;
overflow: hidden;
margin: 0 auto;
}
.one {
width: 1002px;
height: 1002px;
margin-top: -854px;
margin-left: -403px;
border-bottom: 5px solid #D5D1EE
box-shadow: 0px 0px 10px #D5D1EE;
background-color: transparent;
border-radius: 50%;
overflow: hidden;
animation-name: anima;
animation-duration: 3s;
animation-iteration-count: infinite;
/* 动画执行方向 */
animation-direction: alternate;
/* 动画速度曲线 匀速 */
animation-timing-function: linear;
}
@keyframes anima {
from {
opacity: 0.2;
}
to {
opacity: 1;
}
}3、uniapp 预览图片长按保存图片到相册
// 预览长按保存到相册
const previewImage = () => {
    uni.previewImage({
        urls: [props.image],
        longPressActions: {
            itemList: ['保存图片'],
            success: () => {
                //先下载到本地获取临时路径
                uni.downloadFile({
                    url: props.image,
                    success: (res) => {
                        //将临时路径保存到相册,即可在相册中查看图片
                        uni.saveImageToPhotosAlbum({
                            filePath: res.tempFilePath, //不支持网络地址
                            success: () => {
                                uni.showToast({
                                    title: '图片保存成功',
                                    position: 'bottom'
                                })
                            }
                        })
                    },
                    fail: () => {
                        uni.showToast({ title: '图片保存失败' })
                    }
                })
            },
            fail: (err) => {
                console.log(err.errMsg)
            }
        }
    })
}
<van-image
v-if="materialType === 'image'"
v-show="!showImg"
width="100%"
height="100%"
fit="cover"
:src="image || 'default'"
@load="load"
@error="error"
@tap="previewImage"
></van-image>2022.09.21
1、uniapp 跳转路径过长,参数传不齐导致出错
正确写法:使用 encodeURIComponent() 来进行传参。
const handleInterest = () => {
    uni.navigateTo({
        url:
            '/pages/collectionInterest/index?id=' +
            encodeURIComponent(props.id) +
            '&userId=' +
            encodeURIComponent(props.userId) +
            '&orderId=' +
            encodeURIComponent(props.orderId)
    })
}2、css设置图片灰度
img {
    // 设置成100%就变成了黑白图
    filter: grayscale(100%);
    -webkit-filter: grayscale(100%); /* Chrome, Safari, Opera */
}
2022.09.23
1、js枚举 属性是number类型,怎么取对应的属性值
const status = { 0: '已结束', 1: '未开始', 2: '进行中' }<div> {{ status[0] }} </div>如果属性是字符串的话就直接用 . 点,比如:status.finished
2022.09.29
1、在vue3、ts中使用three.js展示3D(glb)模型
npm install three

// 使用的是ts,所以下载一下这个
npm install @types/three 消除警告,在src根目录下的 shims-vue.d.ts 文件
declare module "@types/three"<template>
<div @click="popUp"></div>
<van-popup v-model:show="showPop">
<div id="three"></div>
</van-popup>
</template><script setup lang="ts">
import * as THREE from 'three'
//引入轨道控制器(用来通过鼠标事件控制模型旋转、缩放、移动)
import { OrbitControls } from 'three/examples/jsm/controls/OrbitControls'
import { GLTFLoader } from 'three/examples/jsm/loaders/GLTFLoader'
import { ref, nextTick } from 'vue'
// 弹出层是否展示
const showPop = ref(false)
/**
*
* 1、创建场景
*
*/
//创建一个三维场景
const scene = new THREE.Scene()
//添加光源
//AmbientLight:环境光源,均匀照亮所有物体,防止有些光源照射不到呈现不出来
//PointLight:点光源,类似灯泡发出的光,可以投射阴影,使模型更加立体
const ambient = new THREE.AmbientLight(0xffffff, 0.5),
light1 = new THREE.PointLight(0xffffff, 0.4),
light2 = new THREE.PointLight(0xffffff, 0.4)
//每创建一个object都需要将其添加到三维场景中
scene.add(ambient)
//设置点光源所在位置
light1.position.set(200, 300, 400)
scene.add(light1)
light2.position.set(-200, -300, -400)
scene.add(light2)
//创建一个透视相机
const width = window.innerWidth,
height = window.innerHeight,
camera = new THREE.PerspectiveCamera(45, width / height, 1, 1000)
//设置相机位置
camera.position.set(200, 200, 200)
//设置相机方向
camera.lookAt(0, 0, 0)
/**
*
* 2、创建背景
*
*/
const createUniverse = () => {
const BgImg = 'rgba(0,0,0,0)'
let texture = new THREE.TextureLoader().load(BgImg) // 加载背景贴图
scene.background = texture // 设置场景背景
}
createUniverse()
/**
*
* 3、创建模型
*
*/
//创建辅助坐标轴
const axesHelper = new THREE.AxesHelper(100)
scene.add(axesHelper)
// // 创建一个物体(形状)
// const geometry = new THREE.BoxGeometry(100, 100, 100)
// // 创建材质(外观)
// const material = new THREE.MeshLambertMaterial({
// color: 0x00ffff, //设置材质颜色
// transparent: true, //开启透明度
// opacity: 0.5 //设置透明度
// })
// // 创建一个网格模型对象
// const mesh = new THREE.Mesh(geometry, material)
// // 把网格模型添加到三维场景
// scene.add(mesh)
/**
*
* 4、渲染
*
*/
//创建一个WebGL渲染器
const renderer = new THREE.WebGLRenderer()
renderer.setSize(width, height)
// 执行渲染操作
const animate = () => {
renderer.render(scene, camera)
}
//创建轨道控制器
const controls = new OrbitControls(camera, renderer.domElement)
//添加事件监听 当事件发生改变时触发
controls.addEventListener('change', () => {
//重新渲染
animate()
})
/**
*
* 5、加载glb、gltf模型
*
*/
const publicPath = '/Eraser.glb' // 将模型放到public文件夹下
// 免费模型网:http://glbxz.com/err/search.php?keyword=%E5%85%8D%E8%B4%B9
// 也可以从自己电脑的《3D查看器》里找。
const loadGlbModel = () => {
const loader = new GLTFLoader()
loader.load(
`${publicPath}`,
(gltf) => {
console.log(gltf.scene)
gltf.scene.scale.set(100, 100, 100) // 设置模型大小缩放
gltf.scene.position.set(0, 0, 0)
let axis = new THREE.Vector3(0, 1, 0) //向量axis
gltf.scene.rotateOnAxis(axis, Math.PI / 2)
//绕axis轴逆旋转π/16
gltf.scene.rotateOnAxis(axis, Math.PI / -20)
gltf.scene.rotateOnAxis(axis, Math.PI / 50)
scene.add(gltf.scene)
},
(xhr) => {
// console.log((xhr.loaded / xhr.total) * 100 + '% loaded')
},
(error) => {
console.error(error)
}
)
}
loadGlbModel()
// 这个是我点击小图之后弹出的弹出层。将模型放到弹出层上。
const popUp = () => {
showPop.value = true
//将渲染器绘制出的canvas添加到页面中
nextTick(() => {
// 首次渲染
animate()
document.getElementById('three')?.appendChild(renderer.domElement)
})
}
</script>2022.09.30
1、vue3、ts使用three.js加载glb模型(加载完成就显示模型)
<template>
    <div class="threeBooth" :class="{ nit_mb: !billContent }">
        <div class="container">
            <div :class="[materialType === 'three' ? 'contentThree' : 'contentDefault']">
                <div id="three" v-if="materialType === 'three'"></div>
            </div>
        </div>
    </div>
</template>
<script setup lang="ts">
import * as THREE from 'three'
//引入轨道控制器(用来通过鼠标事件控制模型旋转、缩放、移动)
import { OrbitControls } from 'three/examples/jsm/controls/OrbitControls'
import { GLTFLoader } from 'three/examples/jsm/loaders/GLTFLoader'
import { computed, onMounted, ref } from 'vue'

/**
 *
 * 1、创建场景
 *
 */
//创建一个三维场景
const scene = new THREE.Scene()

//添加光源
//AmbientLight:环境光源,均匀照亮所有物体,防止有些光源照射不到呈现不出来
//PointLight:点光源,类似灯泡发出的光,可以投射阴影,使模型更加立体
const ambient = new THREE.AmbientLight(0xffffff, 0.5),
    light1 = new THREE.PointLight(0xffffff, 0.4),
    light2 = new THREE.PointLight(0xffffff, 0.4)
//每创建一个object都需要将其添加到三维场景中
scene.add(ambient)
//设置点光源所在位置
light1.position.set(200, 300, 400)
scene.add(light1)
light2.position.set(-200, -300, -400)
scene.add(light2)

//创建一个透视相机
const width = window.innerWidth,
    height = window.innerHeight,
    camera = new THREE.PerspectiveCamera(45, width / height, 1, 1000)
//设置相机位置
camera.position.set(26, 26, 26)
// camera.position.set(500, 500, 500)
//设置相机方向
camera.lookAt(0, 0, 0)

/**
 *
 * 2、创建背景
 *
 */
// const createUniverse = () => {
//     const BgImg = 'rgba(0,0,0,0)'
//     let texture = new THREE.TextureLoader().load(BgImg) // 加载背景贴图
//     scene.background = texture // 设置场景背景
// }
// createUniverse()

/**
 *
 * 3、创建模型
 *
 */
//创建辅助坐标轴
// const axesHelper = new THREE.AxesHelper(100)
// scene.add(axesHelper)
// // 创建一个物体(形状)
// const geometry = new THREE.BoxGeometry(100, 100, 100)
// // 创建材质(外观)
// const material = new THREE.MeshLambertMaterial({
//     color: 0x00ffff, //设置材质颜色
//     transparent: true, //开启透明度
//     opacity: 0.5 //设置透明度
// })
// // 创建一个网格模型对象
// const mesh = new THREE.Mesh(geometry, material)
// // 把网格模型添加到三维场景
// scene.add(mesh)

/**
 *
 * 4、渲染
 *
 */
//创建一个WebGL渲染器
const renderer = new THREE.WebGLRenderer({
    // 在构造函数参数中设置alpha属性的值,透明显示
    alpha: true
})
renderer.setSize(width, 258)
// renderer.setSize(width, height)
// renderer.setClearColor(0xffffff, 0) //或者设置背景颜色:透明
// 执行渲染操作
const animate = () => {
    requestAnimationFrame(animate)
    renderer.render(scene, camera)
}
animate()

//创建轨道控制器
const controls = new OrbitControls(camera, renderer.domElement)
//添加事件监听 当事件发生改变时触发
controls.addEventListener('change', () => {
    //重新渲染
    renderer.render(scene, camera)
})

/**
 *
 * 5、加载glb、gltf模型
 *
 */
const publicPath = '/Eraser.glb'

const loadGlbModel = () => {
    const loader = new GLTFLoader()
    loader.load(
        `${publicPath}`,
        (gltf) => {
            console.log(gltf.scene)

            // gltf.scene.scale.set(50, 50, 50) //  设置模型大小缩放
            gltf.scene.scale.set(100, 100, 100) //  设置模型大小缩放
            gltf.scene.position.set(0, 0, 0)
            let axis = new THREE.Vector3(0, 1, 0) //向量axis
            gltf.scene.rotateOnAxis(axis, Math.PI / 2)
            //绕axis轴逆旋转π/16
            gltf.scene.rotateOnAxis(axis, Math.PI / -20)
            gltf.scene.rotateOnAxis(axis, Math.PI / 50)
            scene.add(gltf.scene)
        },
        (xhr) => {
            console.log((xhr.loaded / xhr.total) * 100 + '% loaded')
        },
        (error) => {
            console.error(error)
        }
    )
}
loadGlbModel()

onMounted(() => {
    document.getElementById('three')?.appendChild(renderer.domElement)
})
</script>
2、vue3、ts使用three.js加载glb模型(模型显示不出来的问题)
解决办法:
1. 首次一定要渲染
renderer.render(scene, camera)2. 实在不行,就加上 requestAnimationFrame()
// 执行渲染操作
const animate = () => {
    requestAnimationFrame(animate)
    renderer.render(scene, camera)
}
animate()
3. 挂载一定要在onMounted生命周期函数里
onMounted(() => {
    document.getElementById('three')?.appendChild(renderer.domElement)
})
4. 其他问题:怎么设置canvas的背景颜色为透明?
// 创建一个WebGL渲染器
const renderer = new THREE.WebGLRenderer({
    // 在构造函数参数中设置alpha属性的值,透明显示
    alpha: true
})

//或者 设置背景颜色:透明
renderer.setClearColor(0xffffff, 0)原文地址:https://blog.csdn.net/weixin_48894212/article/details/126637139
本文来自互联网用户投稿,该文观点仅代表作者本人,不代表本站立场。本站仅提供信息存储空间服务,不拥有所有权,不承担相关法律责任。
如若转载,请注明出处:http://www.7code.cn/show_20892.html
如若内容造成侵权/违法违规/事实不符,请联系代码007邮箱:suwngjj01@126.com进行投诉反馈,一经查实,立即删除!

