RabbitMQ工作模式
1.路由模式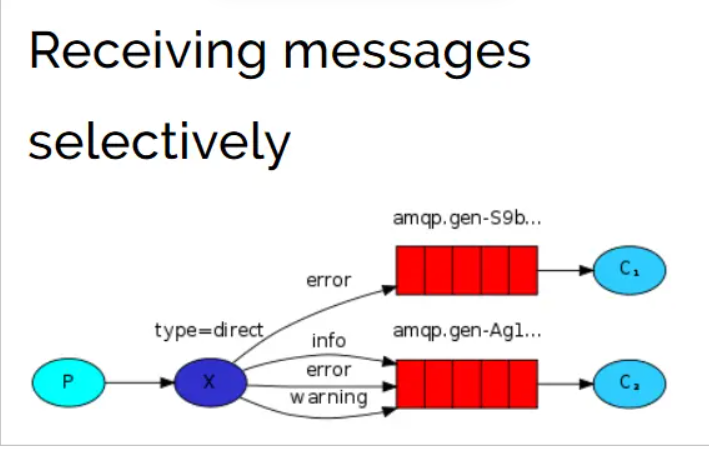
创建交换机 , 连接队列 (生产者)
public class MyTestExDirect {
    @Test
    public void bbb() throws IOException, TimeoutException {
        ConnectionFactory connectionFactory = new ConnectionFactory();
        //连接mq
        connectionFactory.setUsername("账号");
        connectionFactory.setPassword("密码");
        connectionFactory.setHost("ip地址");
        connectionFactory.setPort(端口号);
        connectionFactory.setVirtualHost("/aaa");
        //建立连接
        Connection connection = connectionFactory.newConnection();
        Channel channel = connection.createChannel();
        //创建交换机
        channel.exchangeDeclare("ex_direct", BuiltinExchangeType.DIRECT,false);
        //创建队列
        /**
         * String queue, 队列的名称
         * boolean durable, 持久化
         * boolean exclusive, 是否独占
         * boolean autoDelete,  受否自动删除
         * Map<String, Object> arguments  参数
         */
        channel.queueDeclare("mydirect1",false,false,false,null);
        channel.queueDeclare("mydirect2",false,false,false,null);
        //绑定交换机和队列   设置routingkey
        channel.queueBind("mydirect1","ex_direct","error");
        channel.queueBind("mydirect2","ex_direct","test");
        channel.queueBind("mydirect2","ex_direct","test2");
        //交换机     routingkey     根据routingkey在队列上发布消息
        channel.basicPublish("ex_direct","error",null,"路由模式测试".getBytes());
    }
}


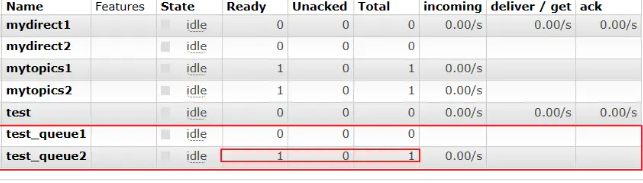
通过routingkey “error” 将消息发送到 mydirect1

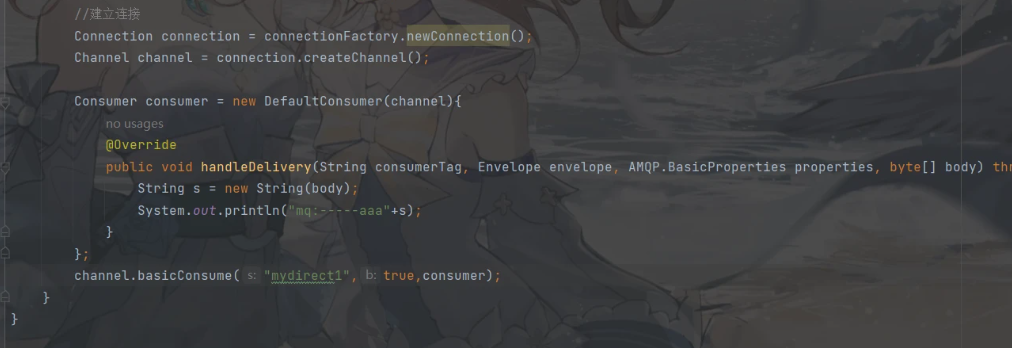
创建消费者
public class ConsumerAppDirect
{
    public static void main( String[] args ) throws IOException, TimeoutException {
        ConnectionFactory connectionFactory = new ConnectionFactory();
        //连接mq
        connectionFactory.setUsername("账号");
        connectionFactory.setPassword("密码");
        connectionFactory.setHost("ip地址");
        connectionFactory.setPort(端口号);
        connectionFactory.setVirtualHost("/aaa");
        //建立连接
        Connection connection = connectionFactory.newConnection();
        Channel channel = connection.createChannel();
        Consumer consumer = new DefaultConsumer(channel){
            @Override
            public void handleDelivery(String consumerTag, Envelope envelope, AMQP.BasicProperties properties, byte[] body) throws IOException {
                String s = new String(body);
                System.out.println("mq:-----aaa"+s);
            }
        };
        channel.basicConsume("mydirect1",true,consumer);
    }
}

2.Topics 主题模式
Topic类型与Direct相比,都是可以根据RoutingKey把消息路由到不同的队列。只不过Topic类型Exchange可以让队列在绑定Routing key 的时候使用通配符!
Routingkey 一般都是有一个或多个单词组成,多个单词之间以”.”分割,例如: item.insert
*:匹配不多不少恰好1个词 test.* test.insert
举例:
item.#:能够匹配item.insert.abc 或者 item.insert

创建交换机和生产者
public class MyTestExTopics {
    @Test
    public void ccc() throws IOException, TimeoutException {
        ConnectionFactory connectionFactory = new ConnectionFactory();
        //连接mq
        connectionFactory.setUsername("账号");
        connectionFactory.setPassword("密码");
        connectionFactory.setHost("ip地址");
        connectionFactory.setPort(端口号);
        connectionFactory.setVirtualHost("/aaa");
        //建立连接
        Connection connection = connectionFactory.newConnection();
        Channel channel = connection.createChannel();
        //创建交换机
        channel.exchangeDeclare("ex_topics", BuiltinExchangeType.TOPIC,false);
        //创建队列
        /**
         * String queue, 队列的名称
         * boolean durable, 持久化
         * boolean exclusive, 是否独占
         * boolean autoDelete,  受否自动删除
         * Map<String, Object> arguments  参数
         */
        channel.queueDeclare("mytopics1",false,false,false,null);
        channel.queueDeclare("mytopics2",false,false,false,null);
        //绑定交换机和队列   设置routingkey
        channel.queueBind("mytopics1","ex_topics","test.#");
        channel.queueBind("mytopics2","ex_topics","*.aaa");
        channel.queueBind("mytopics2","ex_topics","test.*");
        //交换机     此处的routingkey应该是具体的值     根据routingkey在队列上发布消息
        channel.basicPublish("ex_topics","test.aaa",null,"TOPIC模式测试".getBytes());


    }
}


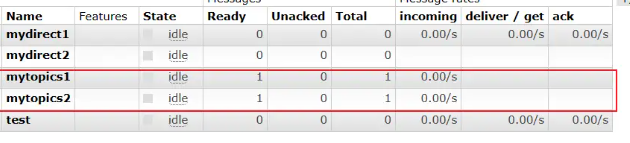

发布消息成功
SpringBoot整合RabbitMQ
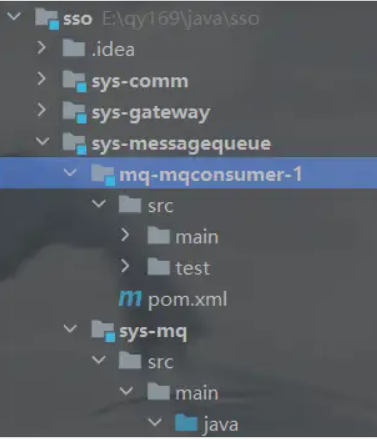
1.搭建项目
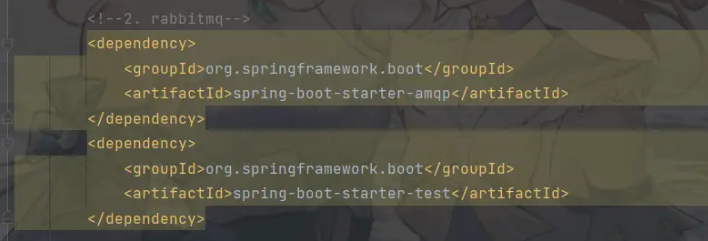
添加依赖
<!--2. rabbitmq-->
        <dependency>
            <groupId>org.springframework.boot</groupId>
            <artifactId>spring-boot-starter-amqp</artifactId>
        </dependency>
        <dependency>
            <groupId>org.springframework.boot</groupId>
            <artifactId>spring-boot-starter-test</artifactId>
        </dependency>
        <dependency>
            <groupId>org.springframework.boot</groupId>
            <artifactId>spring-boot-starter-web</artifactId>
        </dependency>
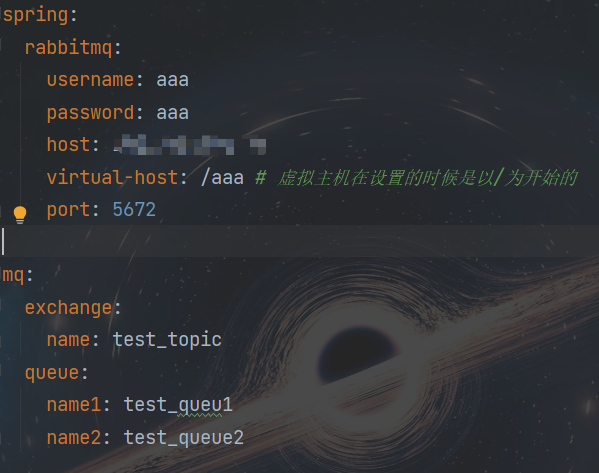
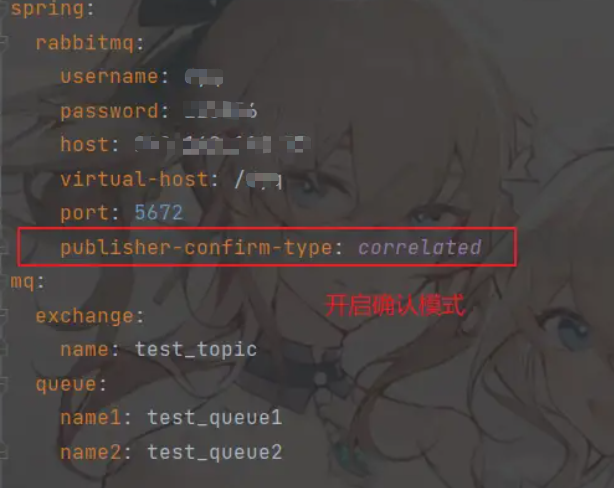
添加配置文件
2.创建工作模式(主题模式)
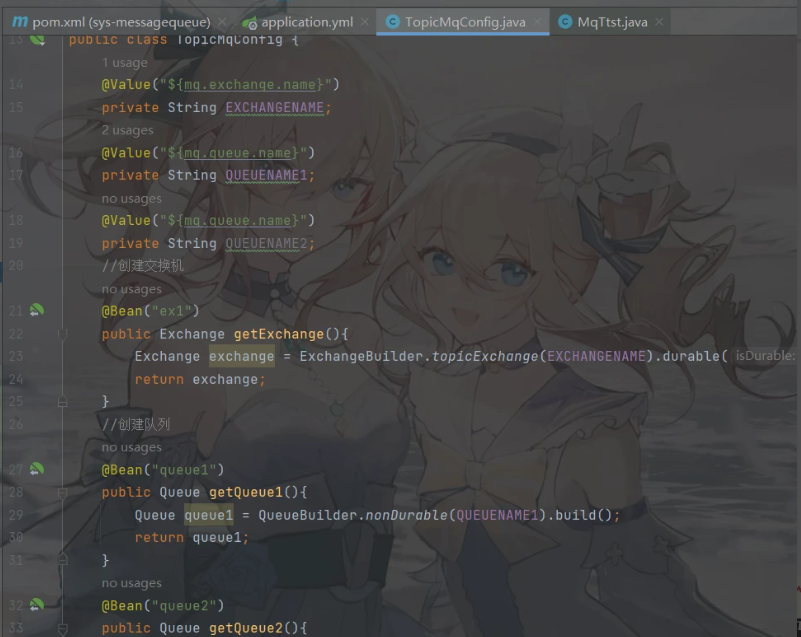
1)创建交换机和队列
package com.example.config;


import org.springframework.amqp.core.*;
import org.springframework.beans.factory.annotation.Qualifier;
import org.springframework.beans.factory.annotation.Value;
import org.springframework.context.annotation.Bean;
import org.springframework.context.annotation.Configuration;


@Configuration
public class TopicMqConfig {
    @Value("${mq.exchange.name}")
    private String EXCHANGENAME;
    @Value("${mq.queue.name}")
    private String QUEUENAME1;
    @Value("${mq.queue.name}")
    private String QUEUENAME2;
    //创建交换机
    @Bean("ex1")
    public Exchange getExchange(){
        Exchange exchange = ExchangeBuilder.topicExchange(EXCHANGENAME).durable(false).build();
        return exchange;
    }
    //创建队列
    @Bean("queue1")
    public Queue getQueue1(){
        Queue queue1 = QueueBuilder.nonDurable(QUEUENAME1).build();
        return queue1;
    }
    @Bean("queue2")
    public Queue getQueue2(){
        Queue queue2 = QueueBuilder.nonDurable(QUEUENAME1).build();
        return queue2;
    }
    //绑定交换机和队列
    @Bean("binding1")
    public Binding bindingQueueToExchange1(@Qualifier("ex1") Exchange exchange,@Qualifier("queue1") Queue queue){
        Binding binding1 = BindingBuilder.bind(queue).to(exchange).with("*.*").noargs();
        return binding1;
    }
    @Bean("binding2")
    public Binding bindingQueueToExchange2(@Qualifier("ex1") Exchange exchange,@Qualifier("queue2") Queue queue){
        Binding binding2 = BindingBuilder.bind(queue).to(exchange).with("test.*").noargs();
        return binding2;
    }
}
2)创建生产者

测试

3)创建消费者
创建配置文件

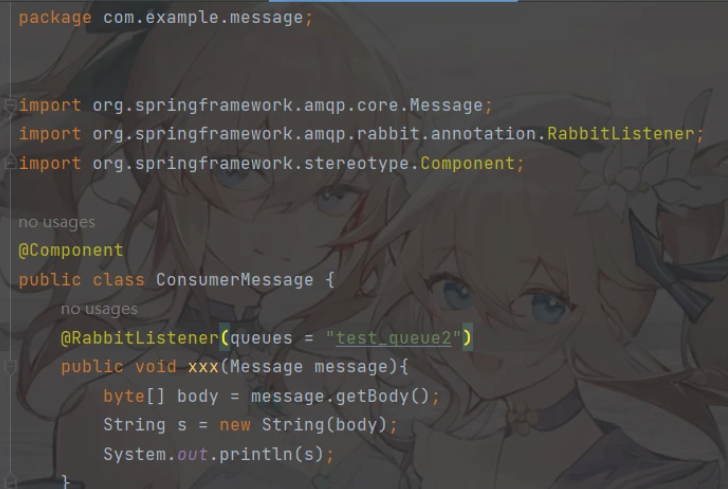
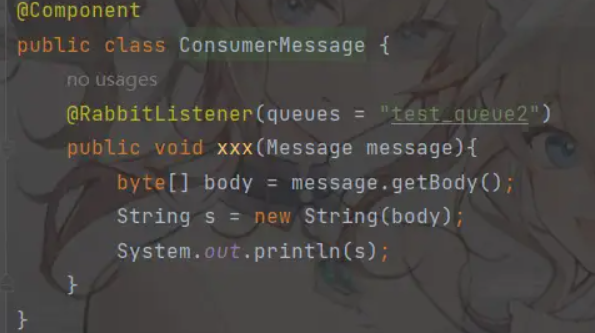
创建测试类 监听队列
package com.example.message;


import org.springframework.amqp.core.Message;
import org.springframework.amqp.rabbit.annotation.RabbitListener;
import org.springframework.stereotype.Component;
@Component
public class ConsumerMessage {
    @RabbitListener(queues = "test_queue2")
    public void xxx(Message message){
        byte[] body = message.getBody();
        String s = new String(body);
        System.out.println(s);
    }
}
测试


MQ高级特性,消息的可靠性传递
1.确认模式
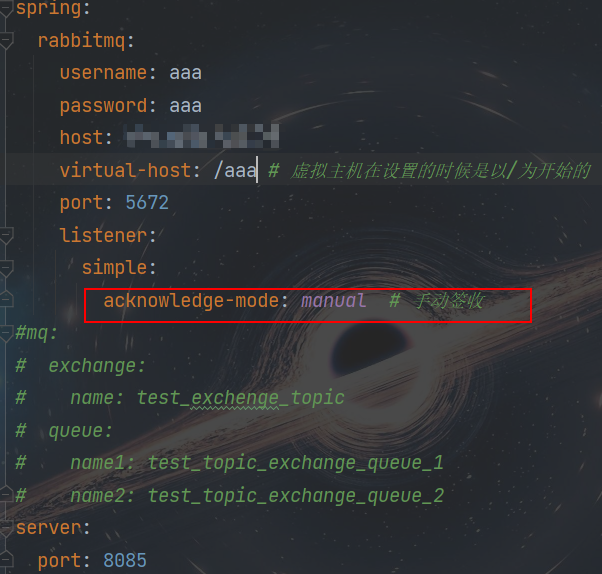
开启确认模式 修改配置
创建测试类
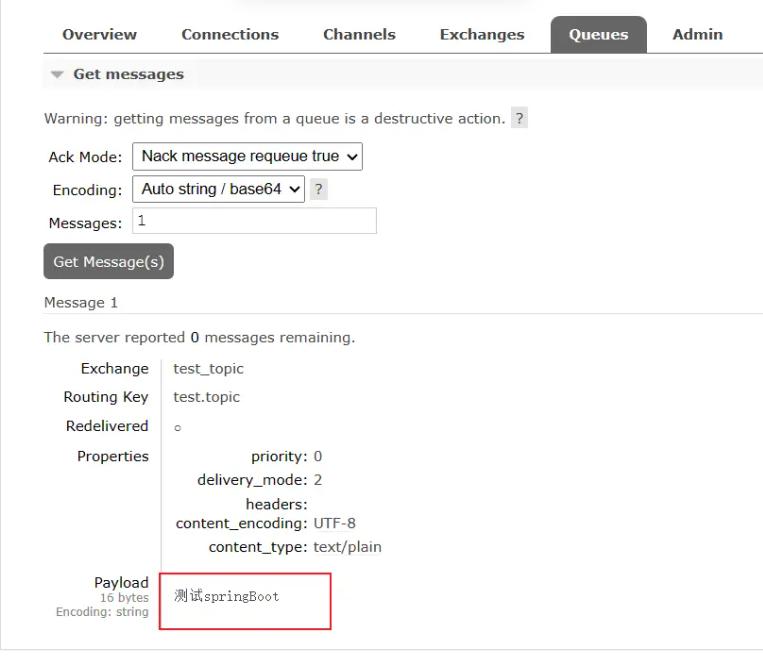
@SpringBootTest
public class MqTtst {
    @Value("${mq.exchange.name}")
    private String EXCHANGENAME;
    @Resource
    private RabbitTemplate rabbitTemplate;
    @Test
    void sendMsg(){
        rabbitTemplate.setConfirmCallback(new RabbitTemplate.ConfirmCallback() {
            @Override
            public void confirm(CorrelationData correlationData, boolean b, String s) {
                if (b){
                    System.out.println("发送消息成功");
                }else {
                    System.out.println("发送消息失败,原因:"+s);
                }
            }
        });
        rabbitTemplate.convertAndSend(EXCHANGENAME,"test.topic","测试springBoot");
    }
}

启动测试

2.消息回退
修改配置

测试
@Test
void sendMsgReturn(){
    //  消息回退
    rabbitTemplate.setMandatory(true);//
    rabbitTemplate.setReturnsCallback(returnedMessage -> System.out.println("消息回退,回退的消息是:"+new String(returnedMessage.getMessage().getBody())));
    rabbitTemplate.convertAndSend(EXCHANGENAME,"test.topic","测试springBoot");
}

3.Consumer Ack
自动确认:acknowledge=”none” 。不管处理成功与否,业务处理异常也不管
(当消费者意担接收到消息之后,消费者就会给broker一个回执,证明已经接收到消息 了,不管消息到底是否成功)
手动确认:acknowledge=”manual” 。可以解决业务异常的情况
(收到消息之后不会立马确认收到消息,当业务处理没有问题的时候手动的调用代码的方 式来进行处理,如果业务失败了,就可以进行额外的操作)
根据异常情况确认:acknowledge=”auto“,(这种方式使用麻烦,不作讲解)
其中自动确认是指,当消息一旦被Consumer接收到,则自动确认收到,并将相应 message 从 RabbitMQ 的消息缓存中移除。但是在实际业务处理中,很可能消息接收到,业务处理出现异常,那么该消息就会丢失。如果设置了手动确认方式,则需要在业务处理成功后,调用channel.basicAck(),手动签收,如果出现异常,则调用channel.basicNack()方法,让其自动重新发送消息。
1)自动确认
2)手动确认
3)创建测试
@Component
public class ShouDingQianShouMeaasge implements ChannelAwareMessageListener {
    @Override
    @RabbitListener(queues = "test_queue2")
    public void onMessage(Message message, Channel channel) throws Exception {
      Thread.sleep(2000);
        byte[] body = message.getBody();
        String s = new String(body);
        System.out.println(s);
        long deliveryTag = message.getMessageProperties().getDeliveryTag();
        try {
            System.out.println(1/0);
            channel.basicAck(deliveryTag,true);
        }catch (Exception e){
            System.out.println("拒绝签收");
            channel.basicNack(deliveryTag,true,true);
        }
    }
}

启动测试


无异常签收成功


原文地址:https://blog.csdn.net/wql56789/article/details/134637828
本文来自互联网用户投稿,该文观点仅代表作者本人,不代表本站立场。本站仅提供信息存储空间服务,不拥有所有权,不承担相关法律责任。
如若转载,请注明出处:http://www.7code.cn/show_21326.html
如若内容造成侵权/违法违规/事实不符,请联系代码007邮箱:suwngjj01@126.com进行投诉反馈,一经查实,立即删除!