CSS3实现缺角矩形
前言
很多同学在进行Web页面开发时,总是非常依赖美工的切图,其实有很多简单的样式效果都可以使用CSS3来实现,下面以渲染缺角矩形的实际场景来简单聊聊。
一、实现的最终效果
二、多种实现方式举例
1.最low的方式:拿div通过旋转定位盖死一个角
最容易想到的方法,我不想实现了,没啥意思,很难看。
2.也很low的方式:使用div对象的before、after伪元素实现
思路跟第一种方法基本一致,唯一的改进就是不需要引入多余的无用div。使用元素的before、after伪元素去做一个三角形盖住角,但问题在于最多只能支持两个角,因为就两个伪元素。另外,背景颜色是写死的,换个背景颜色那个角就现出原形了。
实现效果:

代码:
<!DOCTYPE html>
<html lang="en">
<head>
<meta charset="UTF-8">
<meta http-equiv="X-UA-Compatible" content="IE=edge">
<meta name="viewport" content="width=device-width, initial-scale=1.0">
<title>使用伪元素实现缺角矩形</title>
</head>
<style>
body{
width: 100vw;
height: 100vh;
display: flex;
justify-content: center;
align-items: center;
}
body .panel{
width: 100px;
height: 75px;
background-color: #C42D2D;
position: relative;
}
body .panel::before{
width: 0px;
height: 0px;
position: absolute;
content: '';
top: 0px;
left: 0px;
border: 10px solid #FFF;
border-bottom-color: transparent;
border-right-color: transparent;
}
</style>
<body>
<div class="panel"></div>
</body>
</html>
3.比较好的方式:渐变实现
CSS语法:
background–image: linear–gradient(direction, color–stop1, color–stop2, …);
| 值 | 描述 |
|---|---|
| direction | 用角度值指定渐变的方向(或角度)。 |
| color–stop1, color–stop2,… | 用于指定渐变的起止颜色。 |

45deg: 表示从左下到右上的方向
-45deg: 表示从右下到左上的方向
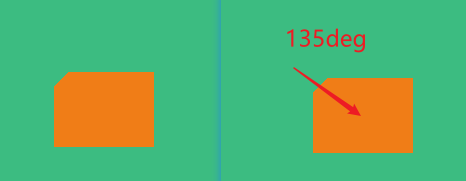
圆盘中箭头所指向的方向,就是这个渐变的起始与终点方向。不好理解吧?来几个例子就好理解了
background–image: linear–gradient(135deg, transparent 10px, #F07D17 0);
效果:对应圆盘中的135deg的指向,是不是就很明白了,要缺哪个角就去查一下把,试一下把。
而且我特意换了个背景,毫无违和感。

代码:
<!DOCTYPE html>
<html lang="en">

<head>
  <meta charset="UTF-8">
  <meta http-equiv="X-UA-Compatible" content="IE=edge">
  <meta name="viewport" content="width=device-width, initial-scale=1.0">
  <title>使用渐变实现缺角矩形</title>
</head>
<style>
  body {
    width: 100vw;
    height: 100vh;
    display: flex;
    justify-content: center;
    align-items: center;
    background-color: #3CBC81;
  }

  body .panel {
    width: 100px;
    height: 75px;
    background-image: linear-gradient(135deg, transparent 10px, #F07D17 0);
  }
</style>

<body>
  <div class="panel"></div>
</body>

</html>
<!DOCTYPE html>
<html lang="en">

<head>
  <meta charset="UTF-8">
  <meta http-equiv="X-UA-Compatible" content="IE=edge">
  <meta name="viewport" content="width=device-width, initial-scale=1.0">
  <title>使用伪元素实现缺角矩形</title>
</head>
<style>
  body {
    width: 100vw;
    height: 100vh;
    display: flex;
    justify-content: center;
    align-items: center;
    background-color: #3CBC81;
  }

  body .panel {
    width: 100px;
    height: 75px;
    background: linear-gradient(135deg, transparent 10px, #F07D17 0) top left,
      linear-gradient(-135deg, transparent 10px, #F07D17 0) top right,
      linear-gradient(-45deg, transparent 10px, #F07D17 0) bottom right,
      linear-gradient(45deg, transparent 10px, #F07D17 0) bottom left;
    background-size: 50% 50%;
    background-repeat: no-repeat;
  }
</style>

<body>
  <div class="panel"></div>
</body>

</html>
其实就是四个矩形合并起来,不信给每个渐变设置不同的颜色:

简单把?
还有更高级的,使用渐变实现的话,背景只能是颜色,如果我们的div的背景是一张图片的话,渐变就不好使了呢。下面学点新的吧。
4.比较好的方式:clip–path实现
clip–path字面意思就是按路径进行裁剪。就像剪纸呗。如果说之前这个属性兼容性很差,现在都已经2022年了,拥抱现代浏览器吧。
clip-path: polygon(100px 0, calc(100% – 100px) 0, 100% 100px,
100% calc(100% – 100px), calc(100% – 100px) 100%,
100px 100%, 0 calc(100% – 100px), 0 100px);


<!DOCTYPE html>
<html lang="en">

<head>
  <meta charset="UTF-8">
  <meta http-equiv="X-UA-Compatible" content="IE=edge">
  <meta name="viewport" content="width=device-width, initial-scale=1.0">
  <title>使用clip-path实现缺角矩形</title>
</head>
<style>
  body {
    width: 100vw;
    height: 100vh;
    display: flex;
    justify-content: center;
    align-items: center;
    background-color: #3CBC81;
  }

  body .panel {
    width: 500px;
    height: 500px;
    background-image: url(./img.png);
    background-color: #FFF;
    background-size: 100% 100%;
    background-repeat: no-repeat;
    clip-path: polygon(100px 0, calc(100% - 100px) 0, 100% 100px,
        100% calc(100% - 100px), calc(100% - 100px) 100%,
        100px 100%, 0 calc(100% - 100px), 0 100px);
  }
</style>

<body>
  <div class="panel"></div>
</body>

</html>
clip–path属性还有很多内容,很多功能,感兴趣的可以去学习一下,由于时间关系,不在这里展开了。
文章中用到了一些图片,放到最后。


最后附上文章最初要实现的那个panel的代码:很简单
<!DOCTYPE html>
<html lang="en">

<head>
  <meta charset="UTF-8">
  <meta http-equiv="X-UA-Compatible" content="IE=edge">
  <meta name="viewport" content="width=device-width, initial-scale=1.0">
  <title>Document</title>
  <style>
    .container {
      width: 100vw;
      height: 100vh;
      display: flex;
      justify-content: center;
      align-items: center;
    }

    .container .panel {
      width: 100px;
      height: 75px;
      display: flex;
      flex-direction: column;
      justify-content: center;
      align-content: center;
      margin: 10px;
    }

    .container .panel .top {
      flex: 3;
      display: flex;
      justify-content: center;
      align-items: center;
      background-color: #794391;
      background: linear-gradient(135deg, transparent 10px, #794391 0);
    }

    .container .panel .top .left-img {
      width: 24px;
      height: 30px;
      background-image: url(./icon.png);
      background-repeat: no-repeat;
      background-size: 100% 100%;
      margin-right: 5px;
    }

    .container .panel .top .right-vol {
      font-weight: 550;
      color: #FFF;

    }

    .container .panel .bottom {
      flex: 2;
      background-color: #E8E8E8;
      display: flex;
      justify-content: center;
      align-items: center;
    }
  </style>
</head>

<body>
  <div class="container">
    <div class="panel">
      <div class="top">
        <div class="left-img"></div>
        <div class="right-vol">550kV</div>
      </div>
      <div class="bottom">江阴火电厂</div>
    </div>
    <div class="panel">
      <div class="top">
        <div class="left-img"></div>
        <div class="right-vol">550kV</div>
      </div>
      <div class="bottom">江阴火电厂</div>
    </div>
    <div class="panel">
      <div class="top">
        <div class="left-img"></div>
        <div class="right-vol">550kV</div>
      </div>
      <div class="bottom">江阴火电厂</div>
    </div>
    <div class="panel">
      <div class="top">
        <div class="left-img"></div>
        <div class="right-vol">550kV</div>
      </div>
      <div class="bottom">江阴火电厂</div>
    </div>
  </div>
</body>

</html>
总结
byebye
原文地址:https://blog.csdn.net/shaofengzong/article/details/123117735
本文来自互联网用户投稿,该文观点仅代表作者本人,不代表本站立场。本站仅提供信息存储空间服务,不拥有所有权,不承担相关法律责任。
如若转载,请注明出处:http://www.7code.cn/show_22566.html
如若内容造成侵权/违法违规/事实不符,请联系代码007邮箱:suwngjj01@126.com进行投诉反馈,一经查实,立即删除!


