1. 需求背景
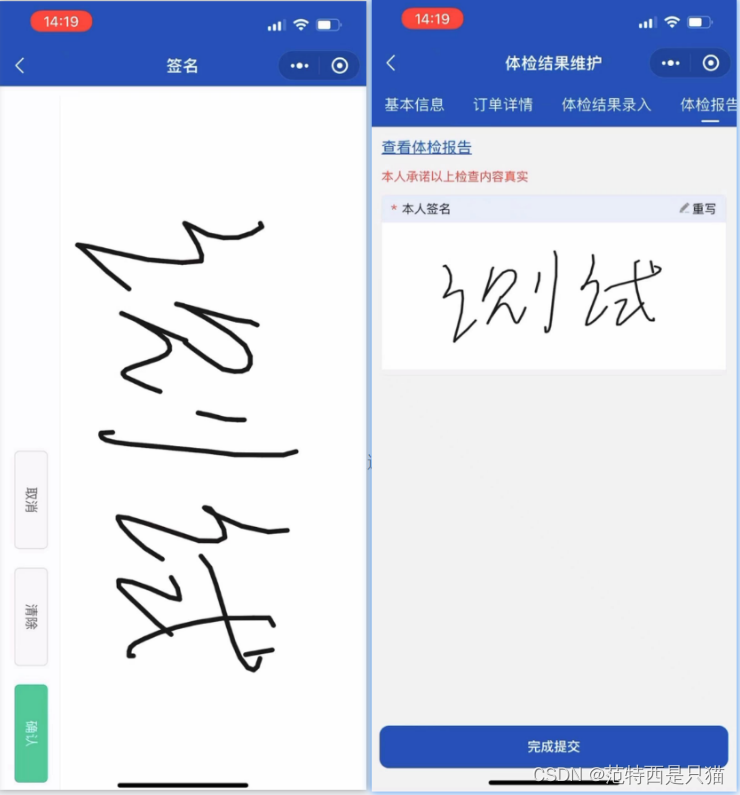
接的一个开发一个小程序,需求很简单,使用uni–app实现一个微信小程序的电子签名功能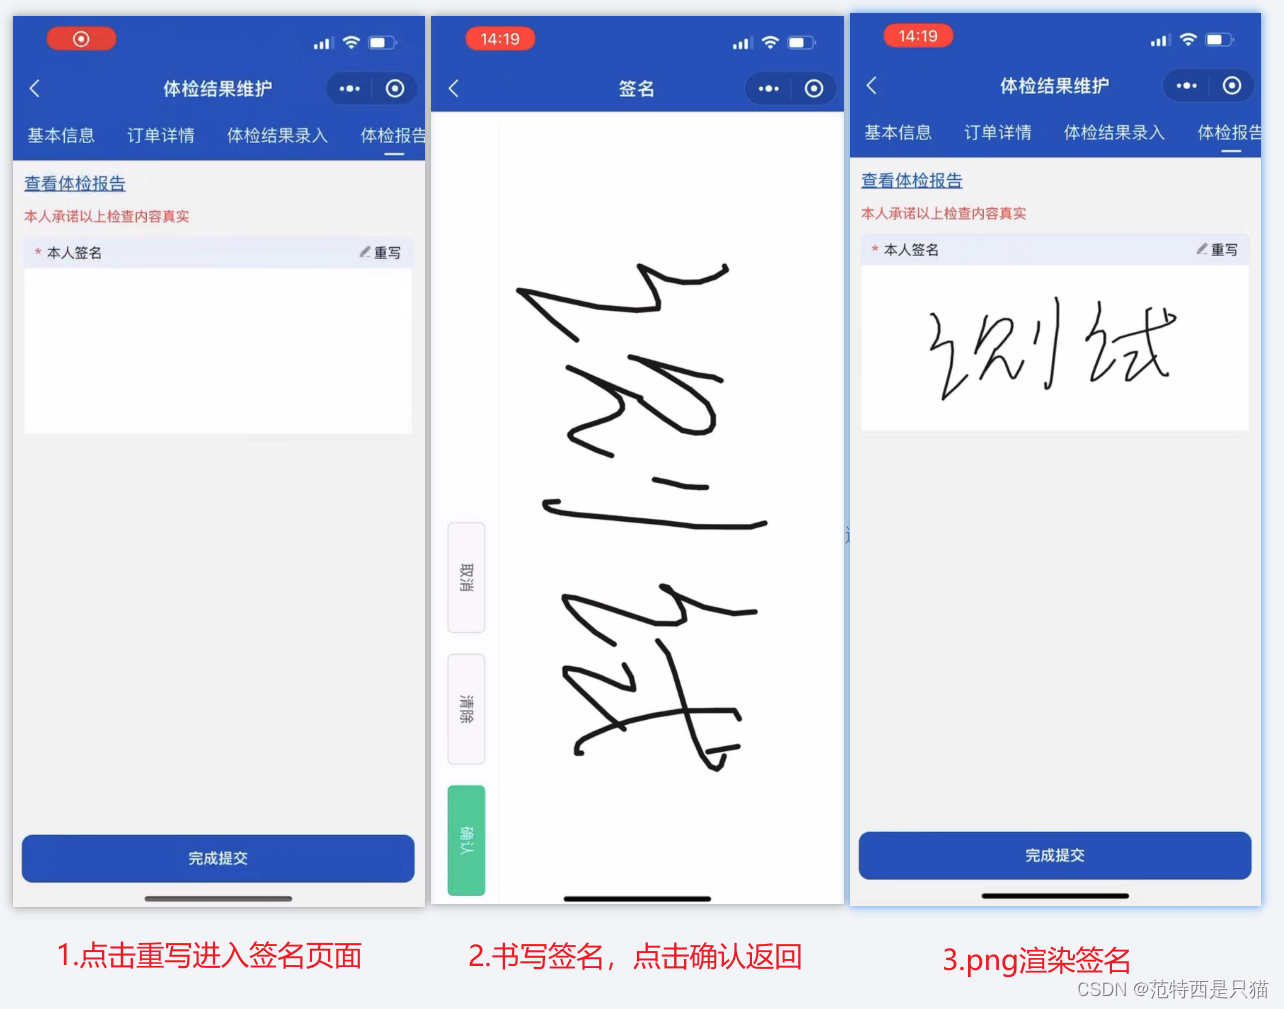
2. 开始撸
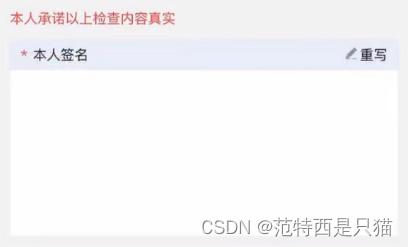
2.1 点击 重写 进入签名页面(上图一)
<template>
<view>
<view class="ft-26 color-red mt-20 mb-20">
本人承诺以上检查内容真实
</view>
<view class="sign">
<view class="sign-header">
<span><i class="color-red">*</i> 本人签名</span>
<div @click="goSign">
<img class="edit-icon" :src="require('@/static/images/edit.png')" alt="">
<label for="">重写</label>
</div>
</view>
<img class="sign-img" :src="tempFilePath">
</view>
</view>
</template>
<script>
export default {
data() {
return {
tempFilePath: "",
}
},
methods: {
// 点击重写,进入签名页面
goSign() {
uni.navigateTo({
url: `/examine/q-sign`
})
},
// 签名页面返回回来,接收签名照片展示
getTempFilePath(data) {
let { tempFilePath } = JSON.parse(data)
this.tempFilePath = tempFilePath
},
},
}
</script>
<style lang="scss" scoped>
.report-view {
height: 50vh;
background: #fff;
}
.popup-content {
width: 100vw;
height: 100vh;
}
.sign {
border-radius: 10rpx;
border: 1rpx solid #E6E6E6;
overflow: hidden;
.sign-header {
line-height: 56rpx;
background: #E8EFF8;
border-radius: 0px;
display: flex;
justify-content: space-between;
padding: 0 20rpx;
font-size: 26rpx;
display: flex;
align-items: center;
.edit-icon {
width: 24rpx;
height: 24rpx;
display: inline-block;
margin-right: 5rpx;
}
span {
i {
line-height: 56rpx;
display: inline-block;
margin-right: 10rpx;
}
}
text {
font-weight: 500;
color: #999999;
}
}
.sign-img {
width: 100%;
height: 300rpx;
background: #fff;
}
}
</style>
2.2 书写签名,点击确认返回,及图片翻转显示(上图二,三)
<template>
	<view>
		<!-- 自定义导航栏 -->
		<NaviBar title="签署" :autoBack="true" />
		<view class="wrapper">
			<view class="handBtn">
				<button @click="retDraw" class="delBtn">清除</button>
				<button @click="saveCanvasAsImg" class="saveBtn">取消</button>
				<button @click="subCanvas" class="subBtn">确认</button>
			</view>
			<view class="handCenter">
				<canvas class="handWriting" :disable-scroll="true" @touchstart="uploadScaleStart"
					@touchmove="uploadScaleMove" canvas-id="handWriting" />
				<!--用于旋转图片的canvas容器-->
				<canvas style="position: absolute" :style="{ width: cavWidth, height: cavWidth1 }"
					canvas-id="handWriting2"></canvas>
			</view>
		</view>
	</view>
</template>

<script>
	export default {
		name: 'Signature',
		data() {
			return {
				canvasName: 'handWriting',
				ctx: '',
				startX: null,
				startY: null,
				canvasWidth: 0,
				canvasHeight: 0,
				selectColor: 'black',
				lineColor: '#1A1A1A', // 颜色
				canvas: null,
				cavWidth: 2000,
				cavWidth1: 2000,
				lineSize: 5, // 笔记倍数
			}
		},
		onLoad({
			location
		}) {
			if (location) {
				this.location = location;
			}
			this.ctx = uni.createCanvasContext('handWriting', this)
			this.$nextTick(() => {
				uni
					.createSelectorQuery()
					.select('.handCenter')
					.boundingClientRect((rect) => {
						this.canvasWidth = rect.width
						this.canvasHeight = rect.height
						/* 将canvas背景设置为 白底,不设置  导出的canvas的背景为透明 */
						this.setCanvasBg('#fff')
					})
					.exec()
			})
		},
		methods: {
			// 笔迹开始
			uploadScaleStart(e) {
				this.startX = e.changedTouches[0].x
				this.startY = e.changedTouches[0].y
				//设置画笔参数
				//画笔颜色
				this.ctx.setStrokeStyle(this.lineColor)
				//设置线条粗细
				this.ctx.setLineWidth(this.lineSize)
				//设置线条的结束端点样式
				this.ctx.setLineCap('round') //'butt'、'round'、'square'
				//开始画笔
				this.ctx.beginPath()
			},
			// 笔迹移动
			uploadScaleMove(e) {
				//取点
				let temX = e.changedTouches[0].x
				let temY = e.changedTouches[0].y
				//画线条
				this.ctx.moveTo(this.startX, this.startY)
				this.ctx.lineTo(temX, temY)
				this.ctx.stroke()
				this.startX = temX
				this.startY = temY
				this.ctx.draw(true)
			},
			/**
			 * 重写
			 */
			retDraw() {
				this.ctx.clearRect(0, 0, 700, 730)
				this.ctx.draw()
				//设置canvas背景
				this.setCanvasBg('#fff')
			},
			/**
			 * @param {Object} str
			 * @param {Object} color
			 * 选择颜色
			 */
			selectColorEvent(str, color) {
				this.selectColor = str
				this.lineColor = color
			},
			// 确认
			subCanvas() {
				const _this = this
				uni.canvasToTempFilePath({
					canvasId: 'handWriting',
					fileType: 'png',
					quality: 1, //图片质量
					success(res) {
						console.log(res.tempFilePath, 'canvas生成图片地址')
						wx.getImageInfo({
							// 获取图片的信息
							src: res.tempFilePath,
							success: (res1) => {
								console.log(res1)
								// 将canvas1的内容复制到canvas2中
								let canvasContext = wx.createCanvasContext('handWriting2')
								let rate = res1.height / res1.width
								let width = 300 / rate
								let height = 300
								_this.cavWidth = 300 / rate
								_this.cavWidth1 = 300
								canvasContext.translate(height / 2, width / 2)
								canvasContext.rotate((270 * Math.PI) / 180)
								canvasContext.drawImage(res.tempFilePath, -width / 2, -height / 2,
									width, height)
								canvasContext.draw(false, () => {
									// 将之前在绘图上下文中的描述(路径、变形、样式)画到 canvas 中
									wx.canvasToTempFilePath({
										// 把当前画布指定区域的内容导出生成指定大小的图片。在 draw() 回调里调用该方法才能保证图片导出成功。
										canvasId: 'handWriting2',
										fileType: 'png',
										quality: 1, //图片质量
										success(res2) {
											let data = JSON.stringify({
												tempFilePath: res2
													.tempFilePath,
											})
											let pages = getCurrentPages();
											let prevPage = pages[pages.length - 2];
											prevPage.$vm.getTempFilePath(data)
											uni.navigateBack({
												delta: 1
											})
										}
									})
								})
							}
						})
					},
				})
			},
			//旋转图片,生成新canvas实例
			rotate(cb) {
				const that = this
				wx.createSelectorQuery()
					.select('#handWriting2')
					.fields({
						node: true,
						size: true
					})
					.exec((res) => {
						const rotateCanvas = res[0].node
						const rotateCtx = rotateCanvas.getContext('2d')
						//this.ctxW-->所绘制canvas的width
						//this.ctxH -->所绘制canvas的height
						rotateCanvas.width = this.ctxH
						rotateCanvas.height = this.ctxW
						wx.canvasToTempFilePath({
							canvas: that.canvas,
							success(res) {
								const img = rotateCanvas.createImage()
								img.src = res.tempFilePath
								img.onload = function() {
									rotateCtx.translate(rotateCanvas.width / 2,
										rotateCanvas
										.height / 2)
									rotateCtx.rotate((270 * Math.PI) / 180)
									rotateCtx.drawImage(img, -rotateCanvas.height / 2, -
										rotateCanvas
										.width / 2)
									rotateCtx.scale(that.pixelRatio, that.pixelRatio)
									cb(rotateCanvas)
								}
							},
							fail(err) {
								console.log(err)
							}
						})
					})
			},
			//取消
			saveCanvasAsImg() {
				this.retDraw()
				uni.navigateBack()
			},
			//设置canvas背景色  不设置  导出的canvas的背景为透明
			//@params:字符串  color
			setCanvasBg(color) {
				/* 将canvas背景设置为 白底,不设置  导出的canvas的背景为透明 */
				//rect() 参数说明  矩形路径左上角的横坐标,左上角的纵坐标, 矩形路径的宽度, 矩形路径的高度
				//这里是 canvasHeight - 4 是因为下边盖住边框了,所以手动减了写
				this.ctx.rect(0, 0, this.canvasWidth, this.canvasHeight - 4)
				// ctx.setFillStyle('red')
				this.ctx.setFillStyle(color)
				this.ctx.fill() //设置填充
				this.ctx.draw() //开画
			},
			toJSON() {}
		}
	}
</script>

<style>
	page {
		background: #fbfbfb;
		height: auto;
		overflow: hidden;
	}

	.wrapper {
		position: relative;
		width: 100%;
		height: 100vh;
		margin: 20rpx 0;
		overflow: auto;
		display: flex;
		align-content: center;
		flex-direction: row;
		justify-content: center;
		font-size: 28rpx;
	}

	.handWriting {
		background: #fff;
		width: 100%;
		height: 100vh;
	}

	.handCenter {
		border-left: 2rpx solid #e9e9e9;
		flex: 5;
		overflow: hidden;
		box-sizing: border-box;
	}

	.handBtn button {
		font-size: 28rpx;
	}

	.handBtn {
		height: 100vh;
		display: inline-flex;
		flex-direction: column;
		justify-content: space-between;
		align-content: space-between;
		flex: 1;
	}

	.delBtn {
		width: 200rpx;
		position: absolute;
		bottom: 350rpx;
		left: -35rpx;
		transform: rotate(90deg);
		color: #666;
	}

	.subBtn {
		width: 200rpx;
		position: absolute;
		bottom: 52rpx;
		left: -35rpx;
		display: inline-flex;
		transform: rotate(90deg);
		background: #29cea0;
		color: #fff;
		margin-bottom: 60rpx;
		text-align: center;
		justify-content: center;
	}

	/*Peach - 新增 - 保存*/

	.saveBtn {
		width: 200rpx;
		position: absolute;
		bottom: 590rpx;
		left: -35rpx;
		transform: rotate(90deg);
		color: #666;
	}
</style>
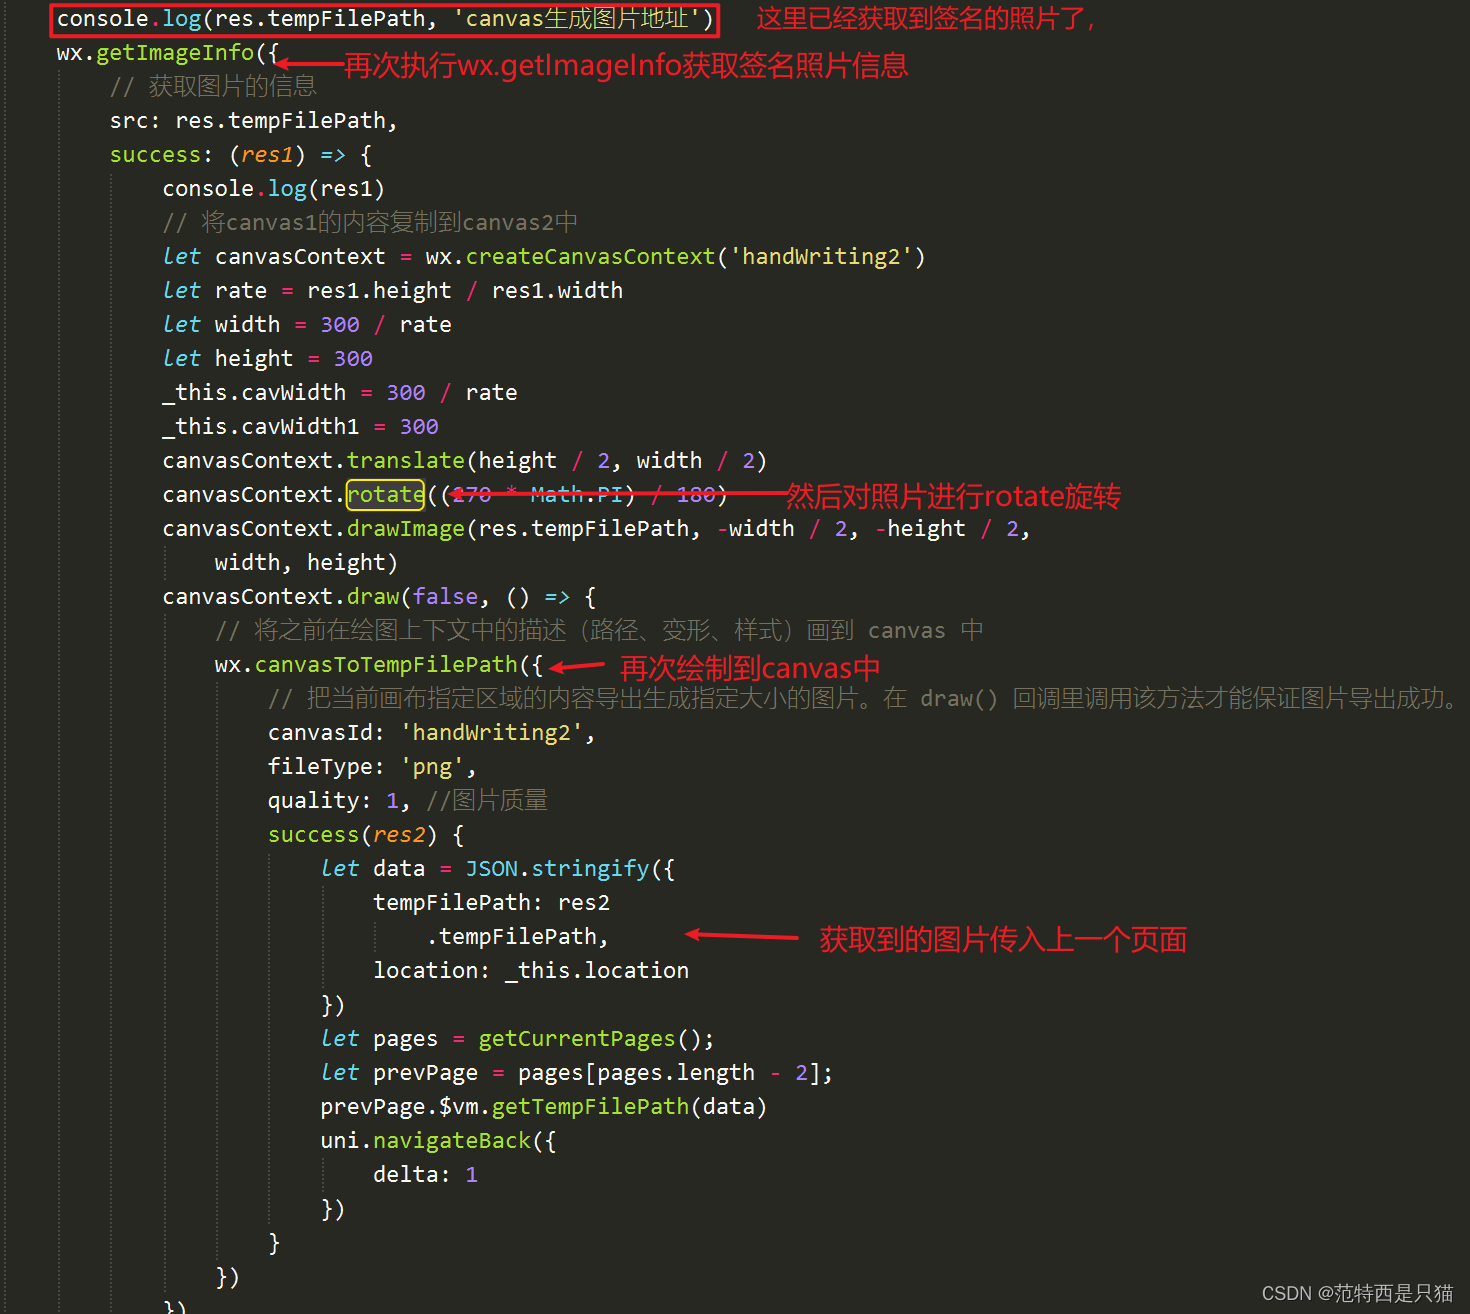
3. 图片进行翻转,返回翻转后的图片

原文地址:https://blog.csdn.net/qq_36410795/article/details/134734330
本文来自互联网用户投稿,该文观点仅代表作者本人,不代表本站立场。本站仅提供信息存储空间服务,不拥有所有权,不承担相关法律责任。
如若转载,请注明出处:http://www.7code.cn/show_23718.html
如若内容造成侵权/违法违规/事实不符,请联系代码007邮箱:suwngjj01@126.com进行投诉反馈,一经查实,立即删除!
声明:本站所有文章,如无特殊说明或标注,均为本站原创发布。任何个人或组织,在未征得本站同意时,禁止复制、盗用、采集、发布本站内容到任何网站、书籍等各类媒体平台。如若本站内容侵犯了原著者的合法权益,可联系我们进行处理。

