Selenium
Selenium是一个模拟浏览器浏览网页的工具,主要用于测试网站的自动化测试工具。
Selenium需要安装浏览器驱动,才能调用浏览器进行自动爬取或自动化测试,常见的包括Chrome、Firefox、IE、PhantomJS等浏览器。
注意:驱动下载解压后,置于Python的安装目录下;然后将Python的安装目录添加到系统环境变量路径(Path)中。
WebDriver 对象提供的相关方法
- close() 方法用于关闭单个窗口
- quit() 方法用于关闭所有窗口
- page_source 属性用于获取网页的源代码
- get(url) 方法用于访问指定的 URL
- title 属性用于获取当前页面的标题
- current_url 用于获取当前页面的 URL
- set_window_size(idth,height) 方法用于设置浏览器的尺寸
- back() 方法用于控制浏览器后退
- forward() 方法用于控制浏览器前进
- refresh() 方法用于刷新当前页面
定位元素
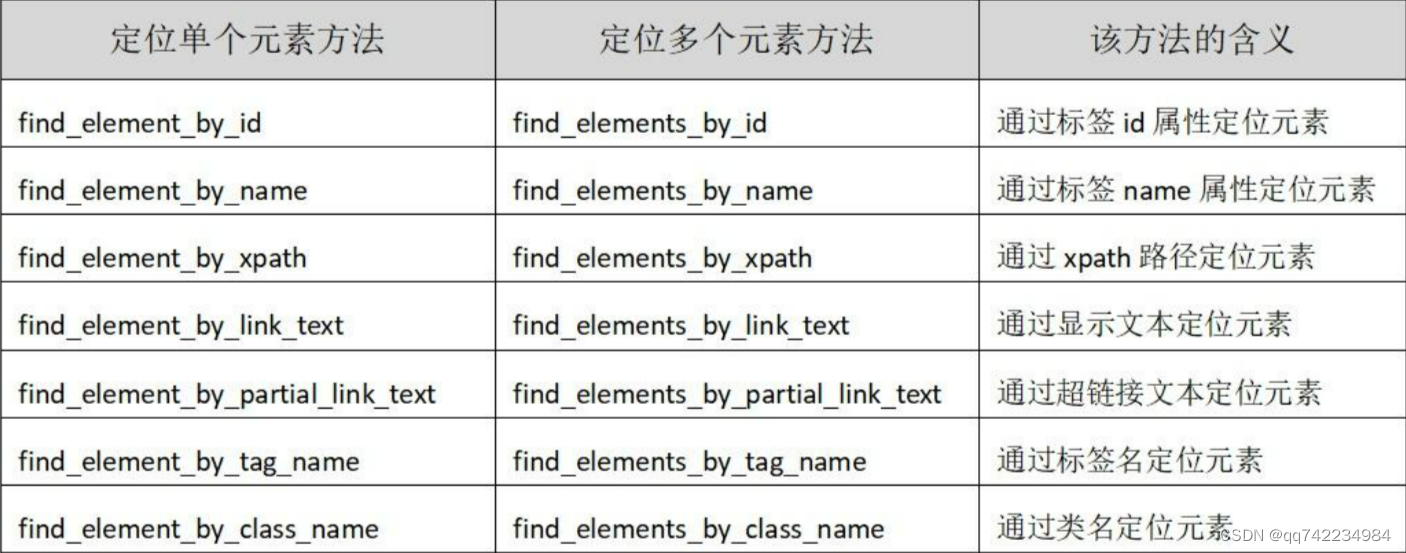
find_elements_by_css_selector("#kw") # 根据选择器进行定位查找,其中#kw表示的是id选择器名称是kw的

可以通过 WebElement 对象的相text 属性用于获取元素的文本内容
import time

from selenium import webdriver


#启动浏览器,启动的是chrome浏览器,注意C是大写的
# test_webdriver = webdriver.Chrome()
#调用的phantomjs浏览器
# test_webdriver = webdriver.PhantomJS()
#使用火狐浏览器
test_webdriver = webdriver.Firefox()
#通过get请求的方式请求https://www.echartsjs.com/examples/
test_webdriver.get("https://www.echartsjs.com/examples/")
#浏览器最大化窗口
test_webdriver.maximize_window()
#通过一个for循环来遍历这些数据
#find_elements_by_xpath,注意,双数,方法里面传递的是xpath语句
for item in test_webdriver.find_elements_by_xpath("//h4[@class='chart-title']"):
    #获取当前节点的text
    print(item.text)
#获取当前浏览器的标题
print(test_webdriver.title)
time.sleep(5)
#浏览器退出
test_webdriver.quit()
ActionChains的基本使用
selenium.webdriver.common.action_chains.ActionChains(driver)
click(on_element=None) ——单击鼠标左键
click_and_hold(on_element=None) ——点击鼠标左键,不松开
context_click(on_element=None) ——点击鼠标右键
double_click(on_element=None) ——双击鼠标左键
drag_and_drop(source, target) ——拖拽到某个元素然后松开
drag_and_drop_by_offset(source, xoffset, yoffset) ——拖拽到某个坐标然后松开
key_down(value, element=None) ——按下某个键盘上的键
key_up(value, element=None) ——松开某个键
move_by_offset(xoffset, yoffset) ——鼠标从当前位置移动到某个坐标
move_to_element(to_element) ——鼠标移动到某个元素
move_to_element_with_offset(to_element, xoffset, yoffset) ——移动到距某个元素(左上角坐标)多少距离的位置
perform() ——执行链中的所有动作
release(on_element=None) ——在某个元素位置松开鼠标左键
send_keys(*keys_to_send) ——发送某个键到当前焦点的元素
send_keys_to_element(element, *keys_to_send) ——发送某个键到指定元素
from selenium import webdriver
import time

test_webdriver = webdriver.Chrome()
test_webdriver.maximize_window()
test_webdriver.get("https://www.baidu.com")
#找到百度首页上的搜索框,发送python
test_webdriver.find_element_by_xpath("//input[@id='kw']").send_keys("python")
#找到百度一下这个按钮,点击一下
test_webdriver.find_element_by_xpath("//input[@id='su']").click()
time.sleep(5)
print(test_webdriver.title)
#获取当前页面的源代码
print(test_webdriver.page_source)
#获取当前的cookie
print(test_webdriver.get_cookies())
test_webdriver.quit()
selenium显示等待和隐式等待
显示等待
明确要等到某个元素的出现或者是某个元素的可点击等条件,等不到,就一直等,除非在规定的时间之内都没找到,就会跳出异常Exception。
WebDriverWait(driver, timeout, poll_frequency=0.5, ignored_exceptions=None)
WebDriverWait()一般由until()或 until_not()方法配合使用
隐式等待
在创建driver时,为浏览器对象创建一个等待时间,这个方法是得不到某个元素就等待一段时间,直到拿到某个元素位置。
注意:在使用隐式等待的时候,实际上浏览器会在你自己设定的时间内部断的刷新页面去寻找我们需要的元素
driver.implicitly_wait() 默认设置为0
#显示等待
# from selenium import webdriver
# #简写用包
# from selenium.webdriver.common.by import By
# #等待用包
# from selenium.webdriver.support.ui import WebDriverWait
# #场景判断,用来判断某个元素是否出现
# from selenium.webdriver.support import expected_conditions as EC
# import time
#
#
# test_driver = webdriver.Chrome()
# test_driver.maximize_window()
# test_driver.get("https://www.baidu.com")
# #WebDriverWait设置显示等待
# #1、test_driver,2、timeout,3、轮训参数
# #until,EC场景判断,通过id来找相关元素kw
# element = WebDriverWait(test_driver,5,0.5).until(EC.presence_of_element_located((By.ID,'dazhuang')))
# element.send_keys('python')
# time.sleep(2)
# test_driver.quit()


#隐式等待
from selenium import webdriver
from selenium.common.exceptions import NoSuchElementException
import time


test_driver = webdriver.Chrome()
test_driver.implicitly_wait(5)
test_driver.get("https://www.baidu.com")
try:
    test_driver.find_element_by_id('dazhuang').send_keys('python')
    time.sleep(2)
except NoSuchElementException as e:
    print('这里报错了')
    print(e)

test_driver.quit()
Chrome无界面浏览器
之前所应用的 Selenium,都是直接操作有界面的浏览器,这就势必会影响爬取数据的速度,而为了尽可能地提高爬取数据的速度,则可以使用 Chrome 无界面浏览器进行数据的爬取,其步骤如下:
- 首先,通过 selenium.webdriver.chrome.options 中的 Options 类创建 Options
对象,用于操作 Chrome 无界面浏览器。 - 其次,使用 Options 对象的 add_argument() 方法启动参数配置,并将该方法中的参数 argument 的值设置为“—headless”,表示使用无界面浏览器。
- 最后,在使用 Chrome 类创建 WebDriver 对象时设置参数 options,并且该参数对应的值需为之前所创建的
Options 对象。
from selenium import webdriver
from selenium.webdriver.chrome.options import Options
import time


# 实例化参数的方法
chrome_options = Options()
# 设置浏览器的无头浏览器,无界面,浏览器将不提供界面,linux操作系统无界面情况下就可以运行了
chrome_options.add_argument("--headless")
# 结果devtoolsactiveport文件不存在的报错
chrome_options.add_argument("--no-sandbox")
# 官方推荐的关闭选项,规避一些BUG
chrome_options.add_argument("--disable-gpu")
# 实例化了一个chrome,导入设置项
test_webdriver = webdriver.Chrome(options=chrome_options)
# 最大化
test_webdriver.maximize_window()
# 打开百度
test_webdriver.get("https://www.baidu.com")
# 再输入框里面输入了python
test_webdriver.find_element_by_xpath("//input[@id='kw']").send_keys("python")
# 执行了点击操作
test_webdriver.find_element_by_xpath("//input[@id='su']").click()
time.sleep(2)
# 打印web界面的title
print(test_webdriver.title)
# 浏览器退出
test_webdriver.quit()
Scrapy(异步网络爬虫框架)
Scrapy框架
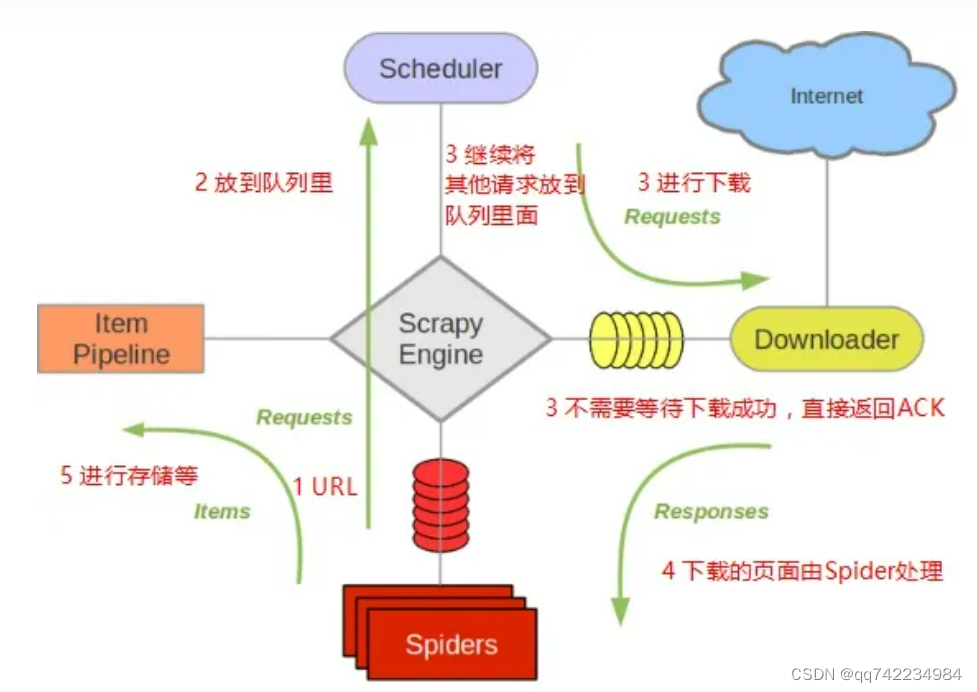
- 调度器从引擎接受request并将他们入队,以便之后引擎请求他们时提供给引擎。
- 初始的爬取URL和后续在页面中获取的待爬取的URL将放入调度器中,等待爬取。同时调度器会自动去除重复的URL(如果特定的URL不需要去重也可以通过设置实现,如post请求的URL)
下载器(Downloader)
-
Item Pipeline负责处理被spider提取出来的item。典型的处理有清理、 验证及持久化(例如存取到数据库中)。
-
当页面被爬虫解析所需的数据存入Item后,将被发送到项目管道(Pipeline),并经过几个特定的次序处理数据,最后存入本地文件或存入数据库。
下载器中间件(Downloader middlewares)
Spider中间件(Spider middlewares)
scrapy startproject 项目名

scrapy genspider 爬虫名 域名

scrapy crawl 爬虫名
scrapy.cfg    项目的主配置信息。(真正爬虫相关的配置信息在settings.py文件中)

items.py      设置数据存储模板,用于结构化数据,如:Django的Model

pipelines     数据持久化处理

settings.py   配置文件

spiders       爬虫目录
参考:https://scrapy-chs.readthedocs.io/zh_CN/latest/intro/overview.html
参考:https://www.osgeo.cn/scrapy/topics/architecture.html
反爬虫
限制手段
请求限制、拒绝响应、客户端身份验证、文本混淆和使用动态渲染技术等
反爬虫的分类
爬虫与反爬虫-功与防
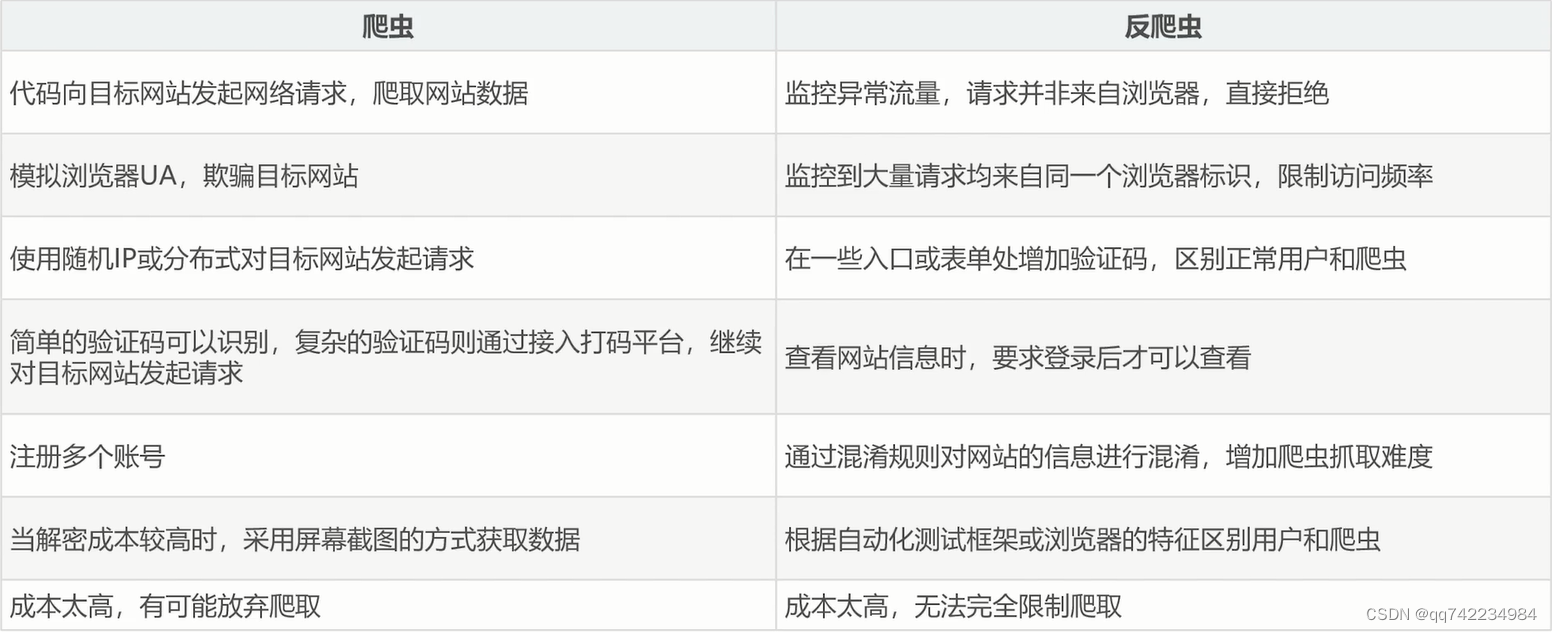
基于身份识别反爬和结局思路
Headers反爬-通过User-agent字段
携带正确的User-agent和使用随机User-agent
Headers反爬-通过cookie字段
Headers反爬-通过Referer字段
基于请求参数反爬
仔细分析抓到的包,搞清楚请求之间的联系
验证码反爬
验证码(CAPTCHA)是“Completely Automated Public Turing testto tell Computers and Humans Apart”(全自动区分计算机和人类的图灵测试)的缩写,是一种区分用户是计算机还是人的公共全自动程序。
基于爬虫行为反爬和解决思路
通过请求ip/账号单位时间内请求频率、次数反爬
通过同一ip/账号请求间隔进行反爬
通过js实现跳转反爬
通过蜜罐(陷阱)捕获ip
通过假数据进行反爬
阻塞任务队列
阻塞网络IO
基于数据加密反爬和解决思路
通过自定义字体反爬
通过js动态生成数据进行反爬
通过数据图片化进行反爬
通过使用图片引擎,解析图片数据
通过编码格式进行反爬
原文地址:https://blog.csdn.net/qq_45832050/article/details/134620957
本文来自互联网用户投稿,该文观点仅代表作者本人,不代表本站立场。本站仅提供信息存储空间服务,不拥有所有权,不承担相关法律责任。
如若转载,请注明出处:http://www.7code.cn/show_24724.html
如若内容造成侵权/违法违规/事实不符,请联系代码007邮箱:suwngjj01@126.com进行投诉反馈,一经查实,立即删除!

