1、什么是fetch:
- fetch是ES6出现的,它使用了 ES6 提出的 promise 对象,为了取代XMLHttpRequest而诞生的;
- 提到XMLHttpRequest就不得不提ajax,ajax是一种实现前后端交互的技术,而ajax是基于XMLHttpRequest模块实现的;
- 但是因为XMLHttpRequest是一个设计粗糙的API,配置和调用方式非常混乱,而且基于事件的异步模型写起来不友好;
- 所以使用XMLHttpRequest模块会产生回调地狱问题,因此产生了fetch,fetch是用来取代XMLHttpRequest模块的,并不是取代ajax的。
- 不同于ajax的XMLHttpRequest方式,这个fetch代码非常的简洁,fetch也是服务于ajax技术,建立前后端连接,实现前后端数据交互的;
2、fetch的用法:
http请求方式不同,写法也会不一样,不同的请求方式可以实现数据库的数据的增删改查;
(1)get请求方式:(默认请求方式是get方式)
<body>
<button id="myget">get</button>
<script>
myget.onclick = function(){
//get方式fetch请求
fetch("http://localhost:3000/users").then(res=>{
// console.log(res)
return res.json()
}).then(res=>{
console.log(res) //res就是请求回来的数据
})
}
</script>
</body>用fetch的含义是:朝fetch里的地址发起请求,请求数据,最后打印,res就是请求回来的数据。
console.log(res) //第一个then的res- 第一个then,接收的res不是数据,里面没有数据;
- 数据在res.json里,意思是把我的数据按照json格式读出来,但是直接打印res.json那拿不到数据,因为res.json也是一个promise对象,所以要return作为一个返回值在第二个then中才能拿到url里的数据。
结果:

console.log(res.json())结果:
![]()
这个res.json也可以换成res.text,只不过res.json是转换成数组包裹的json对象,res.text是转换成json字符串格式,看下面的区别:


✌get方式传参数:
get请求默认是把参数传在地址上,格式是:在地址后面加上“?参数”
看fetch括号里面的地址,用“?”关键字把参数写在地址后面;
代码中的参数是:“username=${username}”
<script>
        myget.onclick = function(){
            let username = "yiyi"
            fetch(`http://localhost:3000/users?username=${username}`).then(res=>{
                // console.log(res)
                return res.json()
            }).then(res=>{
                console.log(res)
            })
        }
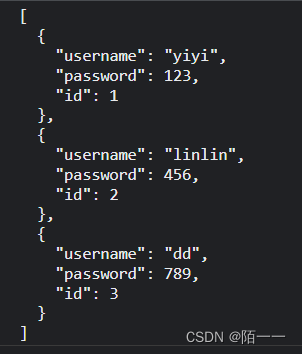
</script>假如没有传参数之前请求回来的完整数据是下图:(json格式数据)
{
    "users": [
      {
        "username": "yiyi",
        "password": 123,
        "id": 1
      },
      {
        "username": "linlin",
        "password": 456,
        "id": 2
      },
      {
        "username": "dd",
        "password": 789,
        "id": 3
      }
    ]
}这个数据也相当于数据库里的完整数据了,因为get方式是从数据库中读取数据,上面代码中get方式传的参数是“{username=yiyi}”,参照数据库那就是读取id=1的数据,读取完后的结果:

(2)post方式:(和get方式,就多了一个对象参数,其他都一样)
post方式:是携带传给后端的数据的,传参数是写在body里面
fetch("http://localhost:3000/users",{
                method:'POST',
                headers:{
                    "content-type":"application/x-www-form-urlencoded"
                },
                body:"username=yiyi&password=123"
})get方式只需要传一个url地址就可以了,但是post是携带信息的,所以需要给fetch传第二个参数;
第二个参数是一个对象,里面放着method(请求方式)、headers(信息格式)、body(携带的信息);
表单方式和json字符串格式的headers和body不同;
headers写的是表单格式,body里的数据就要写成表单格式;headers写的是json格式,body里的数据就要写成json格式;
fetch("http://localhost:3000/users",{
                method:'POST',
                headers:{
                    "content-type":"application/json"
                },
                body:JSON.stringify({
                    username:"yiyi",
                    password:"123"
                })
})header:{“content-type”:”application/json”}
body:JSON.stringify({键:”值”,键:“值”})
(3)put请求方式:
put方式的含义是对数据库的数据进行修改;
把method改为“PUT”;在请求地址 http://localhost:3000/users后面加上你要修改的json文件里id为几的对象,代码中加了“/1”,说明是修改id为1的对象;
fetch("http://localhost:3000/users/1",{
                method:'PUT',
                headers:{
                    "content-type":"application/json"
                },
                body:JSON.stringify({
                    username:"yiyi",
                })
})请求回来的json文件数据:
{
    "users": [
      {
        "username": "yiyi",
        "password": 123,
        "id": 1
      },
      {
        "username": "linlin",
        "password": 456,
        "id": 2
      },
      {
        "username": "dd",
        "password": 789,
        "id": 3
      }
    ]
}代码解释:代码中地址是“/1”,代表要修改id=1所在的对象信息,body里携带的是修改信息,把json文件中id=1的对象修改为: “username“:”yiyi”,修改完json文件为:
{
    "users": [
      {
        "username": "yiyi",
        "id": 1
      },
      {
        "username": "linlin",
        "password": 456,
        "id": 2
      },
      {
        "username": "dd",
        "password": 789,
        "id": 3
      }
    ]
}put方式是整个覆盖修改,对象里的所有值都被新来的信息覆盖。
(4)patch方式:
patch方式:跟put含义一样,是修改数据库的值,把method为“PATCH”;
看代码:
fetch("http://localhost:3000/users/1",{
                method:'PATCH',
                headers:{
                    "content-type":"application/json"
                },
                body:JSON.stringify({
                    username:"haha",
                })
}){
"users": [
{
"username": "yiyi",
"password": 123,
"id": 1
},
{
"username": "linlin",
"password": 456,
"id": 2
},
{
"username": "dd",
"password": 789,
"id": 3
}
]
}修改后:只是把id=1的username改成了传过来的值“haha”,password不变
{
    "users": [
      {
        "username": "haha",
        "password": 123,
        "id": 1
      },
      {
        "username": "linlin",
        "password": 456,
        "id": 2
      },
      {
        "username": "dd",
        "password": 789,
        "id": 3
      }
    ]
  }
(5)delete请求方式:
fetch("http://localhost:3000/users/1",{
                method:'DELETE'
})3、fetch方法不能用catch捕获错误
虽然fetch方法能解决回调地狱问题,但是fetch不能用catch主动捕获错误,就是出错了,它不会就去走catch了,它还会继续往下执行,所以出错了需要自己去处理;
请求数据会出现问题:要么是地址填错了,填的地址没有数据;要么是地址是正确的,因为别的原因数据请求不回来,网络的问题也有可能。
那怎么找出错误是哪里出现的呢,上面我们有在控制台上打印过res这个值;
<body>
    <button id="myget">get</button>
    <script>
        myget.onclick = function(){
            fetch("http://localhost:3000/users").then(res=>{
                console.log(res)
            })
        }
    </script>
</body>
这个res值的结果是:

结果中有一个ok这个值和status状态这个值,ok这个值是当请求成功就是ture,请求失败就是false; status是请求成功为200,请求失败为404;
看ok简单一点,所以我们拿ok是true或者false来判断是否出错;
所以我们要在第一个then后面输出一下res的值,而且要进行if条件判断,
fetch(`http://localhost:3000/users?username=${username}`).then(res=>{
                console.log(res)
                if(res.ok){
                    return res.json()
                }else{
                    //拒绝
                    //reject后面{}放着拒绝以后要返回的值,可以自己定义,一般是返回status和
                    return Promise.reject({
                        status:res.status,
                        statusText:res.statusText
                    })
                }

            }).then(res=>{
                console.log(res)
            }).catch(err=>{
                console.log("error",err)
})如果请求不成功,也就是ok为false时,我们要主动拒绝,因为这个then默认你不写promise对象,也没有主动拒绝,它后面这个链式then就会直接调用。
我们在上面进行if判断,出错了就会走else,就会返回promise对象,里面有status当前状态,和statusText:数据是否返回成功。
这时候如果我们把地址填错,代码的执行是,先执行第一个then,先打印res,也就是console.log(res),然后发现ok是false,请求失败,这样就会执行拒绝的代码:return Promise.reject({})返回一个promise对象然后去执行catch里的代码,实参是promise.reject({实参})这里面大括号里面的实参,也就是:
{status:res.status,statusText:res.statusText},catch里面的err是形参,最后输出结果:
地址填错拒绝时返回的结果:
请求成功时它就会给你把数据拿回来:

完整代码:get方式:
<body>
    <button id="myget">get</button>

    <script>
        myget.onclick = function(){
            let username = "yiyi"
            fetch(`http://localhost:3000/users?username=${username}`).then(res=>{
                console.log(res)
                if(res.ok){
                    return res.json()
                }else{
                    //拒绝
                    //reject后面{}放着拒绝以后要返回的值,可以自己定义,一般是返回status和
                    return Promise.reject({
                        status:res.status,
                        statusText:res.statusText
                    })
                }

            }).then(res=>{
                console.log(res)
            }).catch(err=>{
                console.log("error",err)
            })
        }
    </script>
</body>
post方式:
<body>
<button id="myget">get</button>
<!-- <button id="mypost">post</button>
<button id="myput">put</button>
<button id="mypatch">patch</button>
<button id="mydelete">delete</button> -->
<script>
myget.onclick = function(){
fetch("http://localhost:3000/users",{
method:'POST',
headers:{
"content-type":"application/x-www-form-urlencoded"
},
body:"username=yiyi&password=123"
})
.then(res=>{
console.log(res)
if(res.ok){
return res.json()
}else{
//拒绝
//reject后面{}放着拒绝以后要返回的值,可以自己定义,一般是返回status和
return Promise.reject({
status:res.status,
statusText:res.statusText
})
}
})
.then(res=>{
console.log(res)
}).catch(err=>{
console.log("error",err)
})
}
</script>
</body>4、fetch的缺点
推荐一个网站:Can I use… Support tables for HTML5, CSS3, etc

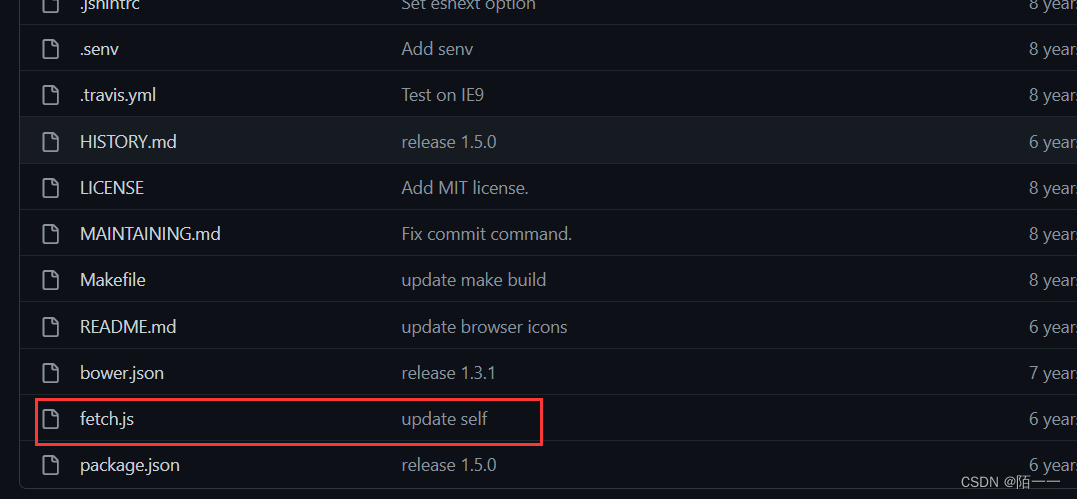
不支持的浏览器,可以使用 polyfill 这个兼容性的库,把库用script标签引入,名字为:fetch.js,
polyfill库:
GitHub – camsong/fetch-ie8: A window.fetch JavaScript polyfill supporting IE8
找到里面的fetch.js文件:

这个库表面上是fetch,但是里面的代码还是基于XMLHttpRequest设计的;
fetch的使用:
fetch是在promise基础上封装出来的,fetch是不用借助于任何模块任何js文件的,是内置的一个功能,直接用,不需要引入任何文件什么的。
但需要兼容浏览器的话,就把上面这个polyfill库引入进来。
原文地址:https://blog.csdn.net/a1598452168YY/article/details/127816778
本文来自互联网用户投稿,该文观点仅代表作者本人,不代表本站立场。本站仅提供信息存储空间服务,不拥有所有权,不承担相关法律责任。
如若转载,请注明出处:http://www.7code.cn/show_26598.html
如若内容造成侵权/违法违规/事实不符,请联系代码007邮箱:suwngjj01@126.com进行投诉反馈,一经查实,立即删除!


