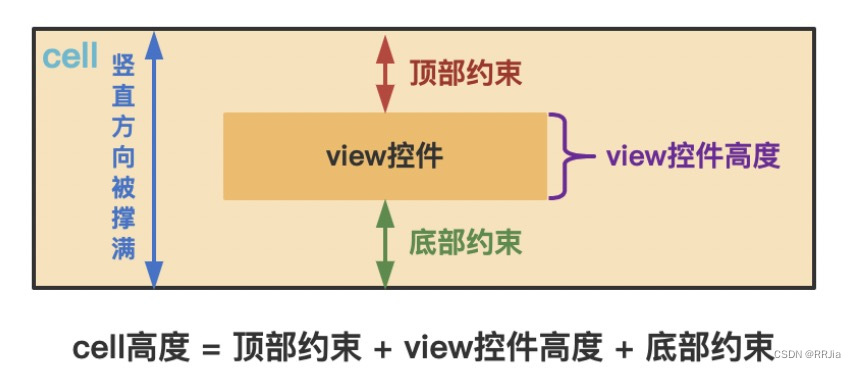
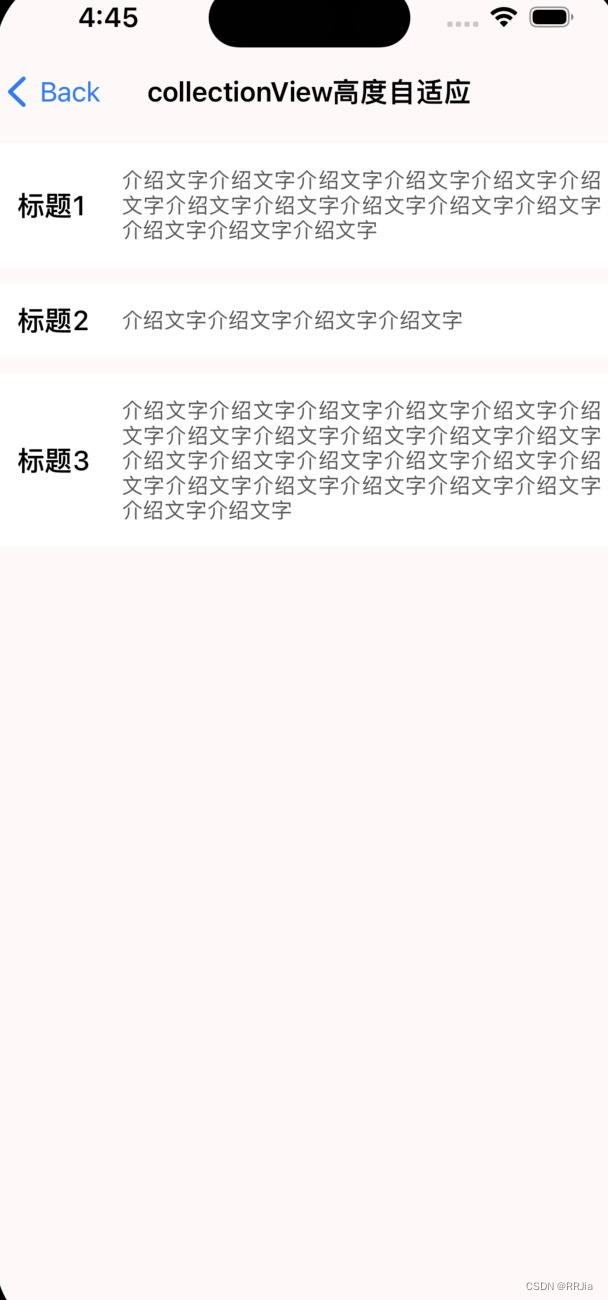
本文介绍: 1)设置layout的estimatedItemSize属性;2)为cell内部的view控件添加上下约束,保证竖直高度被撑满;3)重写preferredLayoutAttributesFitting方法,重新计算cell的高度
实现思路:
1)设置layout的estimatedItemSize属性
flowLayout.estimatedItemSize = CGSize(width: UIScreen.main.bounds.width, height: 50)2)为cell内部的view控件添加上下约束,保证竖直高度被撑满

3)重写preferredLayoutAttributesFitting方法,重新计算cell的高度
override func preferredLayoutAttributesFitting(_ layoutAttributes: UICollectionViewLayoutAttributes) -> UICollectionViewLayoutAttributes {
    self.setNeedsLayout()
    self.layoutIfNeeded()

    // 重新计算contentView的高度
    let size = self.contentView.systemLayoutSizeFitting(layoutAttributes.size)
    var cellFrame = layoutAttributes.frame
    cellFrame.size.height = size.height
    layoutAttributes.frame = cellFrame

    return layoutAttributes
}务必注意:要把cell内部的view添加到cell的self.contentView上才能高度自适应,直接添加到self上不行!!!

1、创建CollectionViewNormalCell.swift文件,代码如下:
 import UIKit
import SnapKit

class CollectionViewNormalCell: UICollectionViewCell {
    public var model: (String, String)? {
        didSet {
            guard let model = self.model else {
                return
            }

            self.titleLabel.text = model.0
            self.subTitlLabel.text = model.1
        }
    }

    private var titleLabel: UILabel = UILabel()
    private var subTitlLabel: UILabel = UILabel()

    override init(frame: CGRect) {
        super.init(frame: frame)
        self.setupUI()
    }

    override func preferredLayoutAttributesFitting(_ layoutAttributes: UICollectionViewLayoutAttributes) -> UICollectionViewLayoutAttributes {
        self.setNeedsLayout()
        self.layoutIfNeeded()

        // 重新计算contentView的高度
        let size = self.contentView.systemLayoutSizeFitting(layoutAttributes.size)
        var cellFrame = layoutAttributes.frame
        cellFrame.size.height = size.height
        layoutAttributes.frame = cellFrame

        return layoutAttributes
    }

    required init?(coder: NSCoder) {
        fatalError("init(coder:) has not been implemented")
    }

    func setupUI() {
        self.backgroundColor = .white

        self.contentView.addSubview(self.titleLabel)
        self.titleLabel.snp.makeConstraints{ make in
            make.left.equalToSuperview().offset(15)
            make.centerY.equalToSuperview()
            make.width.equalTo(50)
        }
        self.titleLabel.textColor = .black
        self.titleLabel.font = .systemFont(ofSize: 17, weight: .medium)
        self.titleLabel.numberOfLines = 1

        self.contentView.addSubview(self.subTitlLabel)
        self.subTitlLabel.snp.makeConstraints { make in
            make.left.equalTo(self.titleLabel.snp.right).offset(15)
            make.right.equalToSuperview().offset(-15)
            make.top.equalToSuperview().offset(15)
            make.bottom.equalToSuperview().offset(-15)
        }
        self.subTitlLabel.numberOfLines = 0
        self.subTitlLabel.textAlignment = .justified
        self.subTitlLabel.textColor = .darkGray
        self.subTitlLabel.font = .systemFont(ofSize: 13)
    }
}
2、创建CollectionViewNormalViewController.swift文件,代码如下
import UIKit
import SnapKit

class CollectionViewNormalViewController: UIViewController {
    // MARK: - 定义collectionView
    public lazy var collectionView: UICollectionView = { [weak self] in
        // 设置collectionView的布局
        let flowLayout = UICollectionViewFlowLayout()
        flowLayout.scrollDirection = .vertical
        flowLayout.minimumLineSpacing = 0
        flowLayout.minimumInteritemSpacing = 0
        flowLayout.sectionInset = UIEdgeInsets(top: 10, left: 0, bottom: 0, right: 0)
        // 这里定义flowLayout的预估大小
        flowLayout.estimatedItemSize = CGSize(width: UIScreen.main.bounds.width, height: 50)

        let collectionView = UICollectionView(frame: .zero, collectionViewLayout: flowLayout)
        collectionView.autoresizingMask = [.flexibleHeight]
        collectionView.showsVerticalScrollIndicator = false
        collectionView.delegate = self
        collectionView.dataSource = self

        collectionView.register(CollectionViewNormalCell.self, forCellWithReuseIdentifier: "CollectionViewNormalCell")

        return collectionView
    }()

    // MARK: - 模拟数据
    public var list: [(String, String)] = [
        ("标题1", "介绍文字介绍文字介绍文字介绍文字介绍文字介绍文字介绍文字介绍文字介绍文字介绍文字介绍文字介绍文字介绍文字介绍文字"),
        ("标题2", "介绍文字介绍文字介绍文字介绍文字"),
        ("标题3",  "介绍文字介绍文字介绍文字介绍文字介绍文字介绍文字介绍文字介绍文字介绍文字介绍文字介绍文字介绍文字介绍文字介绍文字介绍文字介绍文字介绍文字介绍文字介绍文字介绍文字介绍文字介绍文字介绍文字介绍文字")
    ]

    // MARK: - setup UI
    override func viewDidLoad() {
        super.viewDidLoad()
        self.setupUI()
    }

    func setupUI() {
        self.title = "collectionView高度自适应"
        self.collectionView.backgroundColor = UIColor(red: 248/155.0, green: 248/255.0, blue: 248/255.0, alpha: 1.0)

        // 添加collectionView
        self.view.addSubview(self.collectionView)
        self.collectionView.snp.makeConstraints { make in
            make.edges.equalToSuperview()
        }
    }
}

// MARK: - 实现CollectionView的代理和数据源
extension CollectionViewNormalViewController: UICollectionViewDelegate, UICollectionViewDataSource {
    func numberOfSections(in collectionView: UICollectionView) -> Int {
        return self.list.count
    }

    func collectionView(_ collectionView: UICollectionView, numberOfItemsInSection section: Int) -> Int {
        return 1
    }

    func collectionView(_ collectionView: UICollectionView, cellForItemAt indexPath: IndexPath) -> UICollectionViewCell {
        let cell = collectionView.dequeueReusableCell(withReuseIdentifier: "CollectionViewNormalCell", for: indexPath) as! CollectionViewNormalCell
        cell.model = self.list[indexPath.section]
        return cell
    }

}原文地址:https://blog.csdn.net/RRJia/article/details/129263548
本文来自互联网用户投稿,该文观点仅代表作者本人,不代表本站立场。本站仅提供信息存储空间服务,不拥有所有权,不承担相关法律责任。
如若转载,请注明出处:http://www.7code.cn/show_27992.html
如若内容造成侵权/违法违规/事实不符,请联系代码007邮箱:suwngjj01@126.com进行投诉反馈,一经查实,立即删除!
声明:本站所有文章,如无特殊说明或标注,均为本站原创发布。任何个人或组织,在未征得本站同意时,禁止复制、盗用、采集、发布本站内容到任何网站、书籍等各类媒体平台。如若本站内容侵犯了原著者的合法权益,可联系我们进行处理。


