一 案例介绍说明
1.1 案例介绍


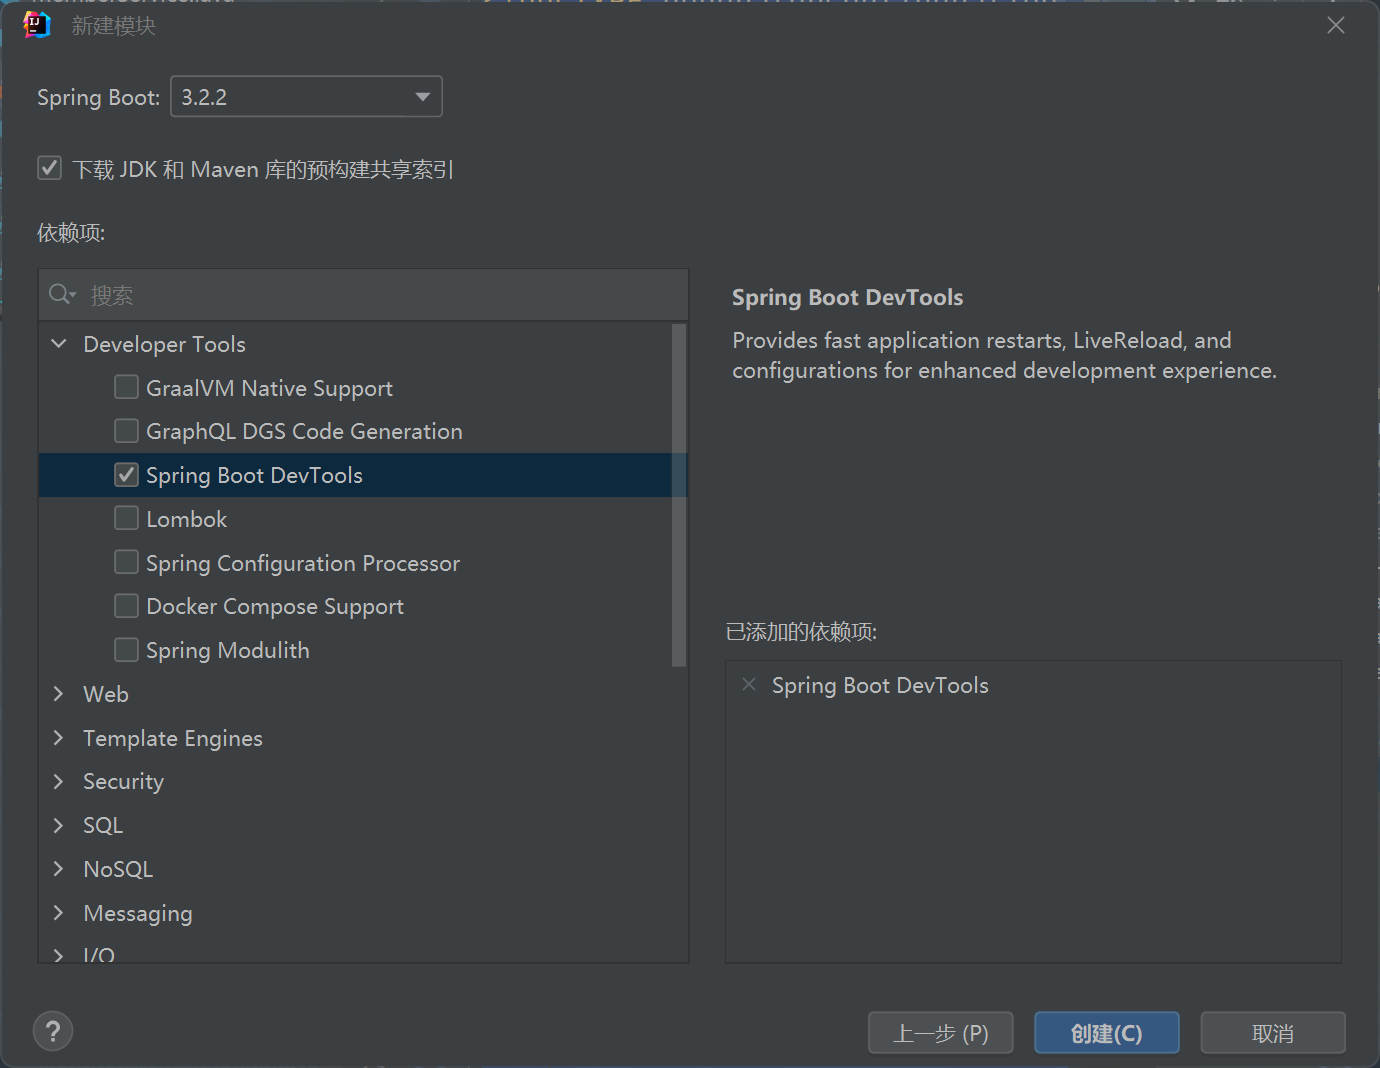
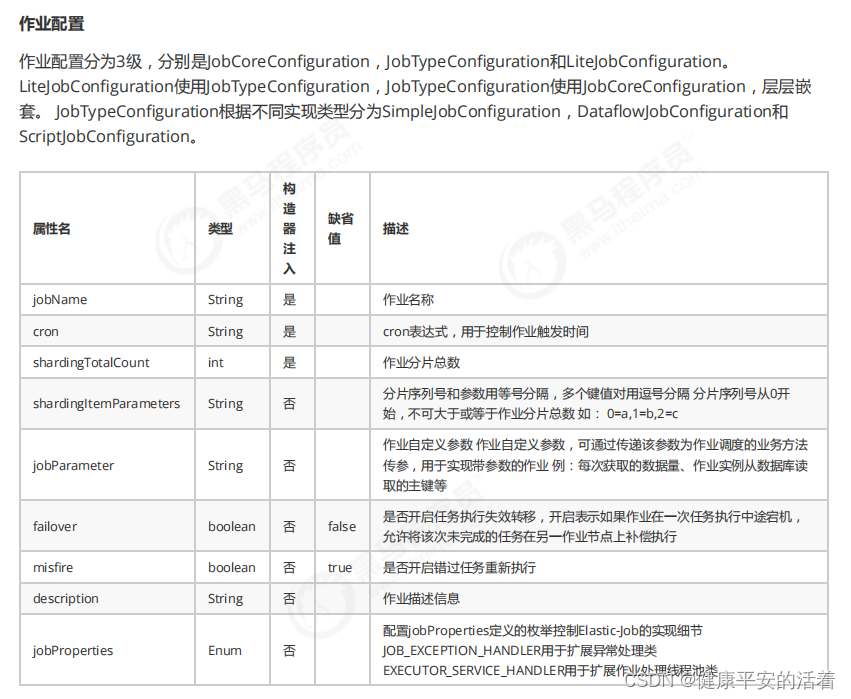
1.2 作业配置
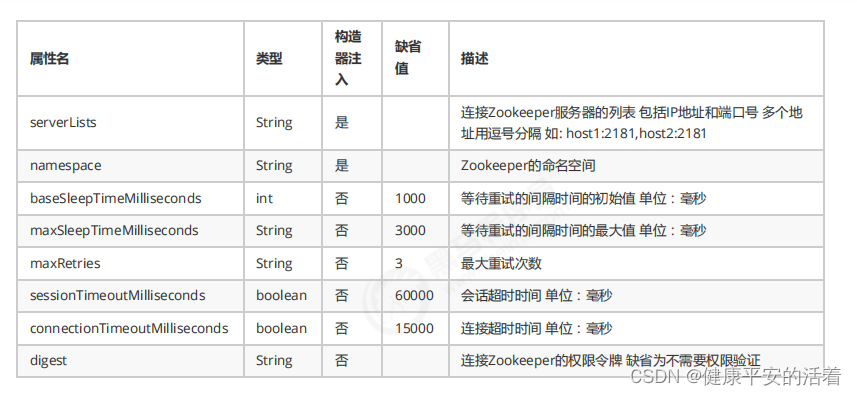
zk的配置
二 操作说明
2.1 数据表的初始化
DROP TABLE IF EXISTS `t_file`;
CREATE TABLE `t_file` (
`id` varchar(11) CHARACTER SET utf8 COLLATE utf8_general_ci NOT NULL,
`name` varchar(255) CHARACTER SET utf8 COLLATE utf8_general_ci NULL DEFAULT NULL,
`type` varchar(255) CHARACTER SET utf8 COLLATE utf8_general_ci NULL DEFAULT NULL,
`content` varchar(255) CHARACTER SET utf8 COLLATE utf8_general_ci NULL DEFAULT NULL,
`backedUp` tinyint(1) NULL DEFAULT NULL,
PRIMARY KEY (`id`) USING BTREE
) ENGINE = InnoDB CHARACTER SET = utf8 COLLATE = utf8_general_ci ROW_FORMAT = Dynamic;
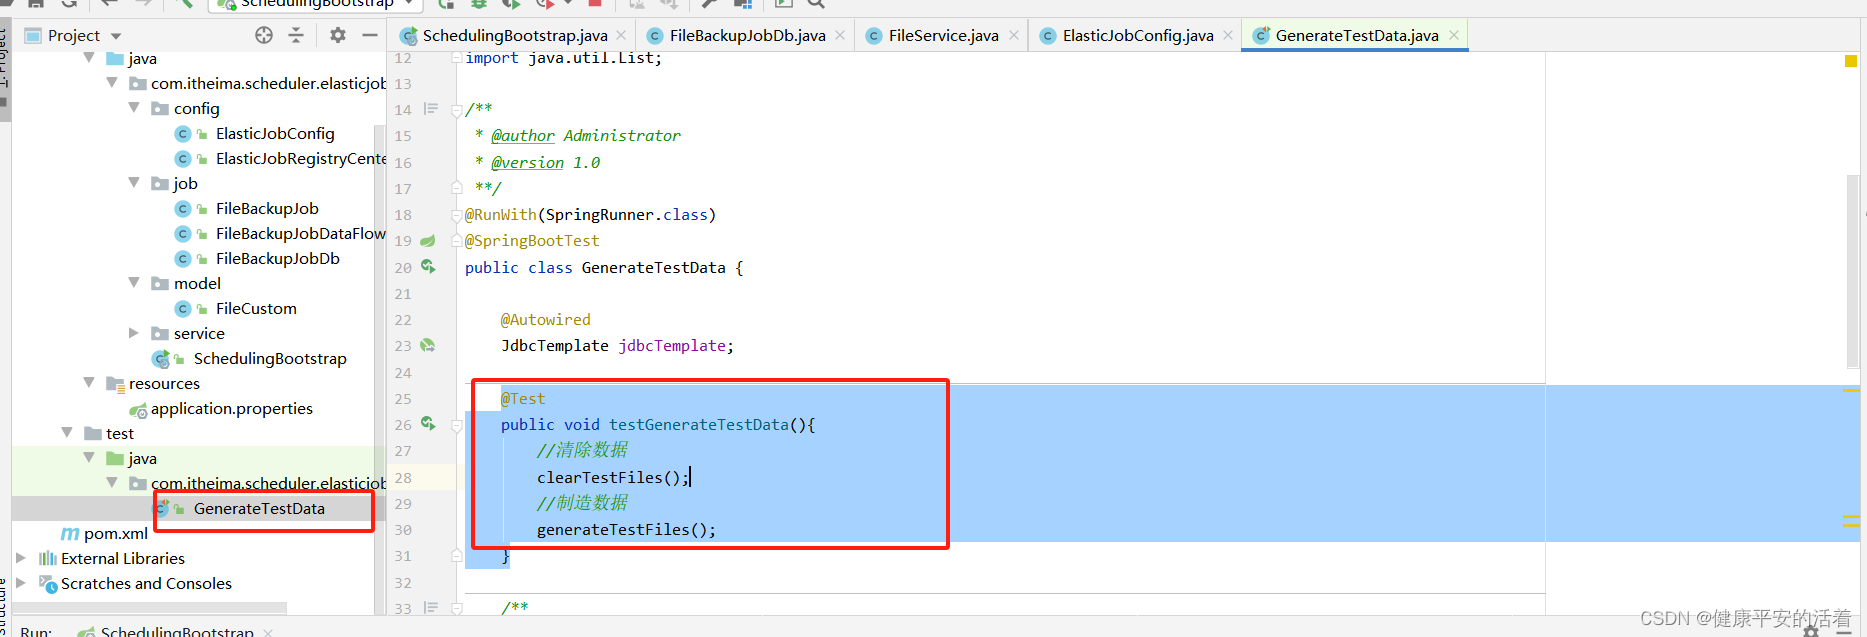
2.2 初始化数据
2.3 pom文件的编写
<dependency>
<groupId>org.springframework.boot</groupId>
<artifactId>spring-boot-starter-web</artifactId>
</dependency>
<dependency>
<groupId>org.springframework.boot</groupId>
<artifactId>spring-boot-starter-jdbc</artifactId>
</dependency>
<dependency>
<groupId>org.springframework.boot</groupId>
<artifactId>spring-boot-starter-test</artifactId>
</dependency>
<dependency>
<groupId>mysql</groupId>
<artifactId>mysql-connector-java</artifactId>
<version>5.1.47</version>
</dependency>
<dependency>
<groupId>com.dangdang</groupId>
<artifactId>elastic-job-lite-spring</artifactId>
<version>2.1.5</version>
</dependency>
<dependency>
<groupId>org.projectlombok</groupId>
<artifactId>lombok</artifactId>
</dependency>2.4 编写注册配置类

2.代码
package com.itheima.scheduler.elasticjob.springboot.config;

import com.dangdang.ddframe.job.api.ElasticJob;
import com.dangdang.ddframe.job.api.simple.SimpleJob;
import com.dangdang.ddframe.job.config.JobCoreConfiguration;
import com.dangdang.ddframe.job.config.dataflow.DataflowJobConfiguration;
import com.dangdang.ddframe.job.config.simple.SimpleJobConfiguration;
import com.dangdang.ddframe.job.event.JobEventConfiguration;
import com.dangdang.ddframe.job.event.rdb.JobEventRdbConfiguration;
import com.dangdang.ddframe.job.lite.config.LiteJobConfiguration;
import com.dangdang.ddframe.job.lite.spring.api.SpringJobScheduler;
import com.dangdang.ddframe.job.reg.base.CoordinatorRegistryCenter;
import com.itheima.scheduler.elasticjob.springboot.job.FileBackupJobDb;
import org.springframework.beans.factory.annotation.Autowired;
import org.springframework.context.annotation.Bean;
import org.springframework.context.annotation.Configuration;
import org.springframework.util.StringUtils;

import javax.sql.DataSource;

/**
 * @author Administrator
 * @version 1.0
 **/
@Configuration
public class ElasticJobConfig {

    @Autowired
    private DataSource dataSource; //数据源已经存在,直接引入

//    @Autowired
//    SimpleJob fileBackupJob;

    @Autowired
    FileBackupJobDb fileBackupJob;

//    @Autowired
//    FileBackupJobDataFlow fileBackupJob;

    @Autowired
    CoordinatorRegistryCenter registryCenter;

    /**
     * 配置任务详细信息
     * @param jobClass 任务执行类
     * @param cron  执行策略
     * @param shardingTotalCount 分片数量
     * @param shardingItemParameters 分片个性化参数
     * @return
     */
    private LiteJobConfiguration createJobConfiguration(final Class<? extends SimpleJob> jobClass,
                                                        final String cron,
                                                        final int shardingTotalCount,
                                                        final String shardingItemParameters){
        //JobCoreConfigurationBuilder
        JobCoreConfiguration.Builder JobCoreConfigurationBuilder = JobCoreConfiguration.newBuilder(jobClass.getName(), cron, shardingTotalCount);
        //设置shardingItemParameters
        if(!StringUtils.isEmpty(shardingItemParameters)){
            JobCoreConfigurationBuilder.shardingItemParameters(shardingItemParameters);
        }
        JobCoreConfiguration jobCoreConfiguration = JobCoreConfigurationBuilder.build();
        //创建SimpleJobConfiguration
        SimpleJobConfiguration simpleJobConfiguration = new SimpleJobConfiguration(jobCoreConfiguration, jobClass.getCanonicalName());
        //创建LiteJobConfiguration
        LiteJobConfiguration liteJobConfiguration = LiteJobConfiguration.newBuilder(simpleJobConfiguration).overwrite(true)
                .monitorPort(9888)//设置dump端口
                .build();
        return liteJobConfiguration;
    }

    //创建支持dataFlow类型的作业的配置信息
    private LiteJobConfiguration createFlowJobConfiguration(final Class<? extends ElasticJob> jobClass,
                                                        final String cron,
                                                        final int shardingTotalCount,
                                                        final String shardingItemParameters){
        //JobCoreConfigurationBuilder
        JobCoreConfiguration.Builder JobCoreConfigurationBuilder = JobCoreConfiguration.newBuilder(jobClass.getName(), cron, shardingTotalCount);
        //设置shardingItemParameters
        if(!StringUtils.isEmpty(shardingItemParameters)){
            JobCoreConfigurationBuilder.shardingItemParameters(shardingItemParameters);
        }
        JobCoreConfiguration jobCoreConfiguration = JobCoreConfigurationBuilder.build();
        // 定义数据流类型任务配置
        DataflowJobConfiguration jobConfig = new DataflowJobConfiguration(jobCoreConfiguration, jobClass.getCanonicalName(),true);
        //创建LiteJobConfiguration
        LiteJobConfiguration liteJobConfiguration = LiteJobConfiguration.newBuilder(jobConfig).overwrite(true)
                .monitorPort(9888)//设置dump端口
                .build();
        return liteJobConfiguration;
    }
    @Bean(initMethod = "init")
    public SpringJobScheduler initSimpleElasticJob() {
        // 增加任务事件追踪配置
        JobEventConfiguration jobEventConfig = new JobEventRdbConfiguration(dataSource);
        //创建SpringJobScheduler

        SpringJobScheduler springJobScheduler = new SpringJobScheduler(fileBackupJob, registryCenter,
                createJobConfiguration(fileBackupJob.getClass(), "0/10 * * * * ?", 4, "0=text,1=image,2=radio,3=vedio")
                ,jobEventConfig);
        return springJobScheduler;
    }
}
3.代码
package com.itheima.scheduler.elasticjob.springboot.config;

import com.dangdang.ddframe.job.reg.base.CoordinatorRegistryCenter;
import com.dangdang.ddframe.job.reg.zookeeper.ZookeeperConfiguration;
import com.dangdang.ddframe.job.reg.zookeeper.ZookeeperRegistryCenter;
import org.springframework.context.annotation.Bean;
import org.springframework.context.annotation.Configuration;

/**
 * @author Administrator
 * @version 1.0
 **/
@Configuration
public class ElasticJobRegistryCenterConfig {

    //zookeeper链接字符串 localhost:2181
    private  String ZOOKEEPER_CONNECTION_STRING = "localhost:2181" ;
    //定时任务命名空间
    private  String JOB_NAMESPACE = "elastic-job-example-java";

    //zk的配置及创建注册中心
    @Bean(initMethod = "init")
    public  CoordinatorRegistryCenter setUpRegistryCenter(){
        //zk的配置
        ZookeeperConfiguration zookeeperConfiguration = new ZookeeperConfiguration(ZOOKEEPER_CONNECTION_STRING, JOB_NAMESPACE);

        //创建注册中心
        CoordinatorRegistryCenter zookeeperRegistryCenter = new ZookeeperRegistryCenter(zookeeperConfiguration);
        return zookeeperRegistryCenter;

    }
}
2.5 启动类

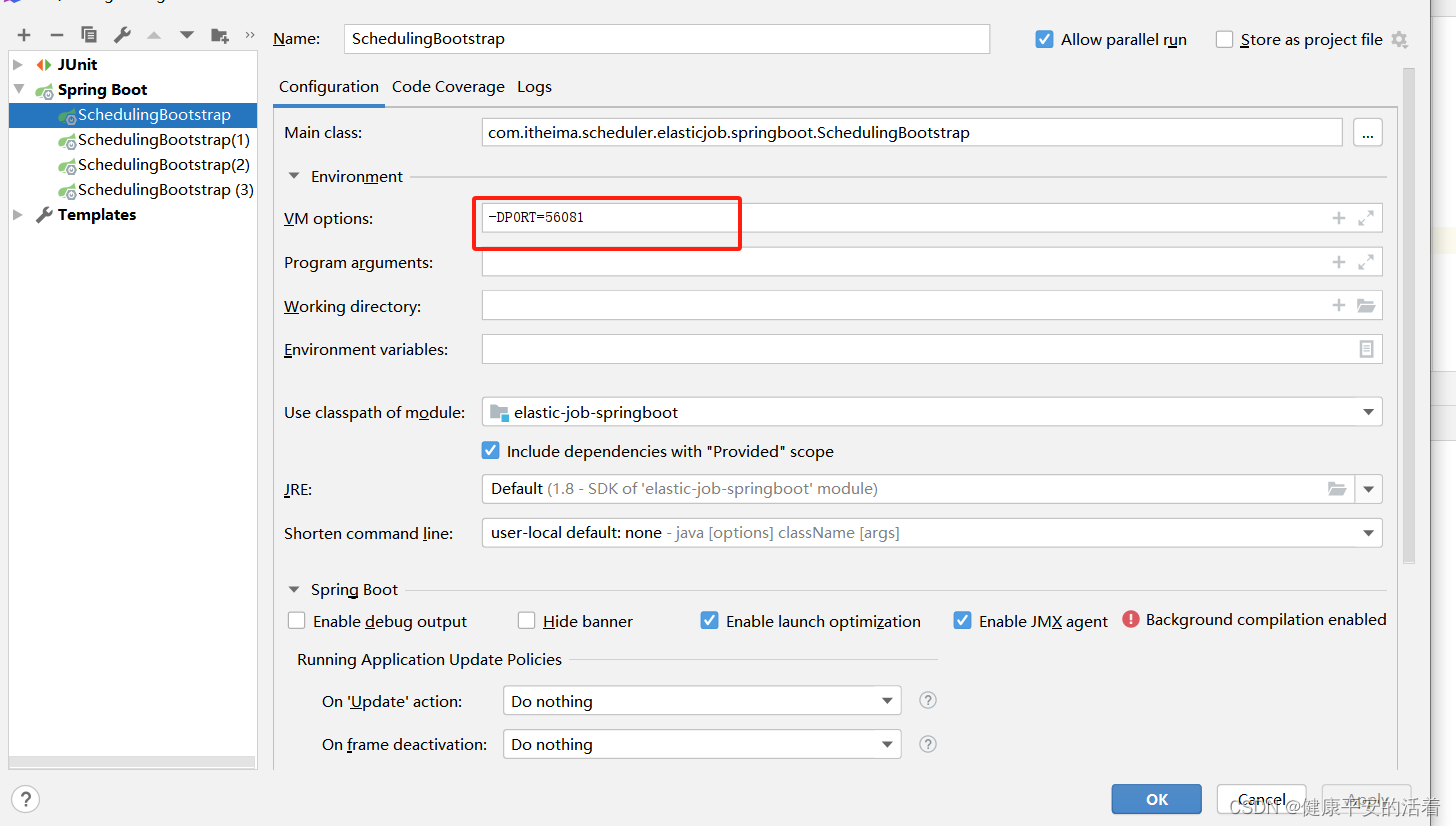
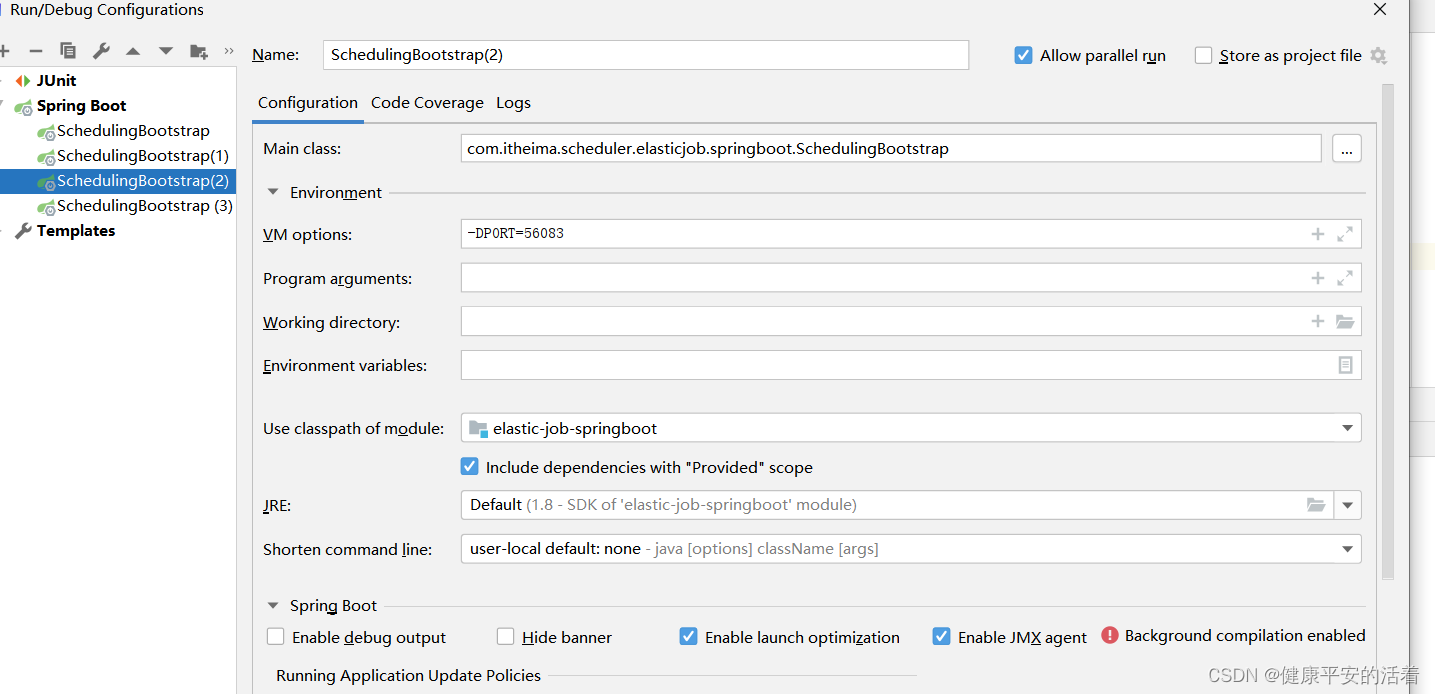
2.6 配置连接

2.7 启动zk
2.8 测试
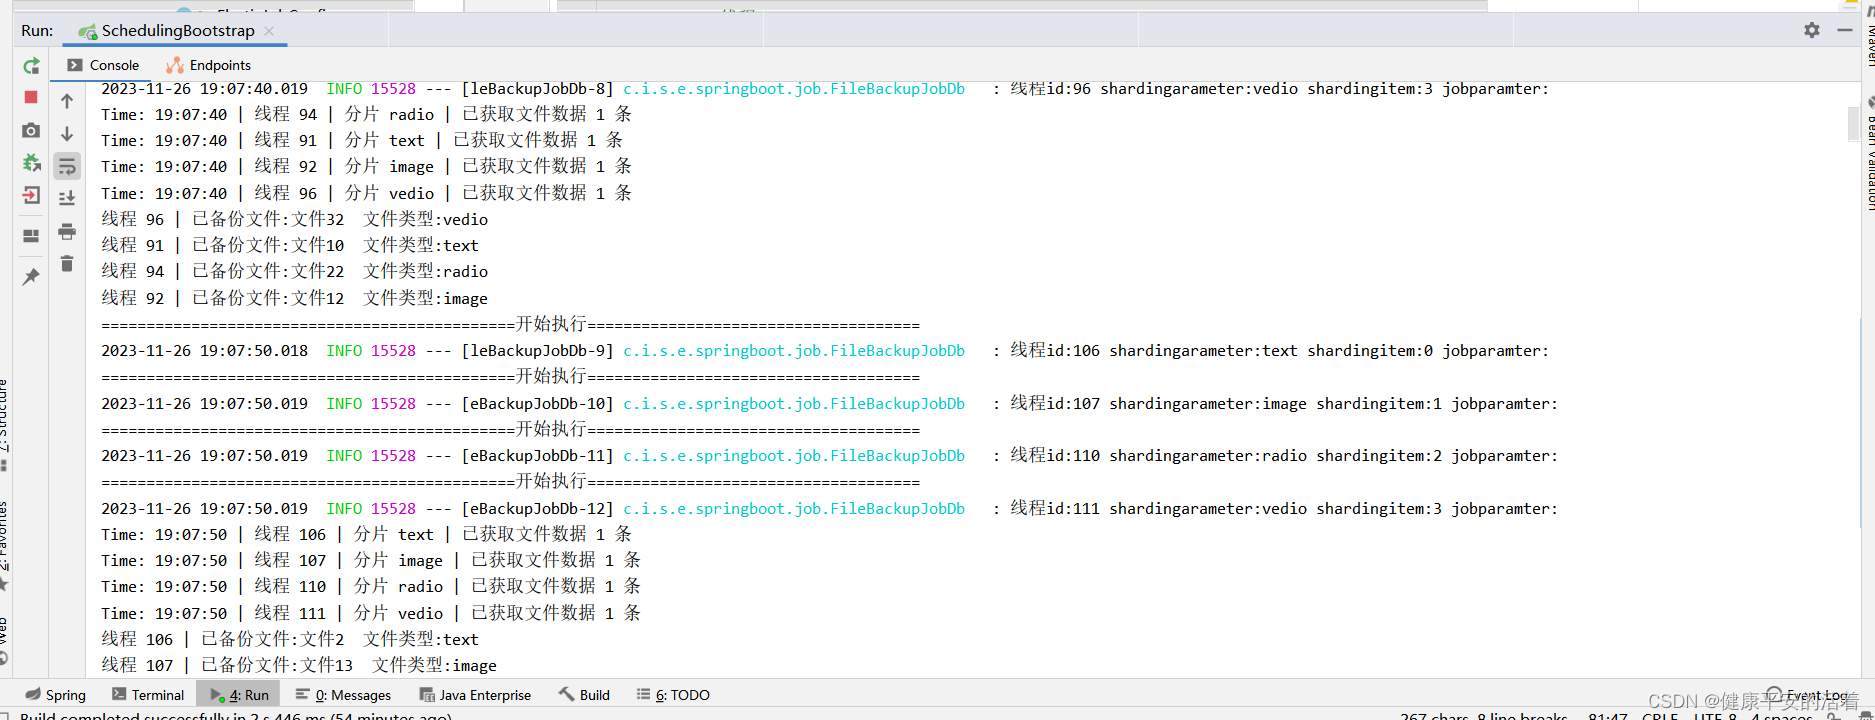
三 多实例测试
3.1 启动4个


2.执行情况


3.2 案例场景分析

测试1:测试窗口1不关闭,再次运行main方法查看控制台日志,注意修改application.properties中的 server.port,保证端口不冲突
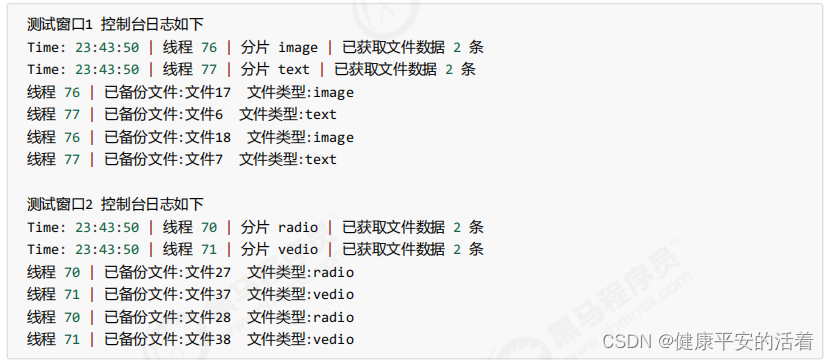
测试2:测试窗口1 和测试窗口2 不关闭,再次运行2次main方法,达到4个任务实例,查看控制台日志
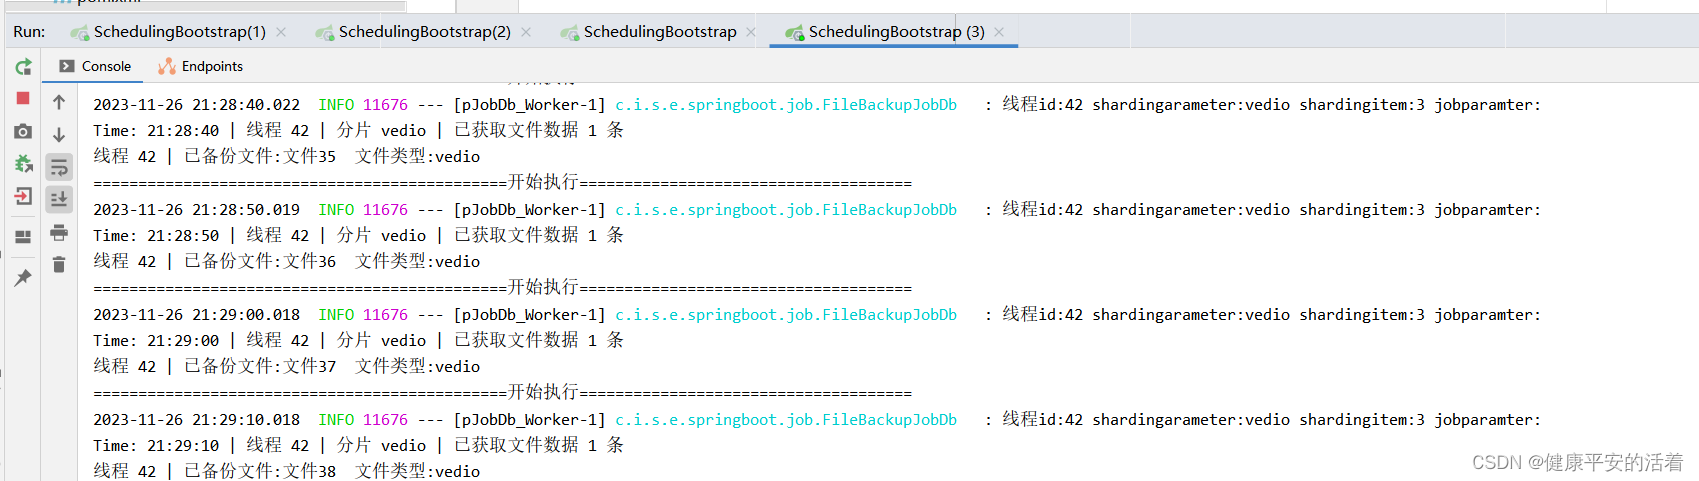
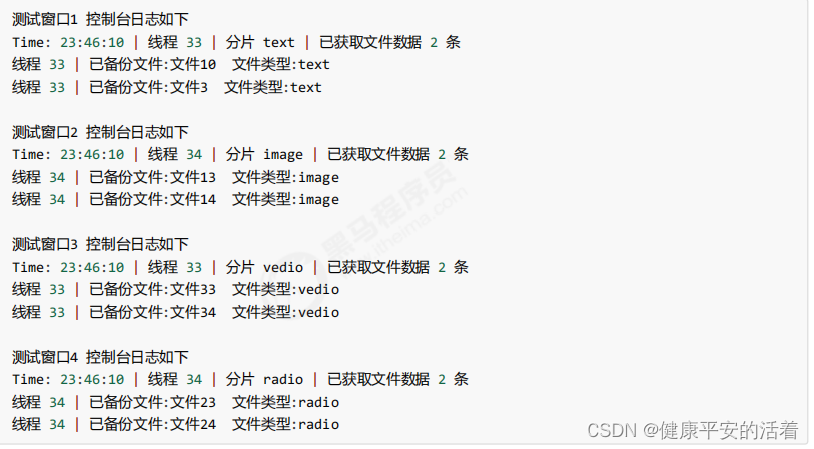 测试3:测试窗口1 和测试窗口2 不关闭,将测试窗口3和测试窗口4任务停止


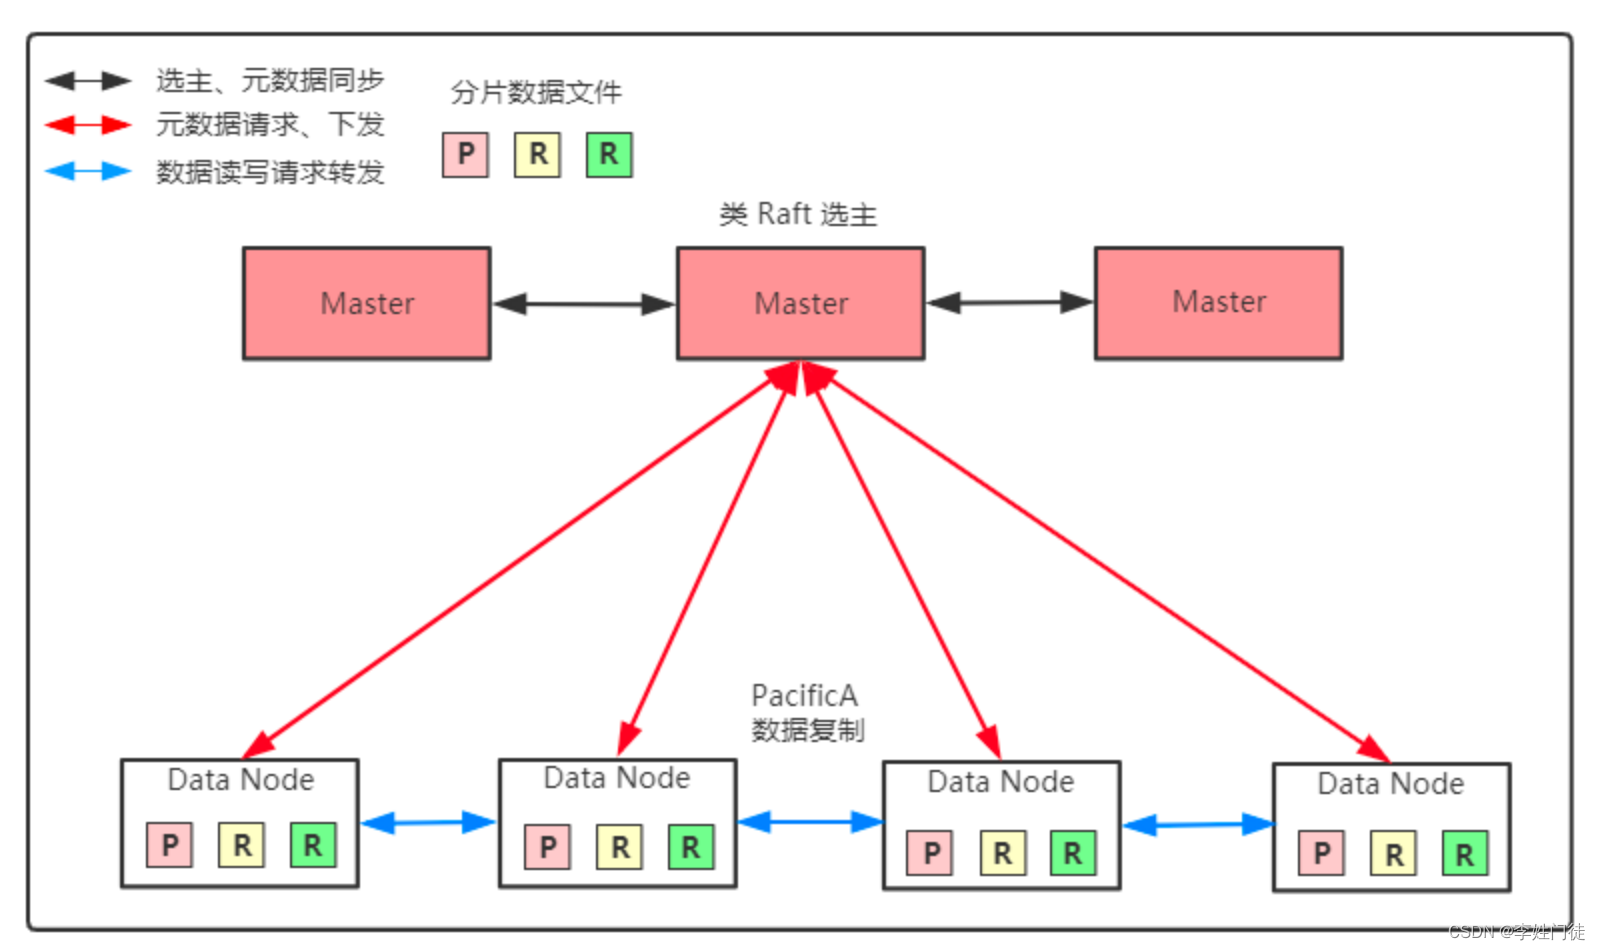
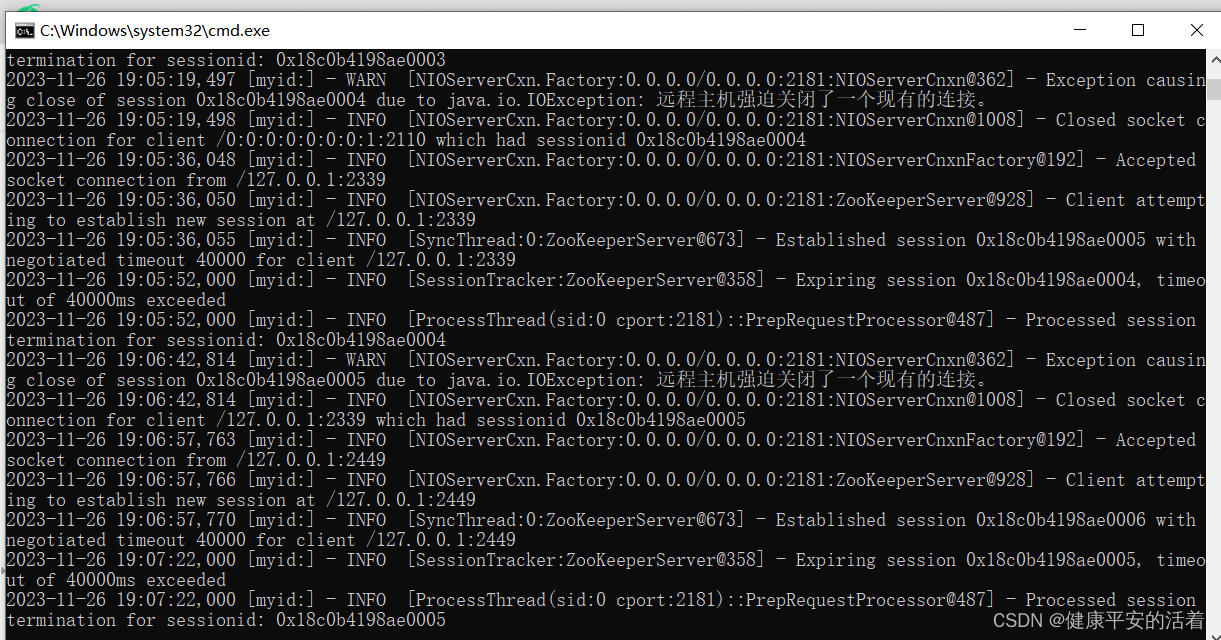
结论:
1、任务运行期间,如果有新机器加入,则会立刻触发分片机制,将任务相对 平均的分配到每台机器上并行执行调度。
2、如果有机器退出集群,则经过短暂的一段时间(大约40秒)后又会重 新触发分片机制

原文地址:https://blog.csdn.net/u011066470/article/details/134631111
本文来自互联网用户投稿,该文观点仅代表作者本人,不代表本站立场。本站仅提供信息存储空间服务,不拥有所有权,不承担相关法律责任。
如若转载,请注明出处:http://www.7code.cn/show_28670.html
如若内容造成侵权/违法违规/事实不符,请联系代码007邮箱:suwngjj01@126.com进行投诉反馈,一经查实,立即删除!
主题授权提示:请在后台主题设置-主题授权-激活主题的正版授权,授权购买:RiTheme官网
声明:本站所有文章,如无特殊说明或标注,均为本站原创发布。任何个人或组织,在未征得本站同意时,禁止复制、盗用、采集、发布本站内容到任何网站、书籍等各类媒体平台。如若本站内容侵犯了原著者的合法权益,可联系我们进行处理。