Canvas学习
一、初识canvas
HTML5 的 canvas 元素使用 JavaScript 在网页上绘制图像。
画布是一个矩形区域,您可以控制其每一像素。
canvas 拥有多种绘制路径、矩形、圆形、字符以及添加图像的方法。
<canvas width="500px" height="500px">
你的浏览器版本太低,请使用高版本浏览器
</canvas>
二、画直线
2.1画直线的步骤
1.获取画布
2.获取画布的上下文
3.开始一条路径
4.确定起始点
5.确定结束点
6.着色
7.结束路径
2.2代码
<canvas width="500px" height="500px">
你的浏览器版本太低,请使用高版本浏览器
</canvas>
<script>
// 1. 获取canvas标签
var canvas=document.getElementsByTagName('canvas')[0]
// 2. 获取上下文
var cvsCtx=canvas.getContext('2d')
// 3. 开启一条路径
cvsCtx.beginPath()
// 4. 确定起始点
cvsCtx.moveTo(100, 100)
// 5. 确定结束点
cvsCtx.lineTo(400, 100)
// 6.设置颜色
cvsCtx.strokeStyle='green'
// 7.设置线宽
cvsCtx.lineWidth=5
// 8. 进行上色
cvsCtx.stroke()
// 9. 关闭路径
cvsCtx.closePath()
</script>
2.3效果

三、画虚线
使用setLineDash([宽度,间隔])结合画直线的方法
    function drawSth(x1,y1,x2,y2,color,width=1){
      // 3.开始路径
      ctx.beginPath()
      // 4.开始坐标
      ctx.moveTo(x1,y1)
      // 5.结束坐标
      ctx.lineTo(x2,y2)
      // 设置样式和宽度
      ctx.strokeStyle=color
      ctx.lineWidth=width
      // 6.着色
      ctx.stroke()
      // 7.结束路径
      ctx.closePath()
    }
	ctx.setLineDash([5,5])
    drawSth(0,0,500,500,'red',1)
    drawSth(500,0,0,500,'red',1)

四、画矩形
矩形有多种画法
-
var canvas=document.querySelector('canvas') // 2. 获取上下文 var ctx=canvas.getContext('2d') ctx.beginPath() ctx.moveTo(100,100) ctx.lineTo(400,100) ctx.lineTo(400,400) ctx.lineTo(100,400) ctx.lineTo(100,100) ctx.stroke() ctx.closePath() </script> -
画填充的矩形
ctx.beginPath() ctx.fillStyle='red' ctx.fillRect(0,0,100,100) -
画描边的矩形
ctx.beginPath() ctx.strokeRect(0,120,100,100) ctx.strokeStyle='red' ctx.stroke() -
画可以描边又可以填充的矩形
    ctx.beginPath()
    ctx.rect(0,350,100,100)
    ctx.fillStyle='blue'
    ctx.fill()
    ctx.strokeStyle='#000'
    ctx.lineWidth=5
    ctx.stroke()

五、画柱形统计图
    var canvas=document.querySelector('canvas')
    // 2. 获取上下文
    var ctx=canvas.getContext('2d')
    // 画直线
    function drawLinear(x1,y1,x2,y2,width,color){
      ctx.beginPath()
      ctx.moveTo(x1,y1)
      ctx.lineTo(x2,y2)
      ctx.lineWidth=width
      ctx.strokeStyle=color
      ctx.stroke()
    }
    // 画矩形
    function drawRect(x,y,width,height){
      ctx.beginPath()
      //随机颜色  ctx.fillStyle=`rgb(${parseInt(Math.random()*255)},${parseInt(Math.random()*255)},${parseI nt(Math.random()*255)})`
      ctx.fillRect(x,y,width,height)
    }
	//画坐标轴
    drawLinear(100,100,100,400,2,'red')
    drawLinear(100,400,400,400,2,'red')
	//循环画多个矩形
    for (let i = 0; i <6; i++) {
      //随机高度 30到400
      var randomH=30+Math.random()*270
      // left top(坐标轴高度-矩形高度) 宽度 高度
      drawRect(120+50*i,400-randomH,30,randomH)
    }

六、清除画布
ctx.clearRect(x,y,width,height)
    var canvas=document.querySelector('canvas')
    // 2. 获取上下文
    var ctx=canvas.getContext('2d')
      ctx.rect(100,100,300,200)
      // 填充颜色
      ctx.fillStyle='green'
      ctx.fill()
      // 设置样式和宽度
      ctx.strokeStyle='red'
      ctx.lineWidth=5
      // 6.着色
      ctx.stroke()
      // clearReact(x,y,width,height)
      // 从(x,y) 开始 清除宽度为 高度为 的图形
      ctx.clearRect(200,100,200,200)

七、画圆
arc(x,y,radius,startAngle,endAngle,false)
坐标 半径 起始角度 结束角度 顺逆时针fasle默认为顺时针
    var canvas=document.querySelector('canvas')
    // 2. 获取上下文
    var ctx=canvas.getContext('2d')
    //画实心圆
    ctx.beginPath()
    ctx.arc(100,100,60,0,Math.PI*2,false)
    ctx.fillStyle='red'
    ctx.fill()
	//画空心圆
    ctx.beginPath()
    ctx.arc(200,200,60,0,Math.PI*2,false)
    ctx.strokeStyle='red'
    ctx.stroke()

八、杯子案例
    var canvas=document.querySelector('canvas')
    // 2. 获取上下文
    var ctx=canvas.getContext('2d')
    // 1. 画矩形
    ctx.beginPath()
    ctx.rect(100,180,200,200)
    ctx.lineWidth=2
    ctx.stroke()
    // 2.画圆弧
    function drawCircle(x,y,r,start,end,flag,width=1){
      ctx.beginPath()
      ctx.arc(x,y,r,start,end,flag)
      ctx.lineWidth=width
      ctx.stroke()
    }
    for (let index = 0; index < 5; index++) {
        drawCircle(120+index*40,100,20,-Math.PI/2,Math.PI/2,true)
        drawCircle(120+index*40,140,20,-Math.PI/2,Math.PI/2,false)
    }
    drawCircle(300,280,40,-Math.PI/2,Math.PI/2,false,5)
效果

九、动态画圆
drawCircle(x,y,r,startDeg,deg*count,false,'red',5)
其中可以确定画圆的起始点startDeg,deg*count 二者的关系是startDeg=deg*count+startDeg
startDeg可能为负数
    var canvas=document.querySelector('canvas')
    // 2. 获取上下文
    var ctx=canvas.getContext('2d')
    // 2.画圆
    function drawCircle(x,y,r,start,end,flag,color='black',width=1){
      ctx.beginPath()
      ctx.arc(x,y,r,start,end,flag)
      ctx.lineWidth=width
      ctx.strokeStyle=color
      ctx.stroke()
    }
	//把圆分为360份 一点一点画圆弧
    var deg=Math.PI*2/360
    var count=0
    var timeout= setInterval(()=>{
      count++
       //当为完整的圆时停止
      if(count==360)
      {
        clearInterval(timeout)
      }
        //,0,deg*count可以确定起点 startdeg,deg.count+startdeg
      drawCircle(250,250,150,0,deg*count,false,'red',5)
    },10)
效果

十、奥运五环案例
var canvas=document.querySelector('canvas')
    // 2. 获取上下文
    var ctx=canvas.getContext('2d')
    // 2.画圆
    function drawCircle(x,y,r,start,end,flag,color='black',width=1){
      ctx.beginPath()
      ctx.arc(x,y,r,start,end,flag)
      ctx.lineWidth=width
      ctx.strokeStyle=color
      ctx.stroke()
    }
    function drawFiveRing(x,y,r,start,flag,color='black',width=1){
      var deg=Math.PI*2/360
      var count=0
      var timer= setInterval(()=>{
      count++
      if(count==360)
      {
        clearInterval(timer)
      }
      drawCircle(x,y,r,start,deg*count,flag,color,width)
      },10)
    }
    drawFiveRing(250,250,100,0,false,'blue',5)
    setTimeout(()=>{
      drawFiveRing(470,250,100,0,false,'black',5)
    },2000)
    setTimeout(()=>{
      drawFiveRing(690,250,100,0,false,'red',5)
    },4000)
    setTimeout(()=>{
      drawFiveRing(360,380,100,0,false,'yellow',5)
    },6000)
    setTimeout(()=>{
      drawFiveRing(580,380,100,0,false,'green',5)
    },8000)
效果

十一、碰撞检测
原理:动态画小球 清除之前小球,x,y的值根据碰撞检测在一发生改变实现小球运动效果
代码
    var canvas=document.querySelector('canvas')
    // 2. 获取上下文
    var ctx=canvas.getContext('2d')
    // 2.画圆
    var w=h=500
    var x=200
    var y=30
    var r=30
    var Xspeed=1
    var Yspeed=2
    function drawCircle(x,y,r){
      //
      ctx.arc(x,y,r,0,Math.PI*2)
      ctx.fillStyle='red'
      ctx.fill()
    }
    var timer= setInterval(()=>{
      // 清除画布
      ctx.beginPath()
      ctx.clearRect(0,0,w,h)
        x+=Xspeed
        y+=Yspeed
        if(x>=w-r || x<=r)
        {
          Xspeed=-Xspeed
        }
        if(y>=h-r || y<=r)
        {
          Yspeed=-Yspeed
        }

      drawCircle(x,y,r)
    },10)
效果

十二、面向对象小球
原理:创建一个小球类,绑定随机颜色,随机半径,绑定两个方法,画小球的方法,和修改小球运动位置的方法,
使用for循环,创建规定小球类的实例,存储起来,在定时器进行不停调用,就会有很多小球一起运动了
代码
    var canvas=document.querySelector('canvas')
    // 2. 获取上下文
    var ctx=canvas.getContext('2d')
    // 2.画圆
    var w=500
    var h=500
    function randomNum(num){
      return Math.random()*num
    }
    // 面向对象小球 创建一个小球类
    function objectBall(x,y,r,Xspeed,Yspeed,color){
      // this.x=60+randomNum(5)
      // this.y=60+randomNum(5)
      this.x=60
      this.y=60
      this.r=10+randomNum(50) //10-60
      this.color='#'+parseInt(Math.random()*0xffffff).toString(16)
      this.Xspeed=1+randomNum(4)
      this.Yspeed=1+randomNum(4)

      // 画小球方法
      objectBall.prototype.show=function(){
        this.run()
        ctx.beginPath()
        ctx.arc(this.x,this.y,this.r,0,Math.PI*2,false)
        ctx.fillStyle=this.color
        ctx.fill()
      }
      // 小球位置和速度
      objectBall.prototype.run=function(){
          if(this.x>=w-this.r || this.x<=this.r)
          {
           this.Xspeed=-this.Xspeed
          }
          this.x+=this.Xspeed
          if(this.y>=h-this.r || this.y<=this.r)
          {
            this.Yspeed=-this.Yspeed
          }
          this.y+=this.Yspeed
       }
    }
    var ballArr=[]
    for (let index = 0; index <50; index++) {
      var ball=new objectBall()
      ballArr.push(ball)
      ball.show()
    }
    setInterval(()=>{
      ctx.clearRect(0,0,w,h)
      for (let index = 0; index < ballArr.length; index++) {
        var ballOne = ballArr[index];
        // ballOne.run()
        ballOne.show()
      }
    },10)
效果

十三、画文字
ctx.font=’字体大小 字体样式
设置字体的大小和样式
fillText(text,x,y,maxWidth)
参数为文本,坐标和最大文字宽度 maxWidth 当文字放不下的时候 会挤压文字
可以通过fillStyle和strokeStyle设置实心文字和空心文字
代码
    var canvas=document.querySelector('canvas')
    // 2. 获取上下文
    var ctx=canvas.getContext('2d')
  //  设置字体
   ctx.font='50px 宋体'
   ctx.fillStyle='black'
   ctx.fillText('今天下英雄,惟使君与操耳',200,50,300)

  //  绘制空心文字strokeText
   ctx.font='100px 宋体'
   ctx.strokeStyle='blue'
   ctx.strokeText('彭于晏',200,200)
   ctx.stroke()
效果

十四、画渐变文字
创建渐变的方法 createLinearGradient(0,0,canvas.width,0)
添加每一部分的颜色 gradient.addColorStop(‘0-1’,‘yellow’)
给文字添加渐变颜色 ctx.fillStyle=gradient
代码
    var canvas=document.querySelector('canvas')
    // 2. 获取上下文
    var ctx=canvas.getContext('2d')
    ctx.font='100px 宋体'
    // 创建渐变的方法 createLinearGradient(0,0,canvas.width,0)
    var gradient= ctx.createLinearGradient(0,0,canvas.width,0)
    gradient.addColorStop('0','yellow')
    gradient.addColorStop('0.50','blue')
    gradient.addColorStop('1','red')
    ctx.strokeStyle=gradient
    ctx.strokeText('神龟虽寿,犹有竟时',0,300,500)
    ctx.fillStyle=gradient
    ctx.fillText('神龟虽寿,犹有竟时',0,100,500)
效果

十五、设置字体的位置
textAlign水平位置
默认是textAlign:start 文字在右上方 水平居中:start end left right center
left文字起始位置在左边 和start一致
right文字起始位置在右边 和end一致
textBaseline 垂直位置:
属性值:middle居中 bottom下面为起始位置 top 上面为起始位置
top:顶端和中线贴边
bottom:底端和中线贴边
代码
    var canvas=document.querySelector('canvas')
    // 2. 获取上下文
    var ctx=canvas.getContext('2d')
    // 画直线
    function drawLinear(x1,y1,x2,y2,color){
      ctx.beginPath()
      ctx.moveTo(x1,y1)
      ctx.lineTo(x2,y2)
      ctx.strokeStyle=color
      ctx.stroke()
      ctx.closePath()
    }
    drawLinear(0,250,500,250,'red')
    drawLinear(250,0,250,500,'red')
    // drawDottedLine(0,0,5,5,'red',500)
    // drawDottedleft(500,0,495,5,'red',500)
    ctx.setLineDash([5,5])
    drawLinear(0,0,500,500,'red')
    drawLinear(500,0,0,500,'red')
    ctx.font='400px 楷体'
    ctx.textAlign="center"
    ctx.textBaseline="middle"
    ctx.fillText('田',250,250)
效果

十六、绘制图片
三个参数:drawImage(img,x,y)
img图片 x,y是图片位置
五个参数:drawImage(img,x,y,width,height)
img图片 x,y是图片位置width,height是图片宽高
九个参数:drawImage(img,tailorx,taily,tailWidth,tailHeight,x,y,width,height)
img图片 ,tailorx,taily,tailWidth,tailHeight 是要截取的图片位置宽高x,y是图片位置width,height是图片宽高
代码
    var canvas=document.querySelector('canvas')
    // 2. 获取上下文
    var ctx=canvas.getContext('2d')
    //  创建图片
    var img=new Image()
    img.src='./imgs/11.jpg'
    img.onload=function(){
      console.log(img.width,img.height);
      ctx.drawImage(img,200,0,150,150,175,175,150,150)
    }
效果

十七、绘制线性小球
原理:在面向对象小球基础上在小球上面画文字,然后根据每一个小球连接前面的所有小球根据两点画直线来实现
代码
    var canvas=document.querySelector('canvas')
    // 2. 获取上下文
    var ctx=canvas.getContext('2d')
    var w=h=500
    // 1. 画直线
    function drawLinear(x1,y1,x2,y2,color){
      ctx.beginPath()
      ctx.moveTo(x1,y1)
      ctx.lineTo(x2,y2)
      ctx.strokeStyle=color
      ctx.stroke()
      ctx.closePath()
    }
    // 2. 画文字
    function drawFont(color,text,x,y,maxWidth){
      ctx.font='22px 微软雅黑'
      ctx.fillStyle=color
      ctx.textAlign='left'
      ctx.textBaseline='middle'
      ctx.fillText(text,x,y,maxWidth)
    }
    function randomNum(num){
      return Math.random()*num
    }
    // 3. 面向对象小球
    function classBall(text){
      this.x=60+randomNum(380) //60-440
      this.y=60+randomNum(380)
      this.r=20+randomNum(30)//20-50
      this.Xspeed=1+randomNum(4)
      this.Yspeed=1+randomNum(4)
      this.text=text
      this.color=`rgb(${parseInt(Math.random()*255)},${parseInt(Math.random()*255)},${parseInt(Math.random()*255)})`
      classBall.prototype.showBall=function(x,y,r,color){
        this.move()
        ctx.beginPath()
        ctx.arc(this.x,this.y,this.r,0,Math.PI*2,false)
        ctx.fillStyle=this.color
        ctx.fill()
        // 画文字
        drawFont(this.color,this.text,this.x+this.r,this.y,200)
      }
      classBall.prototype.move=function(){
        this.x+=this.Xspeed
        if(this.x<=this.r || this.x>=w-this.r)
        {
          this.Xspeed=-this.Xspeed
        }
        this.y+=this.Yspeed
        if(this.y<=this.r || this.y>=h-this.r)
        {
          this.Yspeed=-this.Yspeed
        }
      }
    }
    var titleArr=`JavaScript HTML5前端 JAVA Python Canvas CSS3 Bootstrap 全栈工程师 Node服务端 React Vue SpringBoot`.split(' ')
    var ballArr=[]
    for (let i = 0; i < 5; i++) {
      var ball=new classBall(titleArr[i])
      ballArr.push(ball)
      ball.showBall()
      // 小球连线 A球 B球
      // for (let j = 0; j < i; j++) {
      //   // 取出当前小球前面的小球
      //   var prevBall=ballArr[j]
      //   drawLinear(ball.x,ball.y,prevBall.x,prevBall.y)
      // }
    }
    setInterval(()=>{
      ctx.clearRect(0,0,w,h)
      for (let i = 0; i < ballArr.length; i++) {
      var ballOne=ballArr[i]
      // ballOne.move()
      ballOne.showBall()
      for (let j = 0; j < i; j++) {
        // 取出当前小球前面的小球
        var prevBall=ballArr[j]
        drawLinear(ballOne.x,ballOne.y,prevBall.x,prevBall.y,ballOne.color)
      }
    }
    },10)
效果

十八、画炫彩小球
原理:创建小球类,随机颜色,固定大小,画小球,小球半径一直减小直至0,根据鼠标移动事件创建小球类的实例,存放到数组,通过实例去画小球,当小球半径减少到0从数组删除
代码
    var canvas=document.querySelector('canvas')
    // 2. 获取上下文
    var ctx=canvas.getContext('2d')
    var w=document.documentElement.clientWidth-6
    var h=document.documentElement.clientHeight-6
    // 修改画布宽高
    canvas.width=w
    canvas.height=h

    function randomNum(num){
      return Math.random()*num
    }
    // 画小球
    function drawBall(x,y,r,color){
      ctx.beginPath()
      ctx.arc(x,y,r,0,Math.PI*2,false)
      ctx.fillStyle=color
      ctx.fill()
    }
    // 3. 面向对象小球
    function classBall(x,y){
      this.x=x
      this.y=y
      this.r=60
      // 随机颜色
      this.color=`rgb(${parseInt(Math.random()*255)},
                      ${parseInt(Math.random()*255)},
                      ${parseInt(Math.random()*255)})`
      classBall.prototype.showBall=function(){
        // 小球半径变小
        this.r--
        if(this.r<=0)
        {
          return
        }
        drawBall(this.x,this.y,this.r,this.color)
      }
    }
    var ballArr=[]
        // 鼠标滑动事件
    window.onmousemove=function(e){
      // console.log(e.x,e.y)
      var ball= new classBall(e.x,e.y)
      ballArr.push(ball)
      ball.showBall()
    }
    setInterval(()=>{
      ctx.clearRect(0,0,w,h)
      for (let i = 0; i < ballArr.length; i++) {
        var ballOne = ballArr[i];
        if(ballOne.r<=0)
        {
          ballArr.splice(i,1)
        }
        else{
          ballOne.showBall()
        }
      }
    },10)
效果

十九、画时钟
代码
  <div id="canvas">
    <canvas width="400px" height="400px">
      低版本浏览器不支持,建议使用高版本浏览器
    </canvas>
  </div>
	var canvas=document.querySelector('canvas')
    // 2. 获取上下文
    var ctx=canvas.getContext('2d')
    /*
    div 400*400
    时针60
    分针120
    秒针140
    刻度半径r_sqare=165
    报盘文字的半径r_text140
    圆盘小圆点10
    中心点坐标
    */
   var w=h=400
   var x=y=200
   var r=180
   var r_hour=60
   var r_hourWidth=10
   var r_minute=120
   var r_minuteWidth=5
   var r_second=140
   var r_secondWidth=2
   var r_text=140
   var r_sqare=165
   var r_circle=10
   var deg=Math.PI*2
  //  平移中心点200,200变为起始点
  ctx.translate(w/2,h/2)
  // 总方法
  clock()
  setInterval(()=>{
    clock()
  },1000)
  function clock(){
    //  1. 画圆盘
   drawCircle(0,0,r,'white')
  //  2. 画表针 时 分 秒
  // 获取时间 0 0在水平位置 减去 PI/2=deg/4
  //时间化为角度
    var date=new Date()
    var hour=date.getHours()*(deg/12)-deg/4
    var minute=date.getMinutes()*(deg/60)-deg/4
    var second=date.getSeconds()*(deg/60)-deg/4
    drawLinear(0,0,r_hour*Math.cos(hour),r_hour*Math.sin(hour),'#000',r_hourWidth)
  	drawLinear(0,0,r_minute*Math.cos(minute),r_minute*Math.sin(minute),'#000',r_minuteWidth)
drawLinear(0,0,r_second*Math.cos(second),r_second*Math.sin(second),'red',r_secondWidth)
  // 3. 画中心点
  drawCircle(0,0,r_circle,'#000')
  // 4. 画数字 12个数字
  for (let i = 1; i < 13; i++) {
    // 圆的坐标系 x=x+r*cos(0) y=y+r*sin(0)
    var angle=((Math.PI*2)/12)*i-Math.PI/2
    var xI=r_text*(Math.cos(angle))
    var yI=r_text*(Math.sin(angle))
    drawFont('#000',i,xI,yI)
  }
  // 5. 画刻度 同心圆 x1,y1,x2,y2
  for (let i = 1; i <=60; i++) {
    var angle=((Math.PI*2)/60)*i-Math.PI/2
    var x1=(r-4)*(Math.cos(angle))
    var y1=(r-4)*(Math.sin(angle))
    // 判断整点 5个刻度为一个整点
    if(i%5==0)
    {
      var x2=r_sqare*(Math.cos(angle))
      var y2=r_sqare*(Math.sin(angle))
      drawLinear(x1,y1,x2,y2,'#000',3)
    }
    else{
      var x2=(r_sqare+5)*(Math.cos(angle))
      var y2=(r_sqare+5)*(Math.sin(angle))
      drawLinear(x1,y1,x2,y2,'red',2)
    }
  }
  }
    // 1. 画直线
    function drawLinear(x1,y1,x2,y2,color,width){
      ctx.beginPath()
      ctx.moveTo(x1,y1)
      ctx.lineTo(x2,y2)
      ctx.lineWidth=width
      ctx.strokeStyle=color
      // 直线画圆角
      ctx.lineCap="round"
      ctx.stroke()
      ctx.closePath()
    }
    // 2. 画文字
    function drawFont(color,text,x,y,maxWidth){
      ctx.font='22px 微软雅黑'
      ctx.fillStyle=color
      ctx.textAlign='center'
      ctx.textBaseline='middle'
      ctx.fillText(text,x,y,maxWidth)
    }
    // 3.画圆
    function drawCircle(x,y,r,color){
      ctx.beginPath()
      ctx.fillStyle=color
      ctx.arc(x,y,r,0,Math.PI*2,false)
      ctx.fill()
    }
效果

二十、绘制像素图片
**ctx.getImageData(0,0,width,height)**方法:获取像素信息
4个元素为一组分别代表rgba的值,根据每一组的第一个值/4可以看出是第几个像素, 像素坐标:x+y*每行像素点数=像素顺序 获取像素位置

原理:获取图片的宽高使用ctx.getImageData(0,0,width,height)获取像素数据,清除原来图片画布,根据以上公式获取像素顺序位置,根据a的值判断是否有效,有效就画指定半径的小圆
代码
    var canvas=document.querySelector('canvas')
    // 2. 获取上下文
    var ctx=canvas.getContext('2d')
    var img=new Image()
    img.src='./imgs/one.png'
    img.onload=function(){
      ctx.drawImage(img,0,0)
      var width=img.width
      console.log(width);
      var height=img.height
      var copy1=ctx.getImageData(0,0,width,height)
      console.log(copy1);
      ctx.clearRect(0,0,width,height)
     var leap=3 //控制取点间隔
     for (let y= 0; y<height; y+=leap) {
       for (let x = 0; x < width; x+=leap) {
        //  index就是获取像素 是第几个
         var index=x+y*width
        //  rgba的值
        var r=copy1.data[index*4+0]
        var g=copy1.data[index*4+1]
        var b=copy1.data[index*4+2]
        var a=copy1.data[index*4+3]
        //过滤出有效的像素
        if(a>128){
          // 在当前有效像素点画一个圆
          drawCircle(x,y,1,'#000')
        }
       }
     }
    }
    function drawCircle(x,y,r,color){
      ctx.beginPath()
      ctx.arc(x,y,r,0,Math.PI*2)
      ctx.fillStyle=color
      ctx.fill()
    }
效果

二十一、绘制像素文字
和画图片一个原理:ctx.getImageData(0,0,w,h)获取页面文字像素信息,清除画布去除原来文字,使用以上公式获取像素位置序列,通过对a的判断,进行画圆着色
代码
    var canvas=document.querySelector('canvas')
    // 2. 获取上下文
    var ctx=canvas.getContext('2d')
    var w=h=500
    // 1. 画文字
    drawFont('♟',w/2,h/2,'red',400)
    // 2. 获取像素点
    var copy=ctx.getImageData(0,0,w,h)
    console.log(copy);
    ctx.clearRect(0,0,w,h)
    // 3. 筛选有效像素点
    var leap=3
    // ☃☠✈☢♟☎
    for (let y = 0; y < h; y+=leap) {
      for (let x = 0; x < w; x+=leap) {
        var index=x+y*w

        var r=copy.data[index*4+0]
        var g=copy.data[index*4+1]
        var b=copy.data[index*4+2]
        var a=copy.data[index*4+3]
        if(a>128)
        {
          drawCircle(x,y,1,'red')
        }
      }
    }
    // 画文字
    function drawFont(text,x,y,color,maxWidth){
      ctx.beginPath()
      ctx.font='200px 微软雅黑'
      ctx.fillStyle=color
      ctx.textAlign='center'
      ctx.textBaseline='middle'
      ctx.fillText(text,x,y,maxWidth)
    }
    // 画圆
    function drawCircle(x,y,r,color){
      ctx.beginPath()
      ctx.arc(x,y,r,0,Math.PI*2)
      ctx.fillStyle=color
      ctx.fill()
    }
效果

二十二、绘制动态像素文字
原理:在绘制像素文字基础上,加上面向对象小球思想,达到运动效果。先画文字,获取像素位置信息,使用面向对象小球运动到指定位置上,其中每一个小球运动到最终位置是确定的,使用初始随机位置和末尾位置连线设置小球轨迹,算出水平和垂直速度,根据count+1次数和设置的times确定结束位置,停止运动
代码
    var canvas=document.querySelector('canvas')
    // 2. 获取上下文
    var ctx=canvas.getContext('2d')
    var w=h=500
    var times=100
    var count=0
    drawFont('彭于晏',w/2,h/2,'red',400)
    // 2. 获取像素点
    var copy=ctx.getImageData(0,0,w,h)
    console.log(copy);
    ctx.clearRect(0,0,w,h)
    // 3. 筛选有效像素点
    var leap=10
    var ballArr=[]
    for (let y = 0; y < h; y+=leap) {
      for (let x = 0; x < w; x+=leap) {
        var index=x+y*w
        var a=copy.data[index*4+3]
        if(a>128)
        {
          // drawCircle(x,y,4,'red')
            var ball=new classBall(x,y)
            ballArr.push(ball)
            ball.showBall()
        }
      }
    }
    // 动起来
    var timer= setInterval(()=>{
      count++
      ctx.clearRect(0,0,w,h)
      for (let i = 0; i < ballArr.length; i++) {
        var ballOne=ballArr[i]
        ballOne.showBall()
        if(count+1==times)
        {
          clearInterval(timer)
        }
      }
    },50)
    // 画文字
    function drawFont(text,x,y,color,maxWidth){
      ctx.beginPath()
      ctx.font='200px 微软雅黑'
      ctx.fillStyle=color
      ctx.textAlign='center'
      ctx.textBaseline='middle'
      ctx.fillText(text,x,y,maxWidth)
    }
    // 画圆
    function drawCircle(x,y,r,color){
      ctx.beginPath()
      ctx.arc(x,y,r,0,Math.PI*2)
      ctx.fillStyle=color
      ctx.fill()
    }
    function randomNum(num){
      return parseInt(Math.random()*num)
    }
    function classBall(x2,y2){
      // 需要起始位置和结束位置
      this.x1=randomNum(w)
      this.y1=randomNum(h)
      this.r=3
      this.color='red'
      this.x2=x2
      this.y2=y2
      this.x=this.x1
      this.y=this.y1
      // 通过开始和结束计算水平垂直速度
      this.Xspeed=(x2-this.x1)/times
      this.Yspeed=(y2-this.y1)/times
      classBall.prototype.showBall=function(){
        // 中间还有个运动点
        this.x+=this.Xspeed
        this.y+=this.Yspeed
        drawCircle(this.x,this.y,this.r,this.color)
      }
    }
效果

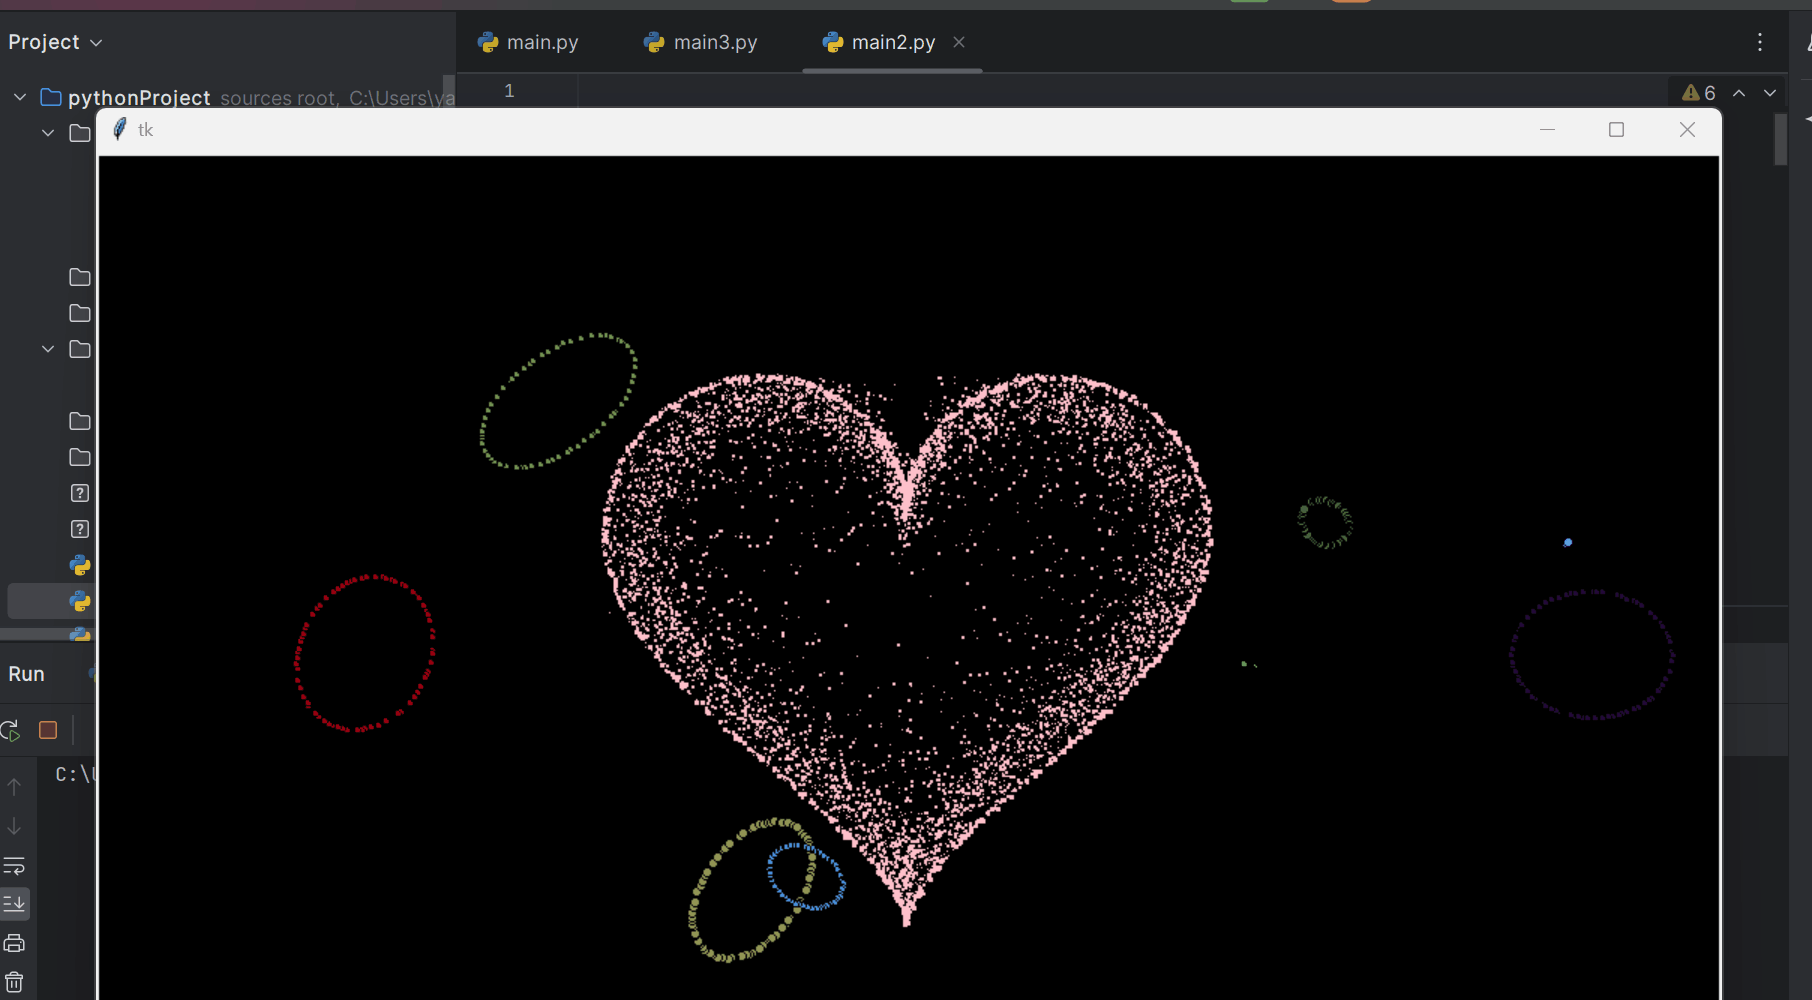
二十三、画彩色文字
原理和绘制动态文字一样,只不过把画圆改为画心形文字作为像素
代码
    var canvas=document.querySelector('canvas')
    // 2. 获取上下文
    var ctx=canvas.getContext('2d')
    var w=h=500
    var times=100
    var count=0
    // 1. 画文字☺♨✈♟☝
    drawFont('♥',w/2,h/2,'red',400)
    // 2. 获取像素点
    var copy=ctx.getImageData(0,0,w,h)
    console.log(copy);
    ctx.clearRect(0,0,w,h)
    // 3. 筛选有效像素点
    var leap=20
    var ballArr=[]
    for (let y = 0; y < h; y+=leap) {
      for (let x = 0; x < w; x+=leap) {
        var index=x+y*w
        var a=copy.data[index*4+3]
        if(a>128)
        {
          // drawCircle(x,y,4,'red')
            var ball=new classBall(x,y)
            ballArr.push(ball)
            ball.showBall()
        }
      }
    }
    // 动起来
    var timer= setInterval(()=>{
      count++
      ctx.clearRect(0,0,w,h)
      for (let i = 0; i < ballArr.length; i++) {
        var ballOne=ballArr[i]
        ballOne.showBall()
        if(count+1==times)
        {
          clearInterval(timer)
        }
      }
    },20)
    // 画文字
    function drawFont(text,x,y,color,maxWidth){
      ctx.beginPath()
      ctx.font='360px 微软雅黑'
      ctx.fillStyle=color
      ctx.textAlign='center'
      ctx.textBaseline='middle'
      ctx.fillText(text,x,y,maxWidth)
    }
    // 画小文字
    function drawLittle(text,x,y,color){
      ctx.beginPath()
      ctx.font='20px 微软雅黑'
      ctx.fillStyle=color
      ctx.textAlign='center'
      ctx.textBaseline='middle'
      ctx.fillText(text,x,y)
    }
    function randomNum(num){
      return parseInt(Math.random()*num)
    }
    function classBall(x2,y2){
      // 需要起始位置和结束位置
      this.x1=randomNum(w)
      this.y1=randomNum(h)
      this.r=3
      this.color=`rgb(255,${parseInt(Math.random()*255)},${parseInt(Math.random()*255)})`
      this.x2=x2
      this.y2=y2
      this.x=this.x1
      this.y=this.y1
      // 通过开始和结束计算水平垂直速度
      this.Xspeed=(x2-this.x1)/times
      this.Yspeed=(y2-this.y1)/times
      classBall.prototype.showBall=function(){
        // 中间还有个运动点
        this.x+=this.Xspeed
        this.y+=this.Yspeed
        drawLittle('♥',this.x,this.y,this.color)
      }
    }
效果

原文地址:https://blog.csdn.net/nbsl_/article/details/124607081
本文来自互联网用户投稿,该文观点仅代表作者本人,不代表本站立场。本站仅提供信息存储空间服务,不拥有所有权,不承担相关法律责任。
如若转载,请注明出处:http://www.7code.cn/show_29268.html
如若内容造成侵权/违法违规/事实不符,请联系代码007邮箱:suwngjj01@126.com进行投诉反馈,一经查实,立即删除!