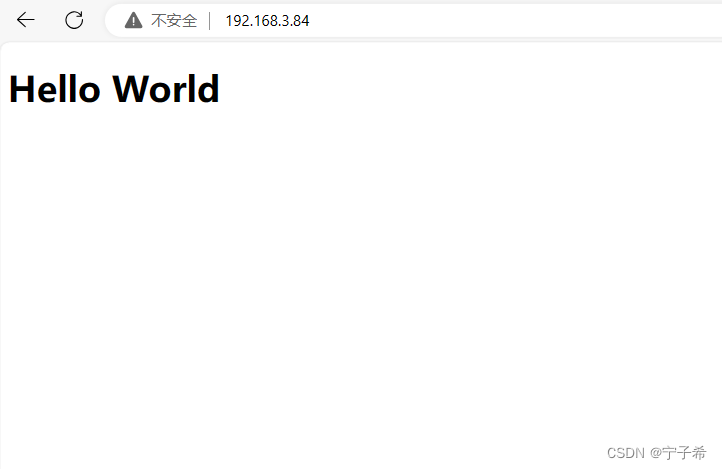
目标:
界面代码
<!DOCTYPE html>
<head>
<meta charset="UTF-8">
<meta name="viewport" content="width=device-width, initial-scale=1.0">
<title>哒哒的demo</title>
<style>
* {
margin: 0;
padding: 0;
}
body {
background-color: rgb(235, 235, 235);
}
form {
width: 400px;
height: 200px;
background-color: white;
padding: 5px;
box-sizing: border-box;
position: absolute;
left: 50%;
top: 1%;
/* 水平居中 */
transform: translateX(-50%);
/* transform: translate(-50%, -50%); */
/* 相对于现在所处位置的位移变化,x便偏移自己宽度的50%,y偏移自己高度的50% */
}
h2 {
margin-bottom: 10px;
text-align: center;
}
form input {
width: 100%;
height: 30px;
display: block;
margin-bottom: 8px;
padding-left: 10px;
box-sizing: border-box;
}
.mya {
width: 100%;
height: 30px;
margin-bottom: 20x;
}
.mya a:nth-child(1) {
float: left;
}
.mya a:nth-child(2) {
float: right;
}
button {
width: 100%;
height: 40px;
background-color: rgb(235, 235, 235);
border: none;
}
button:active {
box-shadow: 0 0 3px rgb(173, 172, 172);
/* x偏移 y偏移 模糊值 颜色 */
}
</style>
</head>
/*第二部分,主要设置一下传输的数据*/
<body>
<form action="">
<h2>WiFi 密码配置</h2>
<input id="wifi" type="text" placeholder="请输入WiFi账号">
<input id="code" type="text" placeholder="请输入WiFi密码">
<button id="set_wifi" type="button" onclick="send_wifi()">提交</button>
<button id="back" type="button" onclick="send_back()">退出</button>
</form>
</body>
/*调用的函数(我的理解)*/
<script>
function setpath() {
var default_path = document.getElementById("newfile").files[0].name;
document.getElementById("filepath").value = default_path;
}
function send_wifi() {
var input_ssid = document.getElementById("wifi").value;
var input_code = document.getElementById("code").value;
var xhttp = new XMLHttpRequest();
xhttp.open("POST", "/wifi_data", true);
xhttp.onreadystatechange = function() {
if (xhttp.readyState == 4) {
if (xhttp.status == 200) {
alert("WiFi设置成功!")
console.log(xhttp.responseText);
location.reload()
} else if (xhttp.status == 0) {
alert("设置失败,请检查网络连接!");
location.reload()
return
} else {
alert(xhttp.status + " Error!n" + xhttp.responseText);
location.reload()
return
}
}
};
var data = {
"wifi_name":input_ssid,
"wifi_code":input_code
}
xhttp.send(JSON.stringify(data));
}
function send_back() {
var xhttp = new XMLHttpRequest();
xhttp.open("POST", "/back", true);
xhttp.onreadystatechange = function() {
if (xhttp.readyState == 4) {
if (xhttp.status == 200) {
alert("退出设置成功!")
console.log(xhttp.responseText);
location.reload()
} else if (xhttp.status == 0) {
alert("设置失败,请检查网络连接!");
location.reload()
} else {
alert(xhttp.status + " Error!n" + xhttp.responseText);
location.reload()
}
}
};
var data = {
"back":"back",
}
xhttp.send(JSON.stringify(data));
}
</script>其实不难,上面一部分是设置一下界面的尺寸,后面一部分是传输数据,最后一部分是调用的函数。
而wifi_name和wifi_code是我们获取的wifi信息。
http_server
/* An HTTP POST handler */
static esp_err_t echo_post_handler(httpd_req_t *req)
{
    char buf[100];
    int ret, remaining = req->content_len;

    while (remaining > 0) {
        /* Read the data for the request */
        if ((ret = httpd_req_recv(req, buf,
                        MIN(remaining, sizeof(buf)))) <= 0) {
            if (ret == HTTPD_SOCK_ERR_TIMEOUT) {
                /* Retry receiving if timeout occurred */
                continue;
            }
            return ESP_FAIL;
        }

        /* Send back the same data */
        httpd_resp_send_chunk(req, buf, ret);
        remaining -= ret;

        /* Log data received */
        ESP_LOGI(TAG, "=========== RECEIVED DATA ==========");
        ESP_LOGI(TAG, "%.*s", ret, buf);
        ESP_LOGI(TAG, "====================================");
    }

    // End response
    httpd_resp_send_chunk(req, NULL, 0);
    return ESP_OK;
}

static const httpd_uri_t echo = {
    .uri       = "/echo",
    .method    = HTTP_POST,
    .handler   = echo_post_handler,
    .user_ctx  = NULL
};这是官方例程中post的一个例子,其实我们主要使用的也就是get和post。
来看这段代码。
static const httpd_uri_t echo = {
    .uri       = "/echo",
    .method    = HTTP_POST,
    .handler   = echo_post_handler,
    .user_ctx  = NULL
};typedef struct httpd_uri {
const char *uri; /*!< The URI to handle */
httpd_method_t method; /*!< Method supported by the URI */
/**
* Handler to call for supported request method. This must
* return ESP_OK, or else the underlying socket will be closed.
*/
esp_err_t (*handler)(httpd_req_t *r);
/**
* Pointer to user context data which will be available to handler
*/
void *user_ctx;
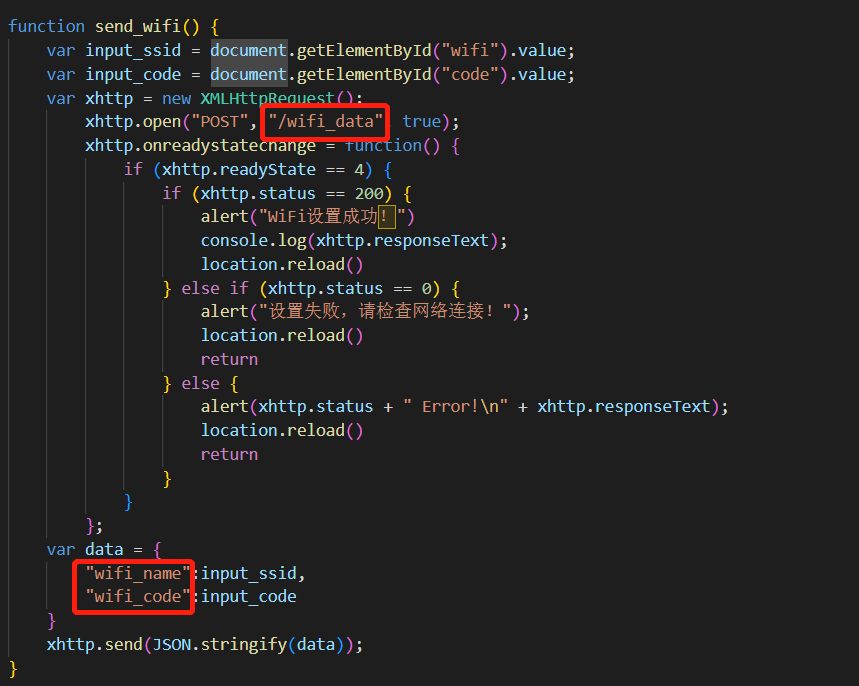
} httpd_uri_t;uri就是我们需要设置的路径,比如在界面中特别圈出来的/wifi_data,那么这里就应该写成/wifi_data,method方法是post方法,handler是我们要调用的函数,user_ctx是我们要传递的数据,handler中的函数就是专门处理传递过来的数据的。比如刚刚在界面中特别圈出来的两个wifi_name和wifi_code就是会在该函数里面处理。
(以上是我的理解,如果有不对的希望指正)
这样一来,基本的结构就差不多清晰了。
嵌入html网页方法
有关嵌入html网页,其实最简单的方式就是定义一个数组内容填充为网页内容。
首先新建一个文件夹,将我们的文件添加进来,文件名是setting.html。
然后修改CMakeList.txt文件,把带路径的文件名添加进EMBED_FILES。
idf_component_register(SRCS
                            "app_main.c"

                       INCLUDE_DIRS
                            "."

                        EMBED_FILES
                            "./html/favicon.ico"
                            "./html/setting.html"
                            )
/* Get handle to embedded file upload script */
    extern const unsigned char upload_script_start[] asm("_binary_setting_html_start");
    extern const unsigned char upload_script_end[]   asm("_binary_setting_html_end");
    const size_t upload_script_size = (upload_script_end - upload_script_start);

    /* Add file upload form and script which on execution sends a POST request to /upload */
httpd_resp_send_chunk(req, (const char *)upload_script_start, upload_script_size);这样一来,我们的界面就完成一半了。
一般我们都把这个放在根目录这里,也就是一开始就访问这个路径。
/* URI handler for getting uploaded files */
    httpd_uri_t file_download = {
        .uri       = "/",  // Match all URIs of type /path/to/file
        .method    = HTTP_GET,
        .handler   = download_get_handler,
        .user_ctx  = NULL
};定义函数。
static esp_err_t download_get_handler(httpd_req_t *req)
{
    extern const unsigned char upload_script_start[] asm("_binary_setting_html_start");
    extern const unsigned char upload_script_end[]   asm("_binary_setting_html_end");
    const size_t upload_script_size = (upload_script_end - upload_script_start);

    /* Add file upload form and script which on execution sends a POST request to /upload */
    httpd_resp_set_type(req,HTTPD_TYPE_TEXT);
    httpd_resp_send(req, (const char *)upload_script_start, upload_script_size);
    return ESP_OK;

}
这样界面就显示出来了,当然这个只是一个简单的实现,具体还要看自己需求的实现。
获取wifi信息
static esp_err_t send_wifi_handler(httpd_req_t *req)
{
    int total_len = req->content_len;
    int cur_len = 0;
    char *buf = ((struct file_server_data *)(req->user_ctx))->scratch;
    int received = 0;
    if (total_len >= SCRATCH_BUFSIZE) {
        /* Respond with 500 Internal Server Error */
        httpd_resp_send_err(req, HTTPD_500_INTERNAL_SERVER_ERROR, "content too long");
        return ESP_FAIL;
    }
    while (cur_len < total_len) {
        received = httpd_req_recv(req, buf + cur_len, total_len);
        if (received <= 0) {
            /* Respond with 500 Internal Server Error */
            httpd_resp_send_err(req, HTTPD_500_INTERNAL_SERVER_ERROR, "Failed to post control value");
            return ESP_FAIL;
        }
        cur_len += received;
    }

    buf[total_len] = '';
    printf("recived data length is :%dn",total_len);
    for (int i = 0; i <total_len ; i++){
        putchar(buf[i]);
    }
    printf("rnwifi data recived!rn");
    cJSON *root = cJSON_Parse(buf);

    char *ssid = cJSON_GetObjectItem(root, "wifi_name")->valuestring;
    char *psw = cJSON_GetObjectItem(root, "wifi_code")->valuestring;
    int ssid_len = strlen(ssid);
    int psw_len = strlen(psw);
    set_system_data_wifi_info(ssid,ssid_len,psw ,psw_len);
    print_system_data_wifi_info();
    cJSON_Delete(root);
    httpd_resp_sendstr(req, "Post control value successfully");
    return ESP_OK;
}主要是用json来进行解析的,也可以用自带的解析函数进行解析,都可以,只要不错。
httpd_uri_t wifi_data = {
        .uri       = "/wifi_data",   // Match all URIs of type /delete/path/to/file
        .method    = HTTP_POST,
        .handler   = send_wifi_handler,
        .user_ctx  = server_data    // Pass server data as context
    };
httpd_register_uri_handler(server, &wifi_data);struct file_server_data {
/* Base path of file storage */
char base_path[ESP_VFS_PATH_MAX + 1];
/* Scratch buffer for temporary storage during file transfer */
char scratch[SCRATCH_BUFSIZE];
};主函数
/* Function to start the file server */
esp_err_t start_file_server(const char *base_path)
{
    static struct file_server_data *server_data = NULL;

    /* Validate file storage base path */
    if (!base_path || strcmp(base_path, "/spiffs") != 0) {
        ESP_LOGE(TAG, "File server presently supports only '/spiffs' as base path");
        return ESP_ERR_INVALID_ARG;
    }

    if (server_data) {
        ESP_LOGE(TAG, "File server already started");
        return ESP_ERR_INVALID_STATE;
    }

    /* Allocate memory for server data */
    server_data = calloc(1, sizeof(struct file_server_data));
    if (!server_data) {
        ESP_LOGE(TAG, "Failed to allocate memory for server data");
        return ESP_ERR_NO_MEM;
    }
    strlcpy(server_data->base_path, base_path,
            sizeof(server_data->base_path));

    httpd_handle_t server = NULL;
    httpd_config_t config = HTTPD_DEFAULT_CONFIG();

    /* Use the URI wildcard matching function in order to
     * allow the same handler to respond to multiple different
     * target URIs which match the wildcard scheme */
    config.uri_match_fn = httpd_uri_match_wildcard;

    ESP_LOGI(TAG, "Starting HTTP Server");
    if (httpd_start(&server, &config) != ESP_OK) {
        ESP_LOGE(TAG, "Failed to start file server!");
        return ESP_FAIL;
    }

    /* URI handler for getting uploaded files */
    httpd_uri_t file_download = {
        .uri       = "/*",  // Match all URIs of type /path/to/file
        .method    = HTTP_GET,
        .handler   = download_get_handler,
        .user_ctx  = server_data    // Pass server data as context
    };
    httpd_register_uri_handler(server, &file_download);


    httpd_uri_t wifi_data = {
        .uri       = "/wifi_data",   // Match all URIs of type /wifi_data/path/to/file
        .method    = HTTP_POST,
        .handler   = send_wifi_handler,
        .user_ctx  = server_data    // Pass server data as context
    };
    httpd_register_uri_handler(server, &wifi_data);

    return ESP_OK;
}
基本上一个简单的实现就完成了。
到这里,我们默认的前提是,esp32在AP模式,手机连上了esp32的热点。
wifi_ap/wifi_sta
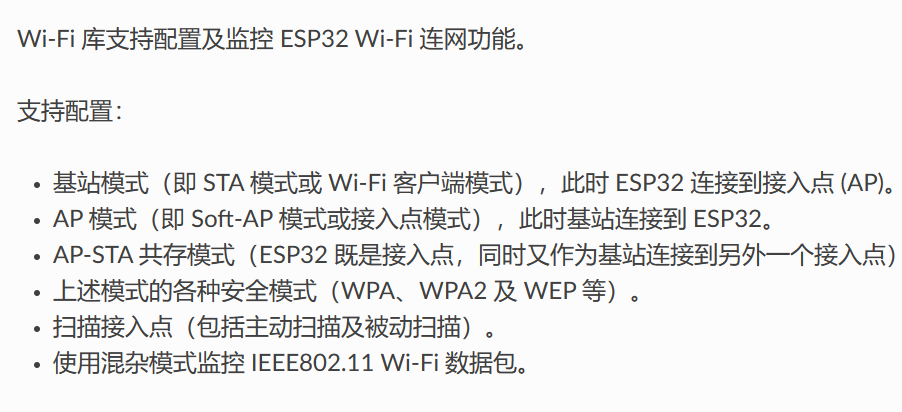
简单来说,就是AP模式下esp32自己是热点。sta模式就是自己不是热点但是可以连其他的热点。
至于AP-STA共存模式,就是可以作为接入点也能连接到别人。
wifi_ap模式
先来看看它的一般情况。
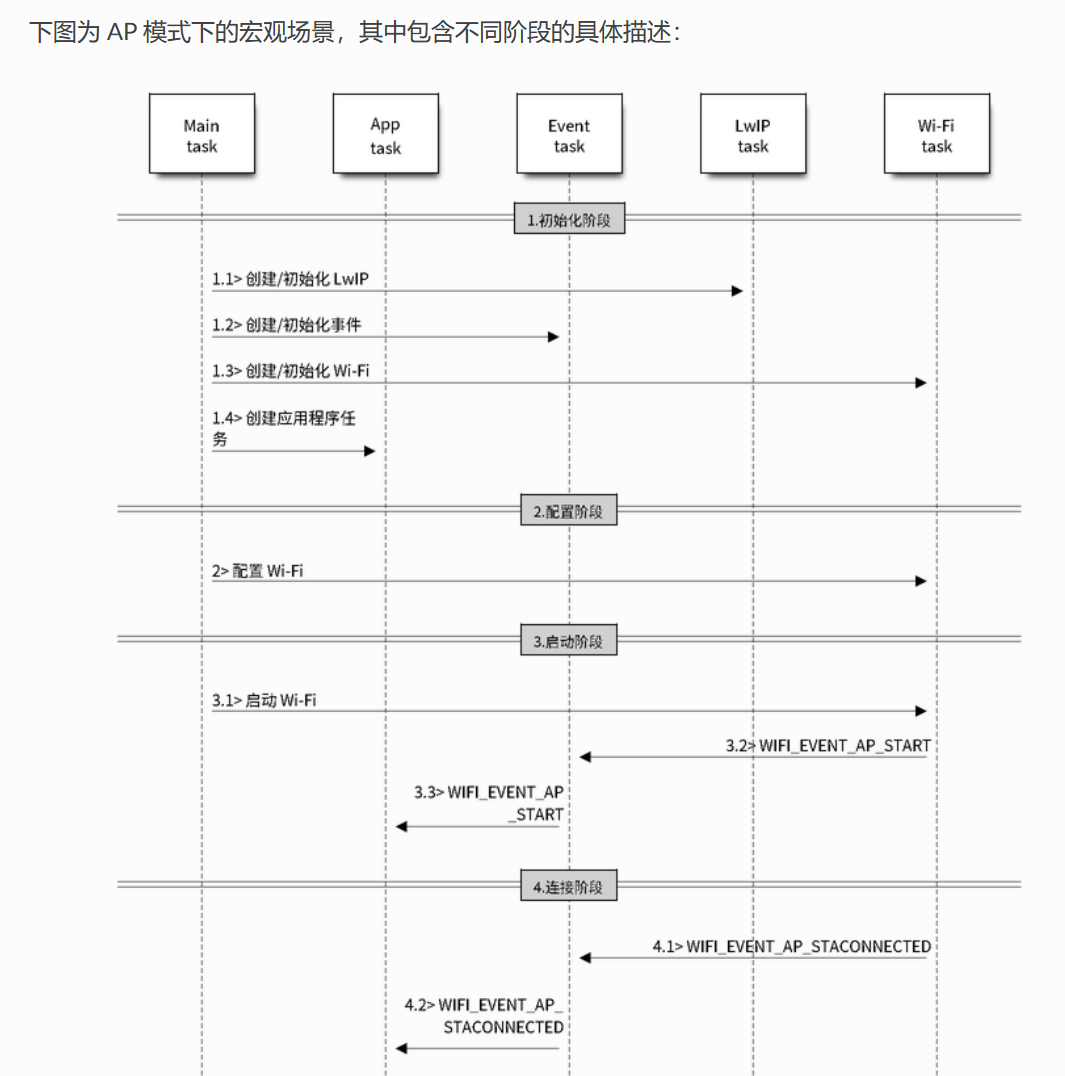
前面两个和后面两个是通过Event task来进行通信的,它们是不能够直接通信的。
这一点,在我们后面的编写过程中,至关重要!!
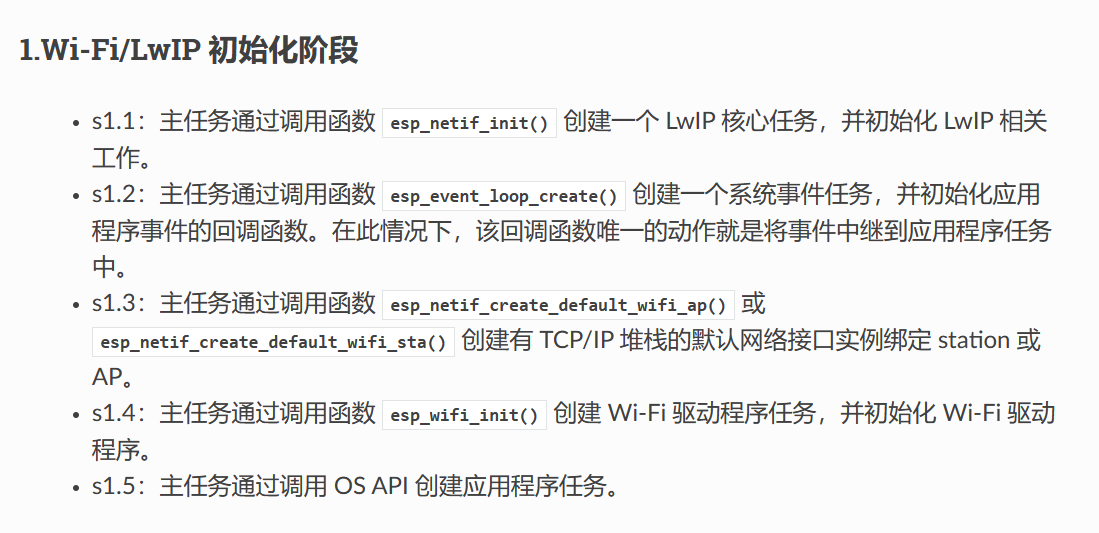
截取其中一小段。
void wifi_init_softap(void)
{
    ESP_ERROR_CHECK(esp_netif_init());
    ESP_ERROR_CHECK(esp_event_loop_create_default());
    esp_netif_create_default_wifi_ap();

    wifi_init_config_t cfg = WIFI_INIT_CONFIG_DEFAULT();
    ESP_ERROR_CHECK(esp_wifi_init(&cfg));

    ESP_ERROR_CHECK(esp_event_handler_register(WIFI_EVENT,
                                                        ESP_EVENT_ANY_ID,
                                                        &wifi_event_handler,
NULL));下面重点来看这段代码。
ESP_ERROR_CHECK(esp_event_handler_register(WIFI_EVENT,
                                                        ESP_EVENT_ANY_ID,
                                                        &wifi_event_handler,
NULL));esp_err_t esp_event_handler_register(const char * event_base, int32_t event_id, void* event_handler, void* event_handler_arg)event_base:是我们要听的事件,比如现在我们要听的就是wifi_event
event_id:是我们要听取的这个wifi_event的什么信息
event_handler:是听取到这个信息之后,我们该怎么处理这个信息,要做什么
最后一个一般不用管。
可以看一下官方的文档。

嗯….还不如看我写的。
事件的作用之前已经说过,是用来连接前后任务的,这里暂且放一放。
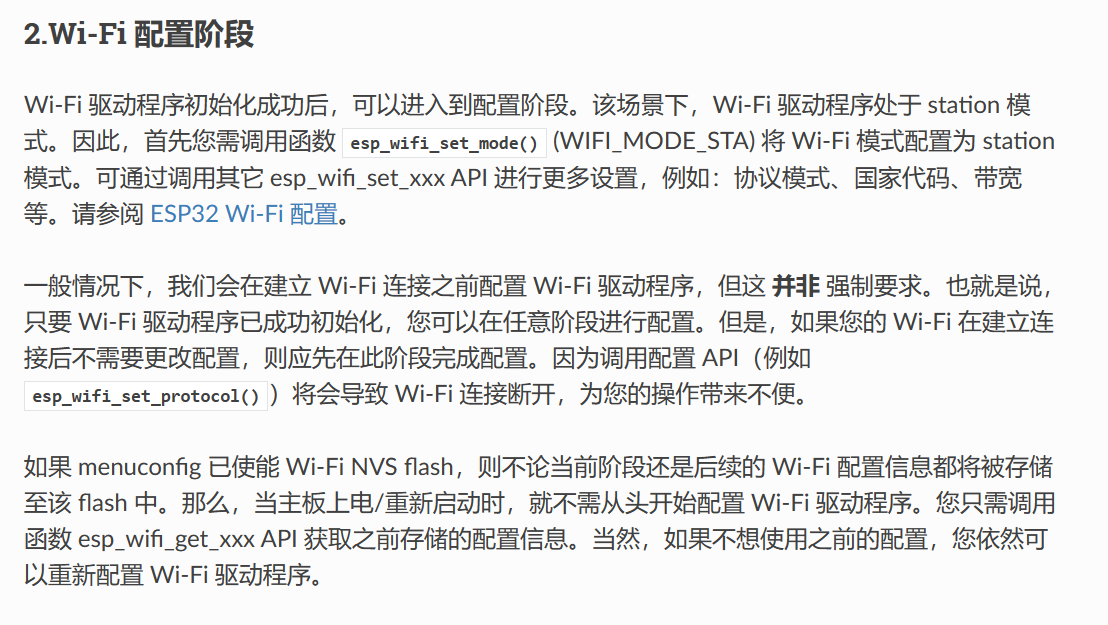
这个没啥好说的,直接配置吧。
也没啥好说的。
那么重点来了!!!
wifi启动之后怎么办呢?
来看这个流程图。
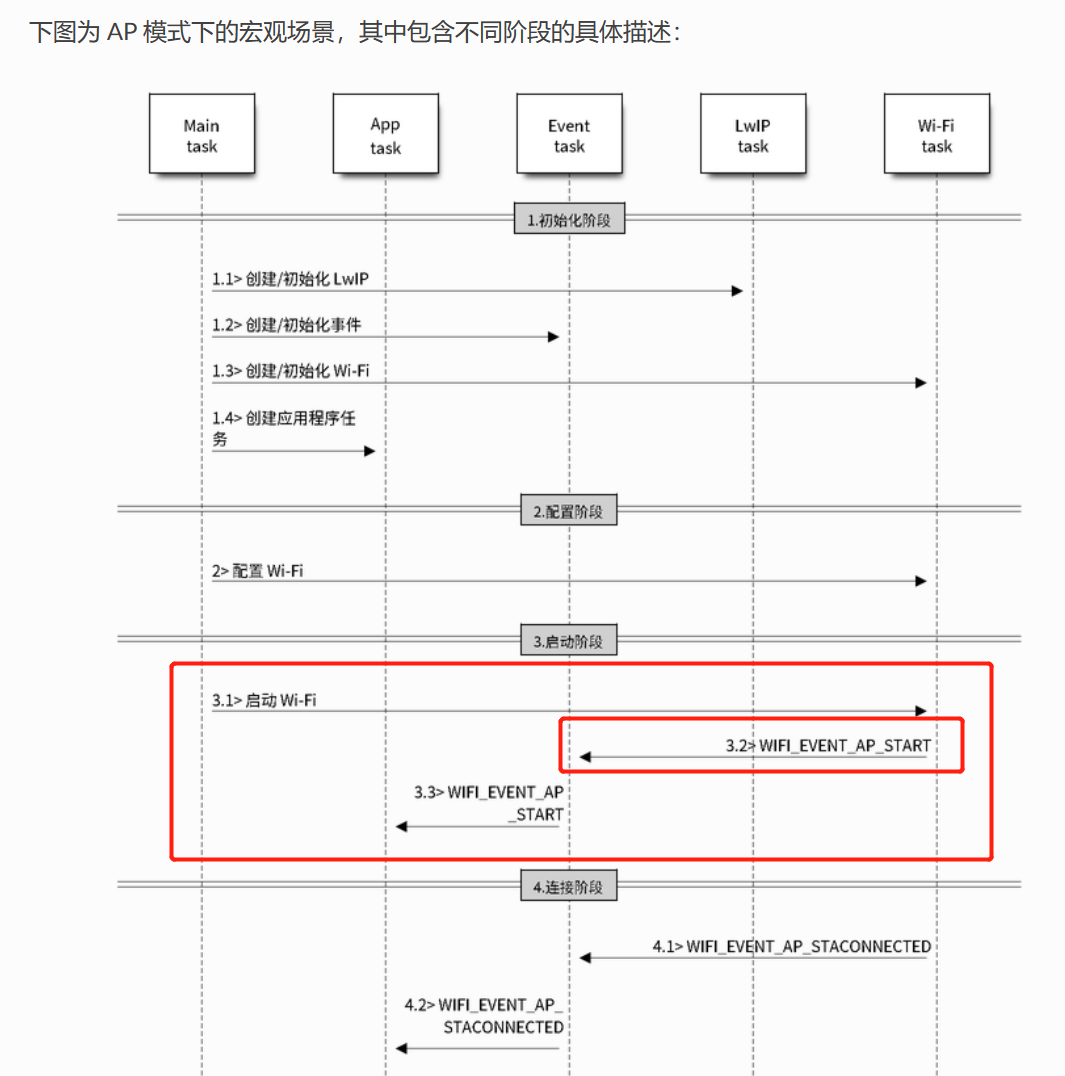
但其实在我们的AP模式里不是很重要,我看官方的例程并没有做出处理。
如果已经连接上了esp32,那么此时会发布一个WIFI_EVENT_AP_STACONNECTED事件。
来看程序。
static void wifi_event_handler(void* arg, esp_event_base_t event_base,
                                    int32_t event_id, void* event_data)
{
    if (event_id == WIFI_EVENT_AP_STACONNECTED) {
        wifi_event_ap_staconnected_t* event = (wifi_event_ap_staconnected_t*) event_data;
        ESP_LOGI(TAG, "station "MACSTR" join, AID=%d",
                 MAC2STR(event->mac), event->aid);
    } else if (event_id == WIFI_EVENT_AP_STADISCONNECTED) {
        wifi_event_ap_stadisconnected_t* event = (wifi_event_ap_stadisconnected_t*) event_data;
        ESP_LOGI(TAG, "station "MACSTR" leave, AID=%d",
                 MAC2STR(event->mac), event->aid);
    }
}可能AP模式下这个事件函数不够清晰,那我们来看看STA模式吧。
wifi_sta模式
还是先看流程图。

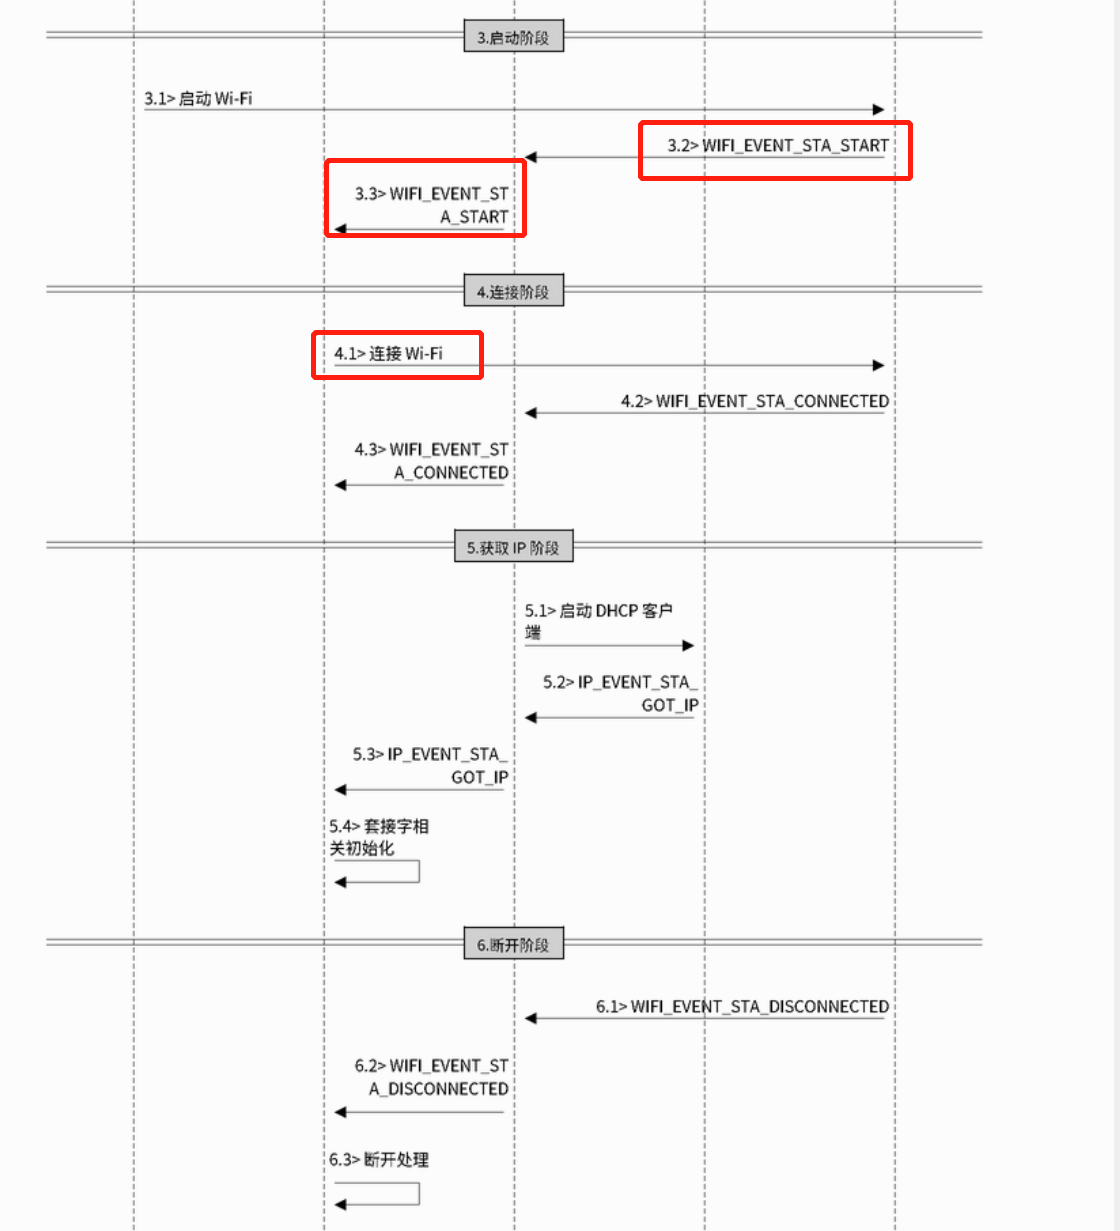
可以看到,启动成功了之后,要通过event task告诉前面两个任务,然后再去连接wifi。
这样,两个就通信了。
来看程序。
static void event_handler(void* arg, esp_event_base_t event_base,
                                int32_t event_id, void* event_data)
{
    if (event_base == WIFI_EVENT && event_id == WIFI_EVENT_STA_START) {
        esp_wifi_connect();
    } else if (event_base == WIFI_EVENT && event_id == WIFI_EVENT_STA_DISCONNECTED) {
        if (s_retry_num < EXAMPLE_ESP_MAXIMUM_RETRY) {
            esp_wifi_connect();
            s_retry_num++;
            ESP_LOGI(TAG, "retry to connect to the AP");
        } else {
            xEventGroupSetBits(s_wifi_event_group, WIFI_FAIL_BIT);
        }
ESP_LOGI(TAG,"connect to the AP fail");如果启动了,则去连接。
如果连接不成功,则再次重试。
至于为什么不在这个里面处理,是因为这里的内存不够,很小,会溢出。

} else if (event_base == IP_EVENT && event_id == IP_EVENT_STA_GOT_IP) {
        ip_event_got_ip_t* event = (ip_event_got_ip_t*) event_data;
        ESP_LOGI(TAG, "got ip:" IPSTR, IP2STR(&event->ip_info.ip));
        s_retry_num = 0;
        xEventGroupSetBits(s_wifi_event_group, WIFI_CONNECTED_BIT);
}全部成功之后,设置一个事件标志位,以便后面的程序做相应的处理。
ESP32其实是允许这两者共存的。
这里参考一下b站小智学长的项目代码,主要是通过消息队列和事件来进行联系。
整合
所使用到wifi_ap,wifi_sta,nvs,http_server等。
1 ap模式下,连接esp32的wifi,设置好了需要连接的wifi信息,sta模式下如何去更新之前默认的连接信息?
typedef enum{
    AP_STA_START = 0,//开启
    AP_STA_UPDATE,//更新
    AP_STA_STOP,//关闭
}WIFI_SET_EVENT_E;xQueueHandle wifi_event_queue;并根据事件来进行相应的操作。
static void wifi_net_task(void* arg)
{

    ds_http_server_init();
    for(;;) {
        WIFI_SET_EVENT_E evt;
        xQueueReceive(wifi_event_queue, &evt, portMAX_DELAY);//接收事件
        printf("get wifi set event %dn",evt);
        switch (evt)
        {
        case AP_STA_START:
            set_is_ap_sta_open(true);
            set_wifi_sta_status(WIFI_STA_MODE_INIT);
            set_wifi_ap_status(WIFI_AP_MODE_DISCONNECT);
            ds_wifi_ap_sta_start();
            break;
        case AP_STA_UPDATE:
            ds_wifi_ap_sta_update_info();
            break;
        case AP_STA_STOP:
            set_is_ap_sta_open(false);
            ds_wifi_ap_sta_stop();
            break;
        default:
            break;
        }
    }
}注意,这里wifi_net_task是任务,不断的循环,同时不断的接收我们的事件以做出相应的操作。
创建任务。
void ds_wifi_ap_sta_init(){
    wifi_event_queue = xQueueCreate(10, sizeof(WIFI_SET_EVENT_E));
    xTaskCreate(wifi_net_task, "wifi_net_task", 4096, NULL, 10, NULL);
}然后通过此函数来发送事件。
void ds_wifi_send_event(WIFI_SET_EVENT_E event){
	WIFI_SET_EVENT_E evt;
    evt = event;
	xQueueSend(wifi_event_queue, &evt, 0);
}这样一来,我们就可以在不同的地方,根据需求去启动、更新、停止我们的wifi了。
至于什么时候更新,当然是在我们设置新的wifi信息的时候了。
打开http_server.c文件。
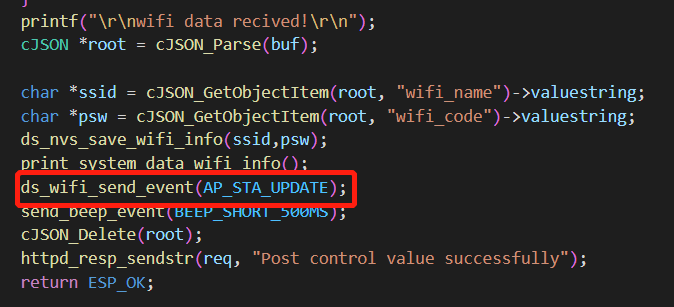
同样的,esp32也提供了自动保存的功能,可以查询api进行设置。
总结
总的来说,就是这么一个流程,当然可能还有细节性的东西我没有注意到,毕竟我也是刚学,如果有不对的地方,欢迎指出来啊!当然了,是不是可以设置一个连接上热点,然后强制跳出来的配置界面?有待继续改进一下…
继续加油!!
原文地址:https://blog.csdn.net/weixin_59288228/article/details/129899471
本文来自互联网用户投稿,该文观点仅代表作者本人,不代表本站立场。本站仅提供信息存储空间服务,不拥有所有权,不承担相关法律责任。
如若转载,请注明出处:http://www.7code.cn/show_31398.html
如若内容造成侵权/违法违规/事实不符,请联系代码007邮箱:suwngjj01@126.com进行投诉反馈,一经查实,立即删除!

