Launcher3桌面加载流程
Android Launcher3(简称Launcher)启动后会加载桌面。基于Android12代码,分析一下桌面加载的流程。
一些相关的概念:
- WorkSpace:桌面。在桌面上可以添加快捷方式、Hoseat或Dock(就是手机或者车机系统在桌面底部的图标栏)、Widet小组件(比如天气)等。
- AllApp:App List,呈现所有App。点击任意App图标可以启动该App。
- DeepShortcuts: 桌面上的应用快捷方式。
- Widget:小组件,一般添加到桌面上,比如天气、闹钟、股票之类。
Launcher桌面加载
Launcher被Android AMS拉起后,进入自己的生命流程。Launcher.java 中的onCreate函数被调用,准备开始加载桌面。
//packages/apps/Launcher3/src/com/android/launcher3/Launcher.java
@Override
protected void onCreate(Bundle savedInstanceState) {
	Object traceToken = TraceHelper.INSTANCE.beginSection(ON_CREATE_EVT,
			TraceHelper.FLAG_UI_EVENT);
	LauncherAppState app = LauncherAppState.getInstance(this);
	mOldConfig = new Configuration(getResources().getConfiguration());
	mModel = app.getModel();

	if (!mModel.addCallbacksAndLoad(this)) {
		// 省略
	}
}
addCallbacksAndLoad在LauncherModel.java中实现,在这个函数中调用了startLoader函数,该函数中会创建LoaderResults对象。如果是首次启动情况下,调用函数startLoaderForResults,在startLoaderForResults函数中创建LoaderTask并利用之前创建的LoaderResults开始加载桌面。
//packages/apps/Launcher3/src/com/android/launcher3/LauncherModel.java
/**
 * Adds a callbacks to receive model updates
 * @return true if workspace load was performed synchronously
 */
public boolean addCallbacksAndLoad(Callbacks callbacks) {
    synchronized (mLock) {
        addCallbacks(callbacks);
        return startLoader();

    }
}

/**
 * Starts the loader. Tries to bind {@params synchronousBindPage} synchronously if possible.
 * @return true if the page could be bound synchronously.
 */
public boolean startLoader() {
	ItemInstallQueue.INSTANCE.get(mApp.getContext())
			.pauseModelPush(ItemInstallQueue.FLAG_LOADER_RUNNING);
	synchronized (mLock) {
		final Callbacks[] callbacksList = getCallbacks();
		if (callbacksList.length > 0) {
			for (Callbacks cb : callbacksList) {
				MAIN_EXECUTOR.execute(cb::clearPendingBinds);
			}

			//  如果直接在加载了,请停止掉。
			// If there is already one running, tell it to stop.
			stopLoader();
			LoaderResults loaderResults = new LoaderResults(
					mApp, mBgDataModel, mBgAllAppsList, callbacksList);
			if (mModelLoaded && !mIsLoaderTaskRunning) {
				// 非首次启动。Launcher直接从数据库中同步加载。
				loaderResults.bindWorkspace();
				loaderResults.bindAllApps();
				loaderResults.bindDeepShortcuts();
				loaderResults.bindWidgets();
				return true;
			} else {
				// 首次启动走这里。
				startLoaderForResults(loaderResults);
			}
		}
	}
	return false;
}

public void startLoaderForResults(LoaderResults results) {
     synchronized (mLock) {
         stopLoader();
         // 创建LoaderTask,通过loadTask加载桌面。
         mLoaderTask = new LoaderTask(
                 mApp, mBgAllAppsList, mBgDataModel, mModelDelegate, results);
         MODEL_EXECUTOR.post(mLoaderTask);
     }
 }
从startLoader这个函数中,可以看出来。Launcher启动时加载的流程是:
- Workspace
- AllApps
- DeepShortcuts
- Widgets
因为Workspace(直观上就是用户看到的桌面)是第一个呈现给用户的,并且桌面也是快捷方式、Widget的容器,所以肯定会第一个加载。
接下来,LoaderTask被执行,调用其run函数。
//packages/apps/Launcher3/src/com/android/launcher3/model/LoaderTask.java
public void run() {
	synchronized (this) {
		// 退出阶段,直接返回
		// Skip fast if we are already stopped.
		if (mStopped) {
			return;
		}
	}

	try (LauncherModel.LoaderTransaction transaction = mApp.getModel().beginLoader(this)) {
		//顺序也是先加载 workspace,然后AllApp,然后DeepShortcuts,然后Widgets
		List<ShortcutInfo> allShortcuts = new ArrayList<>();
		// 加载WorkSpace数据
		loadWorkspace(allShortcuts);
		logASplit(logger, "loadWorkspace");

		verifyNotStopped();
		// 绑定WorkSpace数据(绑定图标之类的数据,桌面及其上内容开始呈现)
		mResults.bindWorkspace();
		logASplit(logger, "bindWorkspace");

		mModelDelegate.workspaceLoadComplete();
		// Notify the installer packages of packages with active installs on the first screen.
		// 发送第一个Screen(开机后默认显示的第一个Screen,如果图标多的话,会被分成多个Screen,通过左右滑动显示其他的)
		sendFirstScreenActiveInstallsBroadcast();
		logASplit(logger, "sendFirstScreenActiveInstallsBroadcast");

		// Take a break
		waitForIdle();
		logASplit(logger, "step 1 complete");
		verifyNotStopped();

		// second step
		List<LauncherActivityInfo> allActivityList = loadAllApps();
		logASplit(logger, "loadAllApps");

		verifyNotStopped();
		mResults.bindAllApps();
		logASplit(logger, "bindAllApps");
		// 省略

		// Take a break
		waitForIdle();
		logASplit(logger, "step 2 complete");
		verifyNotStopped();

		// third step
		List<ShortcutInfo> allDeepShortcuts = loadDeepShortcuts();
		logASplit(logger, "loadDeepShortcuts");

		verifyNotStopped();
		mResults.bindDeepShortcuts();
		logASplit(logger, "bindDeepShortcuts");

		// Take a break
		waitForIdle();
		logASplit(logger, "step 3 complete");
		verifyNotStopped();

		// fourth step
		List<ComponentWithLabelAndIcon> allWidgetsList =
				mBgDataModel.widgetsModel.update(mApp, null);
		logASplit(logger, "load widgets");

		verifyNotStopped();
		mResults.bindWidgets();
		logASplit(logger, "bindWidgets");
		verifyNotStopped();

		mModelDelegate.modelLoadComplete();
		transaction.commit();
	}
}
上面的代码中,开始加载Launcher中的workspace、allapp、deepshortcut、Widget。先加载其数据,然后一步步绑定这些数据(桌面上就开始呈现出内容)。因为代码比较多且流程相似,这里主要关注WorkSpace的加载。
//packages/apps/Launcher3/src/com/android/launcher3/model/LoaderTask.java
private void loadWorkspace(List<ShortcutInfo> allDeepShortcuts) {
loadWorkspace(allDeepShortcuts, LauncherSettings.Favorites.CONTENT_URI,
null /* selection */);
}
protected void loadWorkspace(List<ShortcutInfo> allDeepShortcuts, Uri contentUri,
String selection) {
boolean clearDb = false;
// 省略
if (clearDb) {
Log.d(TAG, "loadWorkspace: resetting launcher database");
LauncherSettings.Settings.call(contentResolver,
LauncherSettings.Settings.METHOD_CREATE_EMPTY_DB);
}
Log.d(TAG, "loadWorkspace: loading default favorites");
LauncherSettings.Settings.call(contentResolver,
LauncherSettings.Settings.METHOD_LOAD_DEFAULT_FAVORITES);
synchronized (mBgDataModel) {
final HashMap<PackageUserKey, SessionInfo> installingPkgs =
mSessionHelper.getActiveSessions();
installingPkgs.forEach(mApp.getIconCache()::updateSessionCache);
mFirstScreenBroadcast = new FirstScreenBroadcast(installingPkgs);
final LoaderCursor c = new LoaderCursor(
contentResolver.query(contentUri, null, selection, null, null), contentUri,
mApp, mUserManagerState);
final Bundle extras = c.getExtras();
mDbName = extras == null
? null : extras.getString(LauncherSettings.Settings.EXTRA_DB_NAME);
try {
// 省略
while (!mStopped && c.moveToNext()) {
// 循环刚刚创建的DB文件。读取DB中的信息(呈现哪些应用图标之类)
try {
if (c.user == null) {
// User has been deleted, remove the item.
c.markDeleted("User has been deleted");
continue;
}
boolean allowMissingTarget = false;
switch (c.itemType) {
case LauncherSettings.Favorites.ITEM_TYPE_SHORTCUT:
case LauncherSettings.Favorites.ITEM_TYPE_APPLICATION:
case LauncherSettings.Favorites.ITEM_TYPE_DEEP_SHORTCUT:
// 获取对应的Intent(比如快捷方式对应的intent)
intent = c.parseIntent();
// If it's a deep shortcut, we'll use pinned shortcuts to restore it
if (cn != null && validTarget && c.itemType
!= LauncherSettings.Favorites.ITEM_TYPE_DEEP_SHORTCUT) {
// If the component is already present
// 如果应用没有被Disable掉,那就么会显示它(通过pm可以disable应用)
if (mLauncherApps.isActivityEnabled(cn, c.user)) {
// no special handling necessary for this item
c.markRestored();
} else {
//否则不会显示这个应用。
// Gracefully try to find a fallback activity.
intent = pmHelper.getAppLaunchIntent(targetPkg, c.user);
if (intent != null) {
c.restoreFlag = 0;
c.updater().put(
LauncherSettings.Favorites.INTENT,
intent.toUri(0)).commit();
cn = intent.getComponent();
} else {
c.markDeleted("Unable to find a launch target");
continue;
}
}
}
// 省略,后面就是从数据库遍历出数据,缓存到各个对象中了(内存中)
break;
// 省略
}
} catch (Exception e) {
Log.e(TAG, "Desktop items loading interrupted", e);
}
}
// Load delegate items
mModelDelegate.loadItems(mUserManagerState, shortcutKeyToPinnedShortcuts);
// Break early if we've stopped loading
if (mStopped) {
mBgDataModel.clear();
return;
}
// Remove dead items
mItemsDeleted = c.commitDeleted();
}
}
loadWorkspace函数中通过LauncherSettings创建了Launcher中的数据。并加载了默认的布局数据到 创建的DB中。然后遍历DB,将数据赋给对应的对象。初次启动时,加载默认布局数据,会按如下顺序进行:
- 找launcher3.layout.provider这个key对应的value(contentprovider),然后通过这个value值读取到配置的launcher_layout的信息。
- 如果第一步没找到。那么找系统中包含“android.autoinstalls.config.action.PLAY_AUTO_INSTALL”的应用,通过它获取launcher_layout信息。
- 如果第二步没找到。找系统中com.android.launcher3.action.PARTNER_CUSTOMIZATION对应的应用,通过它获取launcher_layout信息。
- 如果第三步没找到。加载Launcher中默认的workspace布局( /packages/apps/Launcher3/res/xml/这个目录下的default_workspace_*.xml文件)
关于查找默认布局的实现,可以参考LauncherProvider中的loadDefaultFavoritesIfNecessary函数。

到此,Launcher桌面需要的数据加载完成。下面将数据绑定(显示出来)
Launcher桌面数据绑定
回到LauncherTask的run函数中loadWorkspace函数执行完成后,调用LoaderResults的bindWorkspace函数完成WorkSpace的数据绑定。绑定数据后,后面Activity渲染时就会用这些数据呈现出桌面上的元素。
//packages/apps/Launcher3/src/com/android/launcher3/model/LoaderTask.java
public void run() {
	synchronized (this) {
		// Skip fast if we are already stopped.
		if (mStopped) {
			return;
		}
	}

	Object traceToken = TraceHelper.INSTANCE.beginSection(TAG);
	TimingLogger logger = new TimingLogger(TAG, "run");
	try (LauncherModel.LoaderTransaction transaction = mApp.getModel().beginLoader(this)) {
		List<ShortcutInfo> allShortcuts = new ArrayList<>();
		loadWorkspace(allShortcuts);
		logASplit(logger, "loadWorkspace");


		verifyNotStopped();
		// 绑定WorkSpace中的数据
		mResults.bindWorkspace();
		logASplit(logger, "bindWorkspace");
}
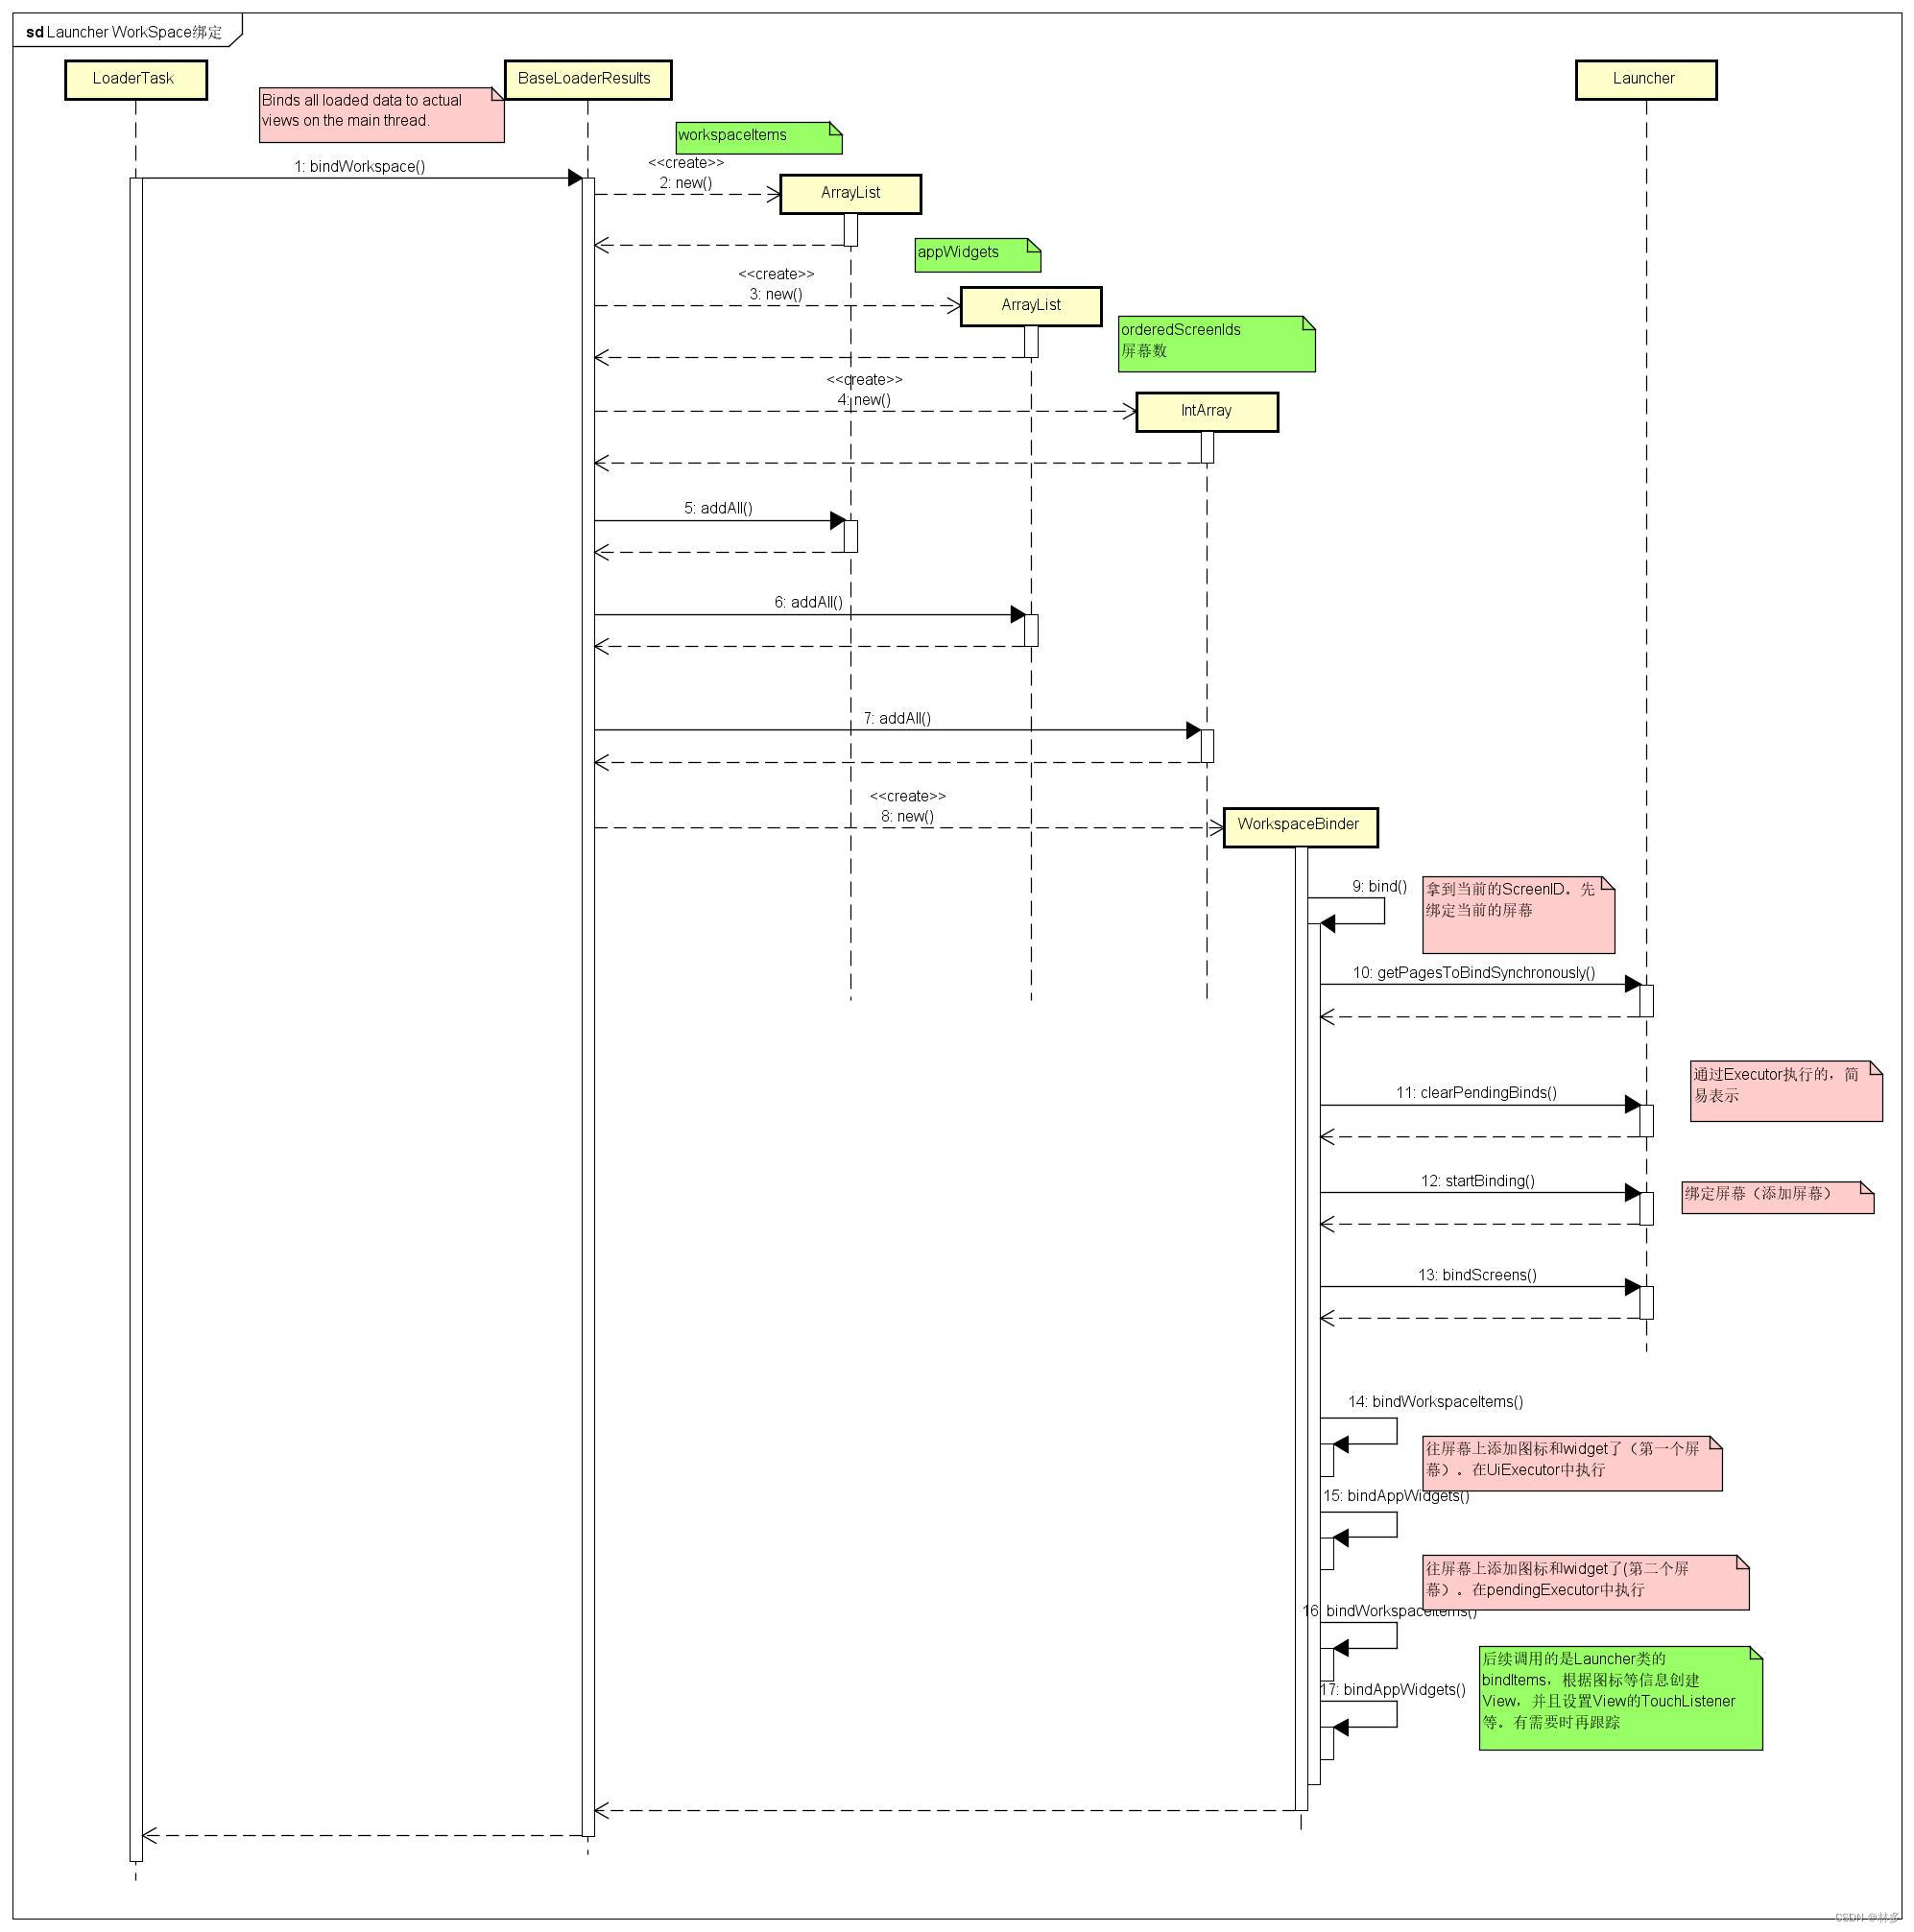
LoaderResults的bindWorkspace函数,在其父类BaseLoaderResults中定义。该函数中,创建workspaceItems、appWidgets、orderedScreenIds (屏幕数)等信息的数组。然后创建WorkspaceBinder,调用其bind函数开始绑定。
//packages/apps/Launcher3/src/com/android/launcher3/model/BaseLoaderResults.java
public void bindWorkspace() {
	// Save a copy of all the bg-thread collections
	ArrayList<ItemInfo> workspaceItems = new ArrayList<>();
	ArrayList<LauncherAppWidgetInfo> appWidgets = new ArrayList<>();
	final IntArray orderedScreenIds = new IntArray();
	ArrayList<FixedContainerItems> extraItems = new ArrayList<>();

	synchronized (mBgDataModel) {
		workspaceItems.addAll(mBgDataModel.workspaceItems);
		appWidgets.addAll(mBgDataModel.appWidgets);
		//可能有多个屏幕(比如图标很多,一个屏幕放不下的情况)
		orderedScreenIds.addAll(mBgDataModel.collectWorkspaceScreens());
		mBgDataModel.extraItems.forEach(extraItems::add);
		mBgDataModel.lastBindId++;
		mMyBindingId = mBgDataModel.lastBindId;
	}

	for (Callbacks cb : mCallbacksList) {
		// callback对象是Launcher这个类
		new WorkspaceBinder(cb, mUiExecutor, mApp, mBgDataModel, mMyBindingId,
				workspaceItems, appWidgets, extraItems, orderedScreenIds).bind();
	}
}
WorkspaceBinder的bind函数中,首先拿到当前屏幕(就是呈现给用户的第一个屏幕)ID,然后优先往第一个屏幕上绑定内容。之后再绑定其他屏幕的内容。
private void bind() {
	final int currentScreen;
	{
		// Create an anonymous scope to calculate currentScreen as it has to be a
		// final variable.
		int currScreen = mCallbacks.getPageToBindSynchronously();
		if (currScreen >= mOrderedScreenIds.size()) {
			// There may be no workspace screens (just hotseat items and an empty page).
			currScreen = PagedView.INVALID_PAGE;
		}
		currentScreen = currScreen;
	}
	final boolean validFirstPage = currentScreen >= 0;
	// 拿到当前的屏幕ID
	final int currentScreenId =
			validFirstPage ? mOrderedScreenIds.get(currentScreen) : INVALID_SCREEN_ID;

	// Separate the items that are on the current screen, and all the other remaining items
	ArrayList<ItemInfo> currentWorkspaceItems = new ArrayList<>();
	ArrayList<ItemInfo> otherWorkspaceItems = new ArrayList<>();
	ArrayList<LauncherAppWidgetInfo> currentAppWidgets = new ArrayList<>();
	ArrayList<LauncherAppWidgetInfo> otherAppWidgets = new ArrayList<>();

	filterCurrentWorkspaceItems(currentScreenId, mWorkspaceItems, currentWorkspaceItems,
			otherWorkspaceItems);
	filterCurrentWorkspaceItems(currentScreenId, mAppWidgets, currentAppWidgets,
			otherAppWidgets);
	final InvariantDeviceProfile idp = mApp.getInvariantDeviceProfile();
	sortWorkspaceItemsSpatially(idp, currentWorkspaceItems);
	sortWorkspaceItemsSpatially(idp, otherWorkspaceItems);

	// Tell the workspace that we're about to start binding items
	executeCallbacksTask(c -> {
		c.clearPendingBinds();
		c.startBinding();
	}, mUiExecutor);

	// Bind workspace screens
	// 先绑定屏幕
	executeCallbacksTask(c -> c.bindScreens(mOrderedScreenIds), mUiExecutor);

	Executor mainExecutor = mUiExecutor;
	// Load items on the current page.
	// 往当前的屏幕上绑定数据内容
	bindWorkspaceItems(currentWorkspaceItems, mainExecutor);
	bindAppWidgets(currentAppWidgets, mainExecutor);
	mExtraItems.forEach(item ->
			executeCallbacksTask(c -> c.bindExtraContainerItems(item), mainExecutor));

	// In case of validFirstPage, only bind the first screen, and defer binding the
	// remaining screens after first onDraw (and an optional the fade animation whichever
	// happens later).
	// This ensures that the first screen is immediately visible (eg. during rotation)
	// In case of !validFirstPage, bind all pages one after other.

	final Executor deferredExecutor =
			validFirstPage ? new ViewOnDrawExecutor() : mainExecutor;

	executeCallbacksTask(c -> c.finishFirstPageBind(
			validFirstPage ? (ViewOnDrawExecutor) deferredExecutor : null), mainExecutor);
	// 绑定非当前屏幕上的内容
	bindWorkspaceItems(otherWorkspaceItems, deferredExecutor);
	bindAppWidgets(otherAppWidgets, deferredExecutor);
	// Tell the workspace that we're done binding items
	executeCallbacksTask(c -> c.finishBindingItems(currentScreen), deferredExecutor);

	if (validFirstPage) {
		executeCallbacksTask(c -> {
			// We are loading synchronously, which means, some of the pages will be
			// bound after first draw. Inform the mCallbacks that page binding is
			// not complete, and schedule the remaining pages.
			c.onPageBoundSynchronously(currentScreen);
			c.executeOnNextDraw((ViewOnDrawExecutor) deferredExecutor);

		}, mUiExecutor);
	}
}
通过调用Launcher类的bindScreens函数,绑定屏幕(添加屏幕)后,调用bindWorkspaceItems和bindAppWidgets等函数往屏幕上绑定数据。实际上这些函数,最终会调用Launcher类中的bindItems,根据图标信息创建View并addView,并且给各个View设置其TouchListener。感兴趣的可以顺着这些函数继续看下。
另外Launcher中的数据库(就是上面首次启动时创建的空数据库,并加载了布局数据。一般名称为Launcher.db)用于保存桌面相关数据信息,其创建在LauncherProvider中实现。
原文地址:https://blog.csdn.net/zxc024000/article/details/134757039
本文来自互联网用户投稿,该文观点仅代表作者本人,不代表本站立场。本站仅提供信息存储空间服务,不拥有所有权,不承担相关法律责任。
如若转载,请注明出处:http://www.7code.cn/show_32228.html
如若内容造成侵权/违法违规/事实不符,请联系代码007邮箱:suwngjj01@126.com进行投诉反馈,一经查实,立即删除!

