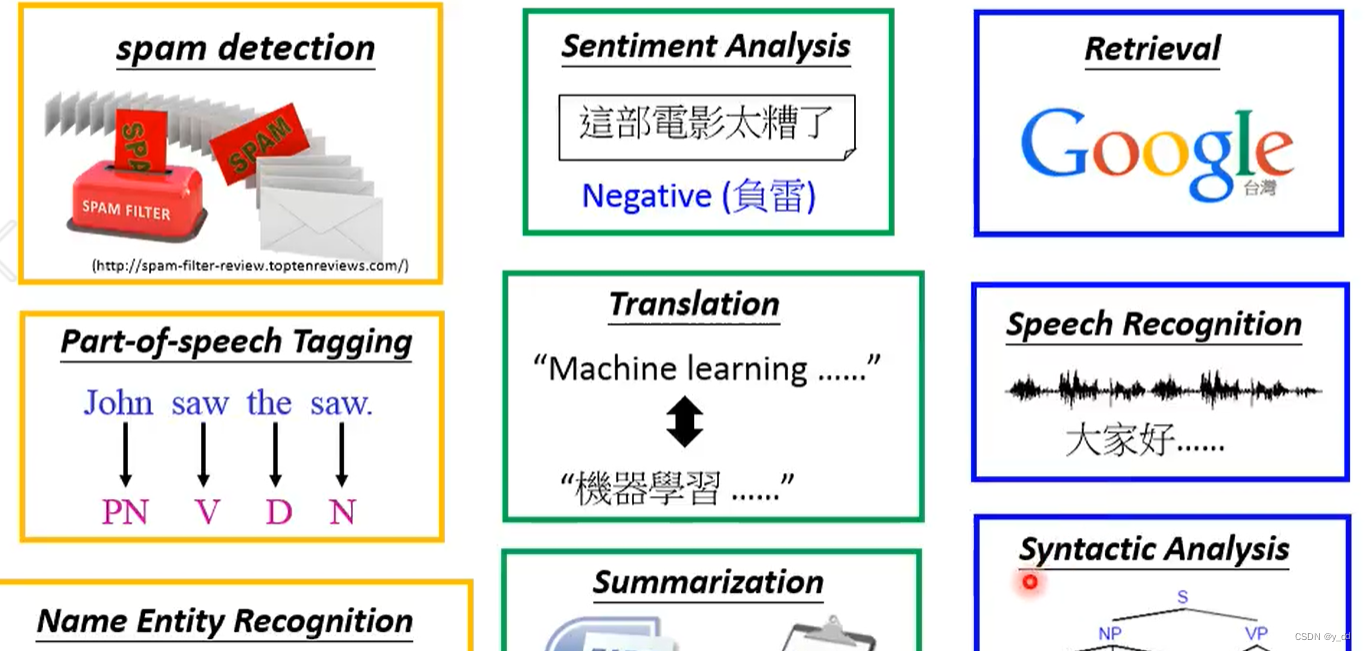
一、说明
这是一个关于 NLP 和分类项目的博客。NLP 是自然语言处理,目前需求量很大。让我们了解如何利用 NLP。我们将通过编码来理解流程和概念。我将在本博客中介绍 BagOfWords 和 n-gram 以及朴素贝叶斯分类模型。这个博客的独特之处(这使得它很长!)是我已经展示了如何根据我们手中的数据集为我们选择正确的模型。那么,让我们开始吧。

二、导入基础库
当编码时出现我们的需求时,我们将导入所需的库。首先,让我们导入 pandas、numpy、matplotlib、seaborn、regex 和 random 库,这些库都被广泛使用。
import pandas as pd
import numpy as np
import matplotlib.pyplot as plt
import seaborn as sns
import random
import regex as re
#below code is for not showing up any warnings that might appear for the ongoing improvements in functions
import warnings
warnings.filterwarnings('ignore')三、以dataframe的形式导入数据集
我从 Kaggle 下载了电影评论数据集。电影数据集是情感分类学习最常用的数据集。我还将在一个单独的博客中向您展示实时项目的情绪分类。现在让我们继续我们的学习吧。
#Reading the csv file into the dataframe
df = pd.read_csv('movie.csv')

#Let's look into the first ten records
df.head(10)
#if no parameter is provided then the head() function will show 5 records, else it will show as many as you will provide
现在,请记住,标记为 1 的情绪是积极的,标记为 0 的情绪是消极的。这就是它的标签方式,当您从网站下载它时,您将获得此信息。现在我们将开始稍微探索一下数据集。
# to get the information about the dataset
df.info()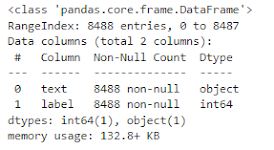
数据集不包含空数据。对我们好!让我们继续看看正面和负面反馈的数量。
df['label'].value_counts()负面评论4318条,正面评论4170条。由于两种类型的反馈的存在几乎相同,因此我们不会在数据集中执行采样。但是,如果我们进行采样,我们可能会获得更高的准确性。让我们绘制情绪数字。
sns.countplot(x = 'label', data = df)
plt.xlabel('Sentiments')

plt.show()
四、文本处理
现在我们进入有趣的部分了!处理文本。我将首先向您展示词袋方法。那么它是什么?
当我们使用文本数据时,我们没有在结构化表格数据中看到的功能。因此,我们需要一些措施来从文本数据中获取特征。如果我们可以从一个句子中取出每个单词,并获得某种度量,通过它我们可以找出该单词是否存在于另一个句子中及其重要性,该怎么办?通过称为“词袋模型”的过程,这当然是可能的。也就是说,我们的电影评论数据集中的每个句子都被视为一个词袋,因此每个句子被称为一个文档。所有文档共同构成一个语料库。
如果这听起来让您感到困惑,请不要担心!这个解释会让事情变得更清楚 -我们将首先创建一个包含语料库中使用的所有唯一单词的字典(这意味着数据集中存在的所有文档或评论)。在计算字数时,我们不考虑像 the、an、is 等语法,因为这对于理解文本上下文没有任何重要意义。然后,我们将所有文档(个人评论)转换为向量,该向量将表示特定文档中字典中单词的存在。BoW 模型中可以通过三种方式来识别单词的重要性 –
计数向量模型将计算整个句子中单词出现的次数。直观地理解会更好,所以假设我们有以下语句 –
review1 = ‘电影非常非常好’
review2 = ‘电影令人失望’
在计数向量模型中,评论将这样显示 –

词频模型 – 在此模型中,每个文档(或句子)中每个单词的频率是相对于整个文档中观察到的单词总数来计算的。它的计算公式为 –
TF = 第 i 个文档中单词出现的次数 / 第 i 个文档中单词的总数
术语频率-逆文档频率模型 – TFIDF 衡量特定句子中单词的重要性。句子中某个单词的重要性与其在文档中出现的次数成正比,与整个语料库中同一单词的出现频率成反比。它的计算公式为 –
TF-IDF = TF x ln (1+N/Ni),其中 N 是语料库中的文档总数,Ni 是包含单词 i 的文档。
好的!这是很多理论。让我们通过编码来理解这个概念。我们首先使用 CountVectorizer 函数统计每个单词在每个文档中出现的次数
五、计数向量化器 — 词袋模型
from sklearn.feature_extraction.text import CountVectorizer

#initializing the CountVectorizer
count_vector = CountVectorizer()

#creating dictionary of words from the corpus
features = count_vector.fit(df['text'])

#Let's see the feature names extracted by the CountVectorizer
feature_names = features.get_feature_names_out()
feature_names![]()
print('Total Number of features extracted are - ',len(feature_names)) ![]()
这代表我们的数据集中存在 48618 个独特特征。这是因为我们没有清除不需要的文本。我们最终会这样做。让我们继续前进!
#Let's randomly pickup 10 feature names out of it
random.sample(set(feature_names), 10)
正如我们所看到的,这些是特征名称,而不是它的向量形式。我们必须将特征转换成向量形式。
feature_vector = count_vector.transform(df['text'])
feature_vector.shape
(8488, 48618)从形状中我们可以看出,所有 8488 个文档都由 48618 个特征(即唯一词)表示。对于文档中出现的单词,对应的特征将携带该单词在文档中出现的次数。如果该单词不存在,则该特征的值为 0。结果我们发现向量数据中有很多 0。为了知道特征向量中存在的 0 的数量,请执行以下操作 –
feature_vector.getnnz()
1158500

# To get the non-zero value density in the document
feature_vector.getnnz()/(feature_vector.shape[0]*feature_vector.shape[1])
0.0028073307190965642feature_vector.todense()
显然,我们需要先修复数据集,然后再进行正确的分类。开始吧 –
六、停用词删除
首先,让我们从句子中删除停用词,因为它们没有任何本质意义。停用词是像 the、an、was、is 等这样的词。这会减少特征的数量。我们将从 nltk 库导入停用词 –
from nltk.corpus import stopwords

#since the reviews are in english, stopwords will be in english that we need to set as below -
all_stopwords = set(stopwords.words('english'))

#this is how stop words looks like -
list(all_stopwords)[:10]

["doesn't",
 "weren't",
 'each',
 "she's",
 'himself',
 'did',
 'about',
 'through',
 'the',
'should']现在我们将再次从头开始,即我们将再次调用 countvectorizer,但这次使用 stop_words 的附加参数,这将阻止停用词出现在计数向量中 –
count_vector2 = CountVectorizer(stop_words=list(all_stopwords))
feature_names2 = count_vector2.fit(df['text'])

feature_vector2 = count_vector2.transform(df['text'])
feature_vector2.shape
(8488, 48473)
之前,特征数量为 48618 个,现在为 48473 个。略有减少。我们需要减少更多。让我们先看看一些功能名称 –
feature_names = feature_names2.get_feature_names_out()
feature_counts = np.sum(feature_vector2.toarray(), axis = 0)

pd.DataFrame(dict(Features = feature_names, Count = feature_counts))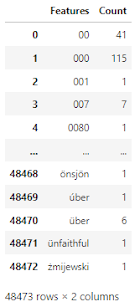
如果我们研究这些特征,我们会发现有许多非英语单词和数字正在污染数据集。让我们把它们清理干净——
#we will use the regex module to go through each document and look for the non english characters and will replace them with a space in our document
for word in df.text[:][:10]:
review = re.sub('[^a-zA-Z]',' ',word)现在最好将评论句子中的所有单词转为小写,然后删除停用词,因为由于大小写的差异,向量化器倾向于创建两个向量来表示 hello 和 HELLO。
sentences = []
for word in df.text:
    review = re.sub('[^a-zA-Z]',' ',word)
    review = review.lower()
    sentences.append(review)
句子现在是 df[‘text’] 的干净形式。让我们在从句子中删除停用词后应用 counvectorizer 并观察特征的差异。
count_vector3 = CountVectorizer(stop_words=list(all_stopwords))
feature_names3 = count_vector3.fit(sentences)
feature_vector3 = count_vector3.transform(sentences)
feature_vector3.shape
(8488, 47672)feature_names = feature_names3.get_feature_names_out()
feature_counts = np.sum(feature_vector3.toarray(), axis = 0)
pd.DataFrame(dict(Features = feature_names, Count = feature_counts))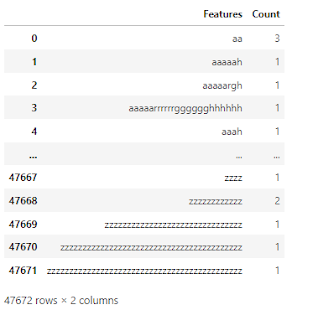
正如我们所看到的,有些评论并不具有任何此类意义。我们将摆脱那些。我们先来了解一下词干分析器和词形还原的含义。
七、词干提取和词形还原
词干提取是将单词还原为词根形式的过程。词干提取会切掉单词的末尾部分,并将其恢复为词根形式,因为矢量化器将相似含义的单词视为两个不同的特征,但以不同的方式书写。例如,爱、爱、被爱,在不同的形式下都有相似的含义。Stemmer 会将每个单词截断为其词根 lov。这将导致创建单个特征而不是 3 个。词干提取的一个问题是词干提取后创建的单词不是词汇表的一部分,并且词干提取也无法考虑单词的形态含义来转换单词。例如,女人和女人都与同一件事有关,但斯特默无法理解这一点。然而,词形还原考虑了单词的形态分析。它使用字典将单词转换为其根词。例如,词形还原可以理解“女人”和“女人”属于同一实体,并将它们还原为“女人”。
from nltk.stem.porter import PorterStemmer
#object for porterstemmer is needed
ps = PorterStemmer()

# we have sentences turned into lowercase now we will stem individual words and then look into if its a stop word or not.
# we will create a list removing all the stop words
sentences_stemmed = []
for texts in sentences:
    reviews = [ps.stem(word) for word in texts.split() if not word in all_stopwords]
    sentences_stemmed.append(' '.join(reviews))

#Let's call the Countvectorizer process now
count_vector4 = CountVectorizer()
feature_names4 = count_vector4.fit(sentences_stemmed)
feature_vector4 = count_vector4.transform(sentences_stemmed)

feature_vector4.shape
(8488, 32342)这里我们可以看到特征从 47672 减少到 32342。现在让我们使用词形还原。我们将使用 WordNetLemmatizer 算法 —
from nltk.stem import WordNetLemmatizer
lemma = WordNetLemmatizer()
sentences_lemma = []
for texts in sentences:
     reviews = [lemma.lemmatize(word) for word in texts.split() if not word in all_stopwords]
     sentences_lemma.append(' '.join(reviews))

#Let's call the Countvectorizer process now
count_vector5 = CountVectorizer()
feature_names5 = count_vector5.fit(sentences_lemma)
feature_vector5 = count_vector5.transform(sentences_lemma)

feature_vector5.shape
(8488, 42521)在这里,我们将使用 PorterStemmer 进行词干提取。也许您可以使用词形还原而不是 PorterStemmer 来找出您得到的结果有什么不同!好吧,现在让我们创建一个函数,它将完成我们迄今为止看到的所有这些任务,并给出句子的最终结果 –
def get_clean_text(df, col):
    sentence = []

    for word in df[col][:]:
        review = re.sub('[^a-zA-Z]',' ',word)
        review = review.lower()
        review = review.split()
        review = [ps.stem(word) for word in review if not word in all_stopwords]
        review = ' '.join(review)
        sentence.append(review)

    return sentence

df['clean_text'] = get_clean_text(df, 'text')
df.head(10)
#Now we need to vectorize it. We will do it in the same way, that is using countvectorizer -
cv = CountVectorizer()
features = cv.fit_transform(df['clean_text'])
九、分类
 dataset into train and test
x = features.toarray()
y = df['label']
from sklearn.model_selection import train_test_split
x_train, x_test, y_train, y_test = train_test_split(x, y, test_size = 0.10, random_state = 42)
9.1 模型训练
from sklearn.naive_bayes import GaussianNB
classifier = GaussianNB()
classifier.fit(x_train, y_train)
9.2 模型验证
y_pred = classifier.predict(x_test)好的!现在让我们检查一下准确性 –
from sklearn.metrics import confusion_matrix, accuracy_score
cm = confusion_matrix(y_test, y_pred)
print(cm)

[[305 124]
[194 226]]round(accuracy_score(y_test, y_pred), 3)
0.625有 194 个假阴性,结果不太好!我们模型的准确度很低。这可能是一些奇怪评论的结果。让我们检查训练集的准确性以检查是否过度拟合 –
y_pred_train = classifier.predict(x_train)
round(accuracy_score(y_train, y_pred_train), 3)
0.902显然,该模型过于拟合。现在让我们在处理数据之前应用另一个 NB 分类模型 –
from sklearn.naive_bayes import BernoulliNB

classifier2 = BernoulliNB()
classifier2.fit(x_train, y_train)

y_pred2 = classifier2.predict(x_test)
cm = confusion_matrix(y_test, y_pred2)
sns.heatmap(cm, annot = True, fmt='.2f')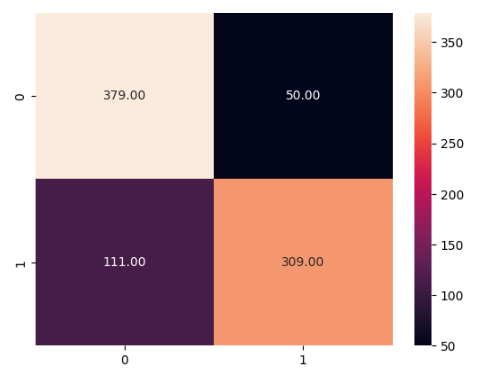
行显示数据中的实际标签,列显示预测标签。由此,我们可以看到有 111 个正面陈述被错误地归类为负面,即 False Negative。有 50 个否定陈述被归类为表示误报的肯定陈述。这表明 BernaulliNB 可能是该数据集的更好模型。
round(accuracy_score(y_test, y_pred2), 3)
0.81y_pred_train2 = classifier2.predict(x_train)
round(accuracy_score(y_train, y_pred_train2), 3)
0.916过度拟合仍然存在,尽管比以前减少了很多。我们来看看完整的分类报告——
from sklearn.metrics import classification_report
print(classification_report(y_test, y_pred2))
precision recall f1-score support
0 0.77 0.88 0.82 429
1 0.86 0.74 0.79 420
accuracy 0.81 849
macro avg 0.82 0.81 0.81 849
weighted avg 0.82 0.81 0.81 849现在我们可以想一些办法来进一步提高准确性。我们可以做什么?让我们尝试更改 BagOfWord 模型。到目前为止我们一直在使用 CountVectorizer,让我们使用 tf idf 矢量化器并看看差异 –
十、TF-TDF 矢量化器 — 词袋模型
from sklearn.feature_extraction.text import TfidfVectorizer
tfidf = TfidfVectorizer()
features = tfidf.fit_transform(df['clean_text'])
x1 = features.toarray()
x_train, x_test, y_train, y_test = train_test_split(x1, y, test_size = 0.10, random_state = 42)
#Let's use GaussianNB first
classifier = GaussianNB()
classifier.fit(x_train, y_train)
y_pred = classifier.predict(x_test)
cm = confusion_matrix(y_test, y_pred)
sns.heatmap(cm, annot = True, fmt='.2f')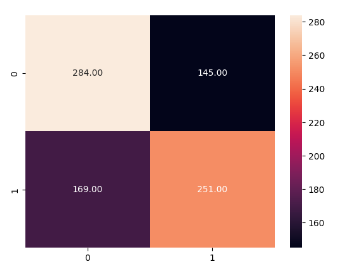
round(accuracy_score(y_test, y_pred), 3)
0.63
#Now using BernaulliNB
classifier2 = BernoulliNB()
classifier2.fit(x_train, y_train)
y_pred2 = classifier2.predict(x_test)
cm = confusion_matrix(y_test, y_pred2)
sns.heatmap(cm, annot = True, fmt='.2f')
round(accuracy_score(y_test, y_pred2), 3)
0.81
y_pred_train2 = classifier2.predict(x_train)
round(accuracy_score(y_train, y_pred_train2), 3)
0.916
print(classification_report(y_test, y_pred2))
precision recall f1-score support
0 0.77 0.88 0.82 429
1 0.86 0.74 0.79 420
accuracy 0.81 849
macro avg 0.82 0.81 0.81 849
weighted avg 0.82 0.81 0.81 849因此,我们看到对于该数据集,最好使用 BernoulliNB 模型,而不是高斯模型。此外,模型性能不会随着矢量化类型的变化而发生显着变化。因此,我们现在将使用除 BogOfWords 之外的其他形式的词向量化并查看变化。
BoW模型忽略句子结构或句子中的单词序列。n-grams 模型可以解决这个问题。单词的含义可能会根据其前面或后面的单词而变化。例如,在“我不高兴”这句话中,这个不高兴应该被视为一个单元,而不是两个单独的单词。n-gram 解决了这个问题,它是 n 个单词的连续序列。当两个连续的单词被视为一个单元时,它被称为二元组,对于三个连续的单词被视为一个单元,它被称为三元组,依此类推。现在让我们使用 n-gram —
十一、N-Grams — 词袋模型
tfidf2 = TfidfVectorizer(ngram_range=(1,2), max_features=5000)
feature2 = tfidf2.fit_transform(df['clean_text'])

x = feature2.toarray()
x_train, x_test, y_train, y_test = train_test_split(x, y, test_size = 0.10, random_state = 42)

#using bernaulli since its performing best
#Now using BernaulliNB

classifier = BernoulliNB()
classifier.fit(x_train, y_train)
 y_pred = classifier.predict(x_test)
cm = confusion_matrix(y_test, y_pred)
sns.heatmap(cm, annot = True, fmt='.2f')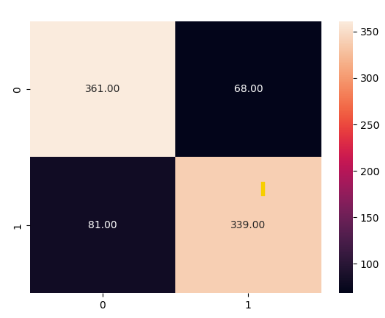
在途中您可以看到误报和漏报的数量减少了!
accuracy_score(y_test, y_pred)
0.8244994110718492

print(classification_report(y_test, y_pred))

              precision    recall  f1-score   support

           0       0.82      0.84      0.83       429
           1       0.83      0.81      0.82       420

    accuracy                           0.82       849
   macro avg       0.82      0.82      0.82       849
weighted avg 0.82 0.82 0.82 849更改矢量化器类型并使用 Bernaulli 后,我们能够达到 82.4% 的精度。我们的准确率从 62.5% 跃升至 82.4%。可能存在一点过度拟合。因此,让我们先尝试清理数据集 –
#removing the words of 1 letter or 0 letter
sentences_clean = []
for listed in df['clean_text'].str.split(' '):
     review = [word for word in listed if len(word) != 1 and len(word) != 0]
     review = ' '.join(review)
     sentences_clean.append(review)

#removing all same letters from string
def allCharactersSame(s) :
     n = len(s)
     for i in range(1, n) :
         if s[i] != s[0] :
             return False
         return True

cleaned = []
for sentences in sentences_clean:
     word_list = []
     for word in sentences.split(' '):
         if allCharactersSame(word):
             pass
         else:
             word_list.append(word)
     word_list = ' '.join(word_list)
     cleaned.append(word_list)

df['clean_text'] = cleaned
df.head()
现在让我们执行矢量化器和分类器 –
tfidf = TfidfVectorizer(ngram_range=(1,2), max_features=10000)
feature = tfidf.fit_transform(df['clean_text'])
x = feature.toarray()
x_train, x_test, y_train, y_test = train_test_split(x, y, test_size = 0.10, random_state = 42)

#using bernaulli since its performing best
#Now using BernaulliNB
classifier = BernoulliNB()
classifier.fit(x_train, y_train)

y_pred = classifier.predict(x_test)
cm = confusion_matrix(y_test, y_pred)
sns.heatmap(cm, annot = True, fmt='.2f')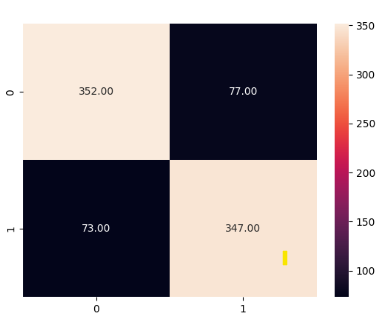
accuracy_score(y_test, y_pred)
0.823321554770318

y_pred1 = classifier.predict(x_train)
#training accuracy calculation
accuracy_score(y_train, y_pred1)
0.8984160230396648正如我们在尝试所有方法后所看到的,我们得出的准确率为 82.3%,训练数据的准确率为 89.8%。这表明模型中仍然存在一点过度拟合。我们可以尝试 GridSearchCV 来获取模型的最佳参数。但我会继续使用 82.3% 的准确率,这对于我们获得的训练准确率来说非常好。
让我们用完整的未见过的数据来测试模型。
十二、对看不见的数据执行文本分析
#This is something I have written for testing
reviews = [
    "I didn't liked the movie. It was so boring.",
    'I am not happy that the movie ended so badly',
    "The movie is terrific. It's a must watch for every one."
]

dataframe = pd.DataFrame({'Text':reviews})
dataframe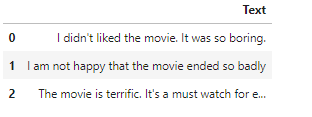
#cleaning up the data and applying stemming
test_sent = get_clean_text(dataframe, 'Text')

#converting into vectors using last trained n-grams model
x1 = tfidf.transform(test_sent).toarray()

#predicting unseen data using last trained classifier
y_pred_res = classifier.predict(x1)

dataframe['predictions'] = y_pred_res.tolist()
dataframe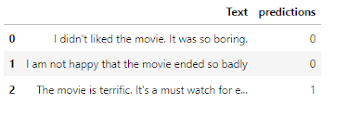
正如我们所看到的,根据我们的数据输入,负面和正面的预测是正确的,这对于我们的模型来说是看不到的。现在您可以使用上述过程创建您自己的文本分析模型。快乐编码:)
十三、结论
在这里,我们已经完成了使用 NLP 和分类的文本分析项目。这是一个非常基本的模型。我们已经从这个基本模型(我在这里展示了)发展到像 NLP 的 Transformers 这样的模型。希望读者对召回、混淆矩阵、分类等概念有一个了解。如果您没有这些概念或者您发现博客很难理解,我会建议您阅读 NLP 和分类的理论第一的。
原文地址:https://blog.csdn.net/gongdiwudu/article/details/134541025
本文来自互联网用户投稿,该文观点仅代表作者本人,不代表本站立场。本站仅提供信息存储空间服务,不拥有所有权,不承担相关法律责任。
如若转载,请注明出处:http://www.7code.cn/show_3351.html
如若内容造成侵权/违法违规/事实不符,请联系代码007邮箱:suwngjj01@126.com进行投诉反馈,一经查实,立即删除!


