1 工程配置类
1.1 添加预编译文件
将AFNetworking添加到预编译头文件,意味着这个框架会被自动的添加到工程的所有源代码文件中。
1.2 给SDK头文件加权限
如果您是从DMG安装Xcode的,看看这个技术通过Joar Wingfors,以避免通过保留所有权,权限和硬链接意外修改SDK头:
$ sudo ditto /Volumes/Xcode/Xcode.app /Applications/Xcode.app
2 调试技巧
2.1 日志打印类
2.1.1 让Xcode的控制台支持LLDB类型的打印
这有什么用?怎么说尼,笔者认为这个还是比较有用滴,为什么有用尼?
因为在Xcode断点调试的时候, 在控制台输入 po self.view.frame 或者 po id 类型的时候就死翘翘了。
不信? 看如下图 :

进入正题
2. echo display @import UIKit >> ~/.lldbinit
3. echo target stop–hook add -o “target stop–hook disable” >> ~/.lldbinit
输完命令后没有任何提示? 好吧, 那恭喜你成功了~! 然后, 最关键的一步来了, 那就是…

就代表成功啦
那么现在我们继续在控制台输入po self.view.frame

成功了!如果po指令是一个id类型也可以正常打印。是不是感觉方便很多呀? 反正我是这么觉得。至于有没有用就看个人需要咯~~!
好吧, 那么问题来了, 我用命令创建, 如果不想玩了怎么办尼??
其实很简答, 看第一条命令 touch ~/.lldbinit, 就是在根目录下创建了一个隐藏文件 .lldbinit ,然后删除这个文件就搞定啦。
2.1.2 Objective-C自定义NSLog宏
/*
XCode LLVM XXX – Preprocessing中Debug会添加 DEBUG=1 标志
*/
#define NSLog(FORMAT, …) fprintf(stderr,”%s:%dt%sn”,[[[NSString stringWithUTF8String:__FILE__] lastPathComponent] UTF8String], __LINE__, [[NSString stringWithFormat:FORMAT, ##__VA_ARGS__] UTF8String]);
#else
#endif
2.1.3 调试宏__func__
__func__ C99的标准,但是GCC只输出函数名称。不知道VC.NET 为啥不支持
__FUNCTION__ 同__func__,
__PRETTY_FUNCTION__ 非标准宏。这个宏比__FUNCTION__功能更强, 若用g++编译C++程序, __FUNCTION__只能输出类的成员名,不会输出类名;而__PRETTY_FUNCTION__则会以 <return–type> <class–name>::<member–function–name>(<parameters–list>) 的格式输出成员函数的详悉信息(注: 只会输出parameters–list的形参类型, 而不会输出形参名).若用gcc编译C程序,__PRETTY_FUNCTION__跟__FUNCTION__的功能相同.
而VC.NET提供的函数宏为:
2.1.4 WriteLog类
WriteLog.h中:
#define ERR_LOG 1 /* 应用程序无法正常完成操作,比如网络断开,内存分配失败等 */
#define WARN_LOG 2 /* 进入一个异常分支,但并不会引起程序错误 */
#define NOTICE_LOG 3 /* 日常运行提示信息,比如登录、退出日志 */
#define DEBUG_LOG 4 /* 调试信息,打印比较频繁,打印内容较多的日志 */
#define LOGERR(format,…) WriteLog(ERR_LOG,__FUNCTION__,__LINE__,format,##__VA_ARGS__)
#define LOGWARN(format,…) WriteLog(WARN_LOG,__FUNCTION__,__LINE__,format,##__VA_ARGS__)
#define LOGNOTICE(format,…) WriteLog(NOTICE_LOG,__FUNCTION__,__LINE__,format,##__VA_ARGS__)
#define LOGDEBUG(format,…) WriteLog(DEBUG_LOG,__FUNCTION__,__LINE__,format,##__VA_ARGS__)
void WriteLog(int ulErrorLevel, const char *func, int lineNumber, NSString *format, …);
WriteLog.m中:
void WriteLog(int ulErrorLevel, const char *func, int lineNumber, NSString *format, …)
{
va_list args;
va_start(args, format);
NSString *string = [[[NSString alloc] initWithFormat:format arguments:args] autorelease];
va_end(args);
NSString *strFormat = [NSString stringWithFormat:@”%@%s, %@%i, %@%@”,@”Function: “,func,@”Line: “,lineNumber, @”Format: “,string];
NSString * strModelName = @”WriteLogTest”; //模块名
NSString *strErrorLevel = [[NSString alloc] init];
switch (ulErrorLevel) {
case ERR_LOG:
strErrorLevel = @”Error”;
break;
case WARN_LOG:
strErrorLevel = @”Warning”;
break;
case NOTICE_LOG:
strErrorLevel = @”Notice“;
break;
case DEBUG_LOG:
strErrorLevel = @”Debug“;
break;
default:
break;
}
NSLog(@”ModalName: %@, ErrorLevel: %@, %@.”,strModelName, strErrorLevel, strFormat);
}
2013-03-07 16:37:17.583 WriteLog[419:207] ModalName: WriteLogTest, ErrorLevel: Notice, Function: -[ViewController pressTheButton:], Line: 66, Format: here we press the button.
2013-03-07 16:37:17.585 WriteLog[419:207] ModalName: WriteLogTest, ErrorLevel: Error, Function: -[ViewController pressTheButton:], Line: 67, Format: here we test.
2013-03-07 16:37:17.585 WriteLog[419:207] ModalName: WriteLogTest, ErrorLevel: Warning, Function: -[ViewController pressTheButton:], Line: 68, Format: second test, Yep!.
2.1.5 在控制台里打印controller的层级
在控制台里使用po [UIViewController _printHierarchy]命令即可打印出controller的层级,一目了然.大家都去玩玩吧~~1

2.1.6 在控制台里打印view的层级
在控制台里使用po [[[UIApplication sharedApplication] keyWindow] recursiveDescription]命令即可打印出view的层级,一目了然。
当然,可能对于某一些人来说打印window下的所有view层级,会觉得眼花缭乱。但是,也可以打印指定某一个view的层级。
po [view recursiveDescription]
po [view recursiveDescription]
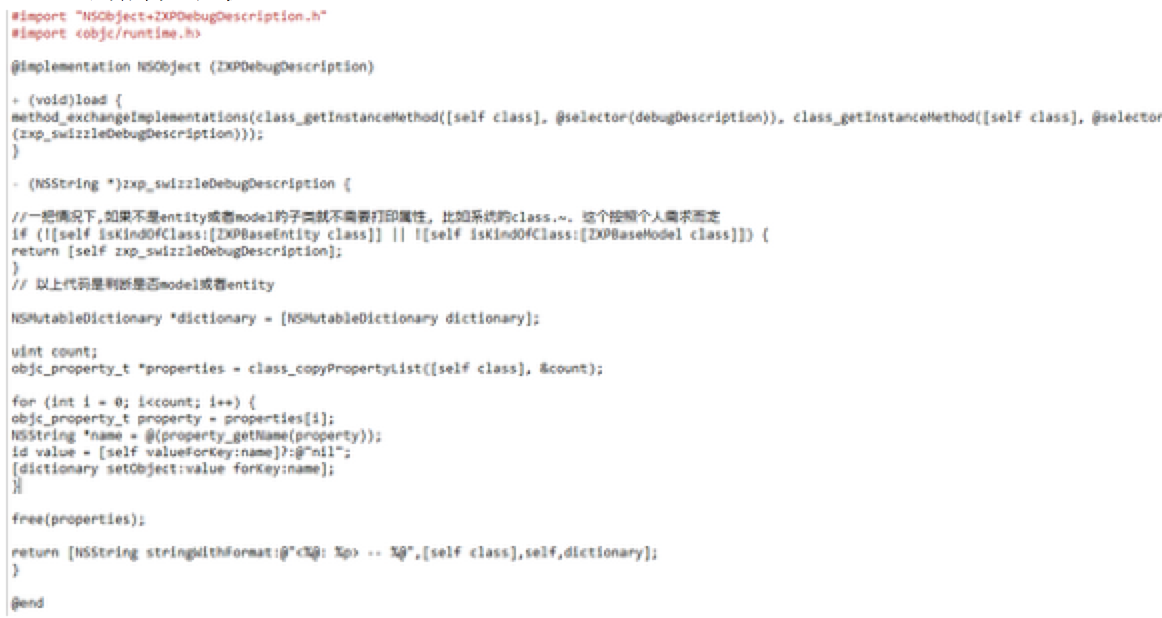
2.1.7 在debug模式下的控制台里使用po命令打印对象的属性和值
添加分类,加上代码即可。不用导入头文件,即可在控制台里使用po命令打印出model的属性和值

2.1.8 给category添加属性的小技巧
这是运用到了对象关联, 如果不会的请看这篇文章: 时空传送门
.h 文件
#import @interface NSObject (ZXPDebugDescription)
@property (copy,nonatomic) NSString *zxp_testString;
@end
#import @interface NSObject (ZXPDebugDescription)
@property (copy,nonatomic) NSString *zxp_testString;
@end
.m 文件
#import “NSObject+ZXPDebugDescription.h”
@implementation NSObject (ZXPDebugDescription)
– (void)setZxp_testString:(NSString *)zxp_testString {
objc_setAssociatedObject(self, @selector(zxp_testString), zxp_testString, OBJC_ASSOCIATION_COPY_NONATOMIC);
}
– (NSString *)zxp_testString {
return objc_getAssociatedObject(self, @selector(zxp_testString));
}
2.2 便捷开发宏定义
2.2.1 运行时判断运行版本宏
Tufu
#define TF_IS_IPAD_RUNTIME [[[UIDevice currentDevice] model] isEqualToString:@”iPad“]
#define TF_IS_IPHONE_RUNTIME [[[UIDevice currentDevice] model] isEqualToString:@”iPhone”]
#define TF_IS_IPOD_TOUCH_RUNTIME [[[UIDevice currentDevice] model] isEqualToString:@”iPod touch“]
#define TF_CALL_AND_MESSAGE_ABILITY_RUNTIME TF_IS_IPHONE_RUNTIME
2.2.2 公共库f形式的公共前缀
#undef TFC_PREFIX
2.2.3 摒弃函数提示
#if defined(__GNUC__) && (__GNUC__ >= 4) && defined(__APPLE_CC__) && (__APPLE_CC__ >= 5465)
#define TF_DEPRECATED(_version) __attribute__((deprecated))
#else
#define TF_DEPRECATED(_version)
#define TF_IS_IPAD UI_USER_INTERFACE_IDIOM() == UIUserInterfaceIdiomPad
2.2.4 自定义log提示
void TFNetLog(NSString *format, …);
void TFLog(NSString *format, …);
}
2.2.5 release版本屏蔽log
#ifdef DEBUG
#else
#define NSLog(…)
#define TFLog(…)
#define TFNetLog(…)
#endif
2.2.6 用宏定义检测block是否可用!
Objective-C
#define BLOCK_EXEC(block, …) if (block) { block(__VA_ARGS__); };
// 宏定义之前的用法
/*
{
completionBlock(arg1,&nbsp; arg2);
}
*/
// 宏定义之后的用法
BLOCK_EXEC(completionBlock, arg1, arg2);
#define BLOCK_EXEC(block, …) if (block) { block(__VA_ARGS__); };
// 宏定义之前的用法
/*
{
}
*/
// 宏定义之后的用法
BLOCK_EXEC(completionBlock, arg1, arg2);
Objective-C
NSString *propertyAttributesString =
@(property_getAttributes(class_getProperty([NSObject class], “description“)));
// T@”NSString”,R,C
NSString *propertyAttributesString =
@(property_getAttributes(class_getProperty([NSObject class], “description“)));
// T@”NSString”,R,C
2.2.7 使用ARC和不使用ARC(from 夏夏)
Objective-C
//使用ARC和不使用ARC
#else
#endif
//使用ARC和不使用ARC
#else
#endif
2.2.8 读取本地图片(from 夏夏)
Objective-C
#define LOADIMAGE(file,ext) [UIImage imageWithContentsOfFile:[NSBundle mainBundle]pathForResource:file ofType:ext]
//定义UIImage对象
#define IMAGE(A) [UIImage imageWithContentsOfFile:[NSBundle mainBundle] pathForResource:A ofType:nil]
#define LOADIMAGE(file,ext) [UIImage imageWithContentsOfFile:[NSBundle mainBundle]pathForResource:file ofType:ext]
//定义UIImage对象
#define IMAGE(A) [UIImage imageWithContentsOfFile:[NSBundle mainBundle] pathForResource:A ofType:nil]
2.3 视图调试
ios中的视图调试(ios8苹果引入了强大的新技术,不可不看)
http://blog.csdn.net/openglnewbee/article/details/42195361
2.3.1 ios8以前调试控制台命令recursiveDescription
在ios8以前,我们想要进行ui实时调试,可以依赖的技术手段有:
1、用xcode启动app,然后点击xcode暂停运行按钮,然后在调试控制台输入下面语句:
po [[UIWindow keyWindow] recursiveDescription]
<UIWindow: 0x7b691cd0; frame = (0 0; 320 480); gestureRecognizers = <NSArray: 0x7b6921f0>; layer = <UIWindowLayer: 0x7b691e00>>
| <UIView: 0x7c078b30; frame = (0 0; 320 480); autoresize = W+H; autoresizesSubviews = NO; layer = <CALayer: 0x7c078440>>
| | <UIView: 0x7c078ca0; frame = (10 87; 145 145); autoresize = RM+BM; autoresizesSubviews = NO; layer = <CALayer: 0x7c0786e0>>
| | <UIView: 0x7c078f20; frame = (165 87; 145 145); autoresize = RM+BM; autoresizesSubviews = NO; layer = <CALayer: 0x7c078630>>
| | <_UILayoutGuide: 0x7c079130; frame = (0 0; 0 20); hidden = YES; layer = <CALayer: 0x7c0792d0>>
| | <_UILayoutGuide: 0x7c079710; frame = (0 480; 0 0); hidden = YES; layer = <CALayer: 0x7c079790>>
po [self.view recursiveDescription]可以看到当前view下的ui结构,示例如下:
<UIView: 0x7ca8ceb0; frame = (0 0; 600 600); autoresize = RM+BM; autoresizesSubviews = NO; layer = <CALayer: 0x7ca8cb30>>
| <UIView: 0x7ca73890; frame = (10 87; 285 285); autoresize = RM+BM; autoresizesSubviews = NO; layer = <CALayer: 0x7ca89200>>
| <UIView: 0x7ca7f520; frame = (305 87; 285 285); autoresize = RM+BM; autoresizesSubviews = NO; layer = <CALayer: 0x7ca7ce70>>
| <_UILayoutGuide: 0x7ca8bd30; frame = (0 0; 0 0); hidden = YES; layer = <CALayer: 0x7ca814d0>>
| <_UILayoutGuide: 0x7ca93b20; frame = (0 0; 0 0); hidden = YES; layer = <CALayer: 0x7ca8d530>>
2.3.2 ios8/xcode6中Debug View Hierarchy功能
在ios8/xcode6以后,苹果引入了新的技术手段支持我们进行实时ui调试;使用xcode运行app过程中,按下底部的Debug View Hierarchy 按钮,或者从菜单中选择Debug > View Debugging > Capture View Hierarchy 来启动视图调试:

启动视图调试后,Xcode会对应用程序的视图层次拍一个快照并展示三维原型视图来探究用户界面的层级。该三维视图除了展示app的视图层次外,还展示每个视图的位置、顺序和视图尺寸,以及视图间的交互方式。
该调试工具非常强大,结合storyboard一起使用可以很好的支撑ios开发的页面布局调整/性能优化等需求,具体的功能这里不一一展开,请开发人员在使用中进行总结和摸索。

2.3.3 第三方工具
2.3.3.1 Flipboard/FLEX
https://github.com/Flipboard/FLEX
http://www.cocoachina.com/ios/20140728/9259.html
2.3.4 Xcode使用心得03:打开僵尸(Zombie)模式
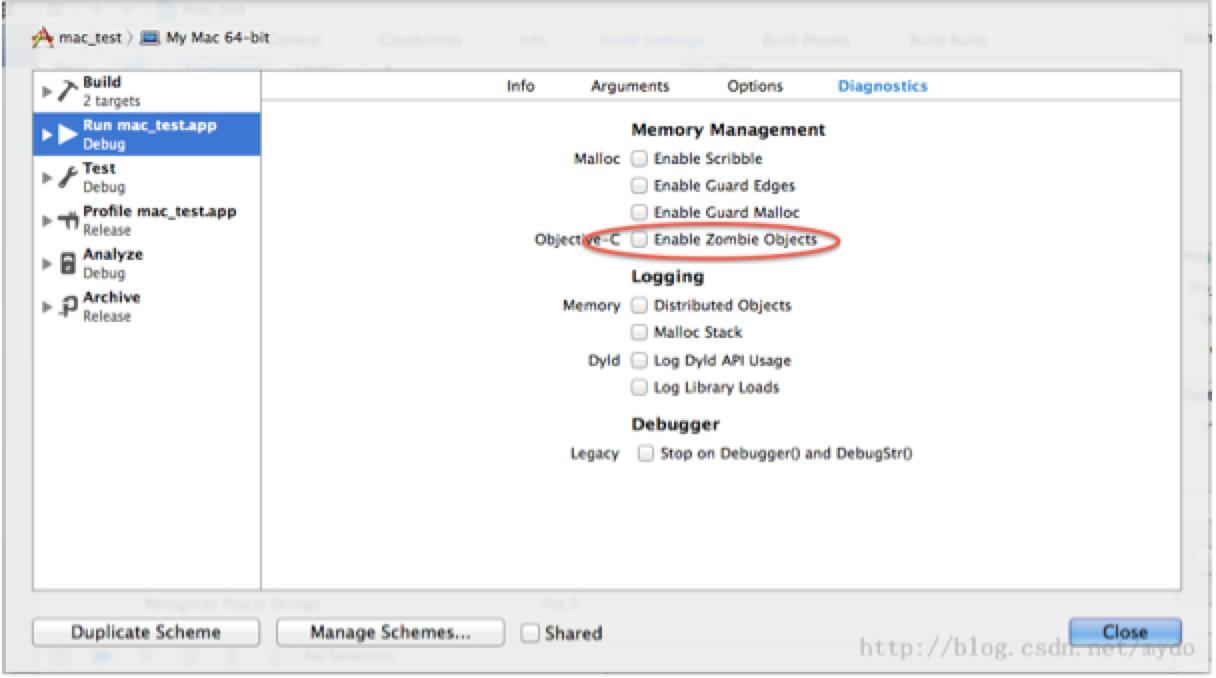
如果打开了ARC或垃圾回收模式,在程序中发消息给以及重新分配的对象,将会引起程序崩溃。这时定位崩溃原因将非常困难,因为出问题的对象已经重新分配了。一个解决的方法就是要求Xcode将对象设置为“僵尸”,而不是重新分配。当给僵尸对象发送消息时,会抛出一个可描述的异常,且调试器会在出错代码行中断下来哦。下面看看如何打开“僵尸”模式喽:
依次选择Xcode菜单: Product->Edit Scheme,进入Diagnostics窗口,勾选Zombie Objects选项即可:

2.4 便捷调试类定义
2.4.1 AmIBeingDebugged(from mattt)
Nolan O’Brien brings the AmIBeingDebugged function to our attention from from this Technical Q&A document:
Objective-C
static Bool AmIBeingDebugged(void) {
int mib[4];
mib[0] = CTL_KERN;
mib[1] = KERN_PROC;
mib[2] = KERN_PROC_PID;
mib[3] = getpid();
sysctl(mib, sizeof(mib) / sizeof(*mib), &info, &size, NULL, 0);
return (info.kp_proc.p_flag & P_TRACED) != 0;
}</sys></unistd.h></sys></stdbool.h></assert.h>
static Bool AmIBeingDebugged(void) {
int mib[4];
mib[0] = CTL_KERN;
mib[1] = KERN_PROC;
mib[2] = KERN_PROC_PID;
mib[3] = getpid();
sysctl(mib, sizeof(mib) / sizeof(*mib), &info, &size, NULL, 0);
return (info.kp_proc.p_flag & P_TRACED) != 0;
}
2.4.2 检查void *实例变量(from mattt)
对于逆向工程的目的,但是这是可以看的对象实例变量。它通常很容易用valueForKey这样获取。
还有一个情况下,它不能用valueForKey获取,虽然:当这个变量是void *类型。
Objective-C
@interface MPMoviePlayerController : NSObject <mpmediaplayback>
{
void *_internal; // 4 = 0x4
BOOL _readyForDisplay; // 8 = 0x8
@interfaceMPMoviePlayerController: NSObject <mpmediaplayback>
{
void *_internal; // 4 = 0x4
BOOL _readyForDisplay; // 8 = 0x8
Objective-C
id internal = *((const id*)(void*)((uintptr_t)moviePlayerController + sizeof(Class)));
id internal = *((const id*)(void*)((uintptr_t)moviePlayerController + sizeof(Class)));
2.4.3 一个通用回调的简单示例(from 灰灰)
.h文件
Objective-C
@interface UIViewController (LHYBlock)
@property (nonatomic, copy) void (^viewControllerActionBlock)(UIViewController *vc, NSUInteger type, NSDictionary *dict);
#pragma mark – viewControllerAction
/**
*
* @param viewControllerActionBlock block的参数有view本身,状态码,键值对。
*/
– (void)viewControllerAction:(void (^)(UIViewController *vc, NSUInteger type, NSDictionary *dict))viewControllerActionBlock;
@end</uikit>
.m 文件
Objective-C
#import “UIViewController+LHYBlock.h”
@implementation UIViewController (LHYBlock)
#pragma mark – runtime associate
– (void)setViewControllerActionBlock:(void (^)(UIViewController *vc, NSUInteger type, NSDictionary *dict))viewControllerActionBlock {
objc_setAssociatedObject(self, @selector(viewControllerActionBlock), viewControllerActionBlock, OBJC_ASSOCIATION_COPY);
}
– (void (^)(UIViewController *, NSUInteger, NSDictionary *))viewControllerActionBlock {
return objc_getAssociatedObject(self, @selector(viewControllerActionBlock));
}
– (void)viewControllerAction:(void (^)(UIViewController *vc, NSUInteger type, NSDictionary *dict))viewControllerActionBlock {
self.viewControllerActionBlock = nil;
self.viewControllerActionBlock = [viewControllerActionBlock copy];
}
@end</objc>
#import “UIViewController+LHYBlock.h”
@implementation UIViewController (LHYBlock)
#pragma mark – runtime associate
– (void)setViewControllerActionBlock:(void (^)(UIViewController *vc, NSUInteger type, NSDictionary *dict))viewControllerActionBlock {
objc_setAssociatedObject(self, @selector(viewControllerActionBlock), viewControllerActionBlock, OBJC_ASSOCIATION_COPY);
}
– (void (^)(UIViewController *, NSUInteger, NSDictionary *))viewControllerActionBlock {
return objc_getAssociatedObject(self, @selector(viewControllerActionBlock));
}
#pragma mark – block
– (void)viewControllerAction:(void (^)(UIViewController *vc, NSUInteger type, NSDictionary *dict))viewControllerActionBlock {
self.viewControllerActionBlock = nil;
self.viewControllerActionBlock = [viewControllerActionBlockcopy];
}
#pragma mark –
@end</objc>
import这个类 , 就能用block, 参数都是通用的本身,状态码,字典.(灰神提供)
2.4.4 自定义弱关联对象(weak associated objects)
不幸的是,关联对象不支持弱引用。 幸运的是,很容易实现。你只需要一个简单的类包装与弱引用一个对象.
Objective-C
@interface WeakObjectContainter : NSObject
@property (nonatomic, readonly, weak) id object;
@end
@implementation WeakObjectContainter
– (instancetype)initWithObject:(id)object {
if (!self) {
}
_object = object;
return self;
}
@end
@interface WeakObjectContainter: NSObject
@property (nonatomic, readonly, weak) id object;
@end
@implementation WeakObjectContainter
– (instancetype)initWithObject:(id)object {
self = [super init];
if (!self) {
}
_object = object;
return self;
}
@end
Objective-C
objc_setAssociatedObject(self, &MyKey, [[WeakObjectContainter alloc] initWithObject:object], OBJC_ASSOCIATION_RETAIN_NONATOMIC);
id object = [objc_getAssociatedObject(self, &MyKey) object];
objc_setAssociatedObject(self, &MyKey, [[WeakObjectContainter alloc]initWithObject:object], OBJC_ASSOCIATION_RETAIN_NONATOMIC);
id object = [objc_getAssociatedObject(self, &MyKey) object];
2.4.5 动态调用block(黑魔法)
Objective-C
//定义一个block
id (^testBlock)(NSString *string,NSArray *array) = ^id(NSString *string,NSArray *array) {
NSLog(@”param:–%@–%@”,string,array);
return string;
};
// _Block_signature 是iOS的私有api
const char * _Block_signature(void *);
const char * signature = _Block_signature((__bridge void *)(testBlock));
NSMethodSignature *methodSignature = [NSMethodSignature signatureWithObjCTypes:signature];
NSInvocation *invocation = [NSInvocation invocationWithMethodSignature:methodSignature];
[invocation setTarget:testBlock];
NSString *string = @”string”;
[invocation setArgument:&string atIndex:1];
NSArray *array = @[@”xx“,@”oo”];
[invocation setArgument:&array atIndex:2];
id returnValue;
[invocation getReturnValue:&returnValue];
NSLog(@”returnValue : %@”,returnValue)
3 APP崩溃调试技巧
3.1 APP启动后崩溃调试

4 兼容性处理
4.1 系统定义宏
4.1.1 __OSX_AVAILABLE_BUT_DEPRECATED宏
我们在开发的过程中会发现某些方法被deprecated了,这是因为这些方法已经被更好的方法代替了,或者是这些放在在当初设计的时候考虑不全面等。
__OSX_AVAILABLE_BUT_DEPRECATED() 宏说明,在某个版本开始引进一个方法,
但是在某个版本之后废弃了。
__OSX_AVAILABLE_BUT_DEPRECATED(__MAC_10_0,__MAC_10_5,__IPHONE_NA,__IPHONE_NA)
在mac os x 10.0 开始引进这个方法,但是在10.5之后废弃了,ios上从来没只支持过。
extern void mymacfunc() __OSX_AVAILABLE_STARTING(__MAC_10_5,__IPHONE_NA);
这个函数在mac os x 10.5之后可用,在ios上不可用
@interface MyClass : NSObject
-(void) mymacmethod __OSX_AVAILABLE_STARTING(__MAC_10_5,__IPHONE_NA);
-(void) mymacandiosmethod
@end
这个类中的mymacmethod 在mac os x 10.5可用,在ios上不可用,但是mymacandiosmethod就没有限制了。
4.1.2 __OSX_AVAILABLE_STARTING
CA_EXTERN NSString * const kCATransitionFromRight
__OSX_AVAILABLE_STARTING (__MAC_10_5, __IPHONE_2_0);
__OSX_AVAILABLE_STARTING 是什么意思呢?
我们知道 Mac OS X and iOS有不同的版本号,__OSX_AVAILABLE_STARTING 宏允许你同时指定Mac OS X and iOS的版本号。
__OSX_AVAILABLE_STARTING(__MAC_10_5,__IPHONE_2_0)它表示从 mac os x10.5 和ios 2.0 才开始使用的,两种平台都支持。
__ OSX_AVAILABLE_STARTING(__MAC_10_5,__IPHONE_NA)
它表示 只支持mac os x 不支持ios平台,最后的NA 表示not applicable ,是这两个单词的缩写
4.1.3 __IPHONE_OS_VERSION_MIN_REQUIRED
#ifdef __IPHONE_OS_VERSION_MIN_REQUIRED
// 只能在ios 下
#if __IPHONE_OS_VERSION_MIN_REQUIRED > 40300
//做一些事情
#else
//做一些事情
#endif
#endif
4.1.4 __MAC_OS_X_VERSION_MIN_REQUIRED
#ifdef __MAC_OS_X_VERSION_MIN_REQUIRED
// 只能在mac os x
#if __MAC_OS_X_VERSION_MIN_REQUIRED < 1050
// code in here might run on pre-Leopard OS
#else
// code here can assume Leopard or later
#endif
#endif
有时候,一些功能可能需要某一个版本之上才能使用,这时候我们可以使用上面的方法。
4.1.5 __IPHONE_X_X
#ifndef __IPHONE_3_0
#warning “This project uses features only available in iPhone SDK 3.0 and later.”
#endif
从字面意思看,如果我们的sdk版本低于3.0可能就会报错。不知道对不对,没试过。一般,如果我们的sdk 版本为x,在<Availability.h> 文件中都会 #define 一下,如果我们的sdk版本为x 就会#define __IPHONE_X_X xxxxx
#ifdef __IPHONE_6_1
methodOne;
#else
methodTwo;
#endif
4.2 系统版本判断
4.2.1 IOS开发中如何区分IOS版本
__IPHONE_OS_VERSION_MIN_REQUIRED
__IPHONE_OS_VERSION_MAX_ALLOWED
//比如用 iPhone OS SDK 3.1.2 编译的程序
__IPHONE_OS_VERSION_MIN_REQUIRED == __IPHONE_3_0
__IPHONE_OS_VERSION_MAX_ALLOWED == __IPHONE_3_1
//这时,我们可以在程序中使用下面类似的 #ifdef 语句:
#if __IPHONE_OS_VERSION_MAX_ALLOWED > __IPHONE_2_2
// iPhone OS SDK 3.0 以后版本的处理
#else
// iPhone OS SDK 3.0 之前版本的处理
#endif
//又或者 iPhone OS SDK 4 推出的时候,可以:
#if __IPHONE_OS_VERSION_MAX_ALLOWED > __IPHONE_2_2
#if __IPHONE_OS_VERSION_MAX_ALLOWED > __IPHONE_3_1
// iPhone OS SDK 4.0 以后版本的处理
#else
// iPhone OS SDK 3.0 ~ 4.0 版本的处理
#endif
#else
// iPhone OS SDK 3.0 之前版本的处理
#endif
5 代码基础
5.1 数据类型相关
5.1.1 Objective-C中的instancetype和id区别
instancetype的作用,就是使那些非关联返回类型的方法返回所在类的类型!
1、相同点
都可以作为方法的返回类型
2、不同点
①instancetype可以返回和方法所在类相同类型的对象,id只能返回未知类型的对象;
②instancetype只能作为返回值,不能像id那样作为参数
http://blog.csdn.net/kuizhang1/article/details/18048829
5.1.2 weakSelf与strongSelf宏定义写法
#define WS(weakSelf) __weak __typeof(&*self)weakSelf = self
#define StrongSelf(strongSelf) __strong __typeof(&*self) strongSelf = self
http://www.tuicool.com/articles/bYBB7r
6 性能优化
6.1 图片资源读取优化
6.1.1 iOS图片内存优化(博文)内存优化经验(from 灰灰)
解决步骤:instrument调试后,发现没被释放的全是imageIO,差不多就知道了,把读图的方式,从[UIImage imageNamed:@”“],改成imageWithContentsOfFile,就可以了。

问题原因:imageNamed读取图片的方法,会缓存在内存中,所以较大的图片,还是用imageWithContentsOfFile。?
Tip1:.xcassets里的图片无法用imageWithContentsOfFile读取;?
Tip 2:imageWithContentsOfFile读取图片需要加文件后缀名如png,jpg等;?
7 参考链接
iOS SDK:那些关于iOS调试的技巧
http://dev.yesky.com/62/34881062.shtml
iOS自定义NSLog日志
原文地址:https://blog.csdn.net/junbaozi/article/details/128846777
本文来自互联网用户投稿,该文观点仅代表作者本人,不代表本站立场。本站仅提供信息存储空间服务,不拥有所有权,不承担相关法律责任。
如若转载,请注明出处:http://www.7code.cn/show_37542.html
如若内容造成侵权/违法违规/事实不符,请联系代码007邮箱:suwngjj01@126.com进行投诉反馈,一经查实,立即删除!


