本文介绍: Faster-RCNN可以采用多种的主干特征提取网络,常用的有VGG,Resnet,Xception等等。Faster-RCNN对输入进来的图片尺寸没有固定,但一般会把输入进来的图片短边固定成600.Resnet50expansion = 4 #最后一个卷积层输出通道数相对于输入通道数的倍数”’inplanes:输入通道数planes:卷积层输出的通道数stride:卷积的步长,默认为1downsample:是否对输入进行下采样”’#使用1*1卷积核,压缩通道数。
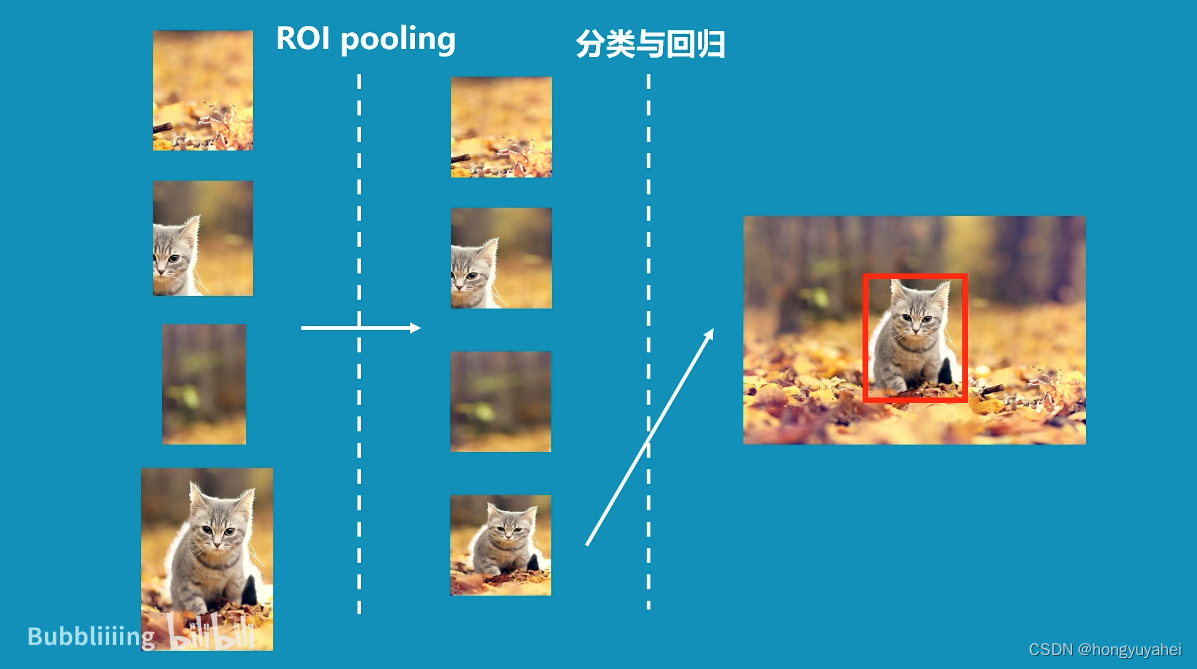
1、什么是Faster R-CNN

2、pytorch–gpu环境配置(跳过)
3、Faster R-CNN整体结构介绍
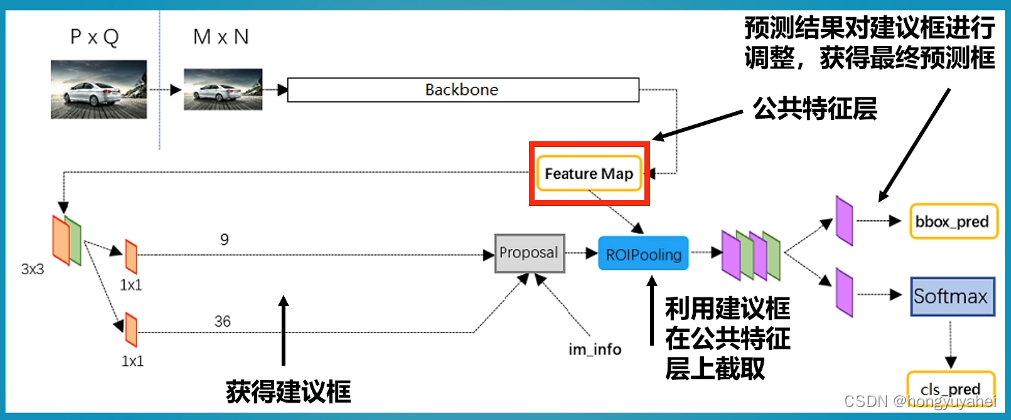
Faster-RCNN可以采用多种的主干特征提取网络,常用的有VGG,Resnet,Xception等等。
Faster-RCNN对输入进来的图片尺寸没有固定,但一般会把输入进来的图片短边固定成600.
4、Resnet50-主干特征提取网络介绍
import math

import torch.nn as nn
from torch.hub import load_state_dict_from_url


class Bottleneck(nn.Module):
    expansion = 4 #最后一个卷积层输出通道数相对于输入通道数的倍数
    def __init__(self, inplanes, planes, stride=1, downsample=None):
        '''
        inplanes:输入通道数
        planes:卷积层输出的通道数
        stride:卷积的步长,默认为1
        downsample:是否对输入进行下采样
        '''
        super(Bottleneck, self).__init__()
        #使用1*1卷积核,压缩通道数
        self.conv1 = nn.Conv2d(inplanes, planes, kernel_size=1, stride=stride, bias=False)#二维卷积层
        self.bn1 = nn.BatchNorm2d(planes)#二维批归一化层
        #使用3*3卷积核,特征提取,padding=1,在输入的周围使用1个零填充,以保持特征图的尺寸
        self.conv2 = nn.Conv2d(planes, planes, kernel_size=3, stride=1, padding=1, bias=False)
        self.bn2 = nn.BatchNorm2d(planes)
        #使用1*1卷积核,扩张通道数
        self.conv3 = nn.Conv2d(planes, planes * 4, kernel_size=1, bias=False)
        self.bn3 = nn.BatchNorm2d(planes * 4)

        self.relu = nn.ReLU(inplace=True)
        self.downsample = downsample
        self.stride = stride

    def forward(self, x):
        residual = x#残差

        out = self.conv1(x)
        out = self.bn1(out)
        out = self.relu(out)

        out = self.conv2(out)
        out = self.bn2(out)
        out = self.relu(out)

        out = self.conv3(out)
        out = self.bn3(out)
        if self.downsample is not None:
            residual = self.downsample(x)

        out += residual
        out = self.relu(out)

        return out

class ResNet(nn.Module):
    def __init__(self, block, layers, num_classes=1000):
        #-----------------------------------#
        #   假设输入进来的图片是600,600,3
        #-----------------------------------#
        self.inplanes = 64 #初始化ResNet模型的通道数为64
        super(ResNet, self).__init__()

        # 600,600,3 -> 300,300,64
        self.conv1 = nn.Conv2d(3, 64, kernel_size=7, stride=2, padding=3, bias=False)
        self.bn1 = nn.BatchNorm2d(64)
        self.relu = nn.ReLU(inplace=True)

        # 300,300,64 -> 150,150,64 最大池化层,用于降低特征图的空间分辨率
        self.maxpool = nn.MaxPool2d(kernel_size=3, stride=2, padding=0, ceil_mode=True)

        #构建4个残差块组成的特征提取部分,每个部分的通道数和空间分辨率逐渐增加
        # 150,150,64 -> 150,150,256
        self.layer1 = self._make_layer(block, 64, layers[0])
        # 150,150,256 -> 75,75,512
        self.layer2 = self._make_layer(block, 128, layers[1], stride=2)
        # 75,75,512 -> 38,38,1024 到这里可以获得一个38,38,1024的共享特征层
        self.layer3 = self._make_layer(block, 256, layers[2], stride=2)
        # self.layer4被用在classifier模型中
        self.layer4 = self._make_layer(block, 512, layers[3], stride=2)

        self.avgpool = nn.AvgPool2d(7)#全局平均池化层 池化核7*7
        #将最终的特征映射到类别数量的空间
        self.fc = nn.Linear(512 * block.expansion, num_classes) #全连接层

        for m in self.modules():
            if isinstance(m, nn.Conv2d):
                n = m.kernel_size[0] * m.kernel_size[1] * m.out_channels
                m.weight.data.normal_(0, math.sqrt(2. / n))
            elif isinstance(m, nn.BatchNorm2d):
                m.weight.data.fill_(1)
                m.bias.data.zero_()

    def _make_layer(self, block, planes, blocks, stride=1):
        downsample = None
        #-------------------------------------------------------------------#
        #   当模型需要进行高和宽的压缩的时候,就需要用到残差边的downsample
        #-------------------------------------------------------------------#
        if stride != 1 or self.inplanes != planes * block.expansion:
            downsample = nn.Sequential(
                nn.Conv2d(self.inplanes, planes * block.expansion,kernel_size=1, stride=stride, bias=False),
                nn.BatchNorm2d(planes * block.expansion),
            )
        layers = []
        layers.append(block(self.inplanes, planes, stride, downsample))
        self.inplanes = planes * block.expansion
        for i in range(1, blocks):
            layers.append(block(self.inplanes, planes))
        return nn.Sequential(*layers)

    def forward(self, x):
        x = self.conv1(x)
        x = self.bn1(x)
        x = self.relu(x)
        x = self.maxpool(x)

        x = self.layer1(x)
        x = self.layer2(x)
        x = self.layer3(x)
        x = self.layer4(x)

        x = self.avgpool(x)
        x = x.view(x.size(0), -1)
        x = self.fc(x)
        return x

def resnet50(pretrained = False):
    model = ResNet(Bottleneck, [3, 4, 6, 3])
    if pretrained:
        state_dict = load_state_dict_from_url("https://download.pytorch.org/models/resnet50-19c8e357.pth", model_dir="./model_data")
        model.load_state_dict(state_dict)
    #----------------------------------------------------------------------------#
    #   获取特征提取部分,从conv1到model.layer3,最终获得一个38,38,1024的特征层
    #----------------------------------------------------------------------------#
    features    = list([model.conv1, model.bn1, model.relu, model.maxpool, model.layer1, model.layer2, model.layer3])
    #----------------------------------------------------------------------------#
    #   获取分类部分,从model.layer4到model.avgpool
    #----------------------------------------------------------------------------#
    classifier  = list([model.layer4, model.avgpool])

    features    = nn.Sequential(*features)
    classifier  = nn.Sequential(*classifier)
    return features, classifier
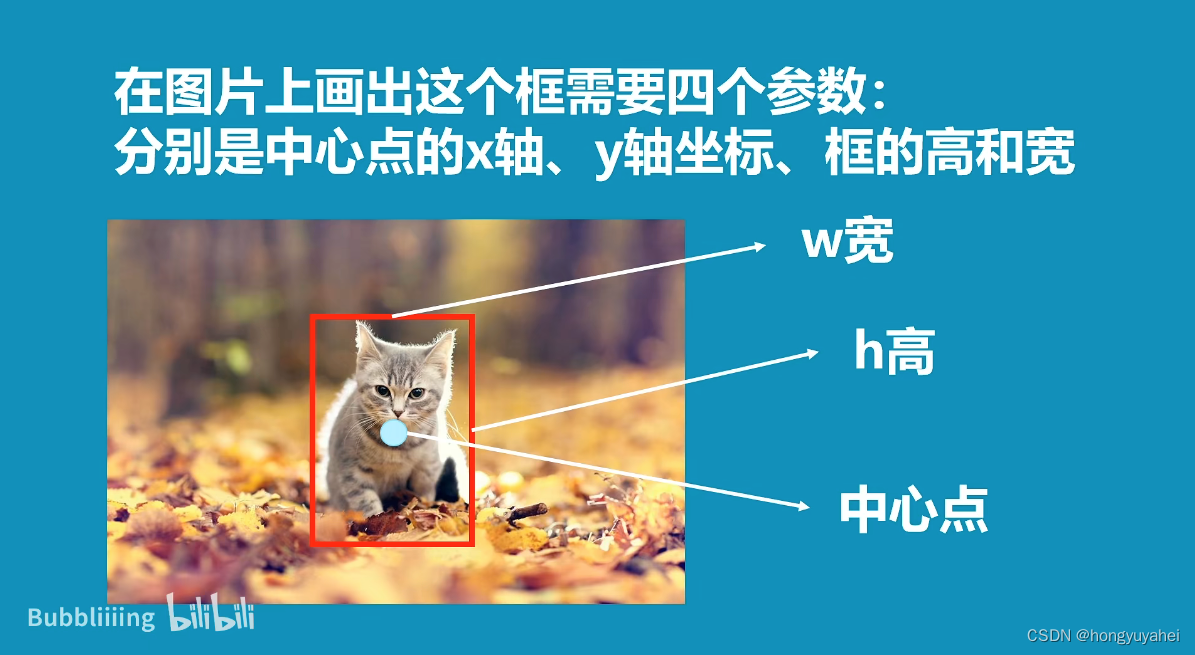
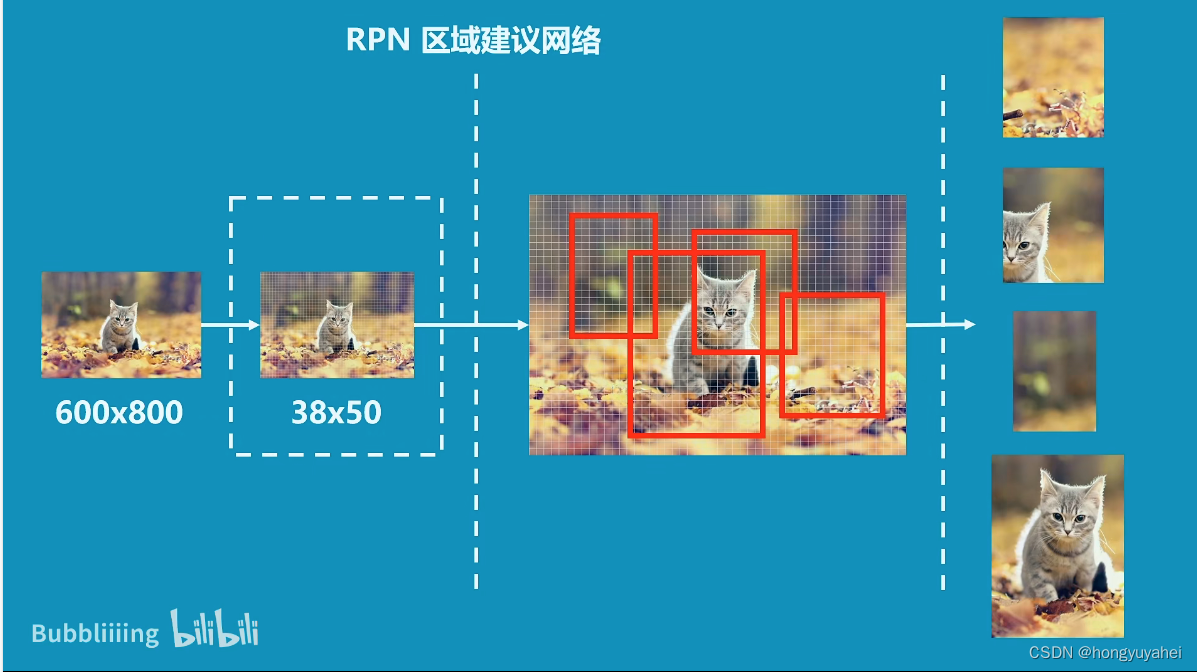
5、RPN-建议框网络构建


6、Anchors–先验框详解
import numpy as np
#--------------------------------------------#
# 生成基础的先验框
#--------------------------------------------#
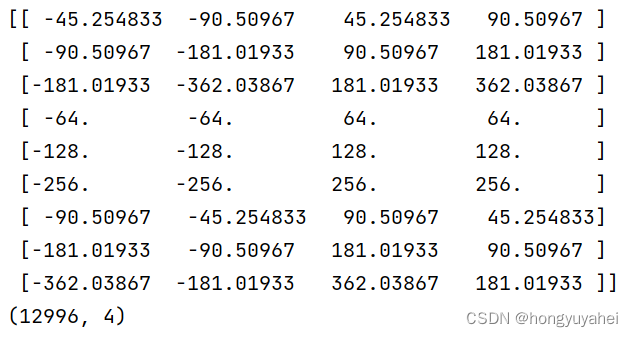
def generate_anchor_base(base_size=16, ratios=[0.5, 1, 2], anchor_scales=[8, 16, 32]):
'''
base_size:基础框的大小,默认为16
ratios:生成锚框的宽高比,默认为[0.5,1,2]
anchor_scales:生成锚框的尺度,默认为[8,16,32]
'''
#创建一个形状为((len(ratios) * len(anchor_scales), 4)的全零数组,用于存储生成的基础先验框的坐标信息
#每个先验框由4个坐标值表示
anchor_base = np.zeros((len(ratios) * len(anchor_scales), 4), dtype=np.float32)
for i in range(len(ratios)):
for j in range(len(anchor_scales)):
#使用两个嵌套的循环遍历宽高比和尺度的所有组合,宽高比定义+面积不变性
h = base_size * anchor_scales[j] * np.sqrt(ratios[i])
w = base_size * anchor_scales[j] * np.sqrt(1. / ratios[i])
index = i * len(anchor_scales) + j
anchor_base[index, 0] = - h / 2.
anchor_base[index, 1] = - w / 2.
anchor_base[index, 2] = h / 2.
anchor_base[index, 3] = w / 2.
return anchor_base
#--------------------------------------------#
# 对基础先验框进行拓展对应到所有特征点上
#--------------------------------------------#
def _enumerate_shifted_anchor(anchor_base, feat_stride, height, width):
#---------------------------------#
# 计算网格中心点
#---------------------------------#
'''
anchor_base 表示基础先验框的坐标信息;
feat_stride 特征点间距步长
height 和 width 表示特征图的高度和宽度。
'''
shift_x = np.arange(0, width * feat_stride, feat_stride)
shift_y = np.arange(0, height * feat_stride, feat_stride)
shift_x, shift_y = np.meshgrid(shift_x, shift_y)
shift = np.stack((shift_x.ravel(), shift_y.ravel(), shift_x.ravel(), shift_y.ravel(),), axis=1)
#---------------------------------#
# 每个网格点上的9个先验框
#---------------------------------#
A = anchor_base.shape[0]
K = shift.shape[0]
anchor = anchor_base.reshape((1, A, 4)) + shift.reshape((K, 1, 4))
#---------------------------------#
# 所有的先验框
#---------------------------------#
anchor = anchor.reshape((K * A, 4)).astype(np.float32)
return anchor
if __name__ == "__main__":
import matplotlib.pyplot as plt
nine_anchors = generate_anchor_base()
print(nine_anchors)
height, width, feat_stride = 38,38,16
anchors_all = _enumerate_shifted_anchor(nine_anchors, feat_stride, height, width)
print(np.shape(anchors_all))
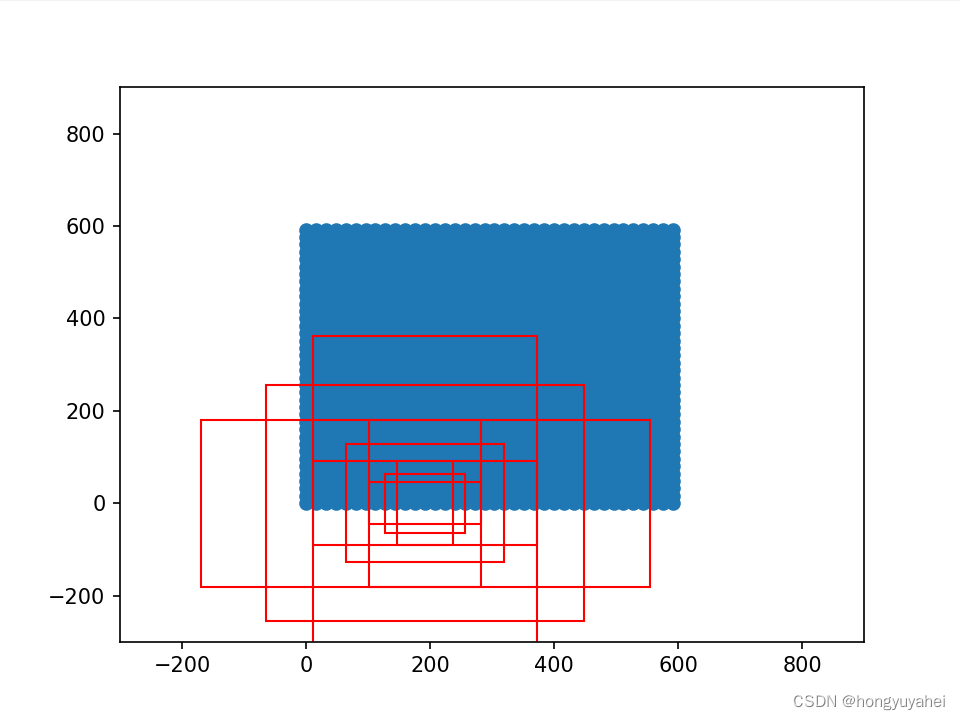
fig = plt.figure()
ax = fig.add_subplot(111)
plt.ylim(-300,900)
plt.xlim(-300,900)
shift_x = np.arange(0, width * feat_stride, feat_stride)
shift_y = np.arange(0, height * feat_stride, feat_stride)
shift_x, shift_y = np.meshgrid(shift_x, shift_y)
plt.scatter(shift_x,shift_y)
box_widths = anchors_all[:,2]-anchors_all[:,0]
box_heights = anchors_all[:,3]-anchors_all[:,1]
for i in [108, 109, 110, 111, 112, 113, 114, 115, 116]:
rect = plt.Rectangle([anchors_all[i, 0],anchors_all[i, 1]],box_widths[i],box_heights[i],color="r",fill=False)
ax.add_patch(rect)
plt.show()
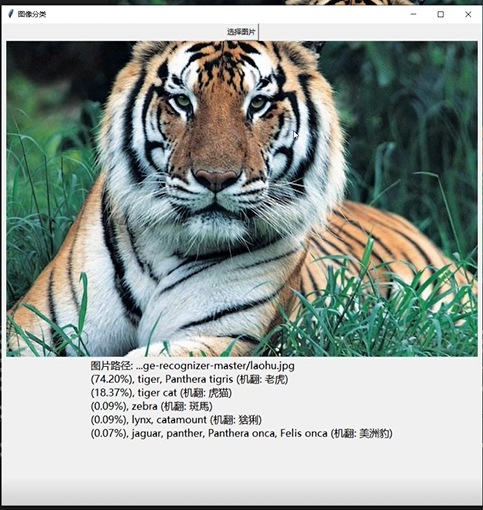
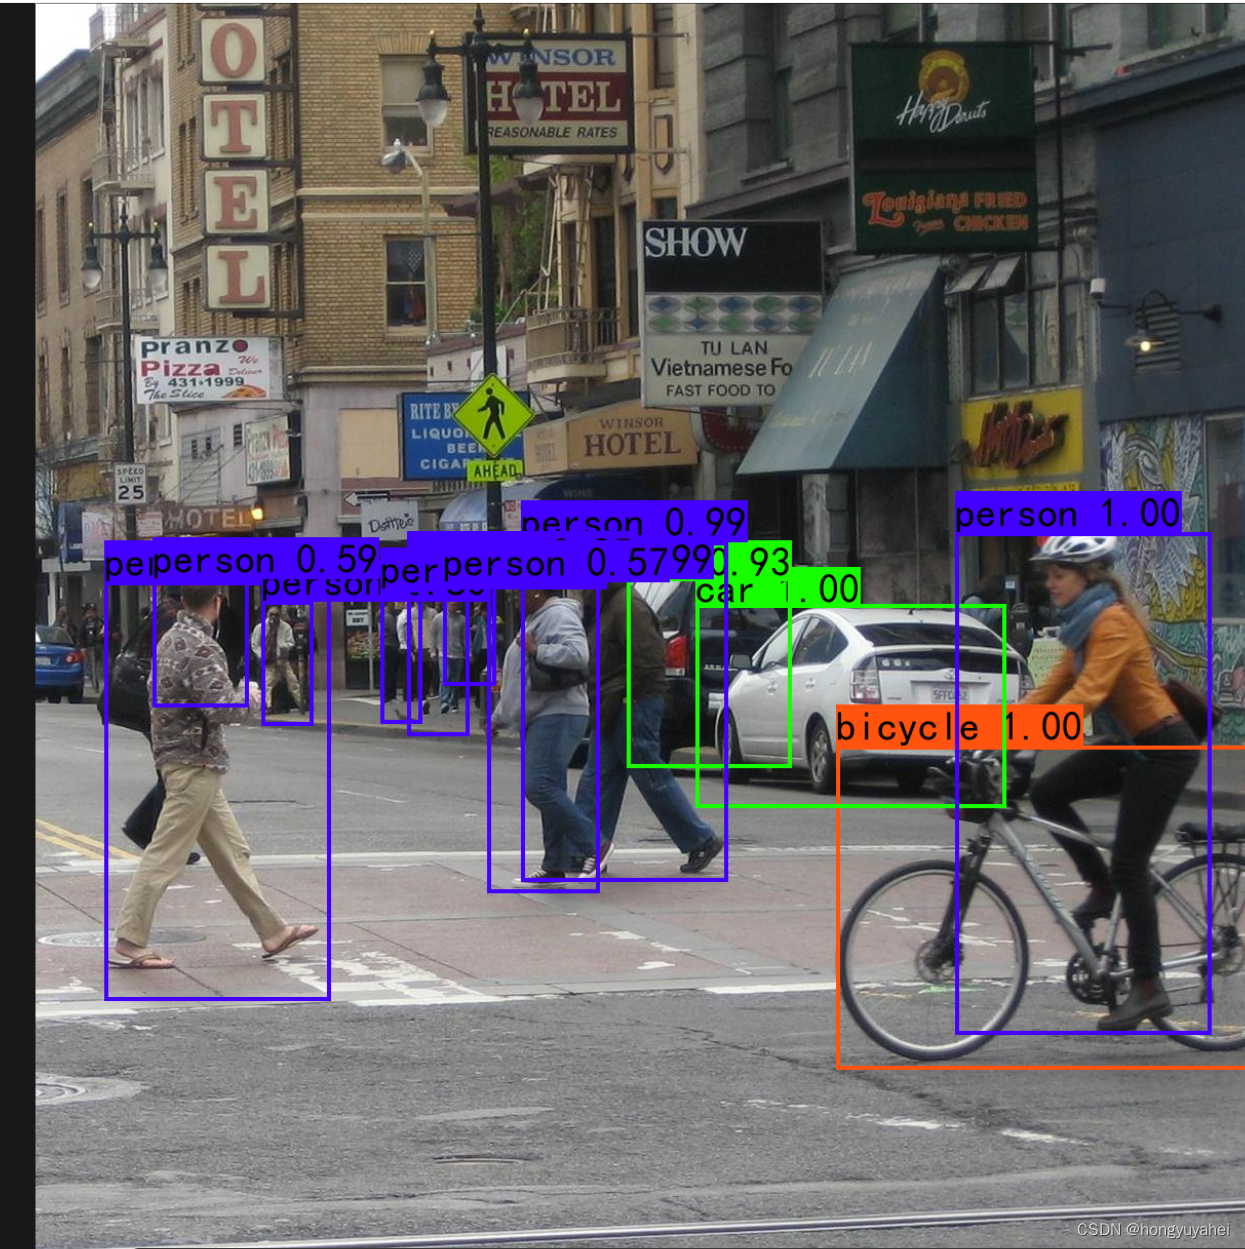
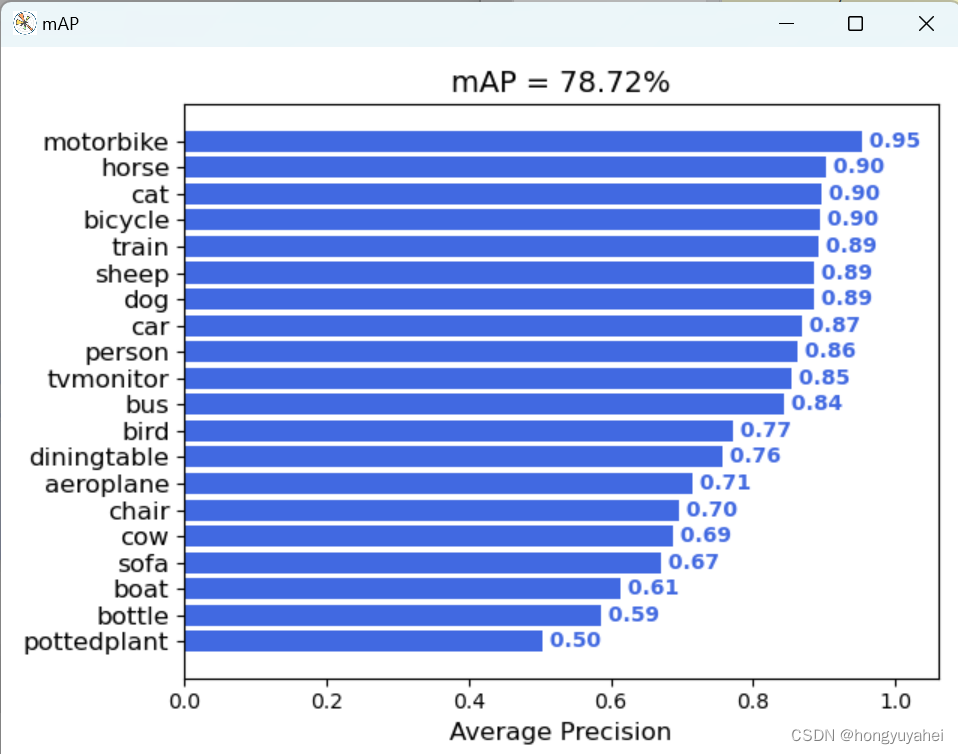
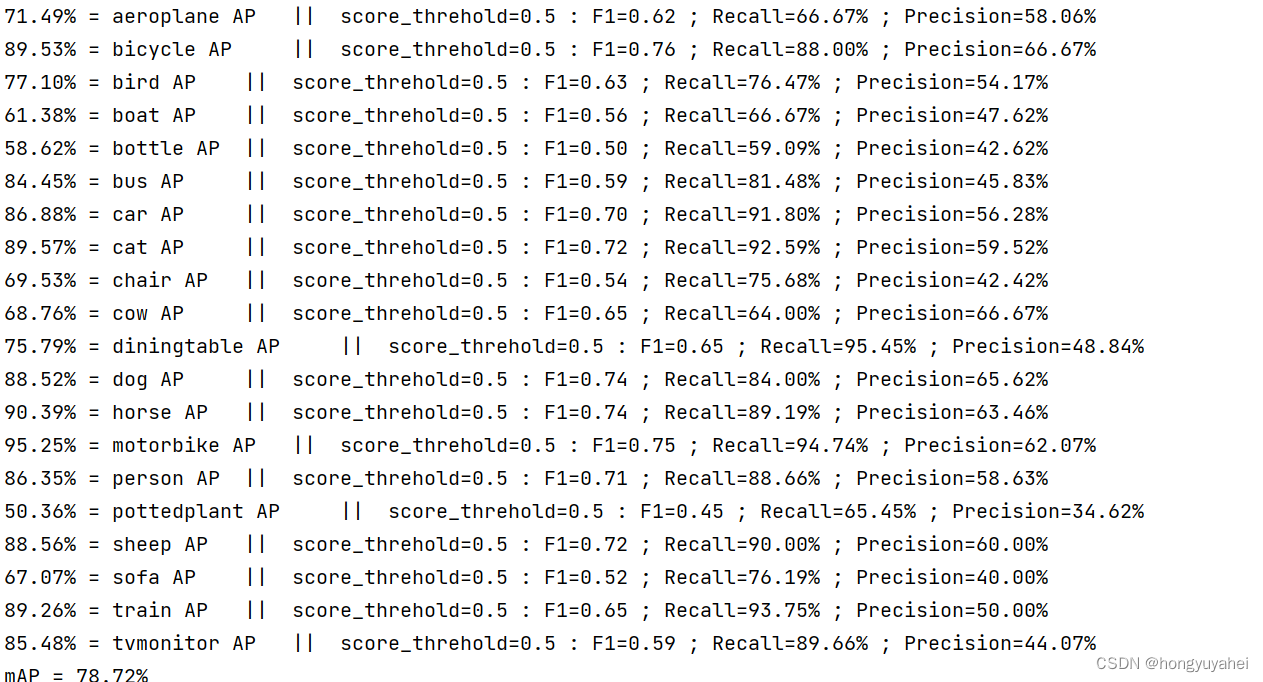
7、模型训练及测试结果
结合博客及视频,完成VOC2007数据集的训练及预测,对faster rcnn原理及如何使用有了初步的认识。train.py frcnn.py predict.py get_map.py 相关结果如下:
原文地址:https://blog.csdn.net/hongyuyahei/article/details/134670920
本文来自互联网用户投稿,该文观点仅代表作者本人,不代表本站立场。本站仅提供信息存储空间服务,不拥有所有权,不承担相关法律责任。
如若转载,请注明出处:http://www.7code.cn/show_37744.html
如若内容造成侵权/违法违规/事实不符,请联系代码007邮箱:suwngjj01@126.com进行投诉反馈,一经查实,立即删除!
主题授权提示:请在后台主题设置-主题授权-激活主题的正版授权,授权购买:RiTheme官网
声明:本站所有文章,如无特殊说明或标注,均为本站原创发布。任何个人或组织,在未征得本站同意时,禁止复制、盗用、采集、发布本站内容到任何网站、书籍等各类媒体平台。如若本站内容侵犯了原著者的合法权益,可联系我们进行处理。