一、Docker资源配额
Docker通过cgroup来控制容器使用的资源限制,可以对docker限制的资源包括CPU、内存、磁盘。
1.1、控制cpu
1.1.1、cpu份额控制
# 查看配置份额的帮助命令
[root@master ~]# docker run --help | grep cpu-shares
  -c, --cpu-shares int                 CPU shares (relative weight)
# 1、CPU shares (relative weight) 在创建容器时指定容器所使用的CPU份额值。
# 2、cpu-shares的值不能保证可以获得1个vcpu或者多少GHz的CPU资源,仅仅只是一个弹性的加权值。
# 3、默认每个docker容器的cpu份额值都是1024。在同一个CPU核心上,同时运行多个容器时,容器的cpu加权的效果才能体现出来。
例: 两个容器A、B的cpu份额分别为1000和500,结果会怎么样?
情况2:分配的结果取决于当时其他容器的运行状态。比如容器A的进程一直是空闲的,那么容器B是可以获取比容器A更多的CPU时间片的; 比如主机上只运行了一个容器,即使它的cpu份额只有50,它也可以独占整个主机的cpu资源。
cgroups只在多个容器同时争抢同一个cpu资源时,cpu配额才会生效。因此,无法单纯根据某个容器的cpu份额来确定有多少cpu资源分配给它,资源分配结果取决于同时运行的其他容器的cpu分配和容器中进程运行情况。
# 参数:  --cpu-shares 512
[root@xianchaomaster1 ~]# docker run -it --cpu-shares 512 centos  /bin/bash
[root@df176dd75bd4 /]# cat /sys/fs/cgroup/cpu/cpu.shares  #查看结果:
512
# 注:稍后,我们启动多个容器,测试一下是不是只能使用512份额的cpu资源。单独一个容器,看不出来使用的cpu的比例。 因没有docker实例同此docker实例竞争。
总结:
通过-c设置的 cpu share 并不是 CPU 资源的绝对数量,而是一个相对的权重值。某个容器最终能分配到的 CPU 资源取决于它的 cpu share 占所有容器 cpu share 总和的比例。通过 cpu share 可以设置容器使用 CPU 的优先级。
# 比如在 host 中启动了两个容器:
docker run --name "container_A" -c 1024 ubuntu
docker run --name "container_B" -c 512 ubuntu

# container_A 的 cpu share 1024,是 container_B 的两倍。
# 当两个容器都需要 CPU 资源时,container_A 可以得到的 CPU 是 container_B 的两倍。
# 需要注意的是,这种按权重分配 CPU只会发生在 CPU资源紧张的情况下。
# 如果 container_A 处于空闲状态,为了充分利用 CPU资源,container_B 也可以分配到全部可用的 CPU。
1.1.2、core核心控制
# 查看绑定cpu的帮助命令
docker run --help | grep cpuset
      --cpuset-cpus string             CPUs in which to allow execution (0-3, 0,1)
      --cpuset-mems string             MEMs in which to allow execution (0-3, 0,1)
# 控制容器运行限定使用哪些cpu内核和内存节点,即使用--cpuset-cpus和--cpuset-mems参数。
对具有NUMA拓扑(具有多CPU、多内存节点)的服务器尤其有用,可以对需要高性能计算的容器进行性能最优的配置。如果服务器只有一个内存节点,则–cpuset-mems的配置基本上不会有明显效果。
扩展:
服务器架构一般分: SMP、NUMA、MPP体系结构介绍
从系统架构来看,目前的商用服务器大体可以分为三类:
1. 即对称多处理器结构(SMP : Symmetric Multi-Processor) 例: x86 服务器,双路服务器。主板上有两个物理cpu
2. 非一致存储访问结构 (NUMA : Non-Uniform Memory Access) 例:  IBM 小型机 pSeries 690
3. 海量并行处理结构 (MPP : Massive ParallelProcessing) 。  例: 大型机  Z14
1.1.3、配额控制参数的混合使用
在上面这些参数中,cpu-shares控制只发生在容器竞争同一个cpu的时间片时有效。
如果通过cpuset-cpus指定容器A使用cpu 0,容器B只是用cpu1,在主机上只有这两个容器使用对应内核的情况,它们各自占用全部的内核资源,cpu-shares没有明显效果。
如何才能有效果?
容器A和容器B配置上cpuset-cpus值并都绑定到同一个cpu上,然后同时抢占cpu资源,就可以看出效果了。
测试cpu-shares和cpuset-cpus混合使用运行效果,就需要一个压缩力测试工具stress来让容器实例把cpu跑满。
如何把cpu跑满?
如何把4核心的cpu中第一和第三核心跑满?可以运行stress,然后使用taskset绑定一下cpu。
扩展:stress命令
概述:linux系统压力测试软件Stress 。
[root@node02 ~]# yum install -y epel-release
[root@node02 ~]# yum install stress -y
-?        显示帮助信息
-v        显示版本号
-q        不显示运行信息
-n        显示已完成的指令情况
-t  --timeout  N   指定运行N秒后停止
    --backoff  N   等待N微妙后开始运行
-c       产生n个进程 :每个进程都反复不停的计算随机数的平方根,测试cpu
-i       产生n个进程 :每个进程反复调用sync(),sync()用于将内存上的内容写到硬盘上,测试磁盘io
-m  --vm n 产生n个进程,每个进程不断调用内存分配malloc()和内存释放free()函数 ,测试内存
    --vm-bytes B  指定malloc时内存的字节数 (默认256MB)
     --vm-hang N   指定在free栈的秒数
-d   --hadd n  产生n个执行write和unlink函数的进程
     -hadd-bytes B  指定写的字节数
      --hadd-noclean  不unlink
# 注:时间单位可以为秒s,分m,小时h,天d,年y,文件大小单位可以为K,M,G
stress -c 2 -i 2 --verbose --timeout 20s
# 运行后使用top命令查看

测试二:测试cpuset-cpus和cpu-shares混合使用
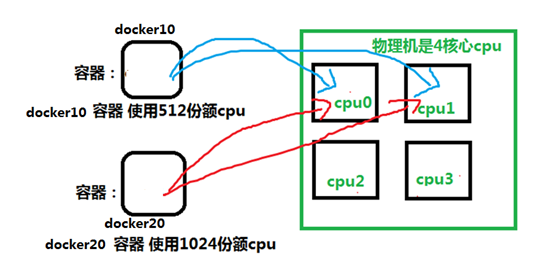
创建两个容器实例:docker10 和docker20。 让docker10和docker20只运行在cpu0和cpu1上,最终测试一下docker10和docker20使用cpu的百分比
# 运行两个容器实例
docker run -itd --name docker10 --cpuset-cpus 0,1 --cpu-shares 512 centos  /bin/bash
docker run -itd --name docker20 --cpuset-cpus 0,1 --cpu-shares 1024 centos  /bin/bash
# 指定docker10和docker20只能在cpu0和cpu1上运行,而且docker20的使用cpu的份额比docker10多一倍
# 参数-itd就是又能打开一个伪终端,又可以在后台运行着docker实例
【1】 进入docker10,使用stress测试进程是不是只在cpu0,1上运行:
[root@xianchaomaster1 ~]# docker exec -it docker10 /bin/bash
[root@d1a431815090 /]# yum install -y epel-release #安装epel扩展源
[root@d1a431815090 /]# yum install stress -y #安装stress命令
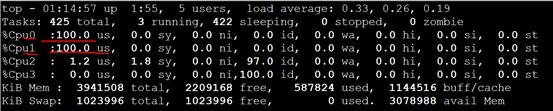
[root@d1a431815090 /]# stress -c 2 -v -t 10m #运行2个进程,把两个cpu占满
在物理机另外一个虚拟终端上运行top命令,按1快捷键,查看每个cpu使用情况:
【2】 然后进入docker20,使用stress测试进程是不是只在cpu0,1上运行,且docker20上运行的stress使用cpu百分比是docker10的2倍
[root@xianchaomaster1 ~]# docker exec -it  docker20  /bin/bash
[root@d1a431815090 /]#  yum install -y epel-release  #安装epel扩展源
[root@d1a431815090 /]# yum install stress -y
[root@f24e75bca5c0 /]# stress  -c 2 -v -t 10m
在另外一个虚拟终端上运行top命令,按1快捷键,查看每个cpu使用情况:
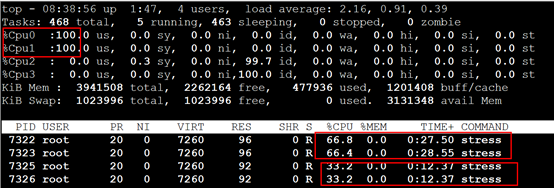
注:两个容器只在cpu0,1上运行,说明cpu绑定限制成功。而docker20是docker10使用cpu的2倍。说明--cpu-shares限制资源成功。
1.2、控制内存
# 查看控制内存的帮助命令
[root@node02 ~]# docker run --help | grep memory
      --kernel-memory bytes            Kernel memory limit
  -m, --memory bytes                   Memory limit # 限制容器的内存使用量。
      --memory-reservation bytes       Memory soft limit
      --memory-swap bytes              Swap limit equal to memory plus swap: '-1' to enable unlimited swap
      --memory-swappiness int          Tune container memory swappiness (0 to 100) (default -1)
# 例1:允许容器使用的内存上限为128M:
docker run -it  -m 128m centos
cat /sys/fs/cgroup/memory/memory.limit_in_bytes  # 进入容器查看内存
134217728

# 例2:创建一个容器,只使用2个cpu核心,只能使用128M内存
docker run -it --cpuset-cpus 0,1 -m 128m centos
1.3、控制IO
防止某个 Docker 容器吃光你的磁盘 I / O 资源
# 限制此设备上的写速度(bytes per second),单位可以是kb、mb或者gb。
[root@node02 ~]# docker run --help | grep write-b
      --device-write-bps list          Limit write rate (bytes per second) to a device (default [])

# 限制此设备上的读速度(bytes per second),单位可以是kb、mb或者gb。
[root@node02 ~]# docker run --help | grep read-b
      --device-read-bps list           Limit read rate (bytes per second) from a device (default [])
# --device参数:将主机设备添加到容器
mkdir -p /var/www/html/
docker run -it  -v /var/www/html/:/var/www/html --device /dev/sda:/dev/sda --device-write-bps /dev/sda:2mb centos  /bin/bash
# 进入容器
time dd if=/dev/sda of=/var/www/html/test.out bs=2M count=50 oflag=direct,nonblock

# 注:dd 参数:
direct:读写数据采用直接IO方式,不走缓存。直接从内存写硬盘上。
nonblock:读写数据采用非阻塞IO方式,优先写dd命令的数据
50+0 records in
50+0 records out
52428800 bytes (52 MB) copied, 50.1831 s, 2.0 MB/s

real	0m50.201s
user	0m0.001s
sys	0m0.303s
# 注: 发现1秒写2M。 限制成功。
1.4、资源释放
[root@node02 ~]# docker run --help | grep rm
      --platform string                Set platform if server is multi-platform capable
      --rm                             Automatically remove the container when it exits
      # 作用:当容器命令运行结束后,自动删除容器,自动释放资源
  -u, --user string                    Username or UID (format: <name|uid>[:<group|gid>])
[root@xianchaomaster1 ~]# docker run -it --rm --name xianchao centos  sleep 6
物理机上查看:
[root@xianchaomaster1 ~]# docker ps -a | grep xianchao
6c75a9317a6b        centos              "sleep 6"           6 seconds ago       Up 4 seconds                            mk
等5s后,再查看:
[root@xianchaomaster1 ~]# docker ps | grep xianchao #自动删除了
二、Docker私有镜像仓库Harbor
2.1、Harbor简介
Docker容器应用的开发和运行离不开可靠的镜像管理,虽然Docker官方也提供了公共的镜像仓库,但是从安全和效率等方面考虑,部署我们私有环境内的Registry也是非常必要的。
Harbor是由VMware公司开源的企业级的Docker Registry管理项目,它包括权限管理(RBAC)、LDAP、日志审核、管理界面、自我注册、镜像复制和中文支持等功能。
官网地址:https://github.com/goharbor/harbor
2.2、为Harbor自签发证书
【1】生成ca证书
[root@node02 ~]# mkdir /data/ssl -p
[root@node02 ~]# cd /data/ssl/
# 生成一个3072位的key,也就是私钥
[root@node02 ssl]# openssl genrsa -out ca.key 3072
Generating RSA private key, 3072 bit long modulus
....................................................................................................................................++
................................................................................................................++
e is 65537 (0x10001)
# 生成一个数字证书ca.pem,3650表示证书的有效时间是3年
[root@node02 ssl]# openssl req -new -x509 -days 3650 -key ca.key -out ca.pem
You are about to be asked to enter information that will be incorporated
into your certificate request.
What you are about to enter is what is called a Distinguished Name or a DN.
There are quite a few fields but you can leave some blank
For some fields there will be a default value,
If you enter '.', the field will be left blank.
-----
Country Name (2 letter code) [XX]:CH                 # 要填
State or Province Name (full name) []:BJ             # 要填
Locality Name (eg, city) [Default City]:BJ           # 要填
Organization Name (eg, company) [Default Company Ltd]:
Organizational Unit Name (eg, section) []:
Common Name (eg, your name or your server's hostname) []:
Email Address []:
【2】生成域名的证书
# 生成一个3072位的key,也就是私钥
[root@node02 ssl]# openssl genrsa -out harbor.key  3072
Generating RSA private key, 3072 bit long modulus
.............................................................................................................................................++
............................................................++
e is 65537 (0x10001)
# 生成一个证书请求,一会签发证书时需要的
[root@node02 ssl]# openssl req -new -key harbor.key -out harbor.csr
You are about to be asked to enter information that will be incorporated
into your certificate request.
What you are about to enter is what is called a Distinguished Name or a DN.
There are quite a few fields but you can leave some blank
For some fields there will be a default value,
If you enter '.', the field will be left blank.
-----
Country Name (2 letter code) [XX]:CH                    # 要填
State or Province Name (full name) []:BJ                # 要填
Locality Name (eg, city) [Default City]:BJ              # 要填
Organization Name (eg, company) [Default Company Ltd]:
Organizational Unit Name (eg, section) []:
Common Name (eg, your name or your server's hostname) []:node02  # 要填,主机名
Email Address []:

Please enter the following 'extra' attributes
to be sent with your certificate request
A challenge password []:
An optional company name []:
【3】签发证书
[root@node02 ssl]# ll
total 16
-rw-r--r-- 1 root root 2459 Dec  4 10:34 ca.key
-rw-r--r-- 1 root root 1574 Dec  4 10:36 ca.pem
-rw-r--r-- 1 root root 1326 Dec  4 10:39 harbor.csr
-rw-r--r-- 1 root root 2459 Dec  4 10:38 harbor.key
[root@node02 ssl]# openssl x509 -req -in harbor.csr -CA ca.pem -CAkey ca.key -CAcreateserial -out harbor.pem -days 3650
Signature ok
subject=/C=CH/ST=BJ/L=BJ/O=Default Company Ltd/CN=node02
Getting CA Private Key
# 显示如上,说明证书签发好了
2.3、安装Harbor
【1】安装Docker
# 1、关闭防火墙
systemctl stop firewalld && systemctl disable firewalld

# 2、关闭iptables防火墙
yum install iptables-services -y  #安装iptables
# 3、禁用iptables
service iptables stop   && systemctl disable iptables
# 4、清空防火墙规则、关闭selinux
iptables -F
setenforce 0
sed -i 's/SELINUX=enforcing/SELINUX=disabled/g' /etc/selinux/config
 # 注意:修改selinux配置文件之后,重启机器,selinux才能永久生效

# 5、配置时间同步
yum install -y ntp ntpdate
ntpdate cn.pool.ntp.org
# 6、编写计划任务
crontab -e
   * */1 * * * /usr/sbin/ntpdate   cn.pool.ntp.org
# 7、重启crond服务使配置生效:
systemctl restart crond

# 8、配置hosts文件
[root@node02 ssl]# cat /etc/hosts
127.0.0.1   localhost localhost.localdomain localhost4 localhost4.localdomain4
::1         localhost localhost.localdomain localhost6 localhost6.localdomain6
10.32.1.147 master
10.32.1.148 node01
10.32.1.149 node02


# 9、安装基础软件包
yum install -y  wget net-tools nfs-utils lrzsz gcc gcc-c++ make cmake libxml2-devel openssl-devel curl curl-devel unzip sudo ntp libaio-devel wget vim ncurses-devel autoconf automake zlib-devel  python-devel epel-release openssh-server socat  ipvsadm conntrack

# 10、安装docker-ce
  # 配置docker-ce国内yum源(阿里云)
 yum-config-manager --add-repo http://mirrors.aliyun.com/docker-ce/linux/centos/docker-ce.repo

# 11、安装docker依赖包
yum install -y yum-utils device-mapper-persistent-data lvm2

# 12、安装docker-ce
yum install docker-ce -y


# 13、启动docker服务
[root@ harbor~]# systemctl start docker && systemctl enable docker
[root@ harbor~]# systemctl status docker
● docker.service - Docker Application Container Engine
   Loaded: loaded (/usr/lib/systemd/system/docker.service; enabled; vendor preset: disabled)
   Active: active (running) since Thu 2021-07-01 21:29:18 CST; 30s ago
     Docs: https://docs.docker.com

看到running,表示docker正常运行

# 14、查看Docker 版本信息
docker version
【2】开启包转发功能和修改内核参数
内核参数修改:br_netfilter模块用于将桥接流量转发至iptables链,br_netfilter内核参数需要开启转发。
modprobe br_netfilter
cat > /etc/sysctl.d/docker.conf <<EOF
net.bridge.bridge-nf-call-ip6tables = 1
net.bridge.bridge-nf-call-iptables = 1
net.ipv4.ip_forward = 1
EOF
sysctl -p /etc/sysctl.d/docker.conf

# 注:
Docker 安装后出现:WARNING: bridge-nf-call-iptables is disabled 的解决办法:
net.bridge.bridge-nf-call-ip6tables = 1
net.bridge.bridge-nf-call-iptables = 1
net.ipv4.ip_forward = 1:
# 将Linux系统作为路由或者VPN服务就必须要开启IP转发功能。
# 当linux主机有多个网卡时一个网卡收到的信息是否能够传递给其他的网卡 如果设置成1 的话 可以进行数据包转发,可以实现VxLAN 等功能。
# 不开启会导致docker部署应用无法访问。

#重启docker
systemctl restart docker
scp /etc/docker/daemon.json 10.32.1.148:/etc/docker/
systemctl daemon-reload
systemctl restart docker
【3】安装Harbor
# 1、创建安装目录
mkdir /data/install -p
cd /data/install/
# 2、安装harbor
/data/ssl目录下有如下文件:
ca.key  ca.pem  ca.srl  harbor.csr  harbor.key  harbor.pem
# 把harbor的离线包harbor-offline-installer-v2.3.0-rc3.tgz上传到这个目录,离线包在课件里提供了
# 下载harbor离线包的地址:https://github.com/goharbor/harbor/releases/tag/

# 3、解压、修改配置文件
tar zxvf harbor-offline-installer-v2.3.0-rc3.tgz
cd harbor
cp harbor.yml.tmpl harbor.yml
vim harbor.yml

hostname:  node02
# 修改hostname,跟上面签发的证书域名保持一致
# 协议用https
certificate: /data/ssl/harbor.pem
private_key: /data/ssl/harbor.key

邮件和ldap不需要配置,在harbor的web界面可以配置
其他配置采用默认即可
修改之后保存退出
注:harbor默认的账号密码:admin/Harbor12345

# 4、安装docker-compose
上传课件里的docker-compose-Linux-x86_64文件到harbor机器

mv docker-compose-Linux-x86_64.64 /usr/bin/docker-compose
chmod +x /usr/bin/docker-compose

# 注: docker-compose项目是Docker官方的开源项目,负责实现对Docker容器集群的快速编排。
#      Docker-Compose的工程配置文件默认为docker-compose.yml,Docker-Compose运行目录下的必要有一个docker-compose.yml。

# 5、安装Harbor
# 安装harbor需要的离线镜像包docker-harbor-2-3-0.tar.gz,课件中或网上自行查找
docker load -i docker-harbor-2-3-0.tar.gz
cd /data/install/harbor
./install.sh

看到下面内容,说明安装成功:
[Step 5]: starting Harbor ...
Creating network "harbor_harbor" with the default driver
Creating harbor-log ... done
Creating registryctl   ... done
Creating harbor-db     ... done
Creating redis         ... done
Creating registry      ... done
Creating harbor-portal ... done
Creating harbor-core   ... done
Creating harbor-jobservice ... done
Creating nginx             ... done
✔ ----Harbor has been installed and started successfully.----
修改windows电脑host文件:
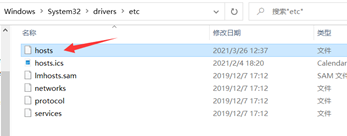
在hosts文件添加如下一行,然后保存即可
10.32.1.149 harbor
# Harbor启停操作:
cd /data/install/harbor
docker-compose stop
docker-compose start
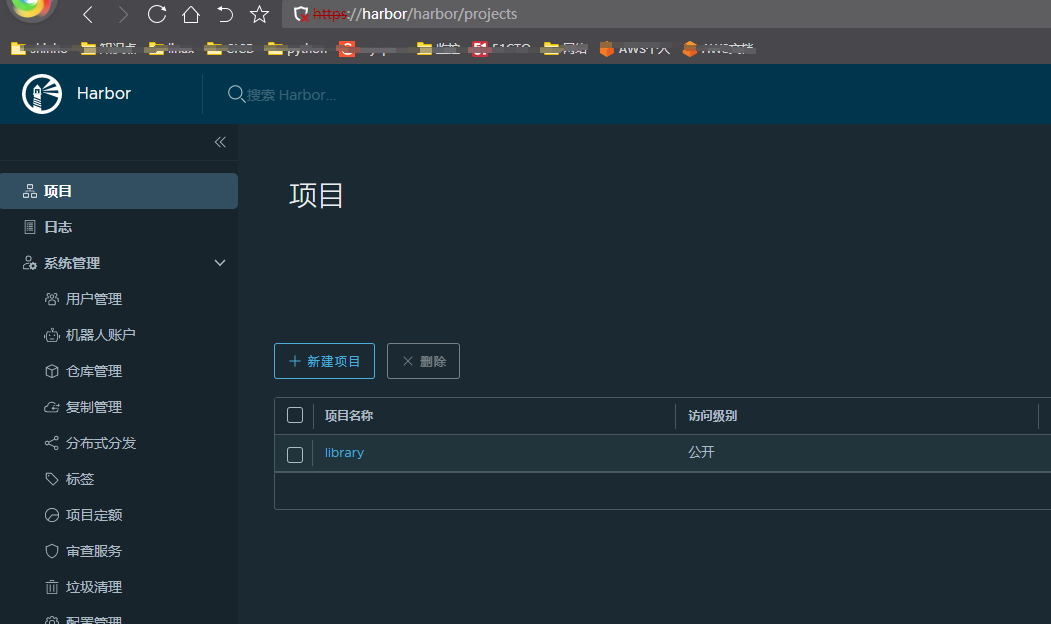
访问:http://harbor
账号:admin
密码:Harbor12345
2.4、测试使用harbor私有镜像仓库
【1】修改docker配置
在要推送镜像的主机上修改docker配置 ,确保能够登陆Harbor
[root@node01 ~]# cat /etc/docker/daemon.json
{
  "insecure-registries":["10.32.1.149"],
  "registry-mirrors": ["https://ogeydad1.mirror.aliyuncs.com","https://naxe401h.mirror.aliyuncs.com"],
  "exec-opts": ["native.cgroupdriver=systemd"]
 }

# 修改配置之后使配置生效:
systemctl daemon-reload && systemctl restart docker
# 查看docker是否启动成功
systemctl status docker
# 配置新增加了一行内容如下:
"insecure-registries":["10.32.1.149"],
# 上面增加的内容表示我们内网访问harbor的时候走的是http,10.32.1.149是安装harbor机器的ip

# 登录harbor:
[root@node01 ~]# docker login 10.32.1.149
Username: admin
Password:
WARNING! Your password will be stored unencrypted in /root/.docker/config.json.
Configure a credential helper to remove this warning. See
https://docs.docker.com/engine/reference/commandline/login/#credentials-store

Login Succeeded
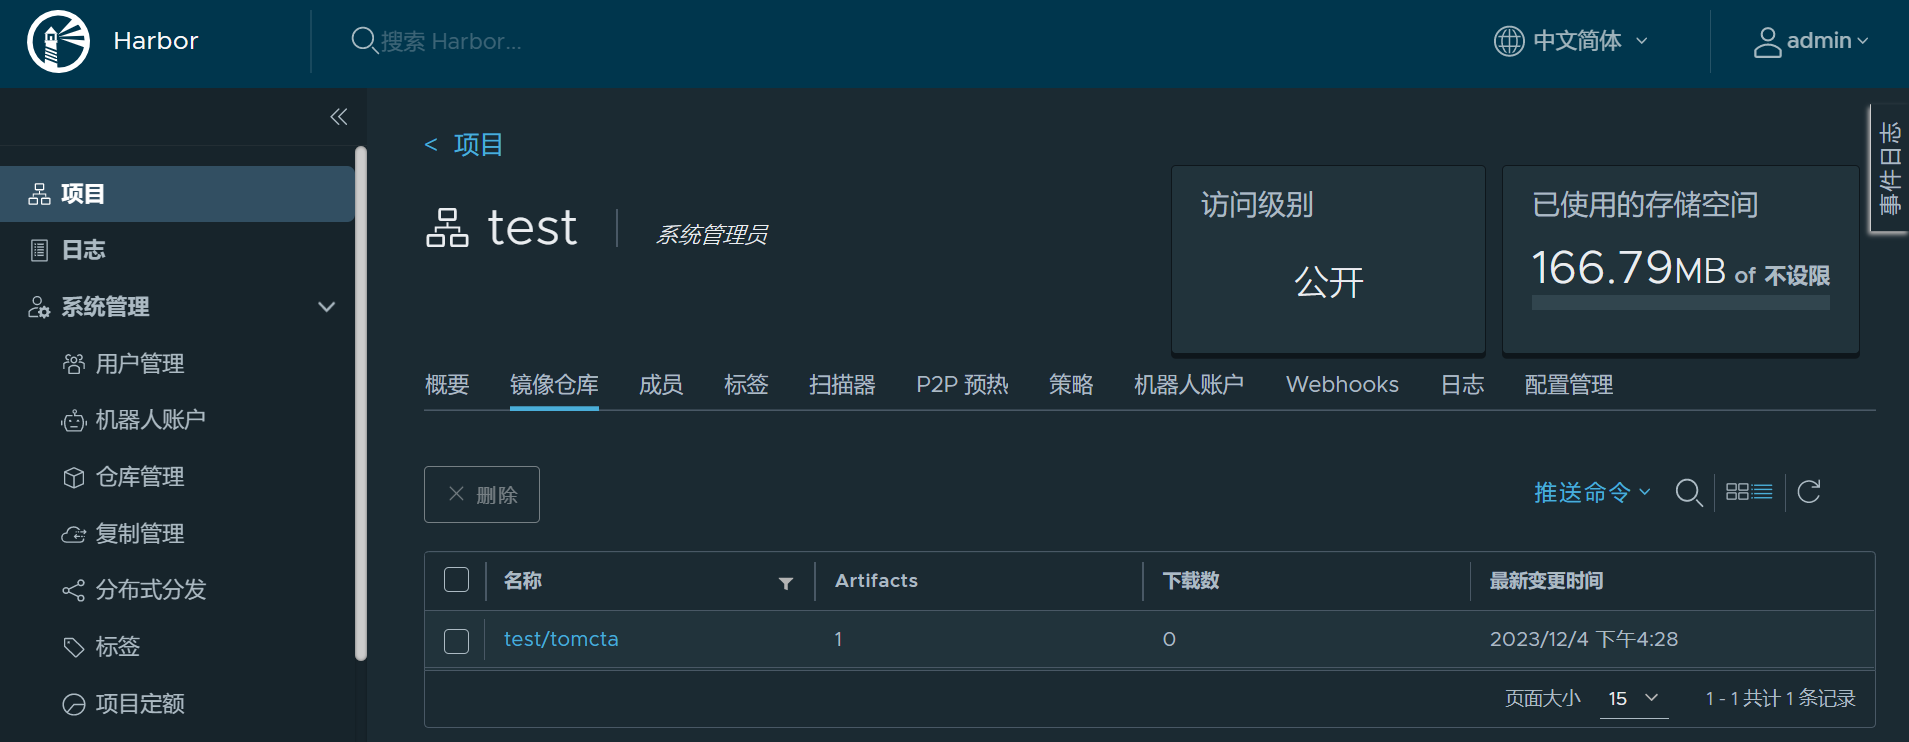
【2】镜像打标签并推送
#把tomcat镜像打标签
[root@node01 ~]# docker tag tomcat:v1 10.32.1.149/test/tomcta:v1
[root@node01 ~]# docker push 10.32.1.149/test/tomcta:v1
The push refers to repository [10.32.1.149/test/tomcta]
5f70bf18a086: Pushed
c910f4018acc: Pushed
668ca50580a1: Pushed
2a7cbc7db080: Pushed
174f56854903: Pushed
v1: digest: sha256:fbb06ef5c561bbe79432cb8cad6529e72d8007511c4a30638ef0efdfb4217d8b size: 1370
【3】检查是否上传成功
【4】从harbor上下载镜像
# 删除镜像
[root@node01 ~]# docker images|grep tomcta
10.32.1.149/test/tomcta                                                      v1                                480cc73e1ef9   8 months ago    452MB
[root@node01 ~]# docker rmi -f 10.32.1.149/test/tomcta:v1
Untagged: 10.32.1.149/test/tomcta:v1
Untagged: 10.32.1.149/test/tomcta@sha256:fbb06ef5c561bbe79432cb8cad6529e72d8007511c4a30638ef0efdfb4217d8b

# 拉取镜像
[root@node01 ~]# docker pull 10.32.1.149/test/tomcta:v1
v1: Pulling from test/tomcta
Digest: sha256:fbb06ef5c561bbe79432cb8cad6529e72d8007511c4a30638ef0efdfb4217d8b
Status: Downloaded newer image for 10.32.1.149/test/tomcta:v1
10.32.1.149/test/tomcta:v1
[root@node01 ~]# docker images|grep tomcta
10.32.1.149/test/tomcta                                                      v1                                480cc73e1ef9   8 months ago    452MB
原文地址:https://blog.csdn.net/qq_40887651/article/details/134775794
本文来自互联网用户投稿,该文观点仅代表作者本人,不代表本站立场。本站仅提供信息存储空间服务,不拥有所有权,不承担相关法律责任。
如若转载,请注明出处:http://www.7code.cn/show_39722.html
如若内容造成侵权/违法违规/事实不符,请联系代码007邮箱:suwngjj01@126.com进行投诉反馈,一经查实,立即删除!