一,什么是跨域
由于浏览器的同源策略限制,当一个请求的URL的协议,域名,端口,三者之间有任意一个与当前页面url不同就会出现跨域

例:http://localhost:5000 或者http://127.0.0.1:5000
协议:HTTP协议是应用层的协议,在TCP/IP协议接收到数据之后
端口号:服务器端口号5000(端口号是可以修改的,就是在不影响别的进程的情况下,你可以修改某一程序的端口号,5000修改为5001完全没问题的)
域名:localhost被称为域名,他代表的就是你的这台计算机。
127.0.0.1就是人们通常说的ip地址,那为什么你通过127.0.0.1也可以正常访问,那是因为在你的电脑的 C:WindowsSystem32Driversetc下的hosts文件中,做了映射,让localhost指向了127.0.0.1,这就是原因,所以你在浏览器通过这两种方式都可以访问
三,在react 结合Umi项目当中有一个文件名为 .umirc.ts文件当中的结构就是下图的样子(umi使用proxy代理解决跨域)
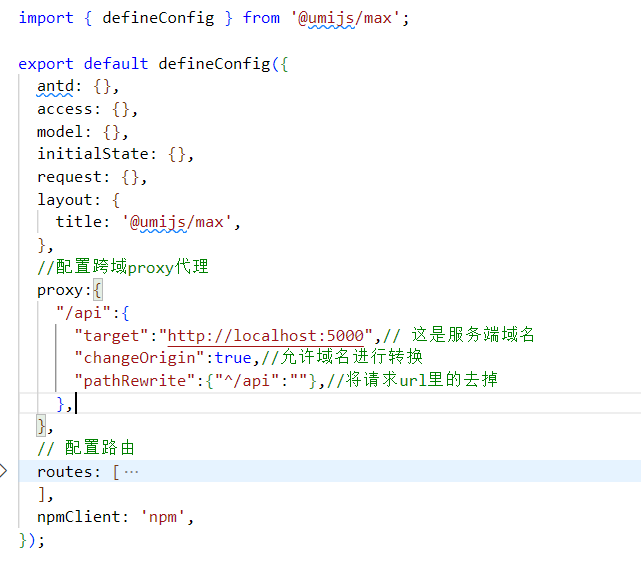
在 .umirc.ts文件配置如上图所示,也可以在config.js配置文件里设置
  proxy:{
    "/api":{ //   (/api)是自己所取得变量名
      "target":"http://localhost:5000",// 这是服务端域名
      "changeOrigin":true,//允许域名进行转换
      "pathRewrite":{"^/api":""},//将请求url里的去掉/api变量名称
},四,如上所述已经配置好 代理,接下来是封装axios请求接口
新建个文件夹,里面创建一个axios.tsx文件存放以下代码
import axios from "axios";

//设置请求头 创建实例时配置默认值
const booksHttp=axios.create({
    baseURL:'/api',//注意因为在.umirc.ts当中设置了代理即(proxy),直接写入代理的变量名称即可,无需再写入http://localhost:5000
    timeout:2000, //所有使用此实例的请求都将等待2秒,然后才会超时
}
);

// 请求拦截
 ``
//设置请求头
booksHttp.interceptors.request.use(config=>{
    return config
})
// 响应拦截
booksHttp.interceptors.response.use(response=>{
    return response
},err=>{
    console.log("访问失败",err)
})
export default booksHttp我自己的本地服务器端口是http://localhost:5000/books 这将是调取的接口
因为配置好代理,则转换域名后浏览器访问到的是这个地址:http://localhost:8001/api/books
首先,在axios.tsx同一文件夹下创建一个文件为index.tsx文件,index.tsx写入以下代码
import booksHttp from  "./axios"
import { useEffect } from "react";
const index=()=>{
     const fun = async () => {
        const { data: res } = await booksHttp.get("/books");
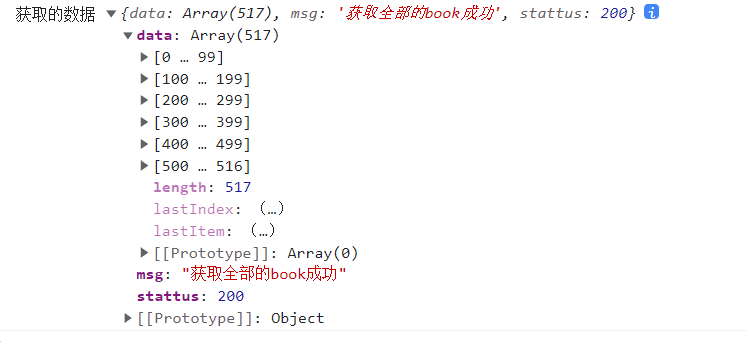
        console.log("获取的数据", res);
    }

    useEffect(() => { //
        fun();
    }, [])

    return <div>获取的数据请看浏览器控制台</div>
}
六,进阶版
此部分内容是将获取的接口(data)数据,渲染成表格。(此部分内容只是渲染,增删改查还未写入,以后补充)
import { ModalForm, PageContainer, ProFormDigit, ProFormSelect, ProFormText, WaterMark } from "@ant-design/pro-components";
import { Button, Card, message, Popconfirm, Space, Table,Image } from "antd";
import { ColumnsType } from "antd/lib/table";
import { useEffect, useState } from "react";
import booksHttp from "./axios"
const index = () => {
    // 数据源
    const [selectedRowKeys, setSelectedRowKeys] = useState<any>([]);
    //点击添加按钮弹出有个弹框
    const [visible, setVisible] = useState<boolean>(false);
    //点击修改按钮弹出有个弹框
    const [modify, setModify] = useState<boolean>(false);

    const fun = async () => {
        const { data: res } = await booksHttp.get("/books");
        console.log("res", res);
        //更新数据状态
        setSelectedRowKeys(res.data)
    }

    useEffect(() => {
        fun();
    }, [])


    interface DataType {
        /*   id(id: any); */
        id: number;
        binding: string;
        author: string;//作者
        current: number;//表示分页值
        category: string;
        image: string;
        isbn: string;
        pages: string;
        price: string;
        pubdate: string;
        publisher: string;
        subtitle: string;
        summary: string;
        title: string;
        translator: string;
    }

    //以下三个是配置表格底部的分页功能
    const IndexObj: any = {
        pageSize: "",
        current: ""
    }
    const changePageSize = (pageSize: any, current: any) => {
        IndexObj.pageSize = pageSize;
        IndexObj.current = current;
        /*   console.log(IndexObj); */
    }
    const paginationProps = {
        showSizeChanger: true,
        showQuickJumper: true,
        //pageSize:pageSize,//固定显示几条每页
        pageSizeOptions: ['5', '10', '20', '30'],
        showTotal: function (total: any, range: number[]) {
            return `第${range[0]}-${range[1]}条/总共${total}条`
            // return '共 ' + selectedRowKeys.length + ' 条数据';
        },
        // total: selectedRowKeys.length,
        onChange: (current: any, pageSize: any) => changePageSize(pageSize, current),
        //onShowSizeChange: (current: any, pageSize: any) => changePageSize(pageSize, current),
    };
    const columns: ColumnsType<DataType> = [
        {
            title: '序号',
            /* 序列自动排序 */
            render(value, record, index) {
                const { current, pageSize } = IndexObj
                //console.log(pageSize);

                const a = (current - 1) * (pageSize) + (index + 1)
                /*  console.log(IndexObj); */
                //console.log(a);

                return a
            },
        },
        {
            title: '作者',
            dataIndex: 'author',
            width:240
        },
        {
            title: '书名',
            dataIndex: 'title',
        },
        {
            title: '编程',
            dataIndex: 'category',
        },
        {
            title: '图片',
            dataIndex: 'image',
            width:320,
            render:(text)=><Image width={100}  src={text} />,
        },
        {
            title: '价格',
            dataIndex: 'price'
        },
        {
            title: '出版日期',
            dataIndex: 'pubdate'
        },
        {
            title: '出版社',
            dataIndex: 'publisher'
        },
        {
            title: '版本',
            dataIndex: 'subtitle'
        },
        {
            title: '概述',
            dataIndex: 'summary',
            // 超出部分自动隐藏
            ellipsis:true
        },
        {
            title: '翻译',
            dataIndex: 'translator'
        },
        {
            title: '操作',
            dataIndex: 'operate',
            width: '200px',
            render(value, record, index) {
                //console.log(value, record, index);

                return (
                    <Space>
                        <Button
                            type="primary"
                        // onClick={() => { setModify(true); ItemFun(record) }}
                        >
                            修改
                        </Button>
                        <Popconfirm
                            title="确定要删除该选项吗?"
                            onConfirm={() => {
                                //DeleState(record.id);
                                // message.success("删除成功")
                            }}
                            onCancel={() => {
                                message.error("删除失败")
                            }}
                            okText="Yes"
                            cancelText="No"
                        >
                            <Button type="primary" danger >删除</Button>
                        </Popconfirm>
                    </Space>
                )
            },
        }
    ];


    return (
        <>
            <PageContainer>
                <WaterMark content='哈哈哈水印'>
                    <Card>
                        <Space>
                            <Button onClick={() => setVisible(true)} type="primary">添加</Button>
                            <Button type="primary">重置</Button>
                            <input
                                /* onKeyUp={handleKeyUp} */
                                width={200}
                                name="name"
                                placeholder="模糊查询"
                            />
                        </Space>
                        {/* rowSelection:表格是否可选择,配置项object,
              columns:表格列的配置描述
              dataSource 数据数组
              rowKey={()=>{ const id = selectedRowKeys.map((Item: { id: number; })=>{return Item.id})
                return id.toString()
             }}
             rowSelection={rowSelection}
              */}
                        <Table rowKey='id'
                            // ellipsis={true}
                            columns={columns}
                            //给表格底部设置滚动条 以便查看表格内容
                            scroll={{
                                x: 1500,
                            }}
                            dataSource={selectedRowKeys}
                            /* 关闭自带的分页 */
                            /* pagination={{
                              total: selectedRowKeys.length,//数据总数量
                              //pageSize:4,//固定显示几条每页
                              showSizeChanger: true,  //是否显示可以设置几条一页的选项
                              defaultPageSize: 5,//默认显示几条数据
                              showTotal: function () {  //设置显示一共几条数据
                                return '共 ' + selectedRowKeys.length + ' 条数据';
                              },
                              onChange(index) {
                                //点击改变页数的选项时调用函数,current:将要跳转的页数
                                console.log(index);
                                return index
                              },
                            }} */
                            pagination={paginationProps}  //分页功能分页功能
                        ></Table>
                    </Card>
                </WaterMark>
            </PageContainer>
    )
}


export default index
最后,想成为后端大牛吗?想知道接口是怎么实现的,敢不敢和我看看这篇文章带你入个门:http://t.csdn.cn/HPaNi
原文地址:https://blog.csdn.net/qq_56894932/article/details/128629413
本文来自互联网用户投稿,该文观点仅代表作者本人,不代表本站立场。本站仅提供信息存储空间服务,不拥有所有权,不承担相关法律责任。
如若转载,请注明出处:http://www.7code.cn/show_40070.html
如若内容造成侵权/违法违规/事实不符,请联系代码007邮箱:suwngjj01@126.com进行投诉反馈,一经查实,立即删除!


