1 文件查找
在文件系统上查找符合条件的文件
文件查找:locate,find
1.1 locate
Usage: locate [OPTION]... [PATTERN]...
-i :不区分大小写的搜索
-n N :只列举前N个匹配项目
-r :使用基本正则表达式
范例:
# 搜索名称或者路径中包含"conf"的文件
locate conf
# 使用Regex正则表达式搜索以".conf"结尾的文件
locate -r ".conf$"
~ yum install -y mlocate
~ locate conf
locate: can not stat o "/var /lib/mlocate/locate.db" : No such file or directory
~ updatedb
~ ls -l /var/lib/mlocate/mlocate.db
-rw-r----- 1 root slocate 9464071 May 22 12:51 /var/lib/mlocate/mlocate.db
~ locate -n 3 conf
/boot/config-3.10.0-1160.el7.x86_64
/boot/grub/grub.conf
/boot/grub2/i386-pc/configfile.mod
范例:文件新创建和删除,无法马上更新 locatedb 数据库
~ touch test.log
~ locate test.log
locate: can not stat o "/var /lib/mlocate/locate.db" : No such file or directory
~ updatedb
~ locate test.log
/root/test.log
~ rm -rf test.log
~ locate test.log
/root/test.log
范例:
~ locate -n 10 -ir '.CONF$'
/boot/grub/grub.conf
/data/etc2022-05-17/asound.conf
/data/etc2022-05-17/chrony.conf
/data/etc2022-05-17/dracut.conf
/data/etc2022-05-17/e2fsck.conf
/data/etc2022-05-17/grub.conf
/data/etc2022-05-17/host.conf
/data/etc2022-05-17/idmapd.conf
/data/etc2022-05-17/kdump.conf
/data/etc2022-05-17/krb5.conf
1.2 find
find 是实时查找工具,通过遍历指定路径完成文件查找(默认递归,包含隐藏文件的查找)
工作特点:
格式:
find [OPTION]... [查找路径] [查找条件] [处理动作]
查找路径:指定具体目标路径;默认为当前目录
查找条件:指定的查找标准,可以文件名、大小、类型、权限等标准进行;默认为找出指定路径下的所有文件
处理动作:对符合条件的文件做操作,默认输出至屏幕
1.2.1 指定搜索目录层级
–maxdepth level:最大搜索目录深度,指定目录下的文件为第一级
–mindepth level:最小搜索目录深度
范例:
find /etc -maxdepth 2 -mindepth 2
1.2.2 对每个目录先处理目录内的文件,再处理目录本身
–depth –d,影响显示次序。
-d # hwarning: the -d option is deprecated; please use –depth instead,because the latter is a POSIX-compliant feature
默认先处理目录,后处理文件
范例:
~ tree /data/test/
/data/test/
├── f1.txt
├── f2.txt
└── test2
    └── test3
        ├── f3.txt
        └── f4.txt

2 directories, 4 files

~ find /data/test/
/data/test/
/data/test/f1.txt
/data/test/f2.txt
/data/test/test2
/data/test/test2/test3
/data/test/test2/test3/f3.txt
/data/test/test2/test3/f4.txt

~ find /data/test/ -depth
/data/test/f1.txt
/data/test/f2.txt
/data/test/test2/test3/f3.txt
/data/test/test2/test3/f4.txt
/data/test/test2/test3
/data/test/test2
/data/test/
1.2.3 根据文件名和inode查找
- –name “文件名称”:支持使用glob,如:*, ?, [], [^]
- -iname “文件名称”:不区分字母大小写
- -inum n 按inode号查找
- –samefile name 相同inode号的文件
- –links n 链接数为n的文件
- –regex “PATTERN”:以PATTERN匹配整个文件路径,而非文件名称
范例:
~ find -name snow.png
~ find -iname snow.png
~ find . -name "*.txt"
~ find /var -name "log*"

~ find . -regex ".*.txt$"
./f1.txt
./f2.txt
./test2/test3/f3.txt
./test2/test3/f4.txt
1.2.4 根据属主、属组查找
- –user USERNAME:查找属主为指定用户(UID)的文件
- –group GRPNAME: 查找属组为指定组(GID)的文件
- –uid UserID:查找属主为指定的UID号的文件
- –gid GroupID:查找属组为指定的GID号的文件
- –nouser:查找没有属主的文件
- –nogroup:查找没有属组的文件
范例:
~ find /home -user zzw -ls
67112643    0 drwx------   2 zzw      zzw            62 May 15 17:59 /home/zzw
67112644    4 -rw-r--r--   1 zzw      zzw            18 Apr  1  2020 /home/zzw/.bash_logout
67112645    4 -rw-r--r--   1 zzw      zzw           193 Apr  1  2020 /home/zzw/.bash_profile
67112646    4 -rw-r--r--   1 zzw      zzw           231 Apr  1  2020 /home/zzw/.bashrc

~ find / -nouser -ls
~ find / -nogroup -ls
1.2.5 根据文件类型查找
范例:
~ find /etc -type d -ls
~ find /etc -type f -ls
1.2.6 空文件或者目录
–empty
范例:
~ find /data/test/ -type d -empty
~ find /data/test/ -empty -ls
1.2.7 组合条件
与:-a,默认多个条件是与关系
或:-o
非:-not !
范例:
~ find /etc/ -type d -o -type l | wc -l
768
~ find /etc/ -type d -o -type l -ls | wc -l # ( find /etc/ -type d -o -type l -a -ls | wc -l )
137
~ find /etc/ ( -type d -o -type l ) -ls | wc -l
768
德-摩根定律:
(非 A) 或 (非 B) = 非(A 且 B)
(非 A) 且 (非 B) = 非(A 或 B)
示例:
!A -a !B = !(A -o B)
!A -o !B = !(A -a B)
范例:
find -user joe -group joe
find -user joe -not -group joe
find -user joe -o -user jane
# 搜索文件和目录所有者不是joe并且也不是jane
find -not ( -user joe -o -user jane )
find / -user joe -o -uid 500
范例:
# 查找文件类型不是目录并且不为空的文件和目录
~ find ! ( -type d -a -empty ) | wc -l
~ find ! -type d -o ! -empty | wc -l

~ find /home/ ! -user wang ! -user mage -ls
~ find ! ( -user wang -o -user mage )
~ find ! -user wang -a ! -user mage

# 找出/tmp 目录下,属主不是root,并且文件名不以f开头的文件
find /tmp ( -not -user root -a -not -name "-f" ) -ls
find /tmp -not ( -user root -o -name "-f" ) -ls
1.2.8 排除目录
范例:
#查找/etc/下,除/etc/sane.d目录的其它所有.conf后缀的文件
# /etc/sane.d 后面不能出现 / 即:/etc/sane.d/
find /etc -path '/etc/sane.d' -a -prune -o -name "*.conf"

#查找/etc/下,除/etc/sane.d和/etc/fonts两个目录的所有.conf后缀的文件
find /etc ( -path "/etc/sane.d" -o -path "/etc/fonts" ) -a -prune -o -name "*.conf"

# 排除/proc和/sys目录
find / ( -path "/sys" -o -path "/proc" ) -a -prune -o -type f -a -mmin -1
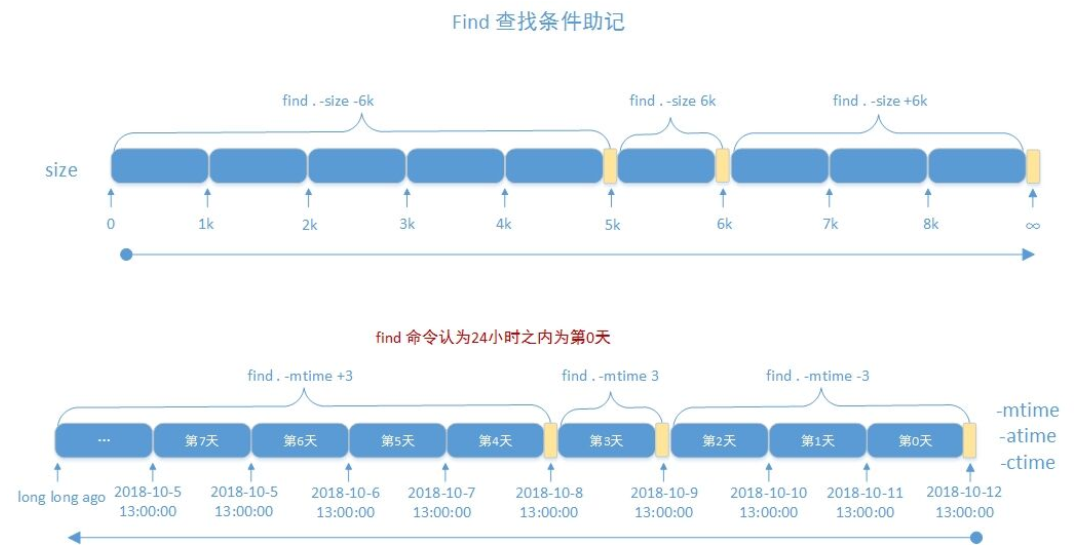
1.2.9 根据文件大小来查找
–size [+|-]#UNIT # 常用单位:k,M,G,c(byte),注意大小写敏感
范例:
# 搜索1k范围是在不包含0字节但是大于0字节,小于等于1字节的范围
~ find /data/test/ -size 1k -ls

# 搜索2k范围是在不包含1024字节但是大于1024,小于等于2048的范围
~ find /data/test/ -size 2k -ls

# 搜索0字节到5k的范围
~ find /data/test/ -size -6k -ls

# 搜索大于2k但是不包含2k,到无穷大
~ find /data/test/ -size +2k -ls

~ find / -size +10G
~ ls -lh /proc/kcore
~ du -sh /proc/kcore
1.2.10 根据时间戳
以“天”为单位
- -atime [+|-]#:以“天”为单位来搜索最近文件的访问时间(读取文件内容)
- -mtime:以“天”为单位来搜索最近文件的修改时间(改变文件内容(数据))
- -ctime:以“天”为单位来搜索最近文件的改变时间(元数据发生改变(文件属性))
以“分钟”为单位
- -amin:以“分钟”为单位来搜索最近文件的访问时间(读取文件内容)
- -mmin:以“分钟”为单位来搜索最近文件的修改时间(改变文件内容(数据))
- -cmin:以“分钟”为单位来搜索最近文件的改变时间(元数据发生改变(文件属性))

1.2.11 根据权限查找
–perm [/|-]MODE
MODE: 精确权限匹配
/MODE:任何一类(u,g,o)对象的权限中只要能一位匹配即可,或关系,+ 从CentOS 7开始淘汰
-MODE:每一类对象都必须同时拥有指定权限,与关系
0: 表示不关注
说明:
- find –perm 755 会匹配权限模式恰好是755的文件
- 只要当任意人有写权限时,find –perm +222就会匹配
- 只有当每个人都有写权限时,find –perm -222才会匹配
- 只有当其它人(other)有写权限时,find –perm -002才会匹配
范例:
~ chmod 600 f1.txt
~ find . -type f -perm 600 -ls
67268584    0 -rw-------   1 root     root            0 May 22 13:12 ./f1.txt

# 搜索权限为222(--w--w--w-,即所有者,所属组,其他人都只有写权限)的文件
~ find -perm 222 -type f -ls

# 搜索权限为-222(--w--w--w-,即所有者,所属组,其他人都要有写权限)为文件和目录
~ find -perm -222 -type f -type d -ls

# 搜索权限为/222(--w--w--w-,即所有者,所属组,其他人任意一组有写权限)为文件和目录
~ find -perm /222 -type f -type d -ls
1.2.12 正则表达式
–regextype type
Changes the regular expression syntax understood by –regex and -iregex tests which occur later on
the command line. Currently-implemented types are emacs (this is the default), posix-awk, posix-
basic, posix-egrep and posix-extended.
–regex pattern
File name matches regular expression pattern. This is a match on the whole path, not a search.
For example, to match a file named ./fubar3', you can use the regular expression .*bar.’ or
.*b.*3', but not f.*r3’. The regular expressions understood by find are by default Emacs Regular
Expressions, but this can be changed with the –regextype option.
范例:
find /data -regextype posix-extended -regex "regix"
1.2.13 处理动作
- –print:默认的处理动作,显示至屏幕(默认行为)
- -ls:类似于对查找到的文件执行“ls -l”命令(***)
- –delete:删除查找到的文件
- –fls file:查找到的所有文件的长格式信息保存至指定文件中(-ls > )
- –ok COMMAND {} ; 对查找到的每个文件执行由COMMAND指定的命令,对于每个文件执行命令之前,都会交互式要求用户确认(交互式,非强制)(***)
- {} :占位符,相当于对find命令搜索的内容丢到{}中 ; :结束符
- –exec COMMAND {} ; 对查找到的每个文件执行由COMMAND指定的命令(非交互式,强制)(***)
- {}: 用于引用查找到的文件名称自身;; :用于结束符
范例:
#备份配置文件,添加.orig这个扩展名
find -name ".conf" -exec cp {} {}.orig ;

#提示删除存在时间超过3天以上的joe的临时文件
find /tmp -ctime +3 -user joe -ok rm {} ;

#在主目录中寻找可被其它用户写入的文件
find ~ -perm -002 -exec chmod o-w {} ;

#查找/data下的权限为644,后缀为sh的普通文件,增加执行权限
find /data –type f -perm 644 -name ".sh" –exec chmod 755 {} ;

~ find -name "*.sh" -ok mv {} /opt ;
~ find -name "*.sh" -exec mv {} /opt ;
1.3 参数替换 xargs
由于很多命令不支持管道 | 来作为传递的参数,xargs 用于产生某个命令的参数,xargs 可以读入 stdin 的数据,并且以空格符或者回车符将 stdin 的数据分隔成为参数。(即很多命令不支持标准输入,可以通过 xargs 命令来使命令支持标准输入)
另外,许多命令不能接受过多的参数,命令执行可能会失败,xargs 可以解决。
注意:文件名或者是其他意义的名词内含有空格符的情况。
find 和 xargs 的组合:
find | xargs COMMMAND
范例:
# xargs 命令的使用
~ type xargs
~ xargs --help
Usage: xargs [OPTION]... COMMAND INITIAL-ARGS...
~ echo /etc/passwd | xargs ls -l
-rw-r--r-- 1 root root 1927 May 21 22:57 /etc/passwd

# xargs 默认会以横向的方式显示(默认行为)
~ echo {1..10} | xargs
~ echo {1..10} | xargs -n1
~ echo {1..10} | xargs -n2
~ seq 3
1
2
3
~ seq 3 | xargs
1 2 3

# 删除当前目录下的大量文件
~ ls | xargs rm -rf

# 批量创建用户
echo user{1..9} | xargs -n1 useradd
# 批量删除用户
echo user{1..9} | xargs -n1 userdel -rf

#这个命令是错误的,7代表可读可写可执行,权限也为或的关系,0代表不关心
find /sbin/ -perm /700 | ls -l

# 查找有特殊权限的文件,并排序,7代表可读可写可执行,权限也为或的关系,0代表不关心
find /bin/ -perm /7000 | xargs ls -lS
# 此命令和上面有何区别?查找是否有suid,sgid,stick三个特殊权限均有的文件,0代表不关心
find /bin/ -perm -7000 | xargs ls -lS
# 以字符nul分隔
# print 0 :0作为文件名的切割符
find -type f -name "*.txt" -print0 | xargs -0 rm

# 并发执行多个进程
seq 100 | xargs -i -P10 wget -P /data http://10.0.0.100/{}.html

# 并行下载bilibili视频
yum install -y python3-pip
pip3 install you-get
seq 10 | xargs -i -P3 you-get https://www.bilibili.com/video/BV1PZ4y1k7m1?p={}&spm_id_from=pageDriver
#并行下载视频 -P 并发量为 3
seq 389 | xargs -i -P3 you-get https://www.bilibili.com/video/av36489007?p={}
1.4 练习
# 1、查找/var目录下属主为root,且属组为mail的所有文件
# 2、查找/var目录下不属于root、lp、gdm的所有文件
# 3、查找/var目录下最近一周内其内容修改过,同时属主不为root,也不是postfix的文件
# 4、查找当前系统上没有属主或属组,且最近一个周内曾被访问过的文件
# 5、查找/etc目录下大于1M且类型为普通文件的所有文件
# 6、查找/etc目录下所有用户都没有写权限的文件
# 7、查找/etc目录下至少有一类用户没有执行权限的文件
# 8、查找/etc/init.d目录下,所有用户都有执行权限,且其它用户有写权限的文件
# 1、查找/var目录下属主为root,且属组为mail的所有文件
~ find /var -type f -user root -group mail -ls

# 2、查找/var目录下不属于root、lp、gdm的所有文件
~ find /var ! ( -user root -o -user lp -o -user gdm ) -type f | xargs ls -l
~ find /var ! -user root ! -user lp ! -user gdm -type f | xargs ls -l

# 3、查找/var目录下最近一周内其内容修改过,同时属主不为root,也不是postfix的文件
~ find /var ! ( -user root -o -user postfix ) -mtime -7 -type f -ls
~ find /var ! -user root ! -user postfix -mtime -7 -type f -ls

# 4、查找当前系统上没有属主或属组,且最近一个周内曾被访问过的文件
~ find / -nouser -nogroup -atime -7 -type f -ls

# 5、查找/etc目录下大于1M且类型为普通文件的所有文件
~ find /etc -size +1M -type f | xargs ls -lh

# 6、查找/etc目录下所有用户都没有写权限的文件
~ find /etc ! -perm /222 -type f -ls

# 7、查找/etc目录下至少有一类用户没有执行权限的文件
~ find /etc ! -perm /111 -type f -ls

# 8、查找/etc/init.d目录下,所有用户都有执行权限,且其它用户有写权限的文件
~ find /etc/init.d -perm -111 -perm /002 -ls
~ find /etc/init.d -perm -113 -ls
2 压缩和解压缩
压缩的简单思路:就是将文件中相同的字符变成一个较短的单一的字符来表示;例如:如果zhongzw的字符在进行压缩时,会制作一个转换表,在转换表中会有一个z来表示zhongzw,这样就节省了空间。如果有1M的0,在压缩时,则会显示1M0,用1M0来表示1M的0。3个字符来表示1M的0。
主要针对单个文件压缩,而非目录
2.1 compress 和 uncompress
Linux compress命令是一个相当古老的 unix 档案压缩指令,压缩后的档案会加上一个 .Z 延伸档名以区别未压缩的档案,压缩后的档案可以以 uncompress 解压。若要将数个档案压成一个压缩档,必须先将档案 tar 起来再压缩。由于 gzip 可以产生更理想的压缩比例,一般人多已改用 gzip 为档案压缩工具。
此工具来自于ncompress包,此工具目前已经很少使用
对应的文件是Z后缀
格式:
compress Options [file ...]
uncompress file.Z # 解压缩
zcat file.Z 不显式解压缩的提前下查看文本文件的内容
范例:
zcat file.Z > file
compress-c message > message.Z
uncompress -c message.Z > m
zcat message.Z
2.2 gzip 和 gunzip
Linux gzip命令用于压缩文件。
gzip是个使用广泛的压缩程序,文件经它压缩过后,其名称后面会多出”.gz“的扩展名。
来自 gzip 包,对应的文件是 .gz 后缀
格式:
gzip [OPTION]... FILE...
常用选项:
范例:
# 解压缩
gunzip file.gz
# 不显式解压缩的提前下查看文本文件的内容
zcat file.gz
范例:常用搭配
bzip2 -c messages > messages.bz2 = bzip2 -k messages
bunzip2 -c messages.bz2 > messages.bz2
bzcat messages.bz2
cat messages | bzip2 > messagesbak.bz2
cat messages | xz > messagebk.xz
2.3 bzip2 和 bunzip2
Linux bzip2命令是.bz2文件的压缩程序。
bzip2采用新的压缩演算法,压缩效果比传统的LZ77/LZ78压缩演算法来得好。若没有加上任何参数,bzip2压缩完文件后会产生.bz2的压缩文件,并删除原始的文件。
来自 bzip2 包,对应的文件是 .bz2 后缀
格式:
bzip2 [OPTION]... FILE...
常用选项:
范例:
# 解压缩
bunzip2 file.bz2
# 不显式解压缩的提前下查看文本文件的内容
bzcat file.bz2
范例:常用搭配
bzip2 -c messages > messages.bz2 = bzip2 -k messages
bunzip2 -c messages.bz2 > messages.bz2
bzcat messages.bz2
cat messages | bzip2 > messagesbak.bz2
cat messages | xz > messagebk.xz
2.4 xz 和 unxz
xz [OPTION]... FILE...
常用选项:
范例:
# 解压缩
unxz file.xz
# 不显式解压缩的提前下查看文本文件的内容
xzcat file.xz
范例:常用搭配
xz -k messages
unxz -k messages.xz
xzcat messages.xz
2.5 zip 和 unzip
zip 可以实现打包目录并且压缩
zip 可以实现打包目录和多个文件成一个文件并压缩,但可能会丢失文件属性信息,如:所有者和组信息,一般建议使用tar代替
分别来自于zlip和unzip包
对应的文件是.zip后缀
范例:zip 的帮助
~ zip --help
Copyright (c) 1990-2008 Info-ZIP - Type 'zip "-L"' for software license.
Zip 3.0 (July 5th 2008). Usage:
zip [-options] [-b path] [-t mmddyyyy] [-n suffixes] [zipfile list] [-xi list]
  The default action is to add or replace zipfile entries from list, which
  can include the special name - to compress standard input.
  If zipfile and list are omitted, zip compresses stdin to stdout.
  -f   freshen: only changed files  -u   update: only changed or new files
  -d   delete entries in zipfile    -m   move into zipfile (delete OS files)
  -r   recurse into directories     -j   junk (don't record) directory names
  -0   store only                   -l   convert LF to CR LF (-ll CR LF to LF)
  -1   compress faster              -9   compress better
  -q   quiet operation              -v   verbose operation/print version info
  -c   add one-line comments        -z   add zipfile comment
  -@   read names from stdin        -o   make zipfile as old as latest entry
  -x   exclude the following names  -i   include only the following names
  -F   fix zipfile (-FF try harder) -D   do not add directory entries
  -A   adjust self-extracting exe   -J   junk zipfile prefix (unzipsfx)
  -T   test zipfile integrity       -X   eXclude eXtra file attributes
  -y   store symbolic links as the link instead of the referenced file
  -e   encrypt                      -n   don't compress these suffixes
  -h2  show more help
# 查看更多帮助
~ zip -h2

Extended Help for Zip

See the Zip Manual for more detailed help


Zip stores files in zip archives.  The default action is to add or replace
zipfile entries.

Basic command line:
  zip options archive_name file file ...

Some examples:
  Add file.txt to z.zip (create z if needed):      zip z file.txt
  Zip all files in current dir:                    zip z *
  Zip files in current dir and subdirs also:       zip -r z .
范例:
#打包并压缩
zip –r /backup/sysconfig.zip /etc/sysconfig/

#默认解压缩至当前目录
unzip /backup/sysconfig.zip

#解压缩至指定目录
unzip /backup/sysconfig.zip -d /tmp

#解压缩至指定目录
cat /var/log/messages | zip messages - (-代表/var/log/messages)
unzip -p message.gz > message #-p 表示管道
~ zip -e kubesphere.zip *
Enter password:
Verify password:
  adding: etc.zip (stored 0%)
  adding: messages.bz2 (stored 0%)
  adding: messages.gz (stored 0%)
  adding: messages.xz (stored 0%)
  adding: messages.Z (stored 0%)

~ unzip kubesphere.zip
Archive:  kubesphere.zip
[kubesphere.zip] etc.zip password:
password incorrect--reenter:
~ zip -P Admin@h3c kubesphere.zip *
  adding: etc.zip (stored 0%)
  adding: messages.bz2 (stored 0%)
  adding: messages.gz (stored 0%)
  adding: messages.xz (stored 0%)
  adding: messages.Z (stored 0%)

~ unzip -P Admin@h3c kubesphere.zip
Archive:  kubesphere.zip
3 打包和解包
3.1 tar
tar 即 Tape ARchive,磁带归档,经常用于备份。可以对目录和多个文件打包一个文件,并且可以压缩,保留文件属性不丢失,常用于备份功能,推荐使用。
tar 是用来建立,还原备份文件的工具程序,它可以加入,解开备份文件内的文件。
对应的文件是 .tar 后缀
格式:
tar [-ABcdgGhiklmMoOpPrRsStuUvwWxzZ][-b <区块数目>][-C <目的目录>][-f <备份文件>][-F <Script文件>][-K <文件>][-L <媒体容量>][-N <日期时间>][-T <范本文件>][-V <卷册名称>][-X <范本文件>][-<设备编号><存储密度>][–after–date=<日期时间>][–atime-preserve][–backuup=<备份方式>][–checkpoint][–concatenate][–confirmation][–delete][–exclude=<范本样式>][–force–local][–group=<群组名称>][–help][–ignore–failed–read][–new–volume-script=<Script文件>][–newer-mtime][–no-recursion][–null][–numeric–owner][–owner=<用户名称>][–posix][–erve][–preserve–order][–preserve–permissions][–record-size=<区块数目>][–recursive-unlink][–remove-files][–rsh-command=<执行指令>][–same-owner][–suffix=<备份字尾字符串>][–totals][–use-compress-program=<执行指令>][–version][–volno-file=<编号文件>][文件或目录…]
选项:
- -A或–catenate 新增文件到已存在的备份文件。
- -b<区块数目>或–blocking-factor=<区块数目> 设置每笔记录的区块数目,每个区块大小为12Bytes。
- -B或–read–full-records 读取数据时重设区块大小。
- -c或–create 建立新的备份文件。
- -C<目的目录>或–directory=<目的目录> 切换到指定的目录。
- -d或–diff或–compare 对比备份文件内和文件系统上的文件的差异。
- -f<备份文件>或–file=<备份文件> 指定备份文件。
- -F<Script文件>或–info–script=<Script文件> 每次更换磁带时,就执行指定的Script文件。
- -g或–listed-incremental 处理GNU格式的大量备份。
- -G或–incremental 处理旧的GNU格式的大量备份。
- -h或–dereference 不建立符号连接,直接复制该连接所指向的原始文件。
- -i或–ignore–zeros 忽略备份文件中的0 Byte区块,也就是EOF。
- -k或–keep–old-files 解开备份文件时,不覆盖已有的文件。
- -K<文件>或–starting-file=<文件> 从指定的文件开始还原。
- -l或–one-file-system 复制的文件或目录存放的文件系统,必须与tar指令执行时所处的文件系统相同,否则不予复制。
- -L<媒体容量>或-tape-length=<媒体容量> 设置存放每体的容量,单位以1024 Bytes计算。
- -m或–modification-time 还原文件时,不变更文件的更改时间。
- -M或–multi–volume 在建立,还原备份文件或列出其中的内容时,采用多卷册模式。
- -N<日期格式>或–newer=<日期时间> 只将较指定日期更新的文件保存到备份文件里。
- -o或–old–archive或–portability 将资料写入备份文件时使用V7格式。
- -O或–stdout 把从备份文件里还原的文件输出到标准输出设备。
- -p或–same-permissions 用原来的文件权限还原文件。
- -P或–absolute-names 文件名使用绝对名称,不移除文件名称前的”/”号。
- -r或–append 新增文件到已存在的备份文件的结尾部分。
- -R或–block–number 列出每个信息在备份文件中的区块编号。
- -s或–same-order 还原文件的顺序和备份文件内的存放顺序相同。
- -S或–sparse 倘若一个文件内含大量的连续0字节,则将此文件存成稀疏文件。
- -t或–list 列出备份文件的内容。
- -T<范本文件>或–files-from=<范本文件> 指定范本文件,其内含有一个或多个范本样式,让tar解开或建立符合设置条件的文件。
- -u或–update 仅置换较备份文件内的文件更新的文件。
- -U或–unlink–first 解开压缩文件还原文件之前,先解除文件的连接。
- -v或–verbose 显示指令执行过程。
- -V<卷册名称>或–label=<卷册名称> 建立使用指定的卷册名称的备份文件。
- -w或–interactive 遭遇问题时先询问用户。
- -W或–verify 写入备份文件后,确认文件正确无误。
- -x或–extract或–get 从备份文件中还原文件。
- -X<范本文件>或–exclude-from=<范本文件> 指定范本文件,其内含有一个或多个范本样式,让ar排除符合设置条件的文件。
- -z或–gzip或–ungzip 通过gzip指令处理备份文件。
- -Z或–compress或–uncompress 通过compress指令处理备份文件。
- -<设备编号><存储密度> 设置备份用的外围设备编号及存放数据的密度。
- –after-date=<日期时间> 此参数的效果和指定”-N”参数相同。
- –atime-preserve 不变更文件的存取时间。
- –backup=<备份方式>或–backup 移除文件前先进行备份。
- –checkpoint 读取备份文件时列出目录名称。
- –concatenate 此参数的效果和指定”-A”参数相同。
- –confirmation 此参数的效果和指定”-w”参数相同。
- –delete 从备份文件中删除指定的文件。
- –exclude=<范本样式> 排除符合范本样式的文件。
- –group=<群组名称> 把加入设备文件中的文件的所属群组设成指定的群组。
- –help 在线帮助。
- –ignore–failed–read 忽略数据读取错误,不中断程序的执行。
- –new–volume-script=<Script文件> 此参数的效果和指定”-F”参数相同。
- –newer-mtime 只保存更改过的文件。
- –no-recursion 不做递归处理,也就是指定目录下的所有文件及子目录不予处理。
- –null 从null设备读取文件名称。
- –numeric-owner 以用户识别码及群组识别码取代用户名称和群组名称。
- –owner=<用户名称> 把加入备份文件中的文件的拥有者设成指定的用户。
- –posix 将数据写入备份文件时使用POSIX格式。
- –preserve 此参数的效果和指定”-ps“参数相同。
- –preserve–order 此参数的效果和指定”-A”参数相同。
- –preserve–permissions 此参数的效果和指定”-p”参数相同。
- –record-size=<区块数目> 此参数的效果和指定”-b”参数相同。
- –recursive-unlink 解开压缩文件还原目录之前,先解除整个目录下所有文件的连接。
- –remove-files 文件加入备份文件后,就将其删除。
- –rsh-command=<执行指令> 设置要在远端主机上执行的指令,以取代rsh指令。
- –same-owner 尝试以相同的文件拥有者还原文件。
- –suffix=<备份字尾字符串> 移除文件前先行备份。
- –totals 备份文件建立后,列出文件大小。
- –use-compress-program=<执行指令> 通过指定的指令处理备份文件。
- –version 显示版本信息。
- –volno-file=<编号文件> 使用指定文件内的编号取代预设的卷册编号。
(1)创建归档,保留权限
# c:创建打包文件,p:保留权限,v:查看过程,f:指定路径
tar -cpvf /PATH/FILE.tar FILE...
# r:追加文件至归档,f:指定路径
tar -rf /PATH/FILE.tar FILE...
# t:查看归档文件中的文件列表,f:指定路径
tar -tf /PATH/FILE.tar
(4)展开归档
# x:解压缩,f:指定路径,-C:指定解压缩路径
tar xf /PATH/FILE.tar
tar xf /PATH/FILE.tar -C /PATH/
tar -zcpvf etc.tar.gz /etc/
tar -jcpvf etc.tar.bz /etc/
tar -Jcpvf etc.tar.xz /etc/

# 只打包目录内的文件,不包括目录本身
tar -zxvf /root/etc.tar.gz /etc/

# 利用 tar 进行文件复制
tar c /data/ | tar -x -C /backup
–exclude 排除文件
范例:
tar zcvf /root/a.tgz --exclude=/app/host1 --exclude=/app/host2 /app
范例:
tar zcvf mybackup.tgz -T /root/includefilelist -X /root/excludefilelist
范例:解压压缩包中指定的文件到指定的目录中
# 将 k9s_Linux_amd64.tar.gz 中的 k9s 解压到 /usr/local/bin/
$ tar -zxvf k9s_Linux_amd64.tar.gz -C /usr/local/bin/ k9s
$ ls -l /usr/local/bin/k9s
-rwxr-xr-x 1 root root 60559360 5月   8 01:01 /usr/local/bin/k9s
3.2 split
split 命令可以分割一个文件为多个文件
格式:
split [–help][–version][-<行数>][-b <字节>][-C <字节>][-l <行数>][要切割的文件][输出文件名]
选项:
- -<行数> : 指定每多少行切成一个小文件
- -b<字节> : 指定每多少字节切成一个小文件
- –help : 在线帮助
- –version : 显示版本信息
- -C<字节> : 与参数”-b”相似,但是在切 割时将尽量维持每行的完整性
- [输出文件名] : 设置切割后文件的前置文件名, split会自动在前置文件名后再加上编号
范例:
#分割大的 tar 文件为多份小文件
split -b Size –d tar-file-name prefix-name

# 示例
split -b 1M mybackup.tgz mybackup-parts

#切换成的多个小分文件使用数字后缀
split -b 1M –d mybackup.tgz mybackup-parts
cat mybackup-parts* > mybackup.tar.gz
范例:分割一个文件为多个文件
~ dd if=/dev/zero of=/data/test/big.img bs=1M count=30
~ ls -lh
total 41M
-rw-r--r-- 1 root root 30M May 22 16:11 big.img
~ split -b1m -d big.img bigfile
~ split -b 10m -d big.img bigile
~ ls -l
total 72660
-rw-r--r-- 1 root root 10485760 May 22 16:12 bigile00
-rw-r--r-- 1 root root 10485760 May 22 16:12 bigile01
-rw-r--r-- 1 root root 10485760 May 22 16:12 bigile02
~ cat bigile0* > bigfile.tar
~ ls -lh bigfile.tar
-rw-r--r-- 1 root root 30M May 22 16:13 bigfile.tar
3.3 cpio
cpio 是历史悠久的打包和解压工具,不过目前也已经较少使用
cpio 命令是通过重定向的方式将文件进行打包备份,还原恢复的工具,它可以解压以 ”.cpio“ 或者 “.tar” 结尾的文件。
格式:
cpio [-0aABckLovV][-C <输入/输出大小>][-F <备份档>][-H <备份格式>][-O <备份档>][–block-size=<区块大小>][–force-local][–help][–quiet][–version]或 cpio [-bBcdfikmnrsStuvV][-C <输入/输出大小>][-E <范本文件>][-F <备份档>][-H <备份格式>][-I <备份档>][-M <回传信息>][-R <拥有者><:/.><所属群组>][–block-size=<区块大小>][–force-local][–help][–no-absolute-filenames][–no-preserve-owner][–only-verify-crc][–quiet][–sparse][–version][范本样式…]或 cpio [-0adkiLmpuvV][-R <拥有者><:/.><所属群组>][–help][–no-preserve-owner][–quiet][–sparse][–version][目的目]
范例:
cpio [选项] > 文件名或者设备名
cpio [选项] < 文件名或者设备名
常用选项:
- -0或–null 接受新增列控制字符,通常配合find指令的”-print0″参数使用。
- -a或–reset–access-time 重新设置文件的存取时间。
- -A或–append 附加到已存在的备份档中,且这个备份档必须存放在磁盘上,而不能放置于磁带机里。
- -b或–swap 此参数的效果和同时指定”-sS”参数相同。
- -B 将输入/输出的区块大小改成5210 Bytes。
- -c 使用旧ASCII备份格式。
- -C<区块大小>或–io-size=<区块大小> 设置输入/输出的区块大小,单位是Byte。
- -d或–make–directories 如有需要cpio会自行建立目录。
- -E<范本文件>或–pattern-file=<范本文件> 指定范本文件,其内含有一个或多个范本样式,让cpio解开符合范本条件的文件,格式为每列一个范本样式。
- -f或–nonmatching 让cpio解开所有不符合范本条件的文件。
- -F<备份档>或–file=<备份档> 指定备份档的名称,用来取代标准输入或输出,也能借此通过网络使用另一台主机的保存设备存取备份档。
- -H<备份格式> 指定备份时欲使用的文件格式。
- -i或–extract 执行copy-in模式,还原备份档。
- -l<备份档> 指定备份档的名称,用来取代标准输入,也能借此通过网络使用另一台主机的保存设备读取备份档。
- -k 此参数将忽略不予处理,仅负责解决cpio不同版本间的兼容性问题。
- -l或–link 以硬连接的方式取代复制文件,可在copy–pass模式下运用。
- -L或–dereference 不建立符号连接,直接复制该连接所指向的原始文件。
- -m或preserve-modification-time 不去更换文件的更改时间。
- -M<回传信息>或–message=<回传信息> 设置更换保存媒体的信息。
- -n或–numeric–uid–gid 使用”-tv”参数列出备份档的内容时,若再加上参数”-n”,则会以用户识别码和群组识别码替代拥有者和群组名称列出文件清单。
- -o或–create 执行copy–out模式,建立备份档。
- -O<备份档> 指定备份档的名称,用来取代标准输出,也能借此通过网络 使用另一台主机的保存设备存放备份档。
- -p或–pass–through 执行copy–pass模式,略过备份步骤,直接将文件复制到目的目录。
- -r或–rename 当有文件名称需要更动时,采用互动模式。
- -R<拥有者><:/.><所属群组>或
- –owner<拥有者><:/.><所属群组> 在copy-in模式还原备份档,或copy-pass模式复制文件时,可指定这些备份,复制的文件的拥有者与所属群组。
- -s或–swap–bytes 交换每对字节的内容。
- -S或–swap–halfwords 交换每半个字节的内容。
- -t或–list 将输入的内容呈现出来。
- -u或–unconditional 置换所有文件,不论日期时间的新旧与否,皆不予询问而直接覆盖。
- -v或–verbose 详细显示指令的执行过程。
- -V或–dot 执行指令时,在每个文件的执行程序前面加上”.”号
- –block-size=<区块大小> 设置输入/输出的区块大小,假如设置数值为5,则区块大小为2500,若设置成10,则区块大小为5120,依次类推。
- –force-local 强制将备份档存放在本地主机。
- –help 在线帮助。
- –no-absolute-filenames 使用相对路径建立文件名称。
- –no-preserve-owner 不保留文件的拥有者,谁解开了备份档,那些文件就归谁所有。
- –only-verify-crc 当备份档采用CRC备份格式时,可使用这项参数检查备份档内的每个文件是否正确无误。
- –quiet 不显示复制了多少区块。
- –sparse 倘若一个文件内含大量的连续0字节,则将此文件存成稀疏文件。
- –version 显示版本信息。
范例:
#将etc目录备份;需要使用相对路径
find ./etc -print | cpio -ov > bak.cpio

#将/data内容追加bak.cpio
find /data | cpio -oA -F bak.cpio

#内容预览
cpio –tv < etc.cpio

#解包文件
cpio –idv < etc.cpio
范例:
# 内容预览
~ cpio -tv < /boot/initramfs-0-rescue-cc2c86fe566741e6a2ff6d399c5d5daa.img
# 解包文件
~ cpio -idv < initramfs-0-rescue-cc2c86fe566741e6a2ff6d399c5d5daa.img
原文地址:https://blog.csdn.net/weixin_74962223/article/details/134777699
本文来自互联网用户投稿,该文观点仅代表作者本人,不代表本站立场。本站仅提供信息存储空间服务,不拥有所有权,不承担相关法律责任。
如若转载,请注明出处:http://www.7code.cn/show_44724.html
如若内容造成侵权/违法违规/事实不符,请联系代码007邮箱:suwngjj01@126.com进行投诉反馈,一经查实,立即删除!


