https://developer.mozilla.org/en-US/docs/Web/API/Window/print
前言
一般信息填写类的需求页面,都会增设「预览」和「打印」功能。我们会通过编写 DOM 及样式来绘制出预览视图,而打印则是基于预览来生成 PDF 文件。
浏览器原生 API window.print() 可以用于打印当前窗口(window.document)视图内容。调用此方法会产生一个打印预览弹框,用户可以根据具体设置来得到打印结果。
window.print() 默认效果缺陷
3.我想要局部打印,但默认是获取的整个 body.innerHtml 的内容
一、打印样式
默认情况下,基于页面上的内容,会将元素,布局和样式都进行打印;
如果仅想在打印上设置特殊样式,可以通过以下方式:
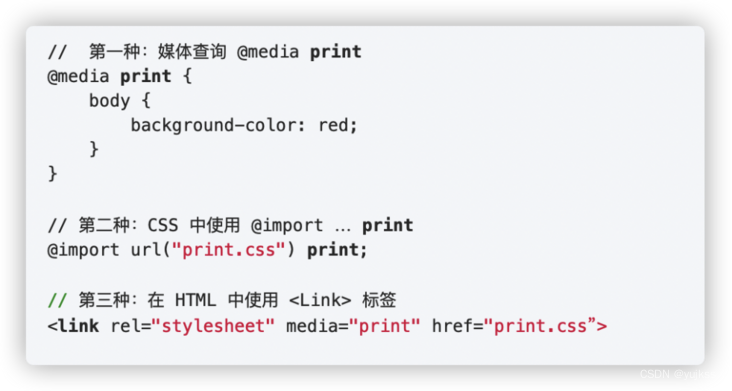
1.使用打印样式表:
<link href="print.css" media="print" rel="stylesheet" />
@media print {p{color: lavender;background: #ccc;}h1{color: lightblue;background: #ccc;}
}
<style media="print"> p{color: lavender;background: #ccc;}h1{color: lightblue;background: #ccc;} </style>
div{// Chrome、Safari 等 webkit 浏览器内核-webkit-print-color-adjust: exact;// 火狐print-color-adjust: exact;color-adjust: exact;
}
二、打印指定区域内容
默认情况下,调用 window.print() 会对整个 document.body 进行打印,当需要打印指定容器内容时,可以通过以下几种方式:
1. 对容器进行打印
<body><div id="container"><p>这是一个段落</p><h1>这是一个标题</h1></div><input type="button" value="打印此页面" onclick="printpage()" />
<script>
const printpage = () => {
let newstr = document.getElementById("container").innerHTML;
let oldstr = document.body.innerHTML;
document.body.innerHTML = newstr;
window.print();
document.body.innerHTML = oldstr;
}
</script>
</body>
2. 对容器内的部分内容进行打印
当只需要打印容器内某一部分内容时,可以通过注释标识进行截取。
<body><div id="container"><!--startprint--><p>这是一个段落</p><!--endprint--><h1>这是一个标题</h1></div><input type="button" value="打印此页面" onclick="printpage()" /><script> const printpage = () => {let oldStr = window.document.body.innerHTML; // 获取body的内容let start = "<!--startprint-->"; // 开始打印标识, 17个字符let end = "<!--endprint-->"; // 结束打印标识let newStr = oldStr.substr(oldStr.indexOf(start) + 17); // 截取开始打印标识之后的内容newStr = newStr.substring(0, newStr.indexOf(end)); // 截取开始打印标识和结束打印标识之间的内容window.document.body.innerHTML = newStr; // 把需要打印的指定内容赋给bodywindow.print(); // 调用浏览器的打印功能打印指定区域window.document.body.innerHTML = oldStr; // body替换为原来的内容} </script>
</body>
3. 监听打印前后事件
通过监听打印前后事件window.onbeforeprint、window.onafterprint ,对不需要进行打印的元素进行隐藏和放开隐藏。
<body>
<div id="container">
<p>这是一个段落</p><h1 id="title">这是一个标题</h1>
</div>
<input type="button" value="打印此页面" onclick="printpage()" />
<script>
const printpage = () => {window.print();}
window.onbeforeprint = function() {
// 将一些不需要被打印的元素隐藏
document.getElementById('title').style.display = 'none';}
window.onafterprint = function() {
// 放开隐藏的元素
document.getElementById('title').style.display = 'block';
}
</script>
</body>
4. iframe
上面几种方式都在当前窗口进行打印,并且都需要更改 document.body 内容,这会出现视图切换,带来的体验不是太好。
下面我们借助 iframe 来实现打印,并且不影响当前视窗的内容展示。
<body>
	<div id="container">
		<p>这是一个段落</p>
		<h1 id="title">这是一个标题</h1>
	</div>
	<input type="button" value="打印此页面" onclick="printpage()" />
	<script>
		const printpage = () => {
			const printContent = document.querySelector('#container').innerHTML;
			const iframe = document.createElement('iframe');
			iframe.setAttribute('style', 'position: absolute; width: 0; height: 0;');document.body.appendChild(iframe);
			const iframeDoc = iframe.contentWindow.document;
			// 设置打印展示方式 - 横向展示
			iframeDoc.write('<style media="print">@page {size: landscape;}</style>');
			// 向 iframe 中注入 printContent 样式
			iframeDoc.write(`<link href="./print.css" media="print" rel="stylesheet" />`);
			// 写入内容
			iframeDoc.write('<div>' + printContent + '</div>');
			setTimeout(function(){
			iframe.contentWindow.print();
			document.body.removeChild(iframe);
			}, 50);
		}
	</script>
</body>
三、强行插入分页
当需要自定义打印分页时机时,可通过如下方式将指定 DOM 设为分割点。
@media print {h1 {page-break-before: always;}
}
@media print {h1 {page-break-after: always;}
}
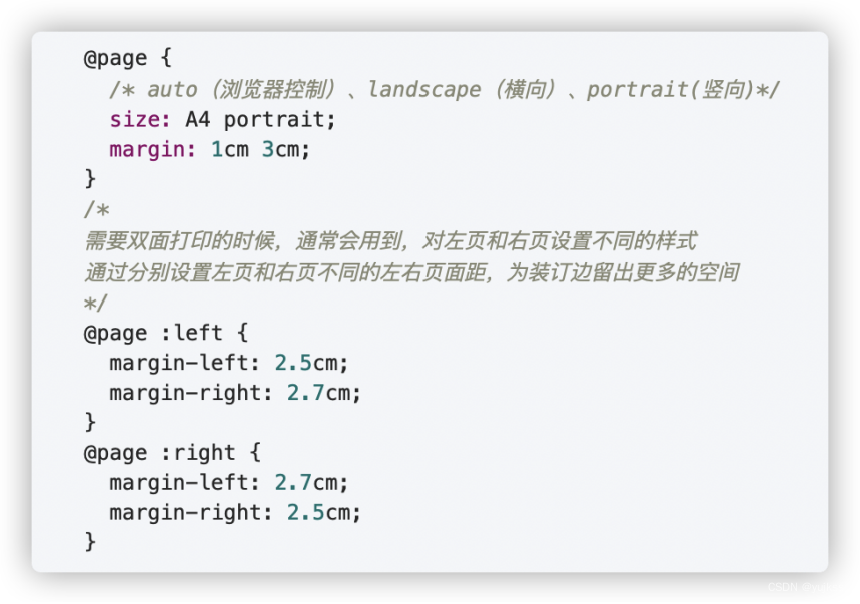
四、打印设置
1.设置打印布局
@media print {
	@page {
		/* 纵向展示(高度展示内容更多) */
		/* size: portrait;*/
		/* 横向(宽度展示内容更大) */
		size: landscape;
		/* 打印的边距 上右下左 */
		margin: 1cm 2cm 1cm 2cm;
		}
}
注意,一旦设置为 size: landscape,在打印时将不能切换展示模式,包括纸张类的设置。
五、最佳实践(React)
1. 背景:
有一个信息填写页面,支持进行预览和打印,预览是一个 Dialog 弹框,打印取自于预览的内容。因此,在打印前,需要将预览内容呈现在 DOM 树上。
2. 思路:
- 点击打印,将预览 Dialog open state 设置为 true,Dialog 渲染到 DOM 树上;
- 执行 setTimeout 延迟任务,在 Dialog 渲染在 DOM 树上后对其隐藏(disabled: none),目的是实现视图上不展示 Dialog;
- 创建 iframe,并将 Dialog 内容及其样式,写入 iframe.document 中;
- 执行 iframe.contentWindow.print() 进行打印;
- 打印完成后做一些重置处理:移除 iframe、将 Dialog 隐藏逻辑去掉、将 Dialog open state 置为 false;
这样,在不影响现有页面内容的展示,同时实现了打印 Dialog 内容。
3. 实现:
const printFocus = () => {
// 打印事件
	// 1.挂载要打印的内容
	setPreviewOpen(true);
	setTimeout(() => {
		// 延迟,等待 Dialog 渲染在 DOM 树上
		// 2.隐藏要打印的内容
		const container =document.querySelector('.preview-wrapper');
		container.setAttribute('style','display: none;');
		// 3. 创建
		iframeconst iframe =document.createElement('iframe');
		const printContent =container.innerHTML;
		iframe.setAttribute('style', 'position: absolute; width: 0;height: 0;');
		document.body.appendChild(iframe);
		const doc =iframe.contentWindow.document;
		// 4. 写入内容//
		doc.write('<style media="print"> @page {size: landscape;}</style>');
		doc.write(`<link href="./preview-focus.css" media="print" rel="stylesheet" />`);
		doc.write('<div>'+ printContent + '</div>');
		const link = doc.getElementsByTagName('link')[0];
		link.onload = () => {
			// 样式文件加载完毕后打印
			// 5.执行打印
			iframe.contentWindow.print();
			// 6.重置工作
			document.body.removeChild(iframe);
			setPreviewOpen(false);
			container.removeAttribute('style');
		}
	},0);
}
六、如果干预打印分页
通常我们会遇到这种情况:在打印内容多于一页时会自动进行分页,若分页的分割点恰巧是一行文字,就会出现文字被切割分别显示在上下两页。
尽管我们可以通过 CSS 属性 page-break–before: always; 来干预分页,但页面内容并非固定的,如何将这个属性恰巧应用在分割点的 DOM 元素之上呢?
1.为可能会被分割的元素设置自定义属性,用于查找访问;
2.根据打印视窗的每页高度,粗估一个高度值,作为页面分割的参考;
3.遍历可分割元素,判断它们是否处于页面分割位置(top < pageHeight && botton > pageHeight);
4.若处于页面分割位置,为此 DOM 设置分割属性 page-break–before: always;。
代码实现:
<!-- 自定义属性标识 -->
<div key={index} data-ident="page-break" className="module-paragraph">
<script>
// 1、获取可能会被分页符分割的元素c
onst pageBreakEles = container.querySelectorAll("[data-ident = 'page-break']") || [];
// 2、定义打印页面的高度,假设粗估后为 877px
const printPageHeight = 877;
// 3、匹配元素,是否处于页面分割线位置
Array.from(pageBreakEles).forEach(ele => {const { top, bottom } = ele.getBoundingClientRect();
// 根据高度计算元素处于第几页
const currentPage = Math.floor(top / printPageHeight);
// 处于分页符位置的元素,设置分割属性
if ((top - currentPage * printPageHeight) < printPageHeight && (bottom - currentPage * printPageHeight) > printPageHeight) {(ele as HTMLElement).style.setProperty('page-break-before', 'always');
}});
</script>
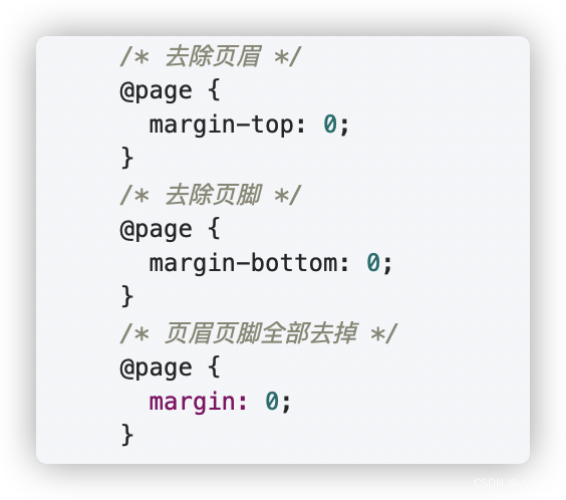
七、 window.print去除浏览器默认页眉页脚
打印时默认有页眉页脚信息,显示在页面外边距范围,我们可以通过去除页面模型page的外边距,使其隐藏页眉页脚信息,再通过设置 body 元素的 margin 来保证打印出来的页面带有外边距
@media print {
  @page {
    margin: 0;
  }
  body {
    margin: 1cm;
  }
}
//打印(兼容IE浏览器)
function webPrint(objId){
var printContent=document.getElementById(objId).innerHTML;//获得需要打印内容的HTML代码
PageSetup_Null();//把页眉页脚设置为空
printWindow=window.open('','_blank');
printWindow.document.write('<!DOCTYPE html PUBLIC "-//W3C//DTD XHTML 1.0 Transitional//EN" "http://www.w3.org/TR/xhtml1/DTD/xhtml1-transitional.dtd"><html xmlns="http://www.w3.org/1999/xhtml"><head><meta http-equiv="Content-Type" content="text/html; charset=utf-8" /> <title></title><style>@page{margin-bottom:0mm;margin-top:2mm}</style></head><body>');
//这里是向新建的窗口写入HTML的head信息,可引入自己的js和css,以供打印时样式与网页中显示的一致
printWindow.document.write('<div style="width:100%; height:100%;">'+printContent+"</div>");
//这里向新建的窗体中写入BODY的内容,注意,外边加的额外DIV是有必要的,它里面CSS可以控制打印时不会出现空白页
printWindow.document.write("</body></html>");//这里向新建的窗体写入HTML的结束标记
printWindow.document.close();//关闭新建窗口的文档输出流,否则下面的打印语句无效
printWindow.print();//打印当前新建窗口中的内容
printWindow.close();//关闭新建的窗口
PageSetup_Default();//把页眉页脚恢复为默认
}
//设置网页打印的页眉页脚为空
function PageSetup_Null(){
var HKEY_Root,HKEY_Path,HKEY_Key;
HKEY_Root="HKEY_CURRENT_USER";
HKEY_Path="\Software\Microsoft\Internet Explorer\PageSetup\";
try{
var Wsh=new ActiveXObject("WScript.Shell");
HKEY_Key="header";
Wsh.RegWrite(HKEY_Root+HKEY_Path+HKEY_Key,"");
HKEY_Key="footer";
Wsh.RegWrite(HKEY_Root+HKEY_Path+HKEY_Key,"");
}catch(e){}
}
//设置网页打印的页眉页脚为默认值
function PageSetup_Default(){
var HKEY_Root,HKEY_Path,HKEY_Key;
HKEY_Root="HKEY_CURRENT_USER";
HKEY_Path="\Software\Microsoft\Internet Explorer\PageSetup\";
try{
var Wsh=new ActiveXObject("WScript.Shell");
HKEY_Key="header";
Wsh.RegWrite(HKEY_Root+HKEY_Path+HKEY_Key,"&w&b页码,&p/&P");
HKEY_Key="footer";
Wsh.RegWrite(HKEY_Root+HKEY_Path+HKEY_Key,"&u&b&d");
}catch(e){}
}
window.print() 实现A4纸张打印及去掉页眉页脚及打印链接
<!DOCTYPE html>
<html lang="zh-CN">
  <head>
    <meta charset="utf-8">
    <meta http-equiv="X-UA-Compatible" content="IE=edge">
    <meta name="viewport" content="width=device-width, initial-scale=1">
    <!-- 上述3个meta标签*必须*放在最前面,任何其他内容都*必须*跟随其后! -->
    <title>测评表</title>

    <!-- Bootstrap -->
    <link href="https://cdn.bootcss.com/bootstrap/3.3.7/css/bootstrap.min.css" rel="stylesheet">

    <!-- HTML5 shim and Respond.js for IE8 support of HTML5 elements and media queries -->
    <!-- WARNING: Respond.js doesn't work if you view the page via file:// -->
    <!--[if lt IE 9]>
      <script src="https://cdn.bootcss.com/html5shiv/3.7.3/html5shiv.min.js"></script>
      <script src="https://cdn.bootcss.com/respond.js/1.4.2/respond.min.js"></script>
    <![endif]-->
  </head>
  <style>
     .a4-endwise{
      width: 1075px;
      height: 1400px;
      border: 1px #000 solid;
      overflow: hidden;
      padding: 0;
      word-break:break-all;
      text-align:center;
    }
    .a4-endwise table{
    	border: 1px #000 solid;
    	width: 80%;
		max-width: 80%;
		margin: 0px 100px;
		text-align: center;
		font-size: 20px;
    }

    .print{
      position: fixed;
      top: 1%;
      right: 10%;
    }
  </style>
  <body>
<a class="print" href="javascript:;" onclick="preview();">打印</a>
<!--startprint-->
    <div class="container a4-endwise" id="test">

    </div>
<!--endprint-->

    <!-- jQuery (necessary for Bootstrap's JavaScript plugins) -->
    <script src="https://cdn.bootcss.com/jquery/1.12.4/jquery.min.js"></script>
    <!-- Include all compiled plugins (below), or include individual files as needed -->
    <script src="https://cdn.bootcss.com/bootstrap/3.3.7/js/bootstrap.min.js"></script>
    <script>
        /**
         * [打印]
         * @return {[type]} [description]
         */
        function preview()
        {
            bdhtml=window.document.body.innerHTML;//获取当前页的html代码
            sprnstr="<!--startprint-->";//设置打印开始区域
            eprnstr="<!--endprint-->";//设置打印结束区域
            prnhtml=bdhtml.substring(bdhtml.indexOf(sprnstr)+18); //从开始代码向后取html
            prnhtml=prnhtml.substring(0,prnhtml.indexOf(eprnstr));//从结束代码向前取html
            window.document.body.innerHTML=prnhtml;
            window.print();
            window.document.body.innerHTML=bdhtml;
        }
    </script>

  </body>
</html>
window.print() 去掉页眉页脚及打印链接
<style media="print">
    @page {
      size: auto;  /* auto is the initial value */
      margin: 0mm; /* this affects the margin in the printer settings */
    }
</style>
八 、IE浏览器打印预览 :使用html 标签引入Webbrowser控件
最近遇到这么一个需求,需要在IE浏览器上打印的时候,不直接调用打印机,而是先打开打印预览页面,再进行打印操作。
这样,就需要对原本的打印方法进行改写了。使用html 标签<object>引入Webbrowser控件,这种方式优势是在IE下可以弹出打印预览,这是打印很人性化的功能,但是遗憾的是高版本的IE浏览器不支持WebBrowser了。
具体实现如下:
<!-- 在body标签中写入一个object -->
<object id="printWB" style="dispaly:none" classid="clsid:8856F961-340A-11D0-A96B-00C04FD705A2" height="0"></object>
function printall(){
		// 打印页面预览
		if (!!window.ActiveXObject || "ActiveXObject" in window){//IE浏览器
		 	$(".noprint").css("display","none");
			try{
				//增加打印预览
				printWB.ExecWB(7, 1);
			}catch(e){
				alert(e);
			}finally{
				$(".noprint").css("display","");
			}
		}else{
			//需要引入jquery.jqprint-0.3.js
			$('#a').jqprint();
		}
	}
<script>
  WebBrowser.ExecWB(1,1) //打开
  WebBrowser.ExecWB(2,1) //关闭现在所有的IE窗口,并打开一个新窗口
  WebBrowser.ExecWB(4,1) //保存网页
  //--------------- 常用 ---------------
  WebBrowser.ExecWB(6,1) //打印
  WebBrowser.ExecWB(7,1) //打印预览
  WebBrowser.ExecWB(8,1) //打印页面设置
  //-------------------------------------
  WebBrowser.ExecWB(10,1) //查看页面属性
  WebBrowser.ExecWB(15,1) //撤销
  WebBrowser.ExecWB(17,1) //全选
  WebBrowser.ExecWB(22,1) //刷新
  WebBrowser.ExecWB(45,1) //关闭窗体无提示
</script>
<html>
<head>
    <title>print demo</title>
    <meta charset="utf-8" >
    <style media="print">
        .noprint {
            display: none;
        }
    </style>
    <script language="JavaScript">
        function doPrintSetup() {
            //打印设置
            printWB.ExecWB(8, 1)
        }

        function doPrintPreview() {
		if (!!window.ActiveXObject || "ActiveXObject" in window){
			//打印预览
            try{
			printWB.ExecWB(7, 1)
			}catch(e){
				alert(e);
			}
		}

        }

        function doPrint() {
            //直接打印
            printWB.ExecWB(6, 6)
        }
    </script>
</head>

<body>
	<object id="printWB" style="dispaly:none" classid="clsid:8856F961-340A-11D0-A96B-00C04FD705A2" height="0"></object>
    <div class="noprint">

        <input type="button" value="打印设置" onclick="doPrintSetup();"></input>
        <input type="button" value="打印预览" onclick="doPrintPreview();"></input>
        <input type="button" value="直接打印" onclick="doPrint();"></input>
        <input type="button" value="关闭窗口" onclick="printWB.ExecWB(45,1);"></input>
    </div>
    <p>这些文本将要被打印!</p>
    <p>关于这个组件还有其他的用法,列举如下:<br/> WebBrowser.ExecWB(1,1) 打开<br/> Web.ExecWB(2,1) 关闭现在所有的IE窗口,并打开一个新窗口<br/> Web.ExecWB(4,1) 保存网页<br/> Web.ExecWB(6,1) 打印<br/> Web.ExecWB(7,1) 打印预览<br/> Web.ExecWB(8,1) 打印页面设置<br/> Web.ExecWB(10,1) 查看页面属性<br/> Web.ExecWB(15,1) 撤销<br/> Web.ExecWB(17,1) 全选<br/> Web.ExecWB(22,1) 刷新<br/> Web.ExecWB(45,1) 关闭窗体无提示<br/>
    </p>
</body>
</html>
https://blog.csdn.net/weixin_44867717/article/details/128178668
https://blog.csdn.net/fengshuiyue/article/details/57483057
原文链接:
https://blog.csdn.net/Misnice/article/details/100539347
https://juejin.cn/post/7071064879217508366
https://juejin.cn/post/6844903630135361550
https://blog.csdn.net/ylq090324/article/details/121348777
https://blog.csdn.net/ZslLoveMiwa/article/details/80616399
https://segmentfault.com/a/1190000039696670
https://blog.csdn.net/JAVA11429/article/details/112747188
https://www.cnblogs.com/robertfang/articles/1599551.html
https://blog.csdn.net/hehyyoulan/article/details/81098814
原文地址:https://blog.csdn.net/qq_39900031/article/details/129963485
本文来自互联网用户投稿,该文观点仅代表作者本人,不代表本站立场。本站仅提供信息存储空间服务,不拥有所有权,不承担相关法律责任。
如若转载,请注明出处:http://www.7code.cn/show_44900.html
如若内容造成侵权/违法违规/事实不符,请联系代码007邮箱:suwngjj01@126.com进行投诉反馈,一经查实,立即删除!