目录:
参考的博客:
NSTimer相关内容日常中时长会用到,且在runLoop中接触过,当时只是简单了解,NSTimer也是很重要的一部分,也是面试中经常会问到的,下面我们就详细总结一下这部分内容和循环引用部分的理解
问题引入
循环引用
简单的循环引用
简单的循环引用就是:
我们举个简单例子体现一下循环引用:
@interface FirstPerson : NSObject

@property (nonatomic, strong) SecondPerson *test;

@end
@interface SecondPerson : NSObject

@property (nonatomic, strong) FirstPerson *test;

@end
如果不是循环引用就是单向持有,假设是A持有B,也就是B是A的一个属性,而B不持有A
若对
A发送release消息,发现持有对象B,则向对象B发送release消息,B对象执行dealloc方法,引用计数为0,释放内存,同时A对象引用计数也为0,内存得到正确释放
如果是循环引用
若对
A发送release消息,发现持有B对象,则会向B对象发送release消息,等待b释放内存。B收到release消息后,发现持有A,于是也向A发送release消息,等待A释放内存。此时就会发生A等待B释放内存,B又等待A释放内存,造成了死锁,发生内存泄漏
若对A发送
release消息,发现持有B对象,则会向B对象发送release消息,等待B释放内存。B收到release消息后,虽然持有A(weak),但不会等待A释放内存,此时引用计数为0,执行dealloc,释放内存,同时A的引用计数变成了0,执行dealloc,释放内存
Block中的循环引用强弱共舞
如果我们在某个页面的属性中声明了一个block,那么就相当于我们这个页面的self持有了这个block
如果我们在block再持有self,这个时候就会造成循环引用,例子如下:
- (void)touchesBegan:(NSSet<UITouch *> *)touches withEvent:(UIEvent *)event {
    self.blk = ^{
        //5秒后执行
        dispatch_after(dispatch_time(DISPATCH_TIME_NOW, (int64_t)(5 * NSEC_PER_SEC)), dispatch_get_main_queue(), ^{
            NSLog(@"%@", weakSelf);
        });
    };
    self.blk();
    //dismiss当前界面
	[self dismissViewControllerAnimated:YES completion:nil];
}
self对象持有block,block里面又持有self,而且彼此之间都是默认的强引用,这就导致了一个循环引用,这个时候我们一执行后面的dismiss退出当前界面之后就会产生,界面已经销毁了,但是刚才产生的循环引用还在,就导致了内存泄漏
我们可以对self进行weak处理,让block中持有的是weak修饰后的self,就可以避免循环引用,代码如下:
- (void)touchesBegan:(NSSet<UITouch *> *)touches withEvent:(UIEvent *)event {
	//用weak修饰self,然后让block持有这个weak修饰过后的self
    __weak typeof(self) weakSelf = self;
    self.blk = ^{
        //5秒后执行
        dispatch_after(dispatch_time(DISPATCH_TIME_NOW, (int64_t)(5 * NSEC_PER_SEC)), dispatch_get_main_queue(), ^{
            NSLog(@"%@", weakSelf);
        });
    };
    self.blk();
    [self dismissViewControllerAnimated:YES completion:nil];
}
这样就没有什么问题了,由于是block弱引用self,所以已经打破了之前的循环引用,此时如果后面执行dismiss销毁当前视图的话,我们去打印刚才的self的值已经是null了。
但是单独添加一个weak修饰的self是有一些漏洞的,如果在block执行到关于self的那部分之前,我们的self在外部被提前释放掉了的话,那么当执行到block有关self的那块部分时程序就会崩溃。为了解决这个问题,我们就可以在weak修饰完self之后,让block持有再用strong修饰的已经被weak修饰过的self,在block内部让self的引用计数先加1保证self不会意外释放,然后当block中的内容执行完之后出block中代码的作用域的时候刚才加1的引用计数会自动release减1,这样一来,既避免了循环引用,也避免了self意外释放,代码示例如下:
- (void)touchesBegan:(NSSet<UITouch *> *)touches withEvent:(UIEvent *)event {
 	//用weak修饰self
	__weak typeof(self) weakSelf = self;
    self.blk = ^{
    	//用strong修饰被weak修饰过的self
    	__strong typeof(self) strongSelf = weakSelf;
        //5秒后执行
        dispatch_after(dispatch_time(DISPATCH_TIME_NOW, (int64_t)(5 * NSEC_PER_SEC)), dispatch_get_main_queue(), ^{
            NSLog(@"%@", strongSelf);
        });
    };
    self.blk();
    [self dismissViewControllerAnimated:YES completion:nil];
}
Delegate中的循环引用
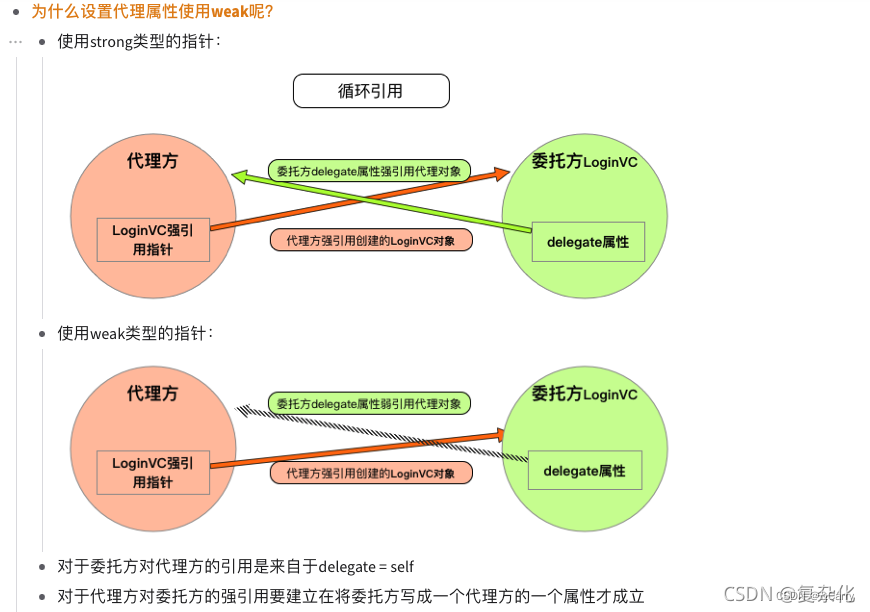
举个简单例子:我们当前界面的self持有一个tableView,然后tableView的delegate又设置为我们的self,假如这之间都是强持有的话就会造成一个循环引用的效果,所以我们的delegate一般都需要用weak来修饰,用来避免循环引用。
NSTimer
之前学习的循环引用部分我们就结束了,下面步入正题NSTimer
创建NSTimer
+ (NSTimer *)scheduledTimerWithTimeInterval:(NSTimeInterval)ti target:(id)target selector:(SEL)aSelector userInfo:(id)userInfo repeats:(BOOL)repeats
+ (NSTimer *)timerWithTimeInterval:(NSTimeInterval)ti target:(id)target selector:(SEL)aSelector userInfo:(id)userInfo repeats:(BOOL)repeats

- (instancetype)initWithFireDate:(NSDate *)date interval:(NSTimeInterval)ti target:(id)target selector:(SEL)aSelector userInfo:(id)userInfo repeats:(BOOL)repeats
这几种方法除了创建方式(参数)不同,方法类型不同(类方法,对象方法),还有什么不同?
我们常用的scheduledTimerWithTimeInterval相比与其他两种方法,其不仅仅是创建了NSTimer对象,还把该对象加入到了当前的runloop中
NSTimer只有被加入到runloop中,才会生效,NSTimer才会真正执行
也就是说,如果我们想使用timerWithTimeInterval或initWithFireDate的话,需要使用NSRunloop的以下方法将NSTimer加入到runloop中
- (void)addTimer:(NSTimer *)aTimer forMode:(NSString *)mode
销毁NSTimer
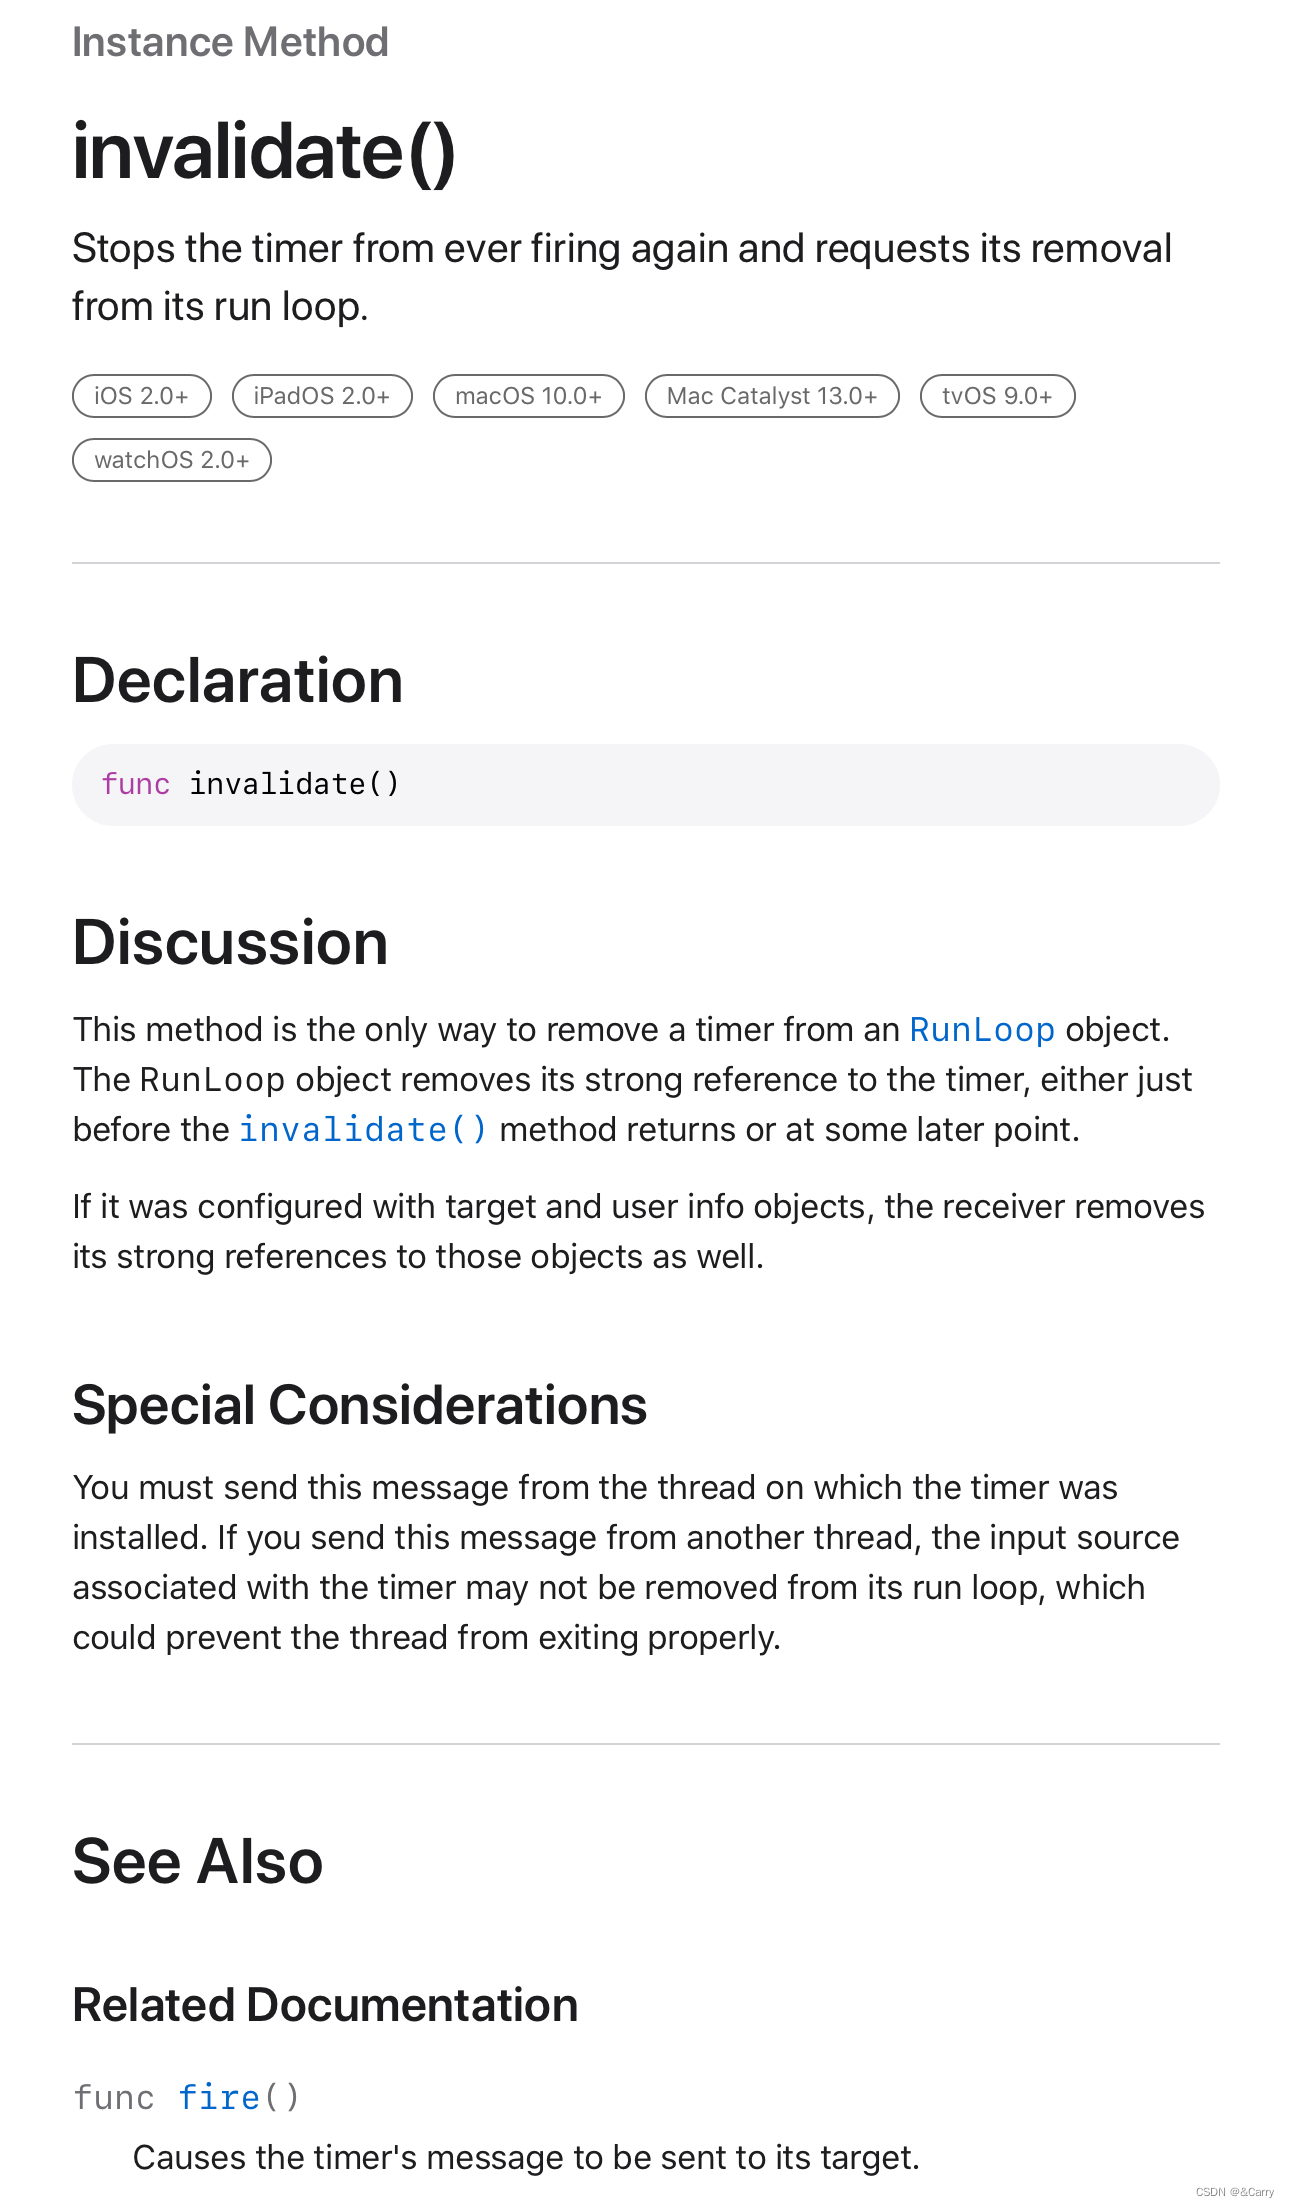
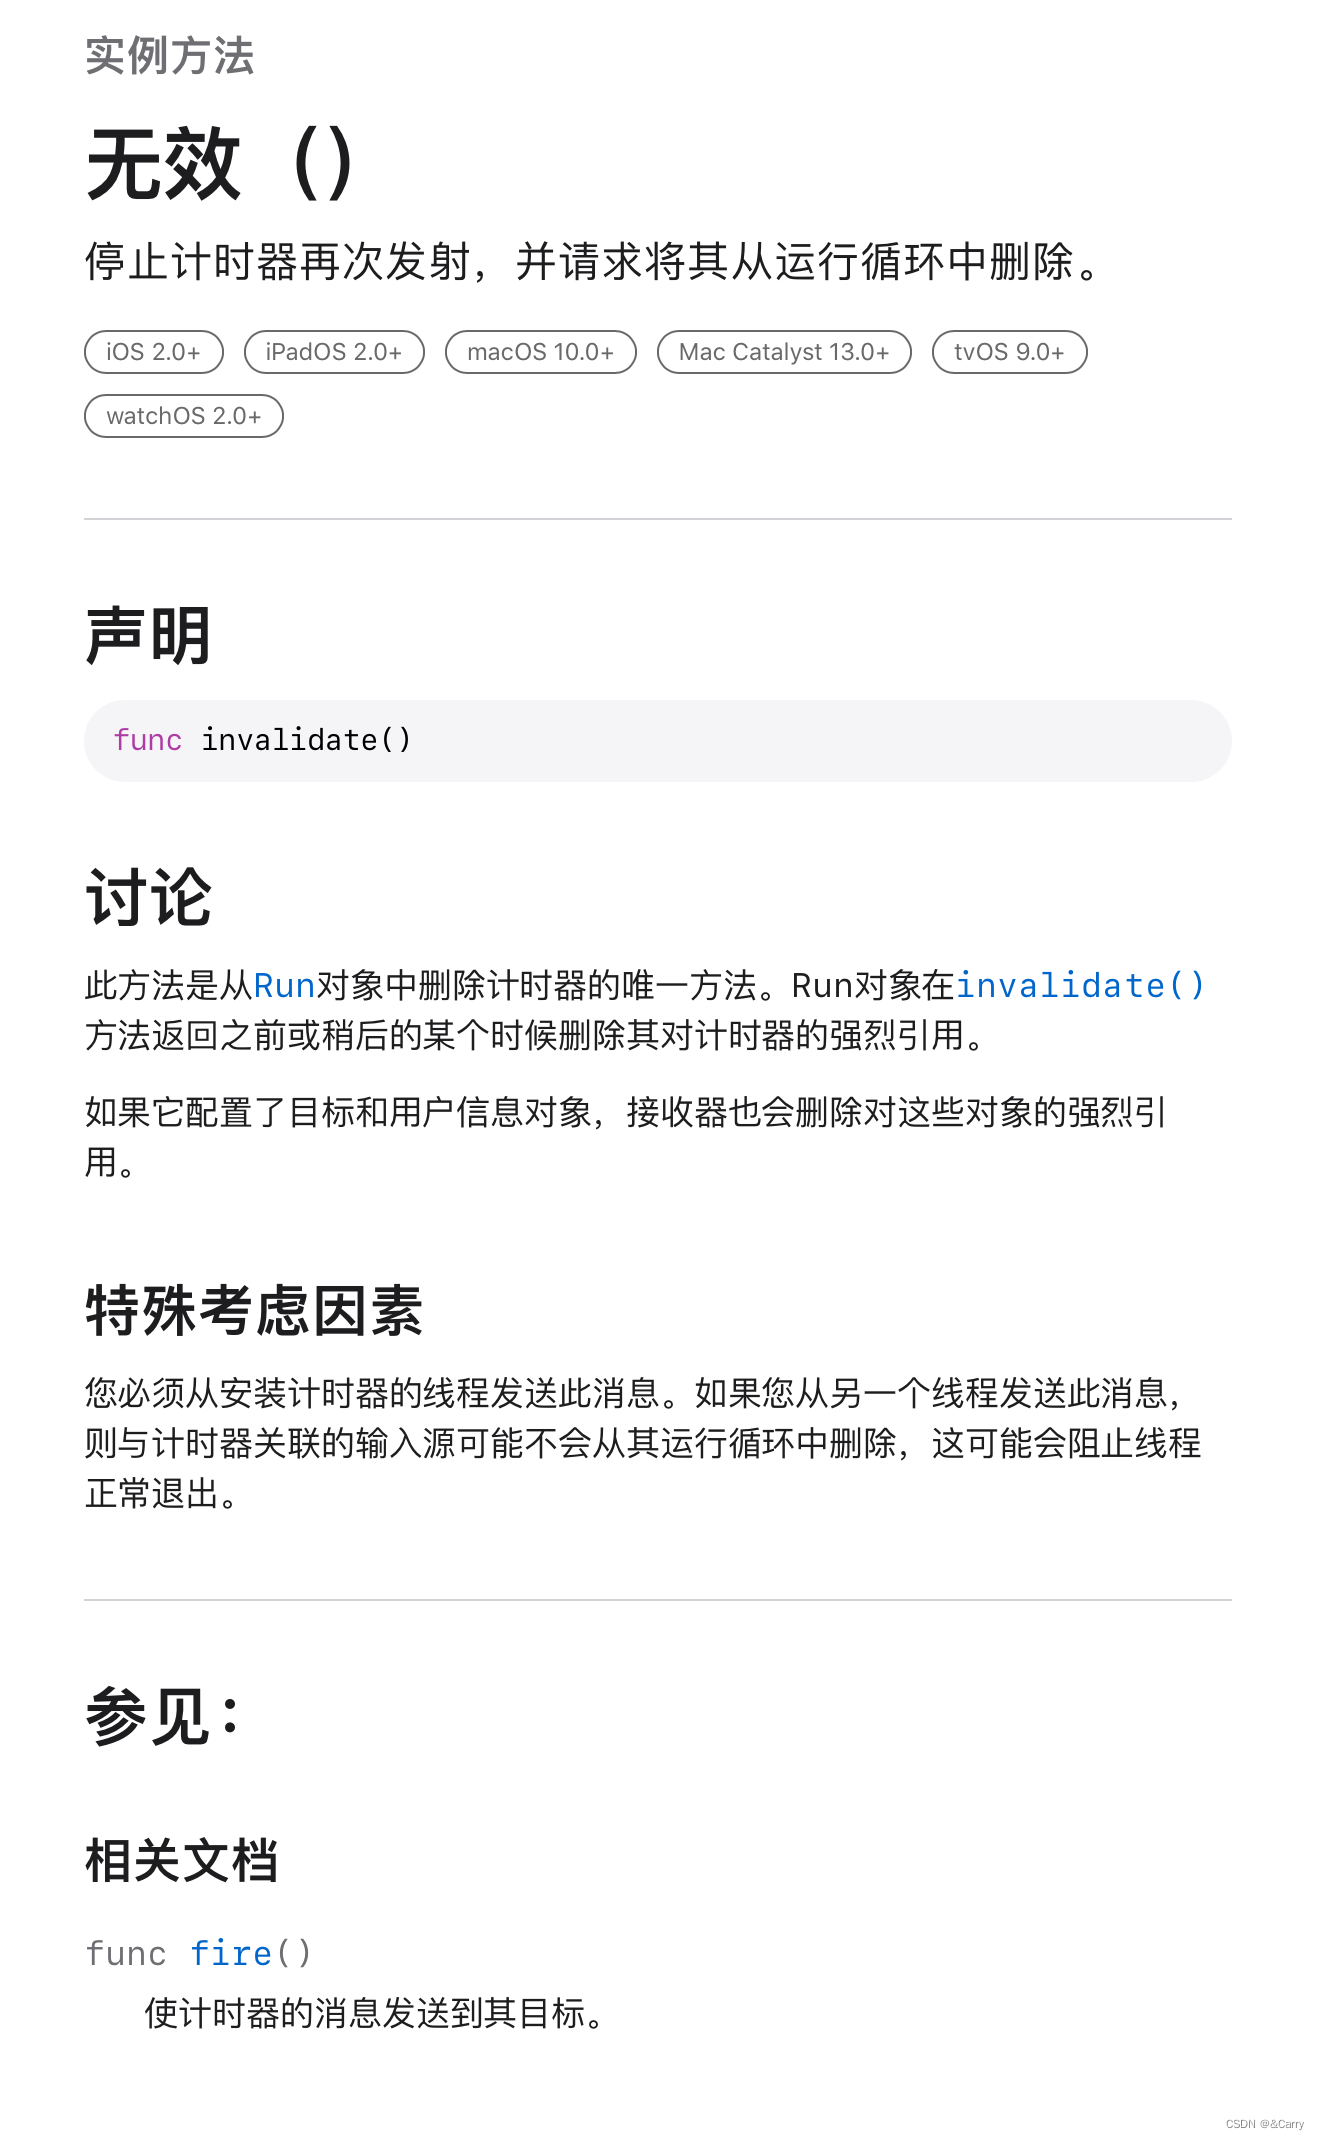
invalidate
ver from ever firing again and requests its removal from its run loop
This method is the only way to remove a timer from an NSRunLoop object
fire
Causes the receiver’s message to be sent to its target
If the timer is non–repeating, it is automatically invalidated after firing
总之,如果想要销毁NSTimer,那么一定要使用invalidate方法
那现在就有一个问题了,我们对NSTimer置nil可以让iOS系统帮我买销毁NSTimer吗?
为什么呢?
我们通过看ARC下的引用计数来探究一下:
- (void)viewDidLoad {
    [super viewDidLoad];
    // Do any additional setup after loading the view.
    NSLog(@"Retain count is %ld", CFGetRetainCount((__bridge CFTypeRef)self));

    _timer = [NSTimer scheduledTimerWithTimeInterval:2 target:self selector:@selector(timerSelector) userInfo:nil repeats:NO];

    NSLog(@"Retain count is %ld", CFGetRetainCount((__bridge CFTypeRef)self));

    [_timer invalidate];

    NSLog(@"Retain count is %ld", CFGetRetainCount((__bridge CFTypeRef)self));

}

- (void) timerSelector {
    NSLog(@"调用了NSTimer!");
}
打印结果如下:

加入了NSTimer之后,引用计数从26变为了27
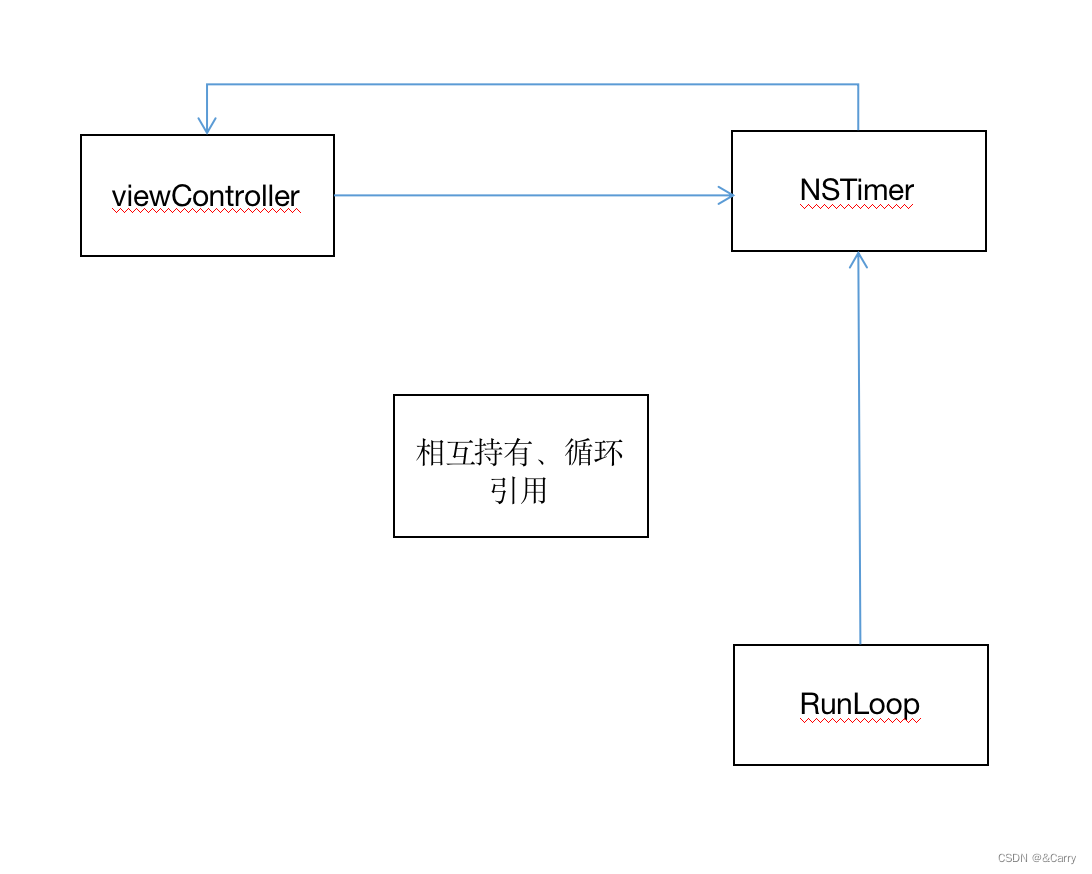
这个其实是timer对ViewController对象进行了强引用
因为如果要让timer运行的时候执行ViewController下面的timerSelector:,timer就需要知道target,并且保存这个target。以便于在以后执行[target performSelector:];,这里的target就是指ViewController(self)
所以,NSTimer和ViewController是相互之间强引用的,这样子就形成了循环引用的问题。
为了解除循环引用,在 invalidate 这个方法下,timer之前保存的target被设置成了nil,强制断开了循环引用。这点和直接设置timer = nil是差不多的。但是invalidate还做了另外一个动作,就是解除了runLoop对timer的强引用,使得timer成功停止
- 解除
RunLoop对象对于该定时器的强引用和定时器对其设置的target等的强引用 - 从
RunLoop中移除该定时器
重要的点: 必须在创建定时器的那个线程中调用invalidate方法,否则可能不会从RunLoop中删除与该计时器相关的输入源,从而阻止线程正确退出
所以在创建NSTimer对象的类的dealloc里面去invalidate timer的这个做法是不行的,因为都是相互强引用的,在定时器invalidate前,我们创建NSTimer对象的类的dealloc不可能被执行到。
面试题
+ (NSTimer *)scheduledTimerWithTimeInterval:(NSTimeInterval)ti target:(id)target selector:(SEL)aSelector userInfo:(id)userInfo repeats:(BOOL)repeats
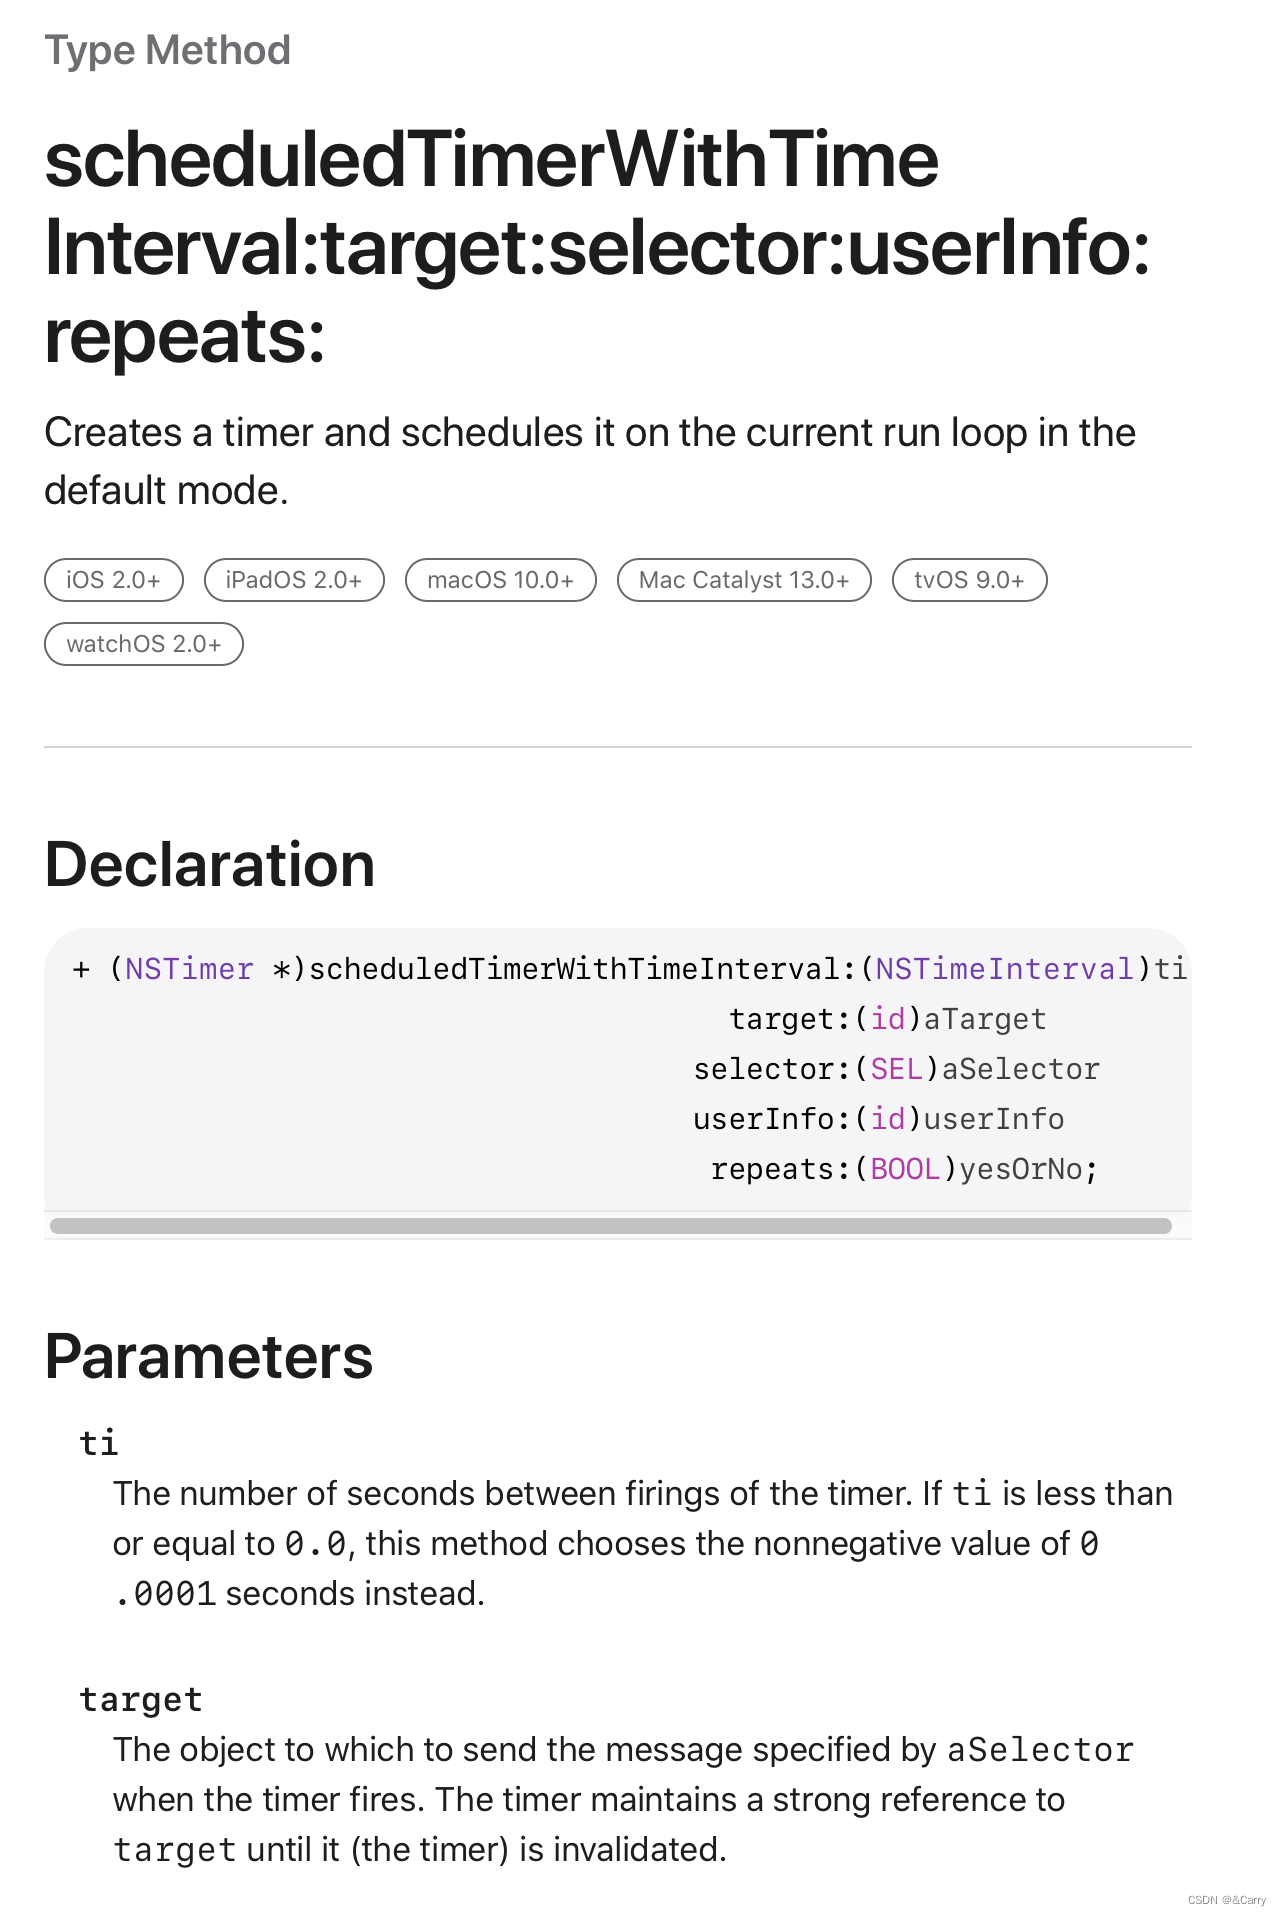
其中关键部分target的翻译如下:
+ (NSTimer *)timerWithTimeInterval:(NSTimeInterval)ti target:(id)target selector:(SEL)aSelector userInfo:(id)userInfo repeats:(BOOL)repeats
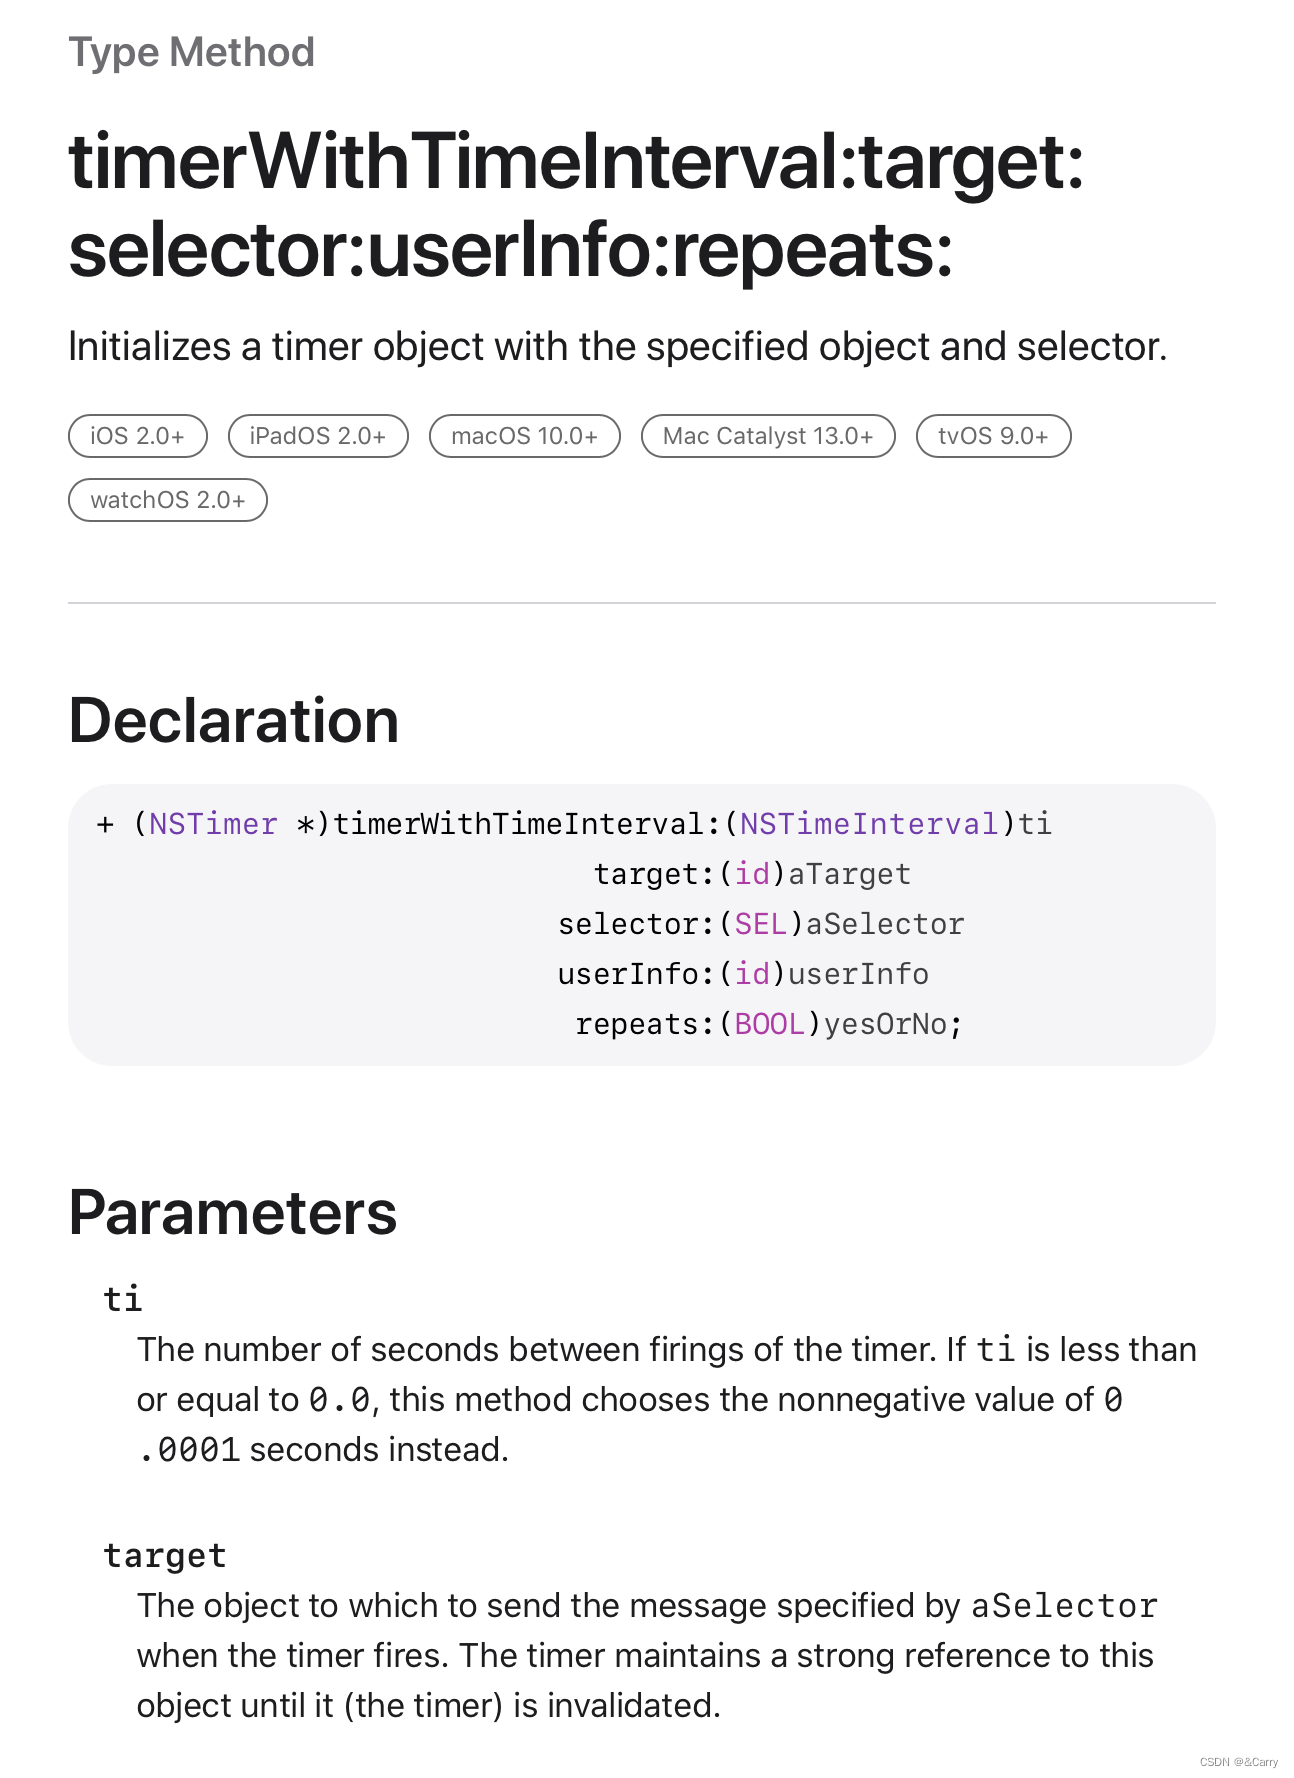
其中关键部分target的翻译如下:
- (instancetype)initWithFireDate:(NSDate *)date interval:(NSTimeInterval)ti target:(id)target selector:(SEL)aSelector userInfo:(id)userInfo repeats:(BOOL)repeats
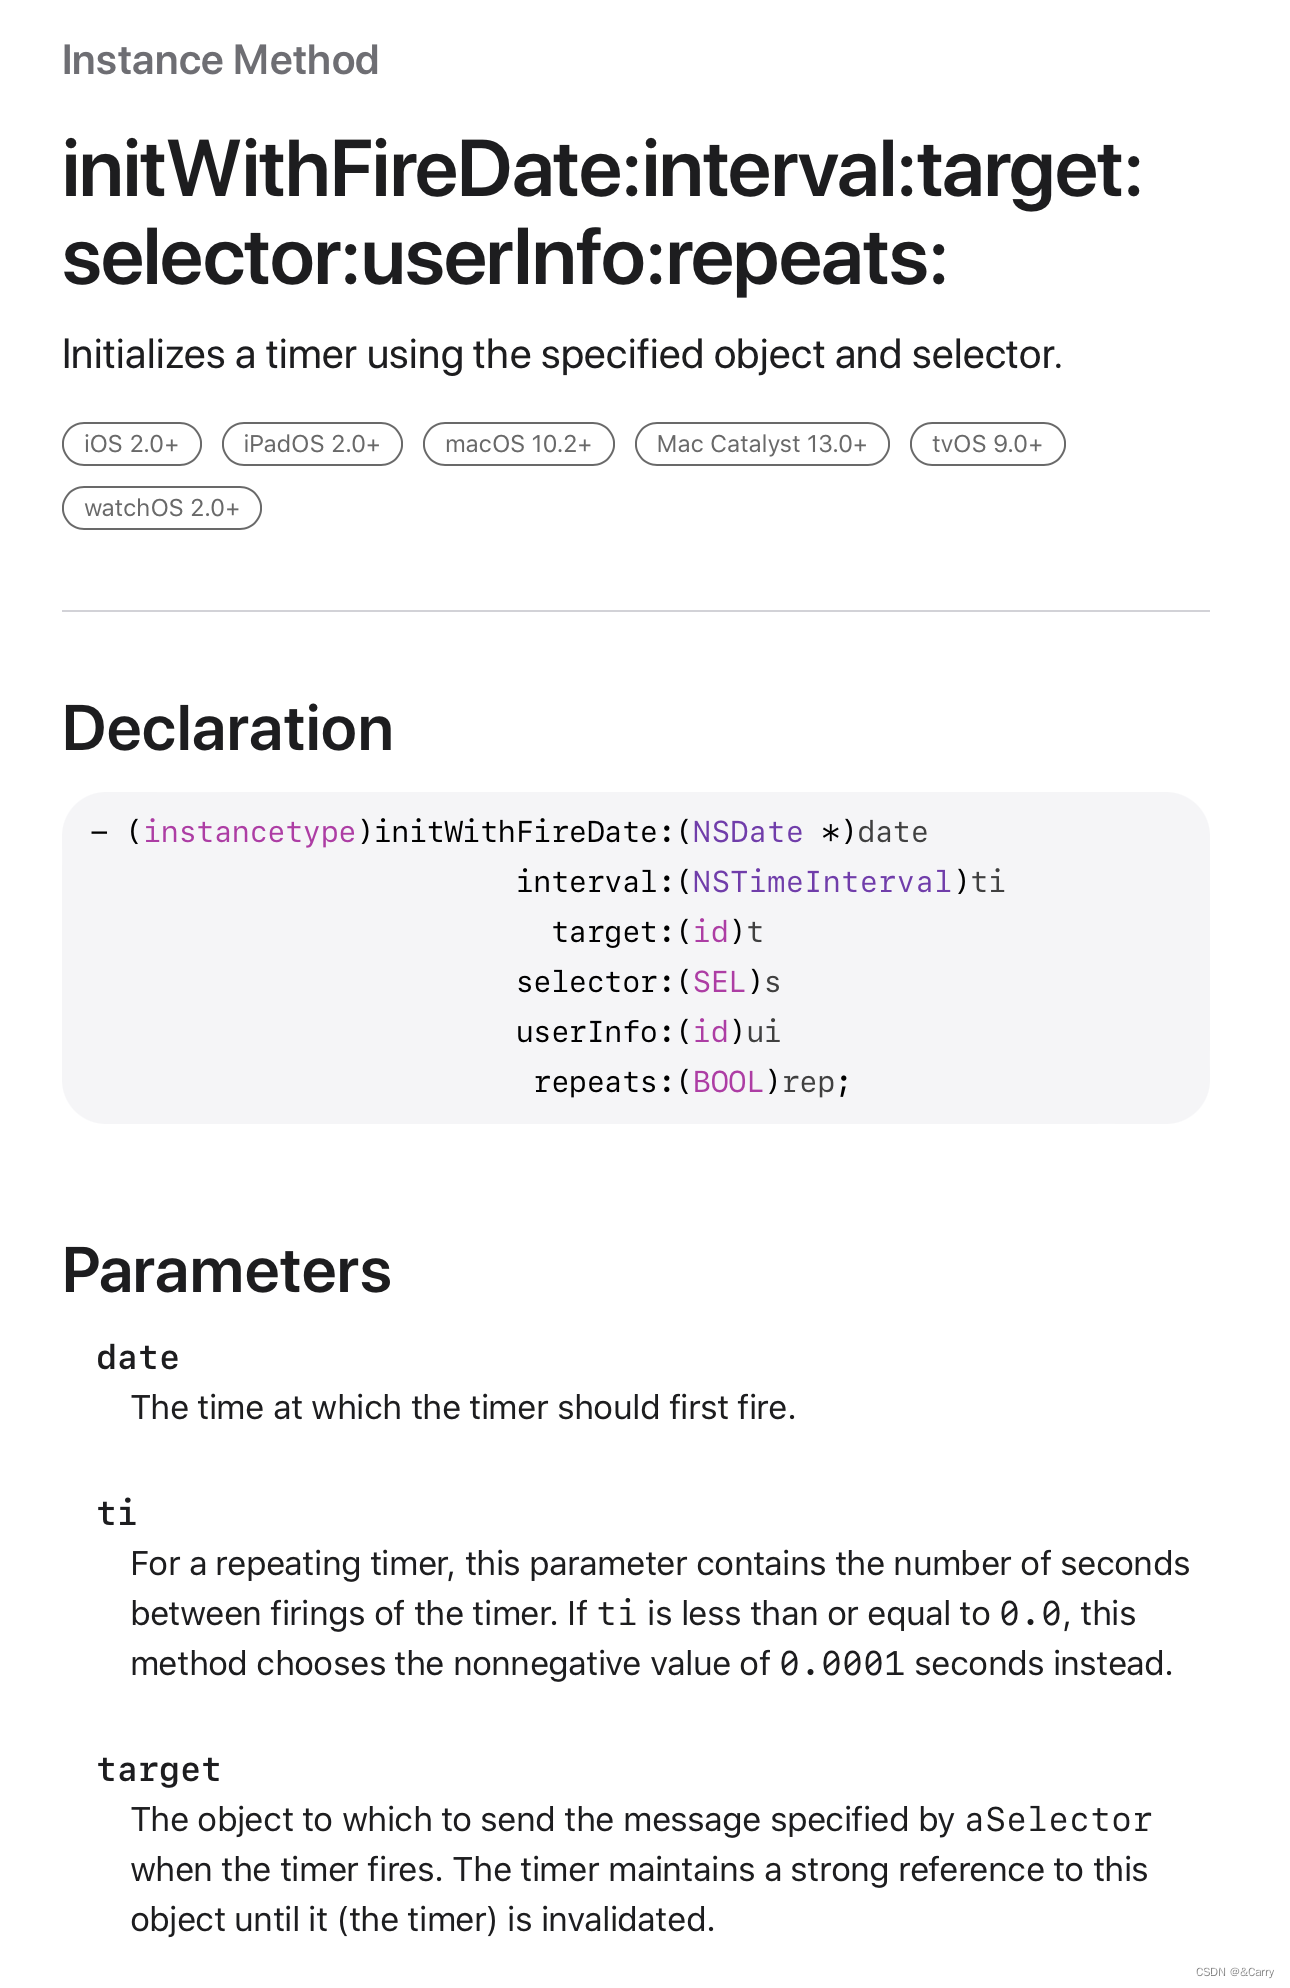
其中关键部分target的翻译如下:
这三种方法关于target的注释无一例外,都是说明定时器会对我们设置的target对象进行强引用。
而且苹果应该也是发现了timer容易造成内存泄漏的问题,所以iOS10以后,这三个方法出了对应新的API,如下:
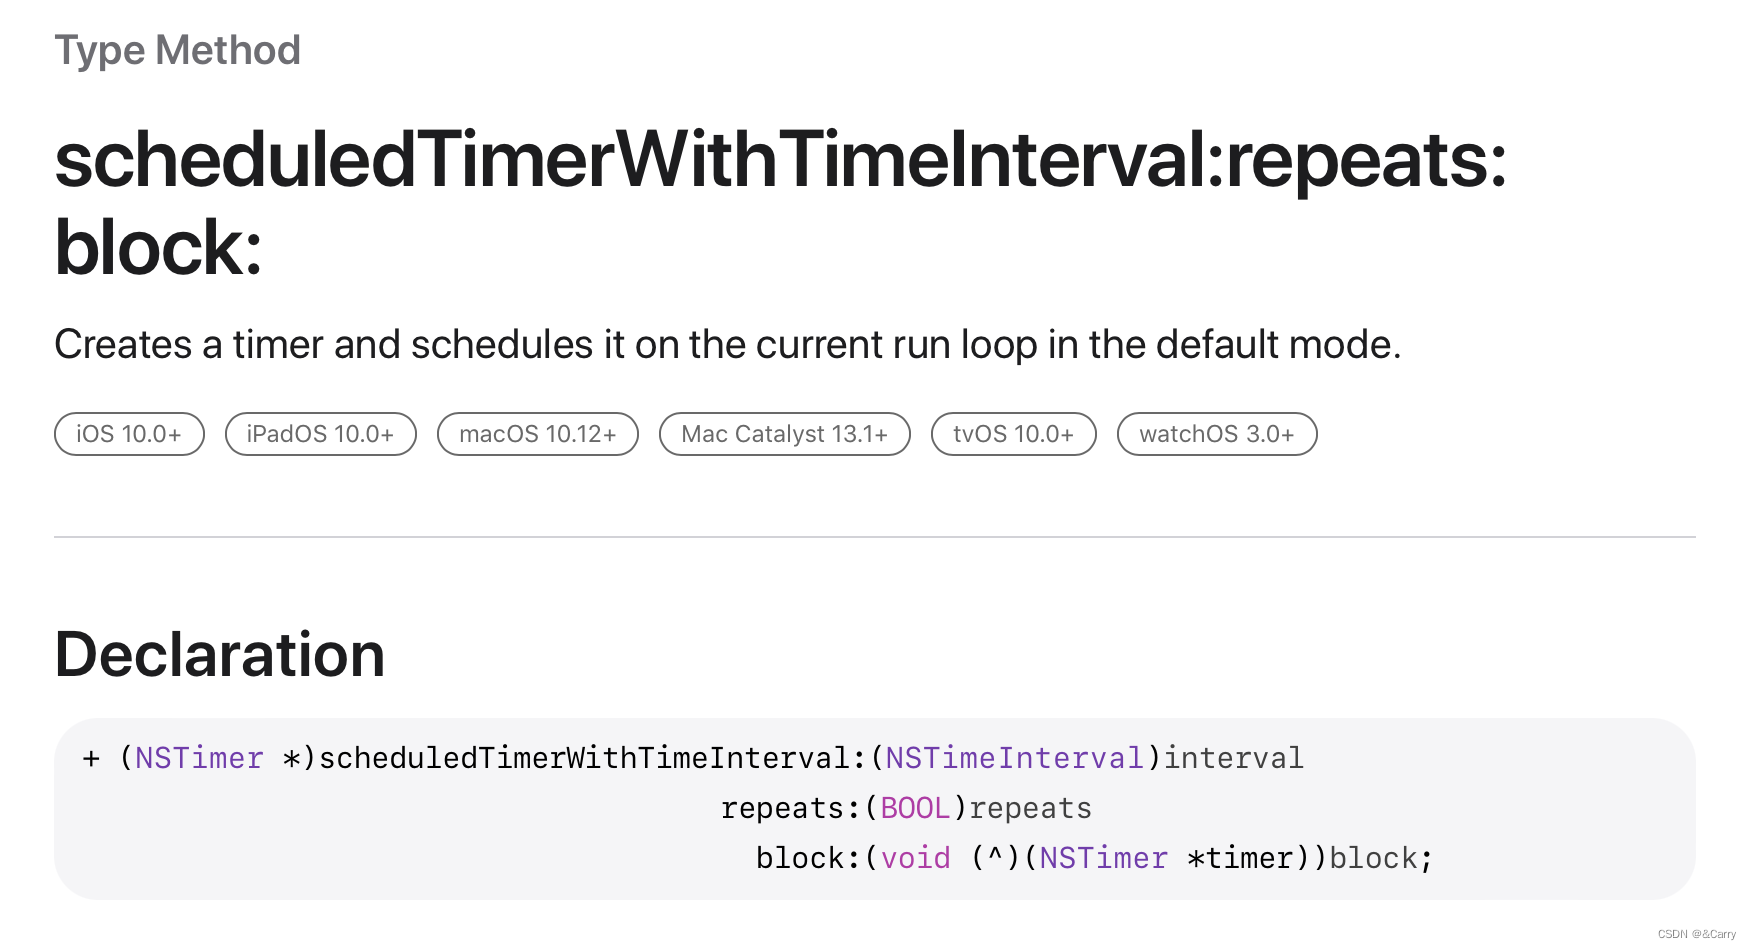

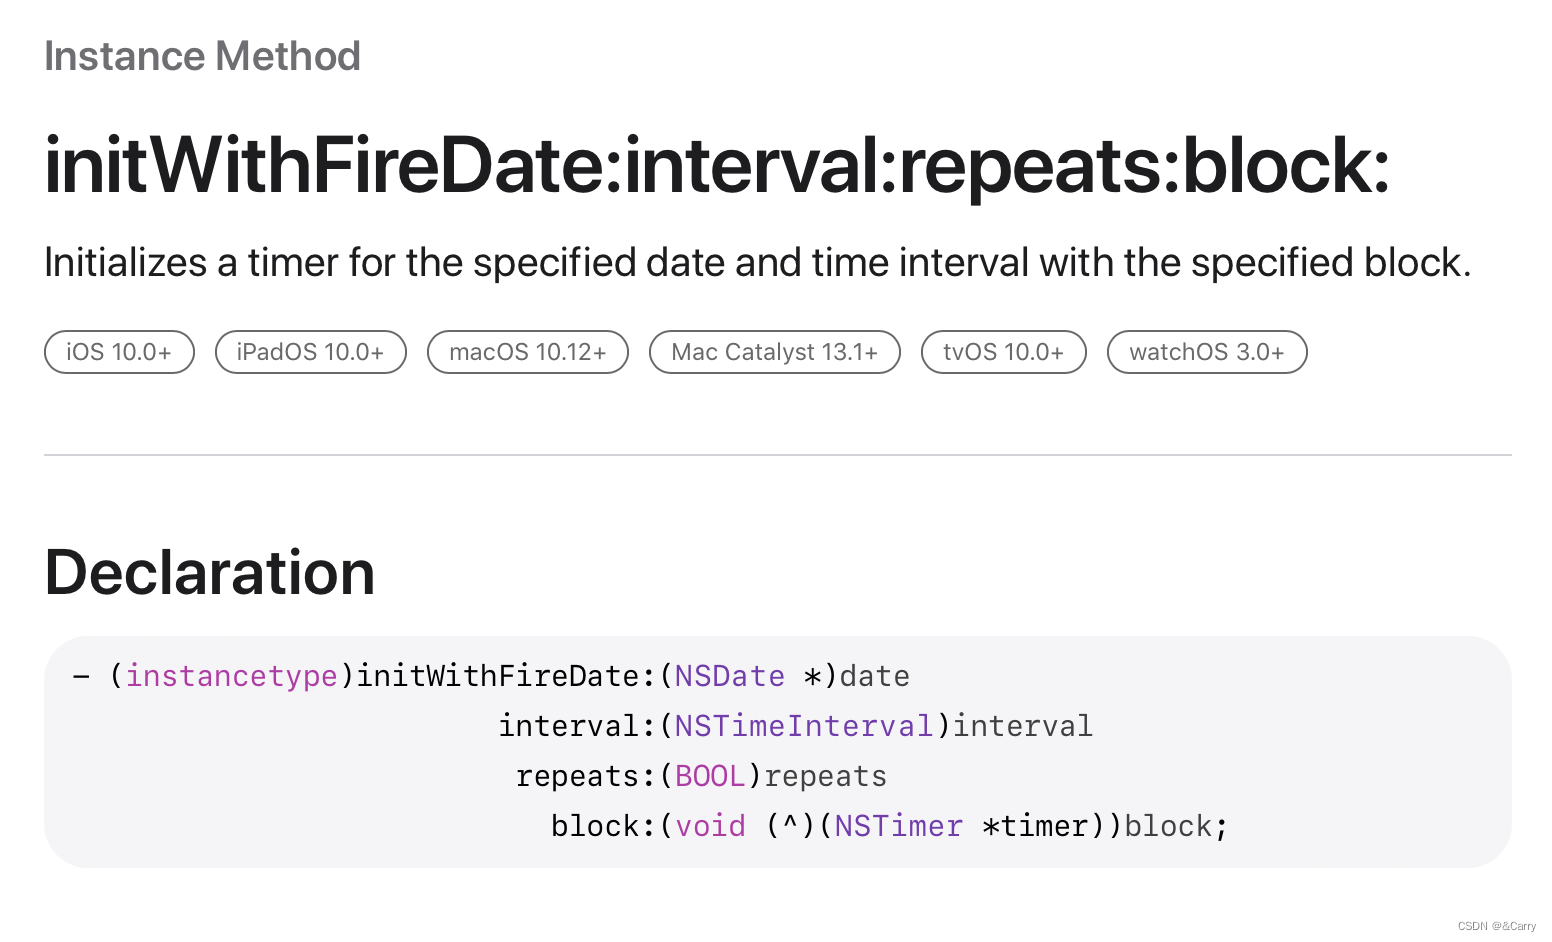
由于这三个API将定时器中我们要执行的任务加到了block中去,且不用设置target,所以就很容易避免循环引用,只需要注意这个block中要用到self的话采用强弱共舞即可。
- 如何解决
NSTimer强持有target的问题?
我们在合适时机手动调用invalidate销毁定时器,或者使用一个代理对象,让timer引用代理对象,代理对象弱引用self,就可以避免循环引用,最合适的就是使用代理对象转发,系统提供的NSProxy(消息转发机制)。我们下面再说 - 那这里
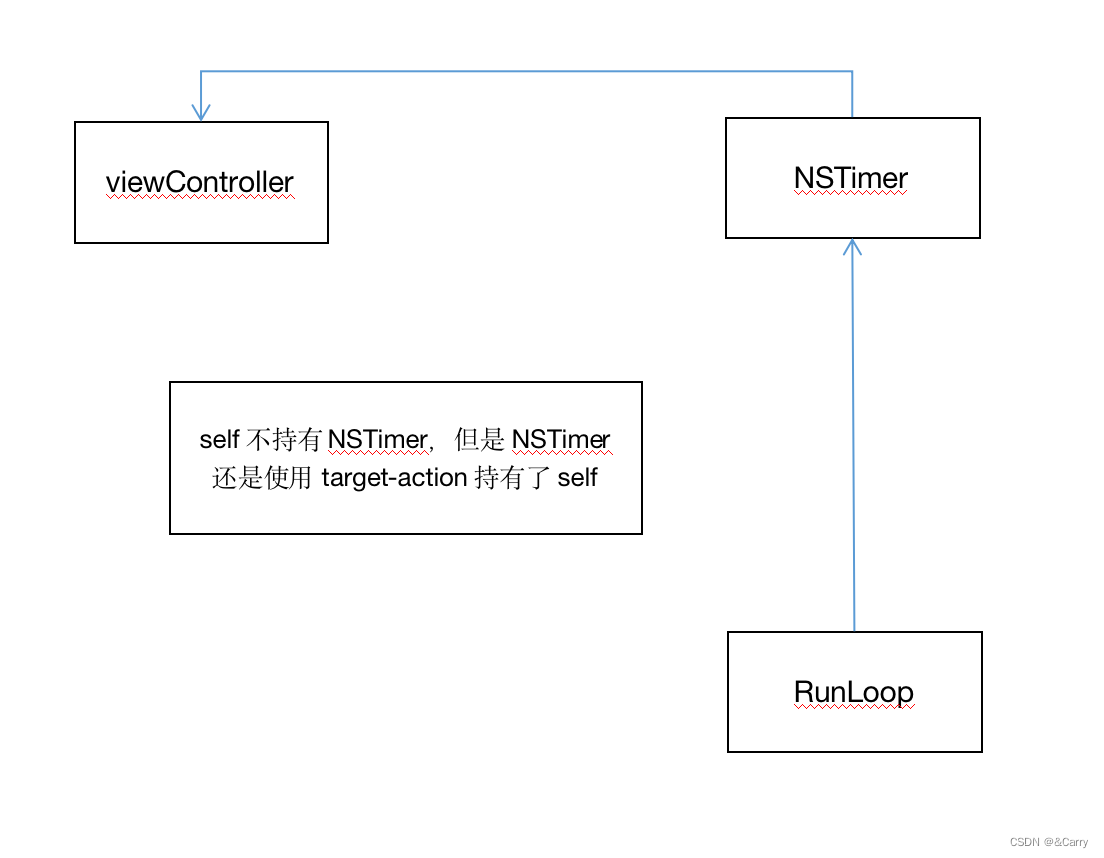
self不持有NSTimer也会出现循环引用吗?
这个有点儿像设套的,说是也许,说不也许,只能说是彼此之间相互引用,导致无法释放,是否可以释放不一定非得取决于循环引用。由于使用NSTimer时是需要添加到RunLoop中的,如果是self不持有,但是NSTimer需要引用target所以必须持有self,这样又会造成一个runloop–>timer–>self这么一个强引用链,导致大家都又释放不了。
到这里肯定有人疑惑,如果将NSTimer的target弱持有self可以解决这个循环引用问题吗?代码如下:
	// 让 timer 对self 产生弱引用
    __weak typeof(self) weakSelf = self;
    self.timer = [NSTimer scheduledTimerWithTimeInterval:1.0 target:weakSelf selector:@selector(test) userInfo:nil repeats:YES];
答案是不行!
原因就是当我们使用__weak把self转为弱指针的时候,这个只有在Block变脸捕获的时候才生效。所以这里我们应该使用NSTimer的block方法,代码如下:
	// 让 timer 对self 产生弱引用
    __weak typeof(self) weakSelf = self;
    self.timer = [NSTimer scheduledTimerWithTimeInterval:1.0 repeats:YES block:^(NSTimer * _Nonnull timer) {
        [weakSelf test];
    }];
这样就成功了,类似的block版的API我们上方已经介绍过了,一共有三种API。
那么还是疑惑究竟是什么导致的NSTimer弱引用self都无法解决呢?
答案在这里:
其实scheduledTimerWithTimeInterval这个方法会调用initWithFireDate方法,我们去GNUStep源码里面找到NSTimer.m,看看initWithFireDate的实现(此处附上:GNUStep源码下载地址):
- (id) initWithFireDate: (NSDate*)fd
	       interval: (NSTimeInterval)ti
		 target: (id)object
	       selector: (SEL)selector
	       userInfo: (id)info
		repeats: (BOOL)f
{
  if (ti <= 0.0)
    {
      ti = 0.0001;
    }
  if (fd == nil)
    {
      _date = [[NSDate_class allocWithZone: NSDefaultMallocZone()]
        initWithTimeIntervalSinceNow: ti];
    }
  else
    {
      _date = [fd copyWithZone: NSDefaultMallocZone()];
    }
  //下面这行代码是关键原因,不管传入的target是strong修饰还是weak修饰,timer持有的都是target的强引用
  _target = RETAIN(object);
  _selector = selector;
  _info = RETAIN(info);
  if (f == YES)
    {
      _repeats = YES;
      _interval = ti;
    }
  else
    {
      _repeats = NO;
      _interval = 0.0;
    }
  return self;
}
我们可以看到其中关键的:_target = RETAIN(object);,由此可见,不管你传入的target是strong修饰还是weak修饰,timer持有的都是target的强引用,所以传入weakSelf是行不通的。
如何解决NSTimer强持有的问题?
中间的代理对象
使用NSObject类实现消息转发
正常使用target-action即将target设置为self,当页面销毁时,不走dealloc方法,造成循环引用:
代码例子如下:
ViewController.h中:
#import <UIKit/UIKit.h>

@interface ViewController : UIViewController

@end


ViewController.m中:
#import "ViewController.h"
#import "SecondController.h"
@interface ViewController ()

@end

@implementation ViewController

- (void)viewDidLoad {
    [super viewDidLoad];
    // Do any additional setup after loading the view.

	UIButton *buttonTest = [UIButton buttonWithType:UIButtonTypeCustom];
    [buttonTest setTitle:@"跳转" forState:UIControlStateNormal];
    [buttonTest setTitleColor:[UIColor blackColor] forState:UIControlStateNormal];
    [buttonTest addTarget:self action:@selector(pressButton) forControlEvents:UIControlEventTouchUpInside];
    buttonTest.frame = CGRectMake(100, 200, 60, 30);
    [self.view addSubview:buttonTest];
}

//当点击跳转按钮时自动跳转进secondController界面
- (void) pressButton {
    SecondController *secondController = [[SecondController alloc] init];
    secondController.modalPresentationStyle = UIModalPresentationFullScreen;
    [self presentViewController:secondController animated:NO completion:nil];
}

@end


//SecondController.h中:
#import <UIKit/UIKit.h>

NS_ASSUME_NONNULL_BEGIN

@interface SecondController : UIViewController

@end

NS_ASSUME_NONNULL_END


//SecondController.m中:
#import "SecondController.h"

@interface SecondController ()
@property (nonatomic, strong) NSTimer *timer;
@end

@implementation SecondController

- (void)viewDidLoad {
    [super viewDidLoad];
    // Do any additional setup after loading the view.

	//打印创建timer前后的self的引用计数
    NSLog(@"Retain count is %ld", CFGetRetainCount((__bridge CFTypeRef)self));

     //创建timer,这个方法会自定将timer添加到RunLoop中去
    _timer = [NSTimer scheduledTimerWithTimeInterval:2 target:self selector:@selector(timerSelector) userInfo:nil repeats:YES];

    NSLog(@"Retain count is %ld", CFGetRetainCount((__bridge CFTypeRef)self));

    NSLog(@"Retain count is %ld", CFGetRetainCount((__bridge CFTypeRef)self));


    self.view.backgroundColor = [UIColor whiteColor];

    //设置一个按钮,点击后dismiss销毁当前视图
    UIButton *buttonTest = [UIButton buttonWithType:UIButtonTypeCustom];
    [buttonTest setTitle:@"返回" forState:UIControlStateNormal];
    [buttonTest setTitleColor:[UIColor blackColor] forState:UIControlStateNormal];
    [buttonTest addTarget:self action:@selector(pressButton) forControlEvents:UIControlEventTouchUpInside];
    buttonTest.frame = CGRectMake(100, 200, 60, 30);
    [self.view addSubview:buttonTest];
}

//按钮的事件函数
- (void) pressButton {
    //销毁当前视图返回到原来的视图
    [self dismissViewControllerAnimated:NO completion:nil];
}

//定时器要执行的函数
- (void)timerSelector {
    NSLog(@"----");
}

//重写dealloc方法做一个标记
- (void) dealloc {
 	//打印标记
    NSLog(@"SecondController dealloc!");
    [_timer invalidate];
}

@end
我们执行代码,过一段时间后点击返回按钮后发现并没有调用dealloc方法,视图已经销毁了,但是视图本身self和timer形成了循环引用,导致定时器依然在运作,打印结果如下:

接下来我们创建一个中间类:
TestProxy.h中:
#import <Foundation/Foundation.h>

NS_ASSUME_NONNULL_BEGIN

@interface TestProxy : NSObject

@property (nonatomic, weak) id target;

+ (instancetype) proxyWithTarget:(id)target;

@end

NS_ASSUME_NONNULL_END


TestProxy.m中:
#import "TestProxy.h"

@implementation TestProxy

//实现我们的类方法,创建一个TestProxy类型的对象,然后将传入的参数作为target便于后续的消息转发
+ (instancetype) proxyWithTarget:(id)target {
    TestProxy *proxy = [[TestProxy alloc] init];
    proxy.target = target;
    return proxy;
}

//因为我们的target是新类,而不是self,所以SEL应该也是新类中的SEL,所以我们调用sel方法的时候可以通过第二次拯救,更改timerSelector这条消息的接受者为self.target,(当然我们再实现一次也可以)
- (id)forwardingTargetForSelector:(SEL)aSelector {
    return self.target;
}

@end
有这么一个中间类之后,我们添加timer的target时就可以这样子了:
//只需要调用TestProxy类的类方法时,将参数传成当前界面的self即可
_timer = [NSTimer scheduledTimerWithTimeInterval:1 target:[TestProxy proxyWithTarget:self] selector:@selector(timerSelector) userInfo:nil repeats:YES];
这样子就是利用了消息转发的第二次拯救,实现了将timer的target设置为中间对象,从而避免了timer和self的循环引用。
现在的打印结果如下:

可以看到成功打印dealloc,并且成功销毁了定时器。
使用NSProxy类实现消息转发
这是一个专门用于做消息转发的类,我们需要通过子类的方式来使用它(与第一种方法基本上一样,不过调用时机不同罢了,具体如下:

所以用NSObject也可以,但是用NSproxy会大幅提升性能。
NSProxy的子类需要实现两个方法,即消息转发的第三次拯救的那一对方法:methodSignatureForSelector:和forwardInvocation:,具体应用如下:
TestNSproxy.h中:
#import <Foundation/Foundation.h>

NS_ASSUME_NONNULL_BEGIN

@interface TestNSproxy : NSProxy

@property (nonatomic, weak) id target;

+ (instancetype)proxyWithTarget:(id)target;

@end

NS_ASSUME_NONNULL_END


TestNSproxy.m中:
#import "TestNSproxy.h"

@implementation TestNSproxy

//实现我们的类方法,创建一个TestNSproxy类型的对象,然后将传入的参数作为target便于后续的消息转发
+ (instancetype)proxyWithTarget:(id)target {
    TestNSproxy *proxy = [TestNSproxy alloc];
    proxy.target = target;
    return proxy;
}

//下面实现第三次消息拯救中的那两个方法
- (NSMethodSignature *)methodSignatureForSelector:(SEL)sel {
    return [self.target methodSignatureForSelector:sel];
}

- (void)forwardInvocation:(NSInvocation *)invocation {
    [invocation invokeWithTarget:self.target];
}

@end


作为中间类作为timer的target的时候:
//只需要调用TestProxy类的类方法时,将参数传成当前界面的self即可
_timer = [NSTimer scheduledTimerWithTimeInterval:1 target:[TestNSproxy proxyWithTarget:self] selector:@selector(timerSelector) userInfo:nil repeats:YES];
我们的打印结果如下:

可以看到是成功打印dealloc,并且成功销毁了定时器。
NSProxy类的优点在于直接执行了消息转发机制三次拯救的第三步的调用methodSignatureForSelector:返回方法签名,如果方法签名不为nil,调用forwardInvocation:来执行该方法,会跳过前面的步骤,提高性能
改变timer引用
上面说过我们可以采用block类型的定时器API,结合self强弱共舞的方法来解决循环引用问题,使得定时器可以及时释放。
而且对于CADisplayLink和NSTimer来说,无论外面传递的target是弱指针还是强指针,都会传入一个内存地址,定时器内部都是对这个内存地址产生强引用,所以传递弱指针没有用
所以我们采用不带target参数的block类型的定时器API是非常好的选择,用法如下(上方已经讲过一次了):
	// 让 timer 对self 产生弱引用
    __weak typeof(self) weakSelf = self;
    self.timer = [NSTimer scheduledTimerWithTimeInterval:1.0 repeats:YES block:^(NSTimer * _Nonnull timer) {
        [weakSelf test];
    }];
使用Category
通过 category 把 NSTimer 的 target 设置为 NSTimer 类,让 NSTimer 自身做为target, 把 selector 通过 block 传入给 NSTimer,在 NSTimer 的 category 里面触发 selector 。这样也可以达到 NSTimer 不直接持有 TimerViewController 的目的,实现更优雅 ( 如果是直接支持 iOS 10 以上的系统版本,那可以使用 iOS 10新增的系统级 block 方案 ),代码示例如下:
首先新建一个NSTimer类的分类:BlocksSupportSecond
BlocksSupportSecond.h中:
#import <Foundation/Foundation.h>

NS_ASSUME_NONNULL_BEGIN

@interface NSTimer (BlocksSupportSecond)

//我们重写封装的一个创建定时器的接口
+ (NSTimer *)tay_scheduledTimerWithTimeInterval:(NSTimeInterval)interval repeats:(BOOL)repeats block: (void(^)(void))block;

@end

NS_ASSUME_NONNULL_END


BlocksSupportSecond.m中:
#import "NSTimer+BlocksSupportSecond.h"

@implementation NSTimer (BlocksSupportSecond)

//我们重写封装的一个创建定时器的接口
+ (NSTimer *)tay_scheduledTimerWithTimeInterval:(NSTimeInterval)interval repeats:(BOOL)repeats block:(void(^)(void))block {
    return [self scheduledTimerWithTimeInterval:interval target:self selector:@selector(tay_blockInvoke:) userInfo:[block copy] repeats:repeats];
}

//用新接口创建定时器时最后在block中添加的操作会传到这里来执行
+ (void)tay_blockInvoke:(NSTimer *)timer {
    void (^block)(void) = timer.userInfo;
    if(block) {
        block();
    }
}

@end


SecondController.h中:
#import <UIKit/UIKit.h>

NS_ASSUME_NONNULL_BEGIN

@interface SecondController : UIViewController

@end

NS_ASSUME_NONNULL_END


SecondController.m中:
#import "SecondController.h"
#import "NSTimer+BlocksSupportSecond.h"

@interface SecondController ()
@property (nonatomic, strong) NSTimer *timer;
@end

@implementation SecondController

- (void)viewDidLoad {
    [super viewDidLoad];
    // Do any additional setup after loading the view.
    NSLog(@"Retain count is %ld", CFGetRetainCount((__bridge CFTypeRef)self));

	//用咱们封装的新接口创建定时器,将定时器要执行的操作放到最后的block参数中
    _timer = [NSTimer tay_scheduledTimerWithTimeInterval:2 repeats:YES block:^{
        NSLog(@"----");
    }];

    NSLog(@"Retain count is %ld", CFGetRetainCount((__bridge CFTypeRef)self));

    //[_timer invalidate];

    NSLog(@"Retain count is %ld", CFGetRetainCount((__bridge CFTypeRef)self));


    self.view.backgroundColor = [UIColor whiteColor];

    UIButton *buttonTest = [UIButton buttonWithType:UIButtonTypeCustom];
    [buttonTest setTitle:@"返回" forState:UIControlStateNormal];
    [buttonTest setTitleColor:[UIColor blackColor] forState:UIControlStateNormal];
    [buttonTest addTarget:self action:@selector(pressButton) forControlEvents:UIControlEventTouchUpInside];
    buttonTest.frame = CGRectMake(100, 200, 60, 30);
    [self.view addSubview:buttonTest];
}

//按钮的事件函数
- (void) pressButton {
    [self dismissViewControllerAnimated:NO completion:nil];
}

//重写dealloc方法做一个标记
- (void) dealloc {
     //打印标记
    NSLog(@"SecondController dealloc!");
    [_timer invalidate];
}

@end

ViewController.h和ViewController.m文件中的代码同上方其他例子,此处不再赘述
打印结果如下:

可以看到是成功打印dealloc,并且成功销毁了定时器。
到这里,有人肯定会想到,用子类去新封装这个接口是不是也可以实现分类实现的效果呢? 答案是不能的,因为创建定时器实质上就是调用的- (id) initWithFireDate: (NSDate*)fd interval: (NSTimeInterval)ti target: (id)object selector: (SEL)selector userInfo: (id)info repeats: (BOOL)f;方法,这个方法我们上方有讲过,值得注意的是,这个实例方法的调用者类型必须是严格的NSTimer类型,即使是NSTimer的子类也是不行的,所以我们就没发去子类里面写新接口了,因为写的话需要子类的实例对象调用initWithFireDate:方法,而这个方法的调用者类型必须是严格的NSTimer类型,所以要想写新接口的话,还是得移步分类中。
在合适的地方调用invalidate方法
这个就是一个比较取巧的方法,麻烦之处就是得记得去在合适的地方及时调用invalidate方法
原文地址:https://blog.csdn.net/m0_52192682/article/details/126240881
本文来自互联网用户投稿,该文观点仅代表作者本人,不代表本站立场。本站仅提供信息存储空间服务,不拥有所有权,不承担相关法律责任。
如若转载,请注明出处:http://www.7code.cn/show_47194.html
如若内容造成侵权/违法违规/事实不符,请联系代码007邮箱:suwngjj01@126.com进行投诉反馈,一经查实,立即删除!

