一、前言
1、介绍说明
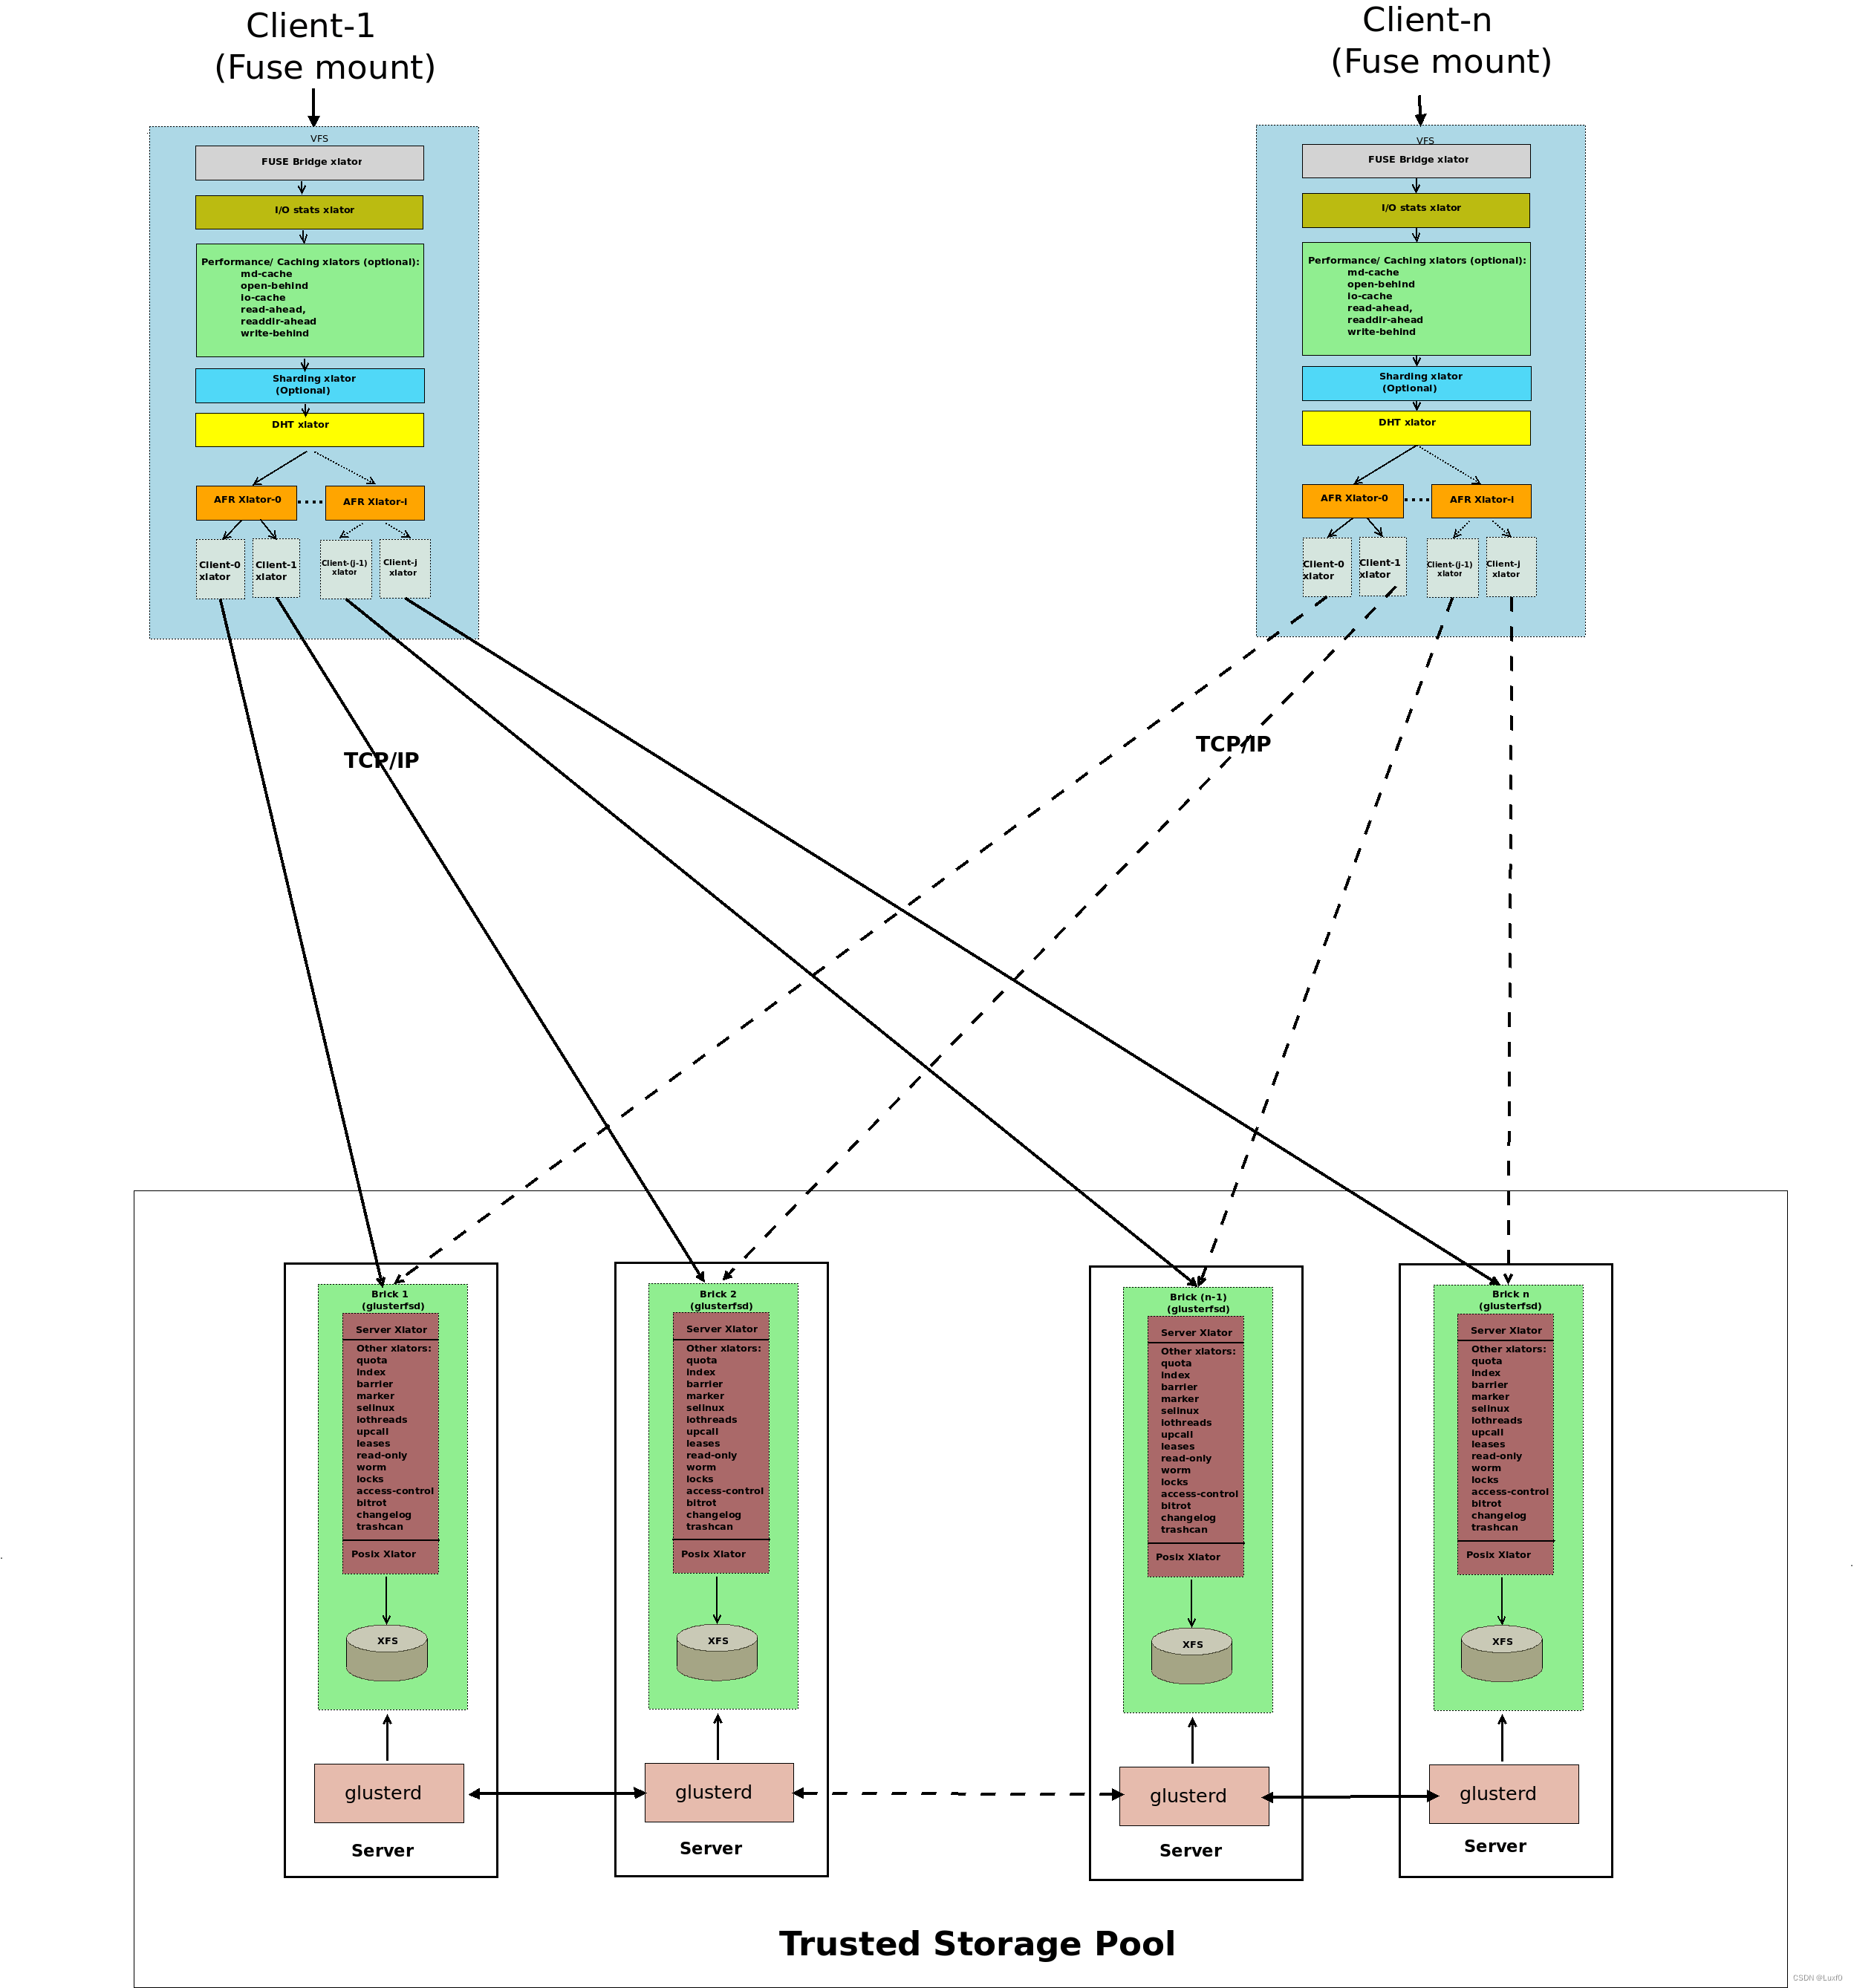
GlusterFS(Gluster File System)是一款高性能、可扩展的分布式文件系统,它将多个物理服务器上的存储资源整合为一个统一的命名空间,实现了对分布式存储资源的集中管理和访问。
它通过横向扩展、数据冗余、高性能和易于管理等特点,为用户提供了高效、安全的分布式存储解决方案。

2、术语说明
-
Brick(存储块)
glusterfs中的基本存储单元(存储块),通常是一个授信存储池中服务器的一个导出目录,可以通过主机名和目录名标识(如server:export) -
Redundancy
冗余度,Dispersed卷可以有任意大小的存储块bricks(B),且可配置冗余度Redundancy(R)。
R最小值为1,R最小值不能为0的原因在于,当R的值为0时,卷就不提供容错机制,其性能还不如直接用条带卷,所以限定R的最小值为1。
R最大值为(B-1)/2,R最大值为(B-1)/2的原因在于,当R的值为B/2,其存储利用率和2副本复制卷相同,但其性能远远不如2副本复制卷,所以限定R的最大值为(B-1)/2。
R最小值和最大值的确定使得B的最小值被确定为3,即创建纠删卷至少需要3个brick才能创建成功。 -
Dispersed
Dispersed卷提高了存储空间的利用率,其存储利用率计算公式为(B-R)/B,有效存储空间为(B-R)*Brick_size,在理论上存储空间利用率可以达到99.9%。也就是说,能够保证在提供一定容错机制的情况下,最大限度的提高存储利用率。
Dispersed卷提高了存储的可靠性,只要任意大于等于B-R个brick能够正常则数据可正常读写,就能够保证数据是可用的、可恢复的;同时还优化了带宽的使用,且部分文件数据的分片失效引起的降级读写不影响其他文件数据的读写。 -
Distributed Dispersed
Distributed Dispersed 卷可以通过扩展Dispersed 卷生成,即扩展一倍或n倍的bricks(B)。对比于Dispersed卷,其原理相同,但在相同的erasure codeing配置下,具有更好的I/O性能。
3、冗余模式
3.1、复制卷(Replication)
在高可用和高可靠性环境中使用复制卷,副本数越多,数据可用性越好,可靠性越高,但也意味着更低的空间利用率和更高的成本。复制卷最少配置副本数为2,2副本容易出现脑裂问题,可考虑配置多一个仲裁盘(arbiter 1)或者配置为3副本来避免脑裂问题。
副本是将每个原始数据分块都镜像复制到另一个存储介质上,从而保证在原始数据失效后,数据仍可用并能通过副本数据恢复。
3.2、纠删卷(Erasure Code)
纠删码机制具有更高的存储效率,在提供相同存储可靠性的条件下,可以最小化冗余存储开销,但是相对于复制卷而言,其IOPS性能下降较多。
纠删卷创建与节点个数无关(节点个数大于等于1),只与存储块bricks(B)、冗余度redunancy(R)相关,其中存储块bricks(B)必须大于等于3。
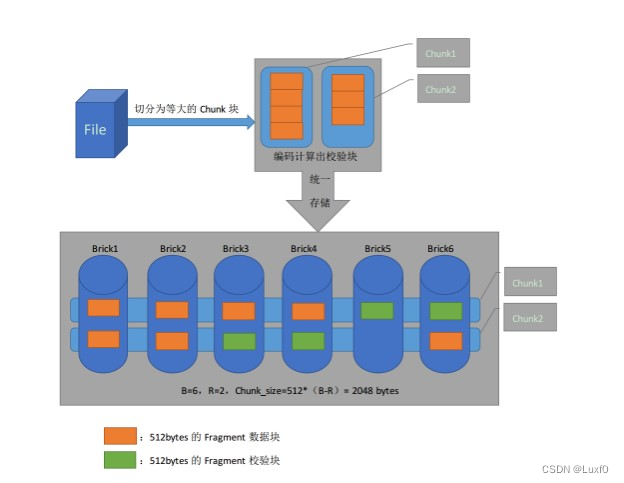
Fragment的大小在GlusterFS源码中有一个宏定义,其大小等于EC_METHOD_WORD_SIZE x EC_GF_BITS=64x8=512 bytes
纠删卷会把每个读写请求切分为大小相同的Chunk块,而每个Chunk块又被分隔为(B – R)个大小为512bytes的Fragment数据分片,然后使用Rabin IDA计算生成R个大小为512bytes的Fragment校验分片,最后将(B – R)个数据分片和R个校验分片以条带的方式存储在一起,即分别存储于每个brick上,从而降低访问热点。其中R个校验分片会以轮询方式存储于卷的每个brick上,用以提高卷的可靠性。
纠删卷中,Chunk的大小可配置,其大小与具体的Redundancy配置有关,其大小等于512 x(B – R)bytes。可通过调整Redundancy的配置来修改Chunk的大小。按照官方4:2(B=6,R=2)纠删卷为例,得出Chunk的大小为(6 – 2)x 512=2048 byte。
注:Redundancy的配置在纠删卷创建之后就确定,不可修改

二、部署说明
1、软件安装
- 安装EPEL源
源码编译安装需要安装相关依赖包,由于CentOS默认源部分依赖包没有,故需要配置epel源以下载依赖包
wget https://mirrors.ustc.edu.cn/epel//7/x86_64/Packages/e/epel-release-7-12.noarch.rpm
rpm -ivh epel-release-7-12.noarch.rpm
yum clean all
yum makecache
yum install autoconf automake bison cmockery2-devel dos2unix flex fuse-devel glib2-devel libacl-devel libaio-devel libattr-devel libcurl-devel libibverbs-devel librdmacm-devel libtirpc-devel libtool libxml2-devel lvm2-devel make openssl-devel pkgconfig pyliblzma python-devel python-eventlet python-netifaces python-paste-deploy python-simplejson python-sphinx python-webob pyxattr readline-devel rpm-build sqlite-devel systemtap-sdt-devel tar userspace-rcu-devel
yum install rpcbind -y
systemctl start rpcbind
wget https://download.gluster.org/pub/gluster/glusterfs/9/9.6/glusterfs-9.6.tar.gz
tar -zxvf glusterfs-9.6.tar.gz
cd glusterfs-9.6
./autogen.sh
./configure --without-libtirpc
make && make install
- 启动glusterd服务,设置开启自启动
注:若启动glusterd服务出现“Failed to start GlusterFS, a clustered file–system server.”错误,则尝试杀死gluster相关进程后再次重启glusterd服务即可
systemctl start glusterd
systemctl enable glusterd
2、集群部署
2.1、前置准备
| 序号 | 节点主机名 | 节点IP地址 |
|---|---|---|
| 1 | node224 | 172.16.21.224 |
| 2 | node225 | 172.16.21.225 |
| 3 | node226 | 172.16.21.226 |
[root@node224 ~]# cat /etc/hosts
127.0.0.1   localhost localhost.localdomain localhost4 localhost4.localdomain4
::1         localhost localhost.localdomain localhost6 localhost6.localdomain6
172.16.21.224    node224
172.16.21.225    node225
172.16.21.226    node226
[root@node224 ~]# scp /etc/hosts node225:/etc/
[root@node224 ~]# scp /etc/hosts node226:/etc/
[root@node224 ~]# ssh-keygen
[root@node224 ~]# ssh-copy-id node225
[root@node224 ~]# ssh-copy-id node226
systemctl stop firewalld
systemctl disable firewalld
setenforce 0
sed -i  "s/SELINUX=enforcing/SELINUX=disabled/g" /etc/selinux/config
2.2、部署过程
a、添加节点
在集群节点node224上分别添加集群节点node225、node226
[root@node224 ~]# gluster peer probe node225
peer probe: success.
[root@node224 ~]# gluster peer probe node226
peer probe: success.
[root@node224 ~]# gluster peer status
Number of Peers: 2

Hostname: node225
Uuid: d9ea85bc-e8f1-4bf5-85df-a954dc89890f
State: Peer in Cluster (Connected)

Hostname: node226
Uuid: 63613c2a-3d54-40dd-93a4-c002977d68f5
State: Peer in Cluster (Connected)
b、配置存储
所有节点格式化本地磁盘挂载到本地目录,用以提供brick使用
[root@node224 ~]# mkfs.xfs -f /dev/sdb
[root@node224 ~]# mkdir  /brick1
[root@node224 ~]# blkid | grep sdb
/dev/sdb: UUID="94967c2b-69f6-4e83-8e90-6c2f530a8f76" TYPE="xfs"
[root@node224 ~]# echo "UUID=94967c2b-69f6-4e83-8e90-6c2f530a8f76 /brick1 xfs defaults 0 0" >> /etc/fstab
[root@node224 ~]# mount -a
[root@node224 ~]# mkdir /brick1/data
c、创建glusterfs卷
[root@node224 ~]# gluster volume create ec-vol  disperse-data 2 redundancy 1 node224:/brick1/data/ node225:/brick1/data/ node226:/brick1/data/
volume create: ec-vol: success: please start the volume to access data
[root@node224 ~]# gluster volume info ec-vol

Volume Name: ec-vol
Type: Disperse
Volume ID: 6629b977-41e1-454c-a4f3-c66a3836e997
Status: Created
Snapshot Count: 0
Number of Bricks: 1 x (2 + 1) = 3
Transport-type: tcp
Bricks:
Brick1: node224:/brick1/data
Brick2: node225:/brick1/data
Brick3: node226:/brick1/data
Options Reconfigured:
transport.address-family: inet
nfs.disable: on
[root@node224 ~]# gluster volume start ec-vol
volume start: ec-vol: success
d、客户端挂载
- 将ec-vol卷挂载到本地
[root@node227 ~]# mkdir /glusterfs
[root@node227 ~]# mount -t glusterfs node224:ec-vol /glusterfs
[root@node227 ~]# mount -l | grep gluster
node224:ec-vol on /glusterfs type fuse.glusterfs (rw,relatime,user_id=0,group_id=0,default_permissions,allow_other,max_read=131072)
[root@node227 ~]# echo "node224:/ec-vol /glusterfs glusterfs defaults,_netdev 0 0" >> /etc/fstab
3、常用操作
3.1、扩展卷(add-brick)
当需要容量扩展时,对于复制卷和纠删卷都需要添加其倍数,复制卷和纠删卷扩展操作命令一致。添加之后需进行卷平衡操作(rebalance)进行数据均衡
- 当对复制卷进行扩展之后,复制卷的brick个数和变为副本数的整数倍,卷类型由复制卷(Replicate)变为分布式复制卷(Distribute-Replicate)
- 当对纠删卷进行扩展之后,纠删卷的brick个数和变为纠删比之和的整数倍,卷类型由纠删卷(Disperse)变为分布式纠删卷(Distribute-Disperse)
3.2、收缩卷(remove-brick)
当因为磁盘原因需要收缩容量时,对于副本和纠删都需要删除其倍数个brick,副本和纠删卷收缩命令操作一致,并且是同一组的需要全部删除,可以一次删除多组;收缩卷需要先进行数据迁移,等待完成之后再确认删除,收缩后需要卷平衡(rebalance)进行数据均衡
注:如2副本分布式复制卷disrepvol存在4个brick(server1:exp1、server2:exp2、server3:exp3、server4:exp4),server1:exp1和server2:exp2为同一组brick,server3:exp3和server4:exp4为同一组brick,其中server1:exp1、server3:exp3互为副本,server2:exp2、server4:exp4互为副本,进行收缩卷操作时,只能同时删除brick1和brick2,或同时删除brick3和brick4
三、Q&A
1、volume create: rep-vol: failed: /brick1/data is already part of a volume
[root@node224 ~]# gluster volume create str-vol stripe 3 node224:/brick1/data/ node225:/brick1/data/ node226:/brick1/data/
volume create: str-vol: failed: /brick1/data is already part of a volume
[root@node224 ~]# yum install attr -y
[root@node224 ~]# rm -rf /brick/data/.glusterfs/
[root@node224 ~]# setfattr -x trusted.glusterfs.volume-id /brick1/data
[root@node224 ~]# setfattr -x trusted.gfid  /brick1/data
原文地址:https://blog.csdn.net/Micha_Lu/article/details/134755515
本文来自互联网用户投稿,该文观点仅代表作者本人,不代表本站立场。本站仅提供信息存储空间服务,不拥有所有权,不承担相关法律责任。
如若转载,请注明出处:http://www.7code.cn/show_48884.html
如若内容造成侵权/违法违规/事实不符,请联系代码007邮箱:suwngjj01@126.com进行投诉反馈,一经查实,立即删除!


