本文介绍: 可以自由选择所需的应用,生成nginx配置作为参考。根据你的业务需求,自动生成复杂的nginx配置文件,提供你作为参考,非常好用下面讲解的常用模块,官网都有解析是使用方法。ngx_http_access_module # 四层基于IP的访问控制,可以通过匹配客户端源IP地址进行限制,简单来说就是允许限制对某些客户端地址的访问。ngx_http_auth_basic_module # 允许通过使用“HTTP 基本身份验证”协议验证用户名和密码来限制对资源的访问。
🏅云计算领域优质创作者
🏅华为云开发者社区专家博主
🏅阿里云开发者社区专家博主
💊交流社区:运维交流社区 欢迎大家的加入!
🐋 希望大家多多支持,我们一起进步!😄
🎉如果文章对你有帮助的话,欢迎 点赞 👍🏻 评论 💬 收藏 ⭐️ 加关注+💗
文章目录
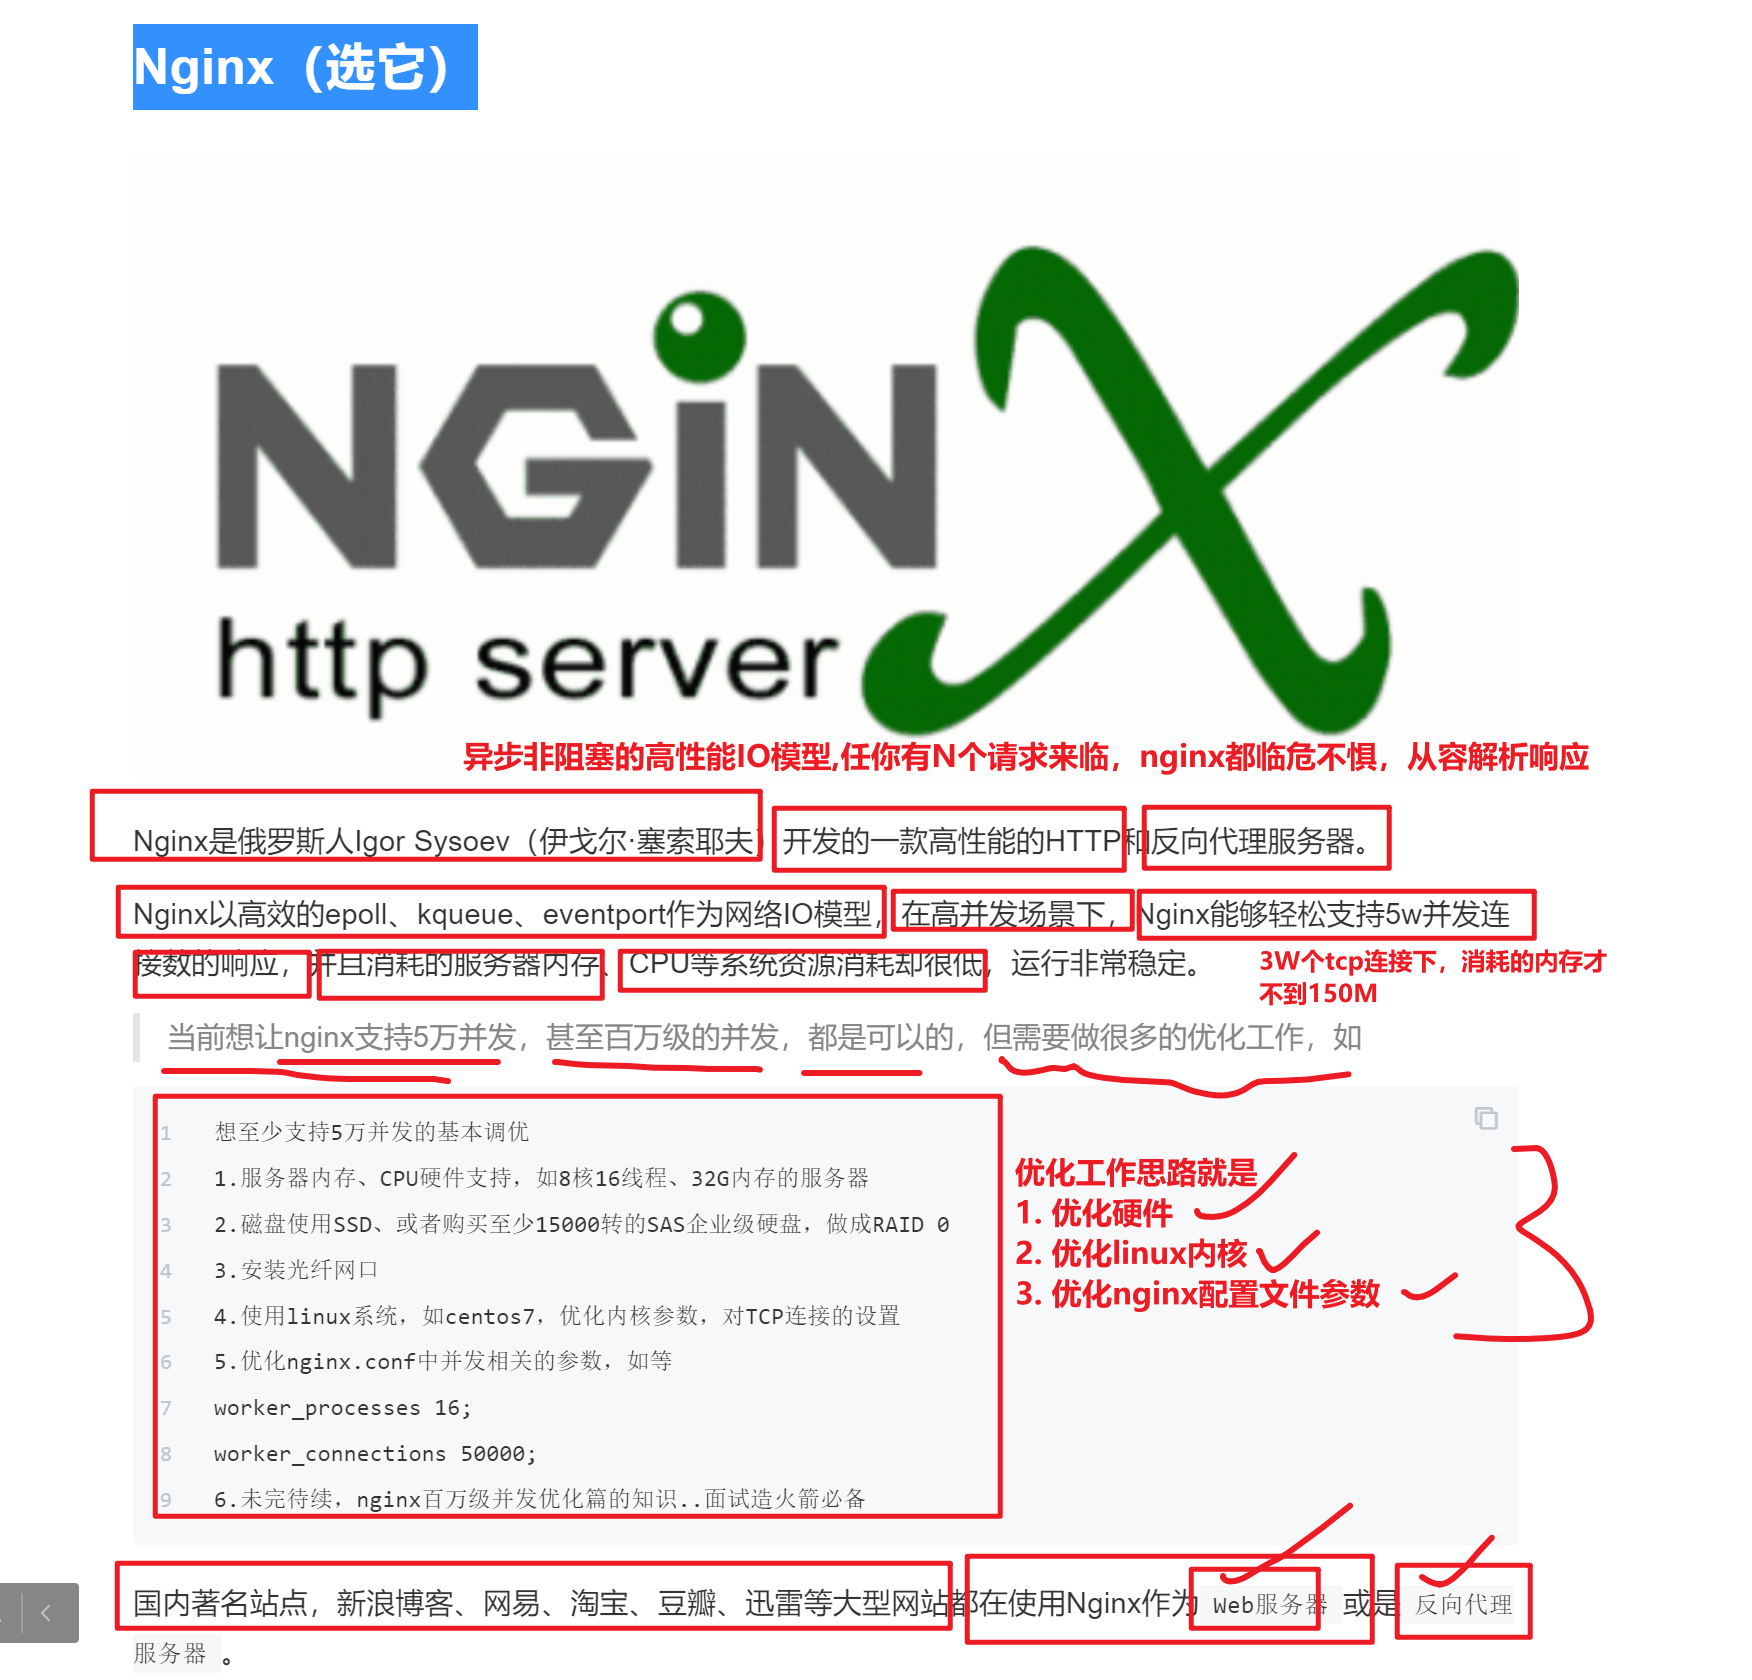
nginx 介绍
在线自动生成nginx配置文件
https://www.digitalocean.com/community/tools/nginx?global.app.lang=zhCN
nginx企业用它干什么
nginx的运行架构
nginx运行后,有多少个干活的工人,多进程,调用多个cpu去解析用户的请求
在linux中进行多进程开发,开辟多个进程,调用多个cpu,当然也会消耗更多的机器资源,内存,cpu资源,给服务器带来更大的压力
不是说进程越多,干活越快,合理的分配,才能达到最高效的处理效率
master主进程原理
包工头进程,管理nginx的数据,创建worker工作进程。
1. 启动时检查nginx.conf是否正确,语法是否有误;
2. 根据配置文件的参数创建、且监控worker进程的数量和状态;
3. 监听socket,接收client发起的请求,然后worker竞争抢夺链接,获胜的可以处理且响应请求。
4. 接收我们发送的管理nginx进程的信号,并且将信号通知到worker进程。
5. 如果我们发送了reload命令,则读取新配置文件,创建新的worker进程,结束旧的worker进程。
worker工作进程原理
1. 实际处理client网络请求的是worker
2. master根据nginx.conf决定worker的数量
3. 有client用户请求到达时,worker之间进程竞争,获胜者和client建立连接且处理用户请求;
4. 接收用户请求后,若需要代理转发给后端,则后端处理完毕后接收处理结果,再响应给用户
5. 接收并处理master发来的进程信号,如启动、重启、重载、停止。
nginx常用模块介绍
nginx常用模块官网:https://nginx.org/en/docs/
下面讲解的常用模块,官网都有解析是使用方法。
ngx_http_access_module # 四层基于IP的访问控制,可以通过匹配客户端源IP地址进行限制,简单来说就是允许限制对某些客户端地址的访问。
ngx_http_auth_basic_module # 允许通过使用“HTTP 基本身份验证”协议验证用户名和密码来限制对资源的访问。
ngx_http_stub_status_module # 状态统计模块。
ngx_http_gzip_module # 文件的压缩功能,是一个使用“gzip”方法压缩响应的过滤器。这通常有助于将传输数据的大小减少一半甚至更多。
ngx_http_gzip_static_module # 静态压缩模块,允许发送带有“ ”文件扩展名的预压缩文件,.gz而不是常规文件。
ngx_http_ssl_module # 为HTTPS提供必要的支持
ngx_http_rewrite_module # 重定向功能,解析和处理rewrite请求,用于使用 PCRE 正则表达式更改请求 URI、返回重定向和有条件选择配置。
ngx_http_referer_module # 防盗链功能,用于阻止“Referer”标头字段中包含无效值的请求访问站点。
ngx_http_proxy_module # 将客户端的请求以http协议转发至指定服务器进行处理。
ngx_stream_proxy_module # tcp负载,将客户端的请求以tcp协议转发至指定服务器处理,允许通过 TCP、UDP (1.9.13) 和 UNIX 域套接字代理数据流。
ngx_http_fastcgi_module # 将客户端对php的请求以fastcgi协议转发至指定服务器理。
ngx_http_uwsgi_module # 将客户端对Python的请求以uwsgi协议转发至指定服务器处理。
ngx_http_headers_module # 允许将“Expires”和“Cache-Control”标头字段以及任意字段添加到响应标头。
ngx_http_upstream_module # 用于定义可由proxy_pass、 fastcgi_pass、 uwsgi_pass、 scgi_pass、 memcached_pass和 grpc_pass指令引用的服务器组。负载均衡模块,提供服务器分组转发、权重分配、状态监测、调度算法等高级功能。
ngx_stream_upstream_module # 用于定义可由proxy_pass 指令引用的服务器组。
ngx_http_fastcgi_module # 允许将请求传递到 FastCGI 服务器。
ngx_http_flv_module # 为 Flash 视频 (FLV) 文件提供伪流服务器端支持。
nginx的安装形式
官网yum仓库
源代码编译
离线的rpm安装(yum 自建仓库)
yum安装nginx
# 1. 配置官网yum源,一键安装即可

cat > /etc/yum.repos.d/nginx.repo << 'EOF'
[nginx-stable]
name=nginx stable repo
baseurl=http://nginx.org/packages/centos/$releasever/$basearch/
gpgcheck=1
enabled=1
gpgkey=https://nginx.org/keys/nginx_signing.key
EOF

# 2.清空yum源,安装最新版nginx
yum clean all

yum install nginx -y

# 3.查看PATH变量
[root@iz0jlfqv8fyt7iuxoec4clz ~]# which nginx
/usr/sbin/nginx
[root@iz0jlfqv8fyt7iuxoec4clz ~]# ll /usr/sbin/nginx
-rwxr-xr-x 1 root root 1399232 Apr 12 01:22 /usr/sbin/nginx

# 4.查看nginx版本
[root@iz0jlfqv8fyt7iuxoec4clz ~]# nginx -V
nginx version: nginx/1.24.0
built by gcc 4.8.5 20150623 (Red Hat 4.8.5-44) (GCC)
built with OpenSSL 1.0.2k-fips  26 Jan 2017
TLS SNI support enabled
configure arguments: --prefix=/etc/nginx --sbin-path=/usr/sbin/nginx --modules-path=/usr/lib64/nginx/modules --conf-path=/etc/nginx/nginx.conf --error-log-path=/var/log/nginx/error.log --http-log-path=/var/log/nginx/access.log --pid-path=/var/run/nginx.pid --lock-path=/var/run/nginx.lock --http-client-body-temp-path=/var/cache/nginx/client_temp --http-proxy-temp-path=/var/cache/nginx/proxy_temp --http-fastcgi-temp-path=/var/cache/nginx/fastcgi_temp --http-uwsgi-temp-path=/var/cache/nginx/uwsgi_temp --http-scgi-temp-path=/var/cache/nginx/scgi_temp --user=nginx --group=nginx --with-compat --with-file-aio --with-threads --with-http_addition_module --with-http_auth_request_module --with-http_dav_module --with-http_flv_module --with-http_gunzip_module --with-http_gzip_static_module --with-http_mp4_module --with-http_random_index_module --with-http_realip_module --with-http_secure_link_module --with-http_slice_module --with-http_ssl_module --with-http_stub_status_module --with-http_sub_module --with-http_v2_module --with-mail --with-mail_ssl_module --with-stream --with-stream_realip_module --with-stream_ssl_module --with-stream_ssl_preread_module --with-cc-opt='-O2 -g -pipe -Wall -Wp,-D_FORTIFY_SOURCE=2 -fexceptions -fstack-protector-strong --param=ssp-buffer-size=4 -grecord-gcc-switches -m64 -mtune=generic -fPIC' --with-ld-opt='-Wl,-z,relro -Wl,-z,now -pie'
nginx管理命令
nginx 		 		# 默认是直接运行启动,前提是当前机器没运行nginx
nginx -t  			# 检测nginx.conf语法
nginx -s reload  	# 重新读取nginx.conf
nginx -s stop   	# 停止nginx  kill -15 nginx


# systemctl去管理nginx启动之类的。


#启动nginx,查看nginx状态,reload重新加载nginx配置, restart重启nginx服务,查看进程id号,关闭nginx
[root@iz0jlfqv8fyt7iuxoec4clz ~]# systemctl start nginx

[root@iz0jlfqv8fyt7iuxoec4clz ~]# systemctl status nginx

[root@iz0jlfqv8fyt7iuxoec4clz ~]# systemctl reload nginx  # worker变化,master不变

[root@iz0jlfqv8fyt7iuxoec4clz ~]# systemctl restart nginx  # 整个nginx进程变化

[root@iz0jlfqv8fyt7iuxoec4clz ~]# systemctl stop nginx
yum 安装 nginx 所有默认路径
[root@iz0jlfqv8fyt7iuxoec4clz ~]# rpm -ql nginx
/etc/logrotate.d/nginx
/etc/nginx
/etc/nginx/conf.d
/etc/nginx/conf.d/default.conf
/etc/nginx/fastcgi_params
/etc/nginx/mime.types
/etc/nginx/modules
/etc/nginx/nginx.conf		# nginx的配置文件路径
/etc/nginx/scgi_params
/etc/nginx/uwsgi_params
/usr/lib/systemd/system/nginx-debug.service
/usr/lib/systemd/system/nginx.service
/usr/lib64/nginx
/usr/lib64/nginx/modules
/usr/libexec/initscripts/legacy-actions/nginx
/usr/libexec/initscripts/legacy-actions/nginx/check-reload
/usr/libexec/initscripts/legacy-actions/nginx/upgrade
/usr/sbin/nginx
/usr/sbin/nginx-debug
/usr/share/doc/nginx-1.24.0
/usr/share/doc/nginx-1.24.0/COPYRIGHT
/usr/share/man/man8/nginx.8.gz
/usr/share/nginx
/usr/share/nginx/html
/usr/share/nginx/html/50x.html
/usr/share/nginx/html/index.html
/var/cache/nginx
/var/log/nginx
通过官网yum仓库默认安装的nginx.conf配置文件
[root@iz0jlfqv8fyt7iuxoec4clz ~]# cat /etc/nginx/nginx.conf

user  nginx;
worker_processes  auto;

error_log  /var/log/nginx/error.log notice;
pid        /var/run/nginx.pid;


events {
    worker_connections  1024;
}


http {
    include       /etc/nginx/mime.types;
    default_type  application/octet-stream;

    log_format  main  '$remote_addr - $remote_user [$time_local] "$request" '
                      '$status $body_bytes_sent "$http_referer" '
                      '"$http_user_agent" "$http_x_forwarded_for"';

    access_log  /var/log/nginx/access.log  main;

    sendfile        on;
    #tcp_nopush     on;

    keepalive_timeout  65;

    #gzip  on;

    include /etc/nginx/conf.d/*.conf;
}
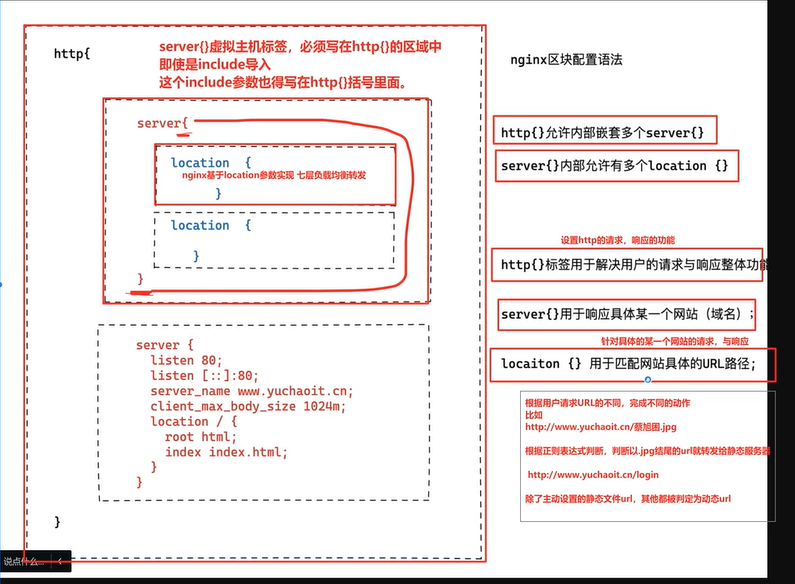
nginx配置模块详解
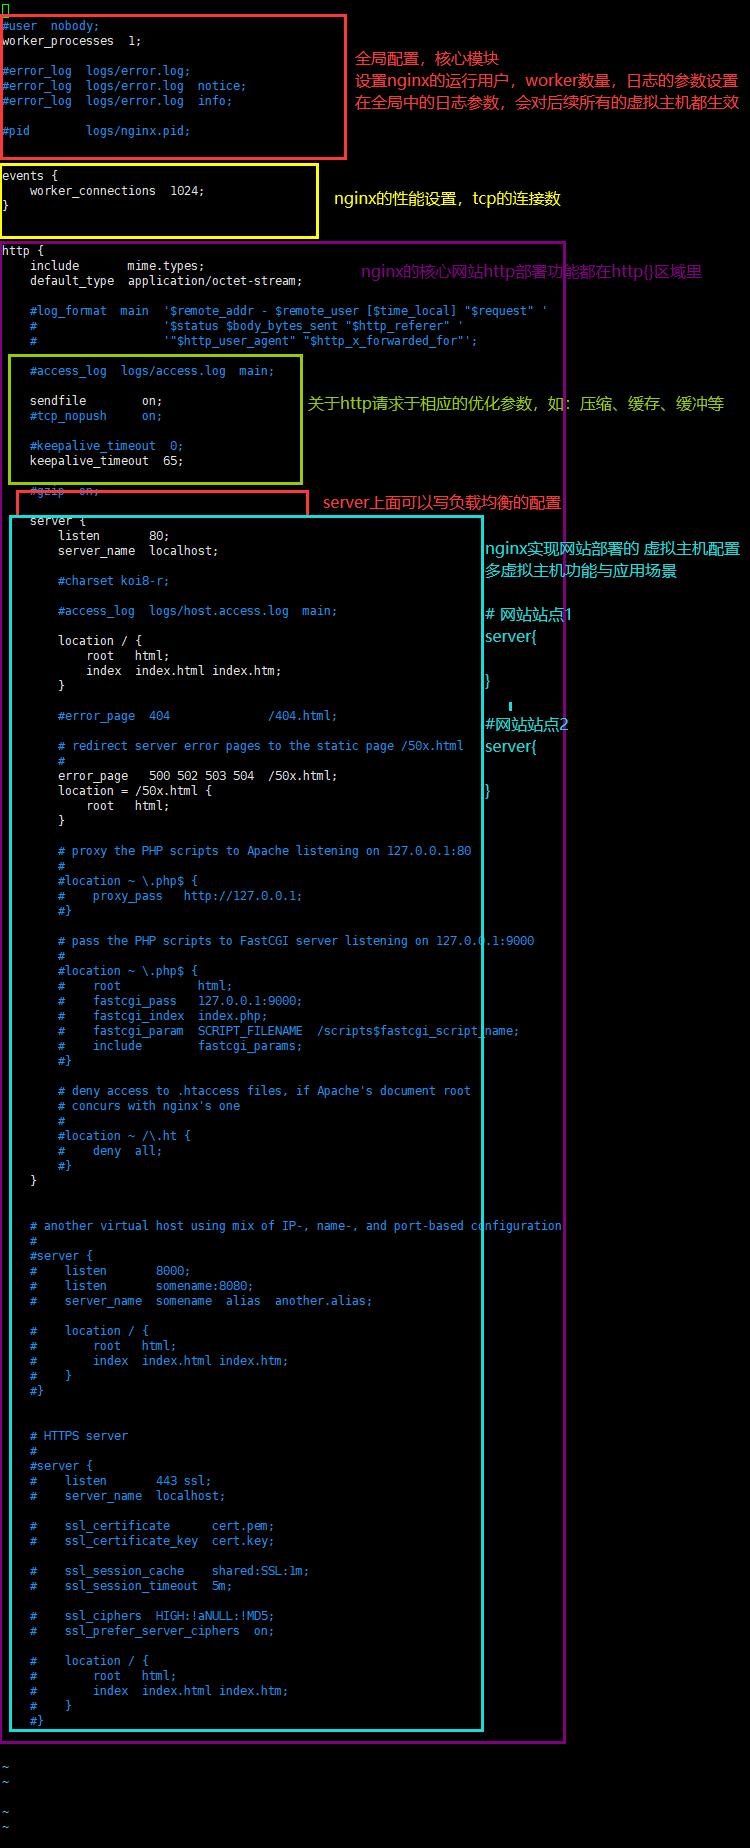
主要区域讲解:
相关文章
| 文章标题 | 文章连接 |
|---|---|
| 【Linux】nginx基础篇 – 介绍及yum安装nginx | https://liucy.blog.csdn.net/article/details/133928000 |
| 【Linux】环境下部署Nginx服务 – 二进制部署方式 | https://liucy.blog.csdn.net/article/details/132145067 |
| nginx配置负载均衡–实战项目(适用于轮询、加权轮询、ip_hash) | https://liucy.blog.csdn.net/article/details/133986013 |
| nginx快速部署一个网站服务 + 多域名 + 多端口 | https://liucy.blog.csdn.net/article/details/133986102 |
原文地址:https://blog.csdn.net/liu_chen_yang/article/details/133928000
本文来自互联网用户投稿,该文观点仅代表作者本人,不代表本站立场。本站仅提供信息存储空间服务,不拥有所有权,不承担相关法律责任。
如若转载,请注明出处:http://www.7code.cn/show_49442.html
如若内容造成侵权/违法违规/事实不符,请联系代码007邮箱:suwngjj01@126.com进行投诉反馈,一经查实,立即删除!
声明:本站所有文章,如无特殊说明或标注,均为本站原创发布。任何个人或组织,在未征得本站同意时,禁止复制、盗用、采集、发布本站内容到任何网站、书籍等各类媒体平台。如若本站内容侵犯了原著者的合法权益,可联系我们进行处理。