往期教程:
apk反编译修改教程系列—–修改apk应用名称 任意修改名称 签名【一】
apk反编译修改教程系列—–任意修改apk版本号 版本名 防止自动更新【二】
apk反编译修改教程系列—–修改apk中的图片 任意更换apk桌面图片【三】
apk反编译修改教程系列—简单去除apk联网权限 其他权限 无法自动更新等【四】
apk反编译修改教程系列—修改apk设置菜单选项名称 修改默认设置 增加减少选项【六】
apk反编译修改教程系列—简单给app添加启动弹窗 添加对话框 跳转指定网页等【七】
apk反编译修改教程系列—如何简单的汉化apk 手机端与电脑端同步演示【八】

今天详细的解析下如何修改一个软件让其可以无限分身的操作步骤。效果类似等同于多开微信等等。演示的apk都比较简单,目的只是了解反编译操作的基本步骤
操作步骤;
演示apk;创建快捷方式apk
工具:MT或者电脑端反编译工具
创建快捷方式apk这款工具主要是来创建一些隐藏app的桌面图标。很多系统类软件在桌面是看不到图标的,因为修改了显示 默认隐藏。
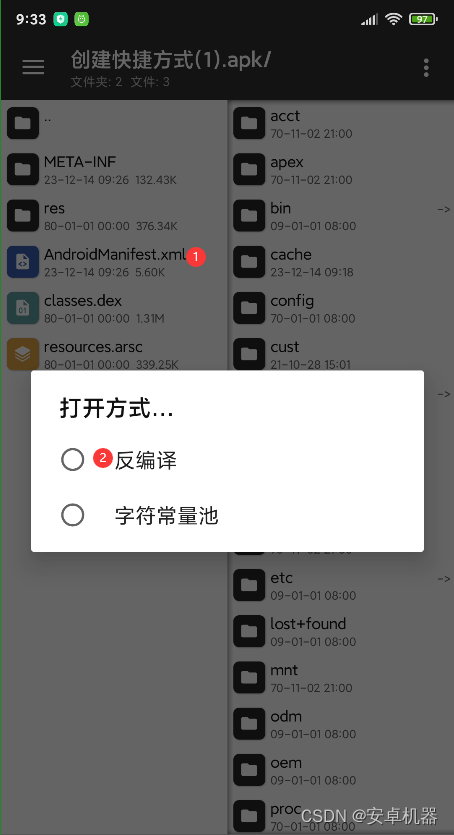
首先.常规打开此款apk。使用手机端或者电脑端工具进行反编译
电脑端举例

手机端:
常规修改打开步骤。必须修改包名。不然有重复包名安装就会提示报错。先修改包名

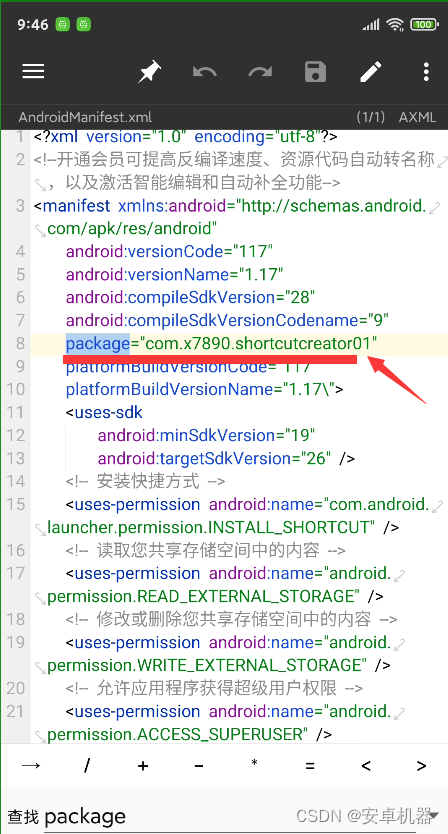
可以看到我在原包名的后面添加了package=”com.x7890.shortcutcreator01加了个01这个没有什么必须。与原包名不一样即可。电脑端修改步骤也一样

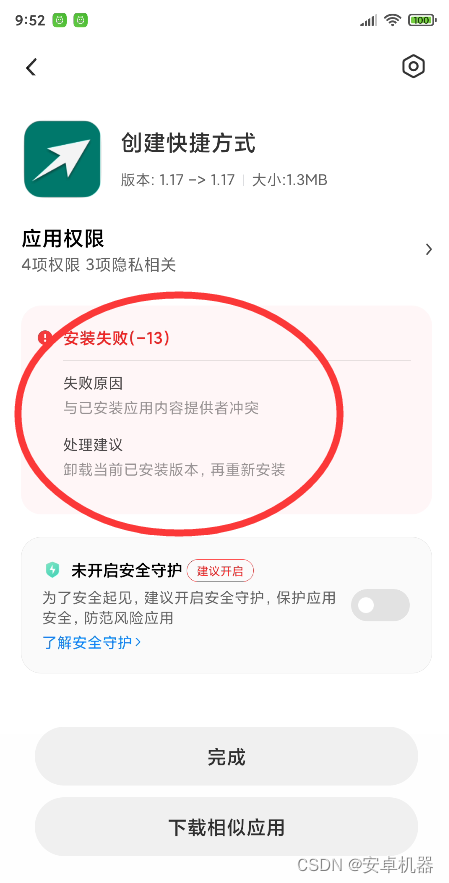
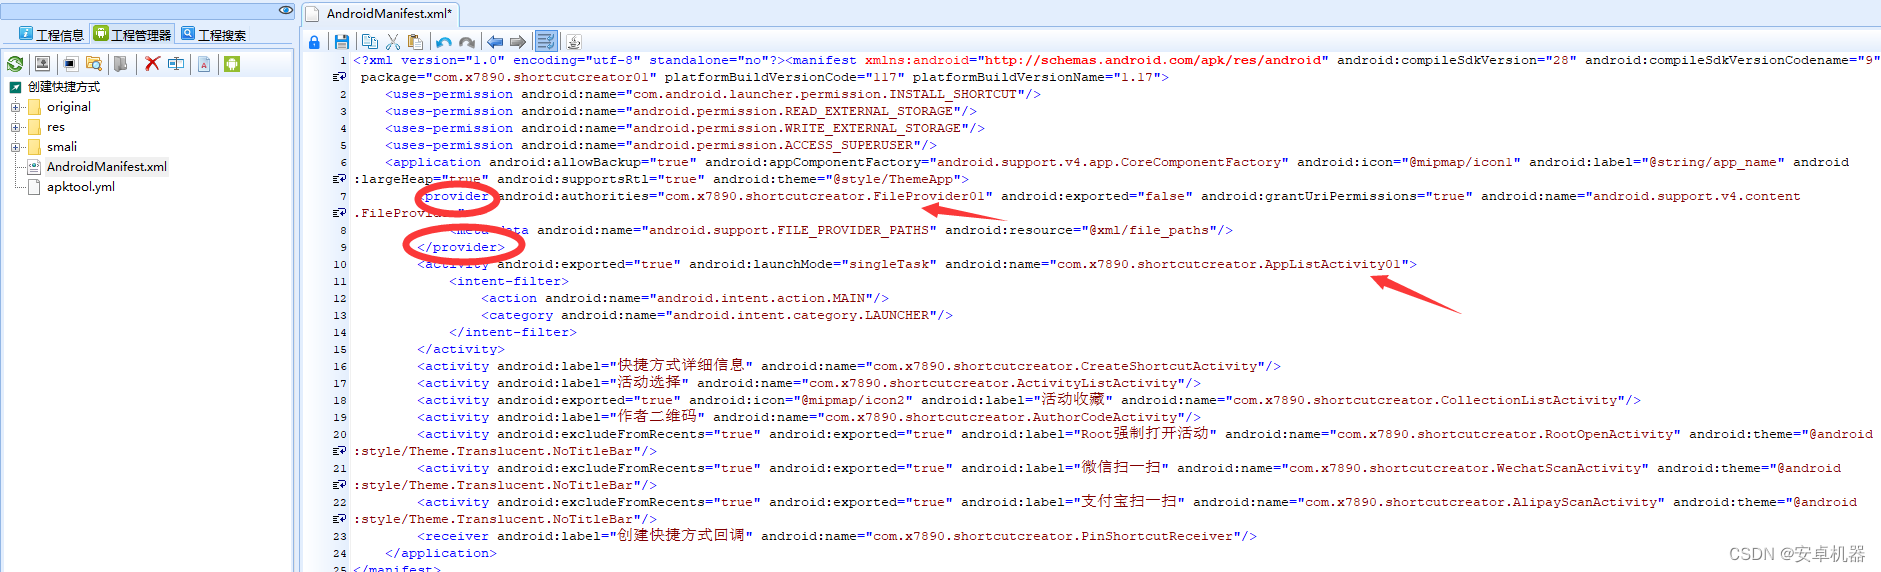
然后回编译保存签名安装会提示报错。提示为“存在同名的内容提供者”,错误的原因是由于我们只修改了包名,没有修改内容提供者。类似
我们需要继续修改内容提供者的信息。同样的步骤反编译打开AndroidManifest.xml。搜索provider修改。我都在原名字后加了01。
原工具代码
<?xml version="1.0" encoding="utf-8" standalone="no"?><manifest xmlns:android="http://schemas.android.com/apk/res/android" android:compileSdkVersion="28" android:compileSdkVersionCodename="9" package="com.x7890.shortcutcreator" platformBuildVersionCode="117" platformBuildVersionName="1.17">
<uses-permission android:name="com.android.launcher.permission.INSTALL_SHORTCUT"/>
<uses-permission android:name="android.permission.READ_EXTERNAL_STORAGE"/>
<uses-permission android:name="android.permission.WRITE_EXTERNAL_STORAGE"/>
<uses-permission android:name="android.permission.ACCESS_SUPERUSER"/>
<application android:allowBackup="true" android:appComponentFactory="android.support.v4.app.CoreComponentFactory" android:icon="@mipmap/icon1" android:label="@string/app_name" android:largeHeap="true" android:supportsRtl="true" android:theme="@style/ThemeApp">
<provider android:authorities="com.x7890.shortcutcreator.FileProvider" android:exported="false" android:grantUriPermissions="true" android:name="android.support.v4.content.FileProvider">
<meta-data android:name="android.support.FILE_PROVIDER_PATHS" android:resource="@xml/file_paths"/>
</provider>
<activity android:exported="true" android:launchMode="singleTask" android:name="com.x7890.shortcutcreator.AppListActivity">
<intent-filter>
<action android:name="android.intent.action.MAIN"/>
<category android:name="android.intent.category.LAUNCHER"/>
</intent-filter>
</activity>
<activity android:label="快捷方式详细信息" android:name="com.x7890.shortcutcreator.CreateShortcutActivity"/>
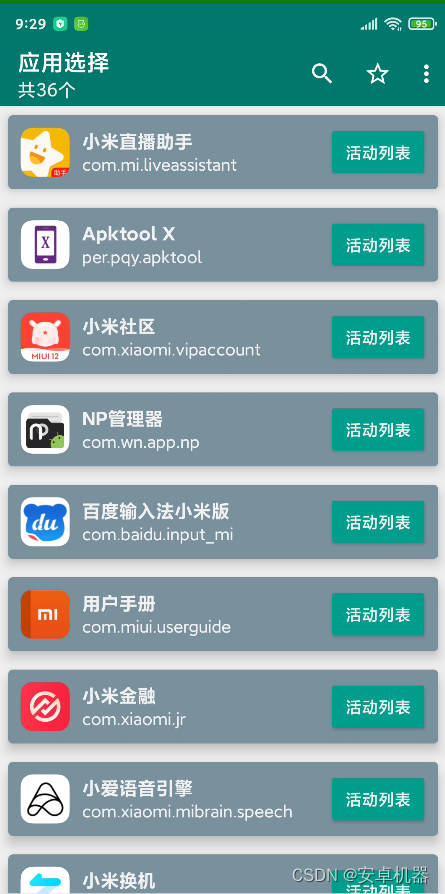
<activity android:label="活动选择" android:name="com.x7890.shortcutcreator.ActivityListActivity"/>
<activity android:exported="true" android:icon="@mipmap/icon2" android:label="活动收藏" android:name="com.x7890.shortcutcreator.CollectionListActivity"/>
<activity android:label="作者二维码" android:name="com.x7890.shortcutcreator.AuthorCodeActivity"/>
<activity android:excludeFromRecents="true" android:exported="true" android:label="Root强制打开活动" android:name="com.x7890.shortcutcreator.RootOpenActivity" android:theme="@android:style/Theme.Translucent.NoTitleBar"/>
<activity android:excludeFromRecents="true" android:exported="true" android:label="微信扫一扫" android:name="com.x7890.shortcutcreator.WechatScanActivity" android:theme="@android:style/Theme.Translucent.NoTitleBar"/>
<activity android:excludeFromRecents="true" android:exported="true" android:label="支付宝扫一扫" android:name="com.x7890.shortcutcreator.AlipayScanActivity" android:theme="@android:style/Theme.Translucent.NoTitleBar"/>
<receiver android:label="创建快捷方式回调" android:name="com.x7890.shortcutcreator.PinShortcutReceiver"/>
</application>
</manifest>修改后的代码
<?xml version="1.0" encoding="utf-8" standalone="no"?><manifest xmlns:android="http://schemas.android.com/apk/res/android" android:compileSdkVersion="28" android:compileSdkVersionCodename="9" package="com.x7890.shortcutcreator01" platformBuildVersionCode="117" platformBuildVersionName="1.17">
    <uses-permission android:name="com.android.launcher.permission.INSTALL_SHORTCUT"/>
    <uses-permission android:name="android.permission.READ_EXTERNAL_STORAGE"/>
    <uses-permission android:name="android.permission.WRITE_EXTERNAL_STORAGE"/>
    <uses-permission android:name="android.permission.ACCESS_SUPERUSER"/>
    <application android:allowBackup="true" android:appComponentFactory="android.support.v4.app.CoreComponentFactory" android:icon="@mipmap/icon1" android:label="@string/app_name" android:largeHeap="true" android:supportsRtl="true" android:theme="@style/ThemeApp">
        <provider android:authorities="com.x7890.shortcutcreator.FileProvider01" android:exported="false" android:grantUriPermissions="true" android:name="android.support.v4.content.FileProvider">
            <meta-data android:name="android.support.FILE_PROVIDER_PATHS" android:resource="@xml/file_paths"/>
        </provider>
        <activity android:exported="true" android:launchMode="singleTask" android:name="com.x7890.shortcutcreator.AppListActivity01">
            <intent-filter>
                <action android:name="android.intent.action.MAIN"/>
                <category android:name="android.intent.category.LAUNCHER"/>
            </intent-filter>
        </activity>
        <activity android:label="快捷方式详细信息" android:name="com.x7890.shortcutcreator.CreateShortcutActivity"/>
        <activity android:label="活动选择" android:name="com.x7890.shortcutcreator.ActivityListActivity"/>
        <activity android:exported="true" android:icon="@mipmap/icon2" android:label="活动收藏" android:name="com.x7890.shortcutcreator.CollectionListActivity"/>
        <activity android:label="作者二维码" android:name="com.x7890.shortcutcreator.AuthorCodeActivity"/>
        <activity android:excludeFromRecents="true" android:exported="true" android:label="Root强制打开活动" android:name="com.x7890.shortcutcreator.RootOpenActivity" android:theme="@android:style/Theme.Translucent.NoTitleBar"/>
        <activity android:excludeFromRecents="true" android:exported="true" android:label="微信扫一扫" android:name="com.x7890.shortcutcreator.WechatScanActivity" android:theme="@android:style/Theme.Translucent.NoTitleBar"/>
        <activity android:excludeFromRecents="true" android:exported="true" android:label="支付宝扫一扫" android:name="com.x7890.shortcutcreator.AlipayScanActivity" android:theme="@android:style/Theme.Translucent.NoTitleBar"/>
        <receiver android:label="创建快捷方式回调" android:name="com.x7890.shortcutcreator.PinShortcutReceiver"/>
    </application>
</manifest>
类似。可以仔细对比下原工具AndroidManifest.xml与修改后的AndroidManifest.xml不同之处
此时重新回编译签名后安装一切正常。按此方法可以一直修改安装同一个软件达到多开.

当然演示的apk与步骤只是一个很简单 很小的工具。了解其修改步骤。任何软件都一样。区别可能有的软件会加固 加密或者会有多出包名等等。当然类似的多开有很多简洁方便的工具和其他修改方法来达到目的.
下期预告:修改apk的默认颜色 布局等相关
**系列教程只是让初学者了解反编译的一些初步常识,尽量每一步都图文说明。详细的由浅入深解析apk的各种反编译操作。有兴趣的友友可以关注
原文地址:https://blog.csdn.net/u011283906/article/details/134983168
本文来自互联网用户投稿,该文观点仅代表作者本人,不代表本站立场。本站仅提供信息存储空间服务,不拥有所有权,不承担相关法律责任。
如若转载,请注明出处:http://www.7code.cn/show_53314.html
如若内容造成侵权/违法违规/事实不符,请联系代码007邮箱:suwngjj01@126.com进行投诉反馈,一经查实,立即删除!