本文介绍: 标准库中也提供了很多的异常类,它们是通过类继承组织起来的。异常类继承层级结构图所示步骤1,定义一个类2,继承与异常类3,重写wait方法示例private:char* msg;try{throw my_exception(“自定义异常”);test07();return 0;
概念
等等)
示例:
int main(int argc, char *argv[])
{
    int num = 10 / 0;
    cout << "OVER" << endl;
    return 0;
}
//不会显示OVER,程序异常结束
抛出异常
例如:
捕获异常
语法:
try{
可能会产生异常的代码
111
222 出现异常
333
}
{
}
{
}
…
{
}
示例
#include <iostream>
#include <cstring>
using namespace std;
//异常步骤,抛出异常,捕获异常
int mydiv(int a,int b)
{
    if(b == 0)
    {
        // 抛出异常
        int num = 0;
        throw num;
    }
    return a / b;
}
void test01(){
    try{
        mydiv(10,0);
    }
    catch(int e)
    {
        cout << e << endl;
    }
        catch(char const* s)
    {
        cout << s << endl;
    }
        catch(...)
    {
        cout << "其他异常" << endl;
    }
}
int main(int argc, char *argv[])
{
    test01();
    return 0;
}
栈解旋
概念
class A{
private:
int num;
public:
A(int num):num(num)
{
    cout << "构造函数" << num << endl;
}
~A()
{
    cout << "析构函数" << num << endl;
}
};
void test02()
{
    A a1(1);
    A a2(2);
    throw 0;
}
int main(int argc, char *argv[])
{
    try{
        test02();
    }
    catch(...)
    {
    }
    return 0;
}
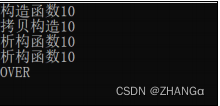
构造函数2
异常的接口声明
作用
限定异常抛出的类型种类
{
函数体
}
注意:
throw():不允许抛出任何异常
void fun01()throw(int,char)
{
    // throw 10;//可以
    // throw 'a';//可以
    // throw 3.14f;//不可以
}
void test03(){
    try{
        fun01();
    }
    catch(int)
    {
        cout << "int的异常" << endl;
    }
    catch(char)
    {
        cout << "char的异常" << endl;
    }
    catch(float)
    {
        cout << "float的异常" << endl;
    }
}
int main(int argc, char *argv[])
{
    test03();
    return 0;
}异常对象的生命周期
#include <iostream>
#include <cstring>
using namespace std;
class B{
private:
int num;
public:
B(int num):num(num)
{
cout << "构造函数" << num << endl;
}
B(const B& b)
{
this->num = b.num;
cout << "拷贝构造" << num << endl;
}
~B()
{
cout << "析构函数" << num << endl;
}
};
void fun02()
{
throw B(10);
}
void test04()
{
try
{
fun02();
}
catch(B b)
{
}
}
int main(int argc, char *argv[])
{
test04();
cout << "OVER" << endl;
return 0;
}
#include <iostream>
#include <cstring>
using namespace std;
class B{
private:
int num;
public:
B(int num):num(num)
{
cout << "构造函数" << num << endl;
}
B(const B& b)
{
this->num = b.num;
cout << "拷贝构造" << num << endl;
}
~B()
{
cout << "析构函数" << num << endl;
}
};
void fun02()
{
throw new B(10);
}
void test04()
{
try{
fun02();
}
catch(B *b)
{
}
}
int main(int argc, char *argv[])
{
test04();
cout << "OVER" << endl;
return 0;
}结果:
#include <iostream>
#include <cstring>
using namespace std;
class B{
private:
int num;
public:
B(int num):num(num)
{
cout << "构造函数" << num << endl;
}
B(const B& b)
{
this->num = b.num;
cout << "拷贝构造" << num << endl;
}
~B()
{
cout << "析构函数" << num << endl;
}
};
void fun02()
{
throw B(10);
}
void test04()
{
try{
fun02();
}
catch(B &b)
{
}
}
int main(int argc, char *argv[])
{
test04();
cout << "OVER" << endl;
return 0;
}结果:

异常的多态
示例1:
class BaseException{};
class MyException01:public BaseException{};
class MyException02:public BaseException{};
void test05()
{
    try{
        throw MyException01();
    }
    catch(BaseException)
    {
        cout << "可以捕获子类异常" << endl;
    }
}
int main(int argc, char *argv[])
{
    test05();
    return 0;
}class BaseException{
public:
virtual void printMsg(){}
};
class NullException:public BaseException{
public:
virtual void printMsg(){
cout << "空指针异常" << endl;
}
};
class ArrOutException:public BaseException{
public:
virtual void printMsg(){
cout << "数组下标越界异常" << endl;
}
};
void test05()
{
try{
throw NullException();
}
catch(BaseException &e)
{
e.printMsg();
}
}
int main(int argc, char *argv[])
{
test05();
return 0;
}标准异常库
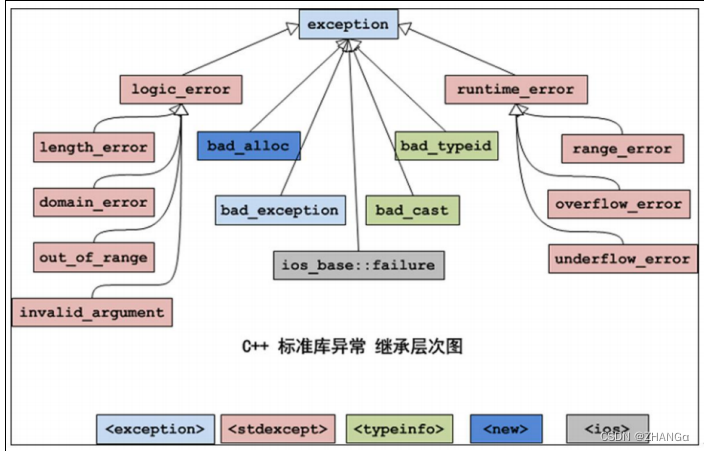
简介
所示

标准异常使用
void test06()
{
    try{
        throw bad_alloc();
    }
    catch(exception &e)
    {
        cout << e.what() << endl;
    }
}
int main(int argc, char *argv[])
{
    test06();
    return 0;
}自定义异常
1,定义一个类
2,继承与异常类
示例
class my_exception:public exception
{
private:
    char* msg;
public:
    my_exception()
    {
    }
    my_exception(char* msg)
    {
        this->msg = msg;
    }
    const char *what()const noexcept
    {
        return msg;
    }
};
void test07()
{
    try{
        throw my_exception("自定义异常");
    }
    catch(exception &e){
        cout << e.what() << endl;
    }
}
int main(int argc, char *argv[])
{
    test07();
    return 0;
}原文地址:https://blog.csdn.net/aisheisadas/article/details/134556406
本文来自互联网用户投稿,该文观点仅代表作者本人,不代表本站立场。本站仅提供信息存储空间服务,不拥有所有权,不承担相关法律责任。
如若转载,请注明出处:http://www.7code.cn/show_5343.html
如若内容造成侵权/违法违规/事实不符,请联系代码007邮箱:suwngjj01@126.com进行投诉反馈,一经查实,立即删除!
声明:本站所有文章,如无特殊说明或标注,均为本站原创发布。任何个人或组织,在未征得本站同意时,禁止复制、盗用、采集、发布本站内容到任何网站、书籍等各类媒体平台。如若本站内容侵犯了原著者的合法权益,可联系我们进行处理。


