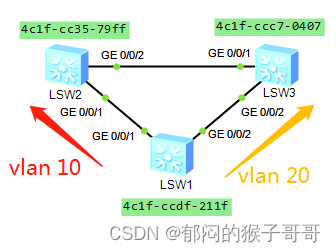
要求:
1、vlan 10 从红色链路转发。
2、vlan 20 从黄色链路转发。
一、基础配置
[SW1]vlan batch 10 20
[SW1]interface GigabitEthernet 0/0/1
[SW1-GigabitEthernet0/0/1]port link-type trunk
[SW1-GigabitEthernet0/0/1]port trunk allow-pass vlan all
[SW1-GigabitEthernet0/0/1]quit
[SW1]interface GigabitEthernet 0/0/2
[SW1-GigabitEthernet0/0/2]port trunk allow-pass vlan all
[SW1-GigabitEthernet0/0/2]quit
[SW2]vlan batch 10 20
[SW2]interface GigabitEthernet 0/0/1
[SW2-GigabitEthernet0/0/1]port link-type trunk
[SW2-GigabitEthernet0/0/1]port trunk allow-pass vlan all
[SW2-GigabitEthernet0/0/1]quit
[SW2]interface GigabitEthernet 0/0/2
[SW2-GigabitEthernet0/0/2]port trunk allow-pass vlan all
[SW3]vlan batch 10 20
[SW3]interface GigabitEthernet 0/0/1
[SW3-GigabitEthernet0/0/1]port link-type trunk
[SW3-GigabitEthernet0/0/1]port trunk allow-pass vlan all
[SW3-GigabitEthernet0/0/1]quit
[SW3]interface GigabitEthernet 0/0/2
[SW3-GigabitEthernet0/0/2]port trunk allow-pass vlan all
二、多实例配置
开启 STP 服务。设置 STP 服务为 MSTP。
[SW1]stp enable
[SW1]stp mode mstp
进入 STP 配置视图。
[SW1]stp region-configuration
创建名为 msgroup01 的组名称(名称可自定义,但需要保证所有加入的节点名称一致)。
[SW1-mst-region]region-name msgroup01
创建实例 1 并允许通过的 vlan 号为 10 至 19 。
[SW1-mst-region]instance 1 vlan 10 to 19
创建实例 2 并允许通过的 vlan 号为20 至 29。
[SW1-mst-region]instance 2 vlan 20 to 29
激活 STP 配置。
[SW1-mst-region]active region-configuration
在其他加入的节点中,使用一模一样的配置(跟 SW1 一样)。
[SW2]stp enable
[SW2]stp mode mstp
[SW2]stp region-configuration
[SW2-mst-region]region-name msgroup01
[SW2-mst-region]instance 1 vlan 10 to 19
[SW2-mst-region]instance 2 vlan 20 to 29
[SW2-mst-region]active region-configuration
[SW3]stp enable
[SW3]stp mode mstp
[SW3]stp region-configuration
[SW3-mst-region]region-name msgroup01
[SW3-mst-region]instance 1 vlan 10 to 19
[SW3-mst-region]instance 2 vlan 20 to 29
[SW3-mst-region]active region-configuration
设置实例优先级。
配置 SW2 的实例 1 优先级高(实例 1 包含 vlan 10)。
(4096 是因为原交换机默认优先级是 32768 ,实际项目中需要先看默认优先级,再调整这里的优先级大小)。
[SW2]stp instance 1 priority 4096
[SW2]stp instance 2 priority 8192
配置 SW3 的实例 2 优先级高(实例 2 包含 vlan 20)。
[SW3]stp instance 1 priority 8192
[SW3]stp instance 2 priority 4096
三、扩展配置
3.1 配置接口为边缘端口
一般用于连接终端的交换机接口,可以避免终端因频繁上下线导致的网络震荡。
全局配置(配置当前设备上所有端口为边缘端口,一般不这样设置)
[SW1]stp edged-port default
接口配置(开启)(也可以更改 enable 参数,使用 disable 关闭此边缘端口)
[SW1]interface GigabitEthernet 0/0/1
[SW1-GigabitEthernet0/0/1]stp edged-port enable
3.2 开启 BPDU 保护
防止环路和避免协议攻击(配合边缘端口使用)。(如果在某个接口收到自己发出的 BPDU 报文,那就将此接口关闭)。
[SW1]stp bpdu-protection
设置因为 BPDU 保护关闭的接口重新恢复的间隔时间(秒)(60 可更改)。
[SW1]error-down auto-recovery cause bpdu-protection interval 60
3.3 根保护(DP接口下设置)
避免由于错误配置或恶意攻击导致的 STP 根桥地位丢失(跟环路保护功能冲突)。
[SW2]interface GigabitEthernet 0/0/1
[SW2-GigabitEthernet0/0/1]stp root-protection
3.4 配置泛洪保护(全局,默认是 1 )
一段时间内,处理 BPDU 的数量。
[SW1]stp tc-protection threshold 5
3.5 关闭接受 BPDU 报文(接口收到后丢弃,但不影响发送)
[SW1]interface GigabitEthernet 0/01
[SW1-GigabitEthernet0/0/1]bpdu disable
3.6 接口关闭 STP(接口不发送 BPDU 报文)
[SW1]interface GigabitEthernet 0/01
[SW1-GigabitEthernet0/0/1]stp disable
3.7 接口关闭 STP 透传 BPDU 报文
CE交换机
[SW1]interface GigabitEthernet 0/01
[SW1-GigabitEthernet0/0/1]bpdu bridge enable
S系列交换机
[SW1]interface GigabitEthernet 0/01
[SW1-GigabitEthernet0/0/1]stp disable
[SW1-GigabitEthernet0/0/1]l2protocol-tunnel stp enable
原文地址:https://blog.csdn.net/sunsun778/article/details/134557835
本文来自互联网用户投稿,该文观点仅代表作者本人,不代表本站立场。本站仅提供信息存储空间服务,不拥有所有权,不承担相关法律责任。
如若转载,请注明出处:http://www.7code.cn/show_5403.html
如若内容造成侵权/违法违规/事实不符,请联系代码007邮箱:suwngjj01@126.com进行投诉反馈,一经查实,立即删除!
声明:本站所有文章,如无特殊说明或标注,均为本站原创发布。任何个人或组织,在未征得本站同意时,禁止复制、盗用、采集、发布本站内容到任何网站、书籍等各类媒体平台。如若本站内容侵犯了原著者的合法权益,可联系我们进行处理。