本文介绍: 本文主要介绍了在pod中,与node相关的调度策略,亲和性,污点与容忍度等的内容。
目录
本文主要介绍了在pod中,与node相关的调度策略,亲和性,污点与容忍度等的内容
node调度策略nodeName和nodeSelector
在创建pod等资源时,可以通过调整字段进行node调度,指定资源调度到满足何种条件的node
指定nodeName
vim testpod1.yaml
apiVersion: v1
kind: Pod
metadata:
	name: testpod1
	namespace: default
	labels:
		app: tomcat
spec:
	nodeName: ws-k8s-node1 #增加字段,将这个pod调度到node1
	containers:
		- name: test
		  image: docker.io/library/tomcat
			imagePullPolicy: IfNotPresent
kubectl apply -f testpod1.yaml
kubectl get pods #可以看到已经调度到node1上了
testpod1    1/1     Running   0    116s   10.10.179.9    ws-k8s-node1   <none>           <none>
指定nodeSelector
vim testpod2.yaml
apiVersion: v1
kind: Pod
metadata:
	name: testpod2
	namespace: default
	labels:
		app: tomcat
spec:
	nodeSelector: #添加nodeSelector选项,
		admin: ws  #调度到具有admin=ws标签的node上
	containers:
		- name: test
		  image: docker.io/library/tomcat
			imagePullPolicy: IfNotPresent
kubectl apply -f testpod2.yaml
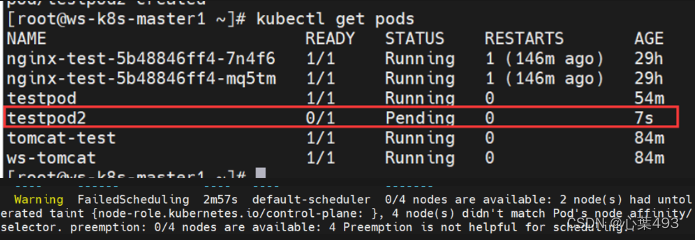
但因为我没有admin=ws标签的node,所以应用后pod处于pending状态

#现在我给node1的节点打个标签
#kubectl --help | grep -i label
#kubectl label --help
Examples:
  # Update pod 'foo' with the label 'unhealthy' and the value 'true'
  #kubectl label pods foo unhealthy=true
kubectl label nodes ws-k8s-node1 admin=ws
#node/ws-k8s-node1 labeled
#调度情况恢复正常
kubectl get pods | grep testpod2
testpod2                      1/1     Running   0              11m
#删除node标签
kubectl label nodes ws-k8s-node1 admin-
#删除testpod2
kubectl delete pods testpod2

如果同时使用nodeName和nodeSelector,则会报错亲和性错误,无法正常部署;
如果nodeName和nodeSelector指定的node同时满足这两项的条件,就可以部署
node亲和性
亲和性在Kubernetes中起着重要作用,通过定义规则和条件,它允许我们实现精确的Pod调度、资源优化、高性能计算以及容错性和可用性的增强。通过利用亲和性,我们可以更好地管理和控制集群中的工作负载,并满足特定的业务需求。
#查看帮助
kubectl explain pods.spec.affinity
RESOURCE: affinity <Object>
DESCRIPTION:
     If specified, the pod's scheduling constraints
     Affinity is a group of affinity scheduling rules.
FIELDS:
   nodeAffinity <Object> #node亲和性
     Describes node affinity scheduling rules for the pod.

   podAffinity  <Object> #pod亲和性
     Describes pod affinity scheduling rules (e.g. co-locate this pod in the
     same node, zone, etc. as some other pod(s)).

   podAntiAffinity      <Object> #pod反亲和性
     Describes pod anti-affinity scheduling rules (e.g. avoid putting this pod
     in the same node, zone, etc. as some other pod(s)).
node节点亲和性
在创建pod时,会根据nodeaffinity来寻找最适合该pod的条件的node
#查找帮助
kubectl explain pods.spec.affinity.nodeAffinity
KIND:     Pod
VERSION:  v1
RESOURCE: nodeAffinity <Object>
DESCRIPTION:
     Describes node affinity scheduling rules for the pod.
     Node affinity is a group of node affinity scheduling rules.
FIELDS:
   preferredDuringSchedulingIgnoredDuringExecution      <[]Object>
   requiredDuringSchedulingIgnoredDuringExecution       <Object>

#软亲和性,如果所有都不满足条件,也会找一个节点将就
preferredDuringSchedulingIgnoredDuringExecution
#硬亲和性,必须满足,如果不满足则不找节点,宁缺毋滥
requiredDuringSchedulingIgnoredDuringExecution
硬亲和性
kubectl explain pods.spec.affinity.nodeAffinity.requiredDuringSchedulingIgnoredDuringExecution
#nodeSelectorTerms    <[]Object> -required-
#     Required. A list of node selector terms. The terms are ORed.
kubectl explain pods.spec.affinity.nodeAffinity.requiredDuringSchedulingIgnoredDuringExecution.nodeSelectorTerms
FIELDS:
   matchExpressions     <[]Object> #匹配表达式
     A list of node selector requirements by node's labels.
   matchFields  <[]Object>         #匹配字段
     A list of node selector requirements by node's fields.
#匹配表达式
kubectl explain pods.spec.affinity.nodeAffinity.requiredDuringSchedulingIgnoredDuringExecution.nodeSelectorTerms.matchExpressions
key  <string> -required-
operator     <string> -required-
values       <[]string>
#可用operator
     - `"DoesNotExist"`
     - `"Exists"`
     - `"Gt"`
     - `"In"`
     - `"Lt"`
     - `"NotIn"`

#
vim ying-pod.yaml
apiVersion: v1
kind: Pod
metadata:
  name: ying-pod
	labels:
		app: tomcat
		user: ws
spec:
	affinity:
		nodeAffinity:
			requiredDuringSchedulingIgnoredDuringExecution:
				nodeSelectorTerms:
				- matchExpressions:
					- key: name         #去找key=name
						opertor: In       # name = ws或=wws
						values:
							- ws
							- wss
	containers:
		- name: test1
			namespace: default
			image: docker.io/library/tomcat
		  imagePullPolicy: IfNotPresent

kubectl apply -f ying-pod.yaml
#需要name=ws或name=wws,但是没有节点有标签,而且是硬亲和
#所以pod会处于pending状态
kubectl get pods | grep ying
ying-pod                      0/1     Pending       0          15m
#修改node标签
kubectl label nodes ws-k8s-node1 name=ws
#开始构建,并且已经到node1节点了
kubectl get pod -owide | grep ying
ying-pod      0/1     ContainerCreating   0       80s     <none>    ws-k8s-node1   <none>           <none>
#删除标签
kubectl label nodes ws-k8s-node1 name-
软亲和性
vim ruan-pod.yaml
apiVersion: v1
kind: Pod
metadata:
	name: ruan-pod
	namespace: default
spec:
	containers:
		- name: test
			image: docker.io/library/alpine
			imagePullPolicy: IfNotPresent
	affinity:
		nodeAffinity:
			preferredDuringSchedulingIgnoredDuringExecution: #必选preference和weight
			 - preference:
					matchExpressions:
						- key: name
							operate: In #还有Exists,Gt,Lt,NotIn等
							values:
								- ws
					weight: 50 #软亲和性有“权重”说法,权重更高的更优先,范围1-100
			 - preference:
					matchExpressions:
						- key: name
							operate: In
							values:
								- wws
					weight: 70 #设置的比上面的高,用以做测试
kubectl apply -f ruan-pod.yaml

#不满足条件,所以随机找一个进行调度,能看到调度到了node2上
kubectl get pod -owide | grep ruan
ruan-pod                      0/1     ContainerCreating   0          3m24s   <none>         ws-k8s-node2   <none>           <none>

#修改node1的标签name=ws
kubectl label nodes ws-k8s-node1 name=ws
kubectl delete -f ruan-pod.yaml  #删除再重新创建
kubectl apply -f ruan-pod.yaml
kubectl get pods -owide | grep ruan #调整到了node1上
ruan-pod          0/1     ContainerCreating   0       2s      <none>         ws-k8s-node1   <none>           <none>

#修改node2的标签name=wws,此时node2权重比node1高
kubectl label nodes ws-k8s-node2 name=wss
kubectl delete -f ruan-pod.yaml
kubectl apply -f ruan-pod.yaml
kubectl get pods -owide | grep ruan #没有变化,还在node1
ruan-pod       0/1     ContainerCreating   0       4m29s   <none>      ws-k8s-node1   <none>           <none>
#因为yaml的匹配顺序,已经匹配到了name=ws,如果没有另外标签不同的则不会变化

#修改ruan-pod.yaml
...
			- preference:
					matchExpressions:
          - key: name
            operator: In
            values:
            - ws
        weight: 50
      - preference:
          matchExpressions:
          - key: names
            operator: In
            values:
            - wws
				weight: 70
...
#添加node2标签name1=wws,权重比node1高,且标签key不同
kubectl label nodes ws-k8s-node2 names=wws
kubectl delete -f ruan-pod.yaml
kubectl apply -f ruan-pod.yaml
kubectl get po -owide | grep ruan #可以看到ruan-pod已经回到了node2上
ruan-pod     0/1     ContainerCreating   0    3m47s   <none>      ws-k8s-node2   <none>           <none>

#清理环境
kubectl label nodes ws-k8s-node1 name-
kubectl label nodes ws-k8s-node2 names-
kubectl delete -f ruan-pod.yaml
kubectl delete -f ying-pod.yaml --fore --grace-period=0 #强制删除
污点与容忍度
污点类似于标签,可以给node打taints,如果pod没有对node上的污点有容忍,那么就不会调度到该node上。
在创建pod时可以通过tolerations来定义pod对于污点的容忍度
#查看node上的污点
#master节点是默认有污点
kubectl describe node ws-k8s-master1 | grep -i taint
Taints:             node-role.kubernetes.io/control-plane:NoSchedule
#node默认没有污点
kubectl describe node ws-k8s-node1 | grep -i taint
Taints:             <none>

#kubectl explain nodes.spec.taints查看帮助
kubectl explain nodes.spec.taints.effect
1.NoExecute
对已调度的pod不影响,仅对新需要调度的pod进行影响
2.NoSchedule
对已调度和新调度的pod都会有影响
3.PreferNoSchedule
软性的NoSchedule,就算不满足条件也可以调度到不容忍的node上

#查看当前master节点pod容忍情况
kubectl get pods -n kube-system -owide
kubectl describe pods kube-proxy-bg7ck -n kube-system | grep -i tolerations -A 10
Tolerations:                 op=Exists
                             node.kubernetes.io/disk-pressure:NoSchedule op=Exists
                             node.kubernetes.io/memory-pressure:NoSchedule op=Exists
                             node.kubernetes.io/network-unavailable:NoSchedule op=Exists
                             node.kubernetes.io/not-ready:NoExecute op=Exists
                             node.kubernetes.io/pid-pressure:NoSchedule op=Exists
                             node.kubernetes.io/unreachable:NoExecute op=Exists
                             node.kubernetes.io/unschedulable:NoSchedule op=Exists
Events:                      <none>

#给node1打一个污点,使其不接受
kubectl taint node ws-k8s-node1 user=ws:NoSchedule
#创建wudian.yaml进行测试
cat > wudian.yaml << EOF
apiVersion: v1
kind: Pod
metadata:
  name: wudain-pod
  namespace: default
  labels:
    app: app1
spec:
  containers:
  - name: wudian-pod
    image: docker.io/library/tomcat
    imagePullPolicy: IfNotPresent
EOF
kubectl apply -f wudian.yaml
#wudian-pod调度到了node2
kubectl get pods -owide
NAME         READY   STATUS    RESTARTS   AGE   IP             NODE           NOMINATED NODE   READINESS GATES
wudain-pod   1/1     Running   0          18s   10.10.234.72   ws-k8s-node2   <none>           <none>
#给node2添加污点
kubectl taint node ws-k8s-node2 user=xhy:NoExecute
#再查看发现wudain-pood已经被删除
kubectl get pods -owide
No resources found in default namespace.
#再次创建变成离线状态
kubectl apply -f wudian.yaml
kubectl get pods -owide
NAME         READY   STATUS    RESTARTS   AGE   IP       NODE     NOMINATED NODE   READINESS GATES
wudain-pod   0/1     Pending   0          3s    <none>   <none>   <none>           <none>

#查看当前node污点状态
kubectl describe node ws-k8s-node1 | grep -i taint
Taints:             user=ws:NoSchedule
kubectl describe node ws-k8s-node2 | grep -i taint
Taints:             user=xhy:NoExecute

#创建带有容忍度的pod wudian2.yaml
cat > wudian2.yaml << EOF
apiVersion: v1
kind: Pod
metadata:
  name: wudain2-pod
  namespace: default
  labels:
    app: app1
spec:
  containers:
  - name: wudian2-pod
    image: docker.io/library/tomcat
    imagePullPolicy: IfNotPresent
  tolerations:  #容忍度
  - key: "user"
    operator: "Equal"    #equal表示等于,exists代表存在
    value: "ws"          #根据字段,表示能容忍user=ws的污点
#如果operator为exists且value为空则代表容忍所有key相同的
    effect: "NoSchedule" #需要准确匹配容忍等级,如果不匹配则不会生效
#   tolerationSeconds: 1800  effect为NoExecute时才能使用,表示容忍污染的时间,默认是0,即永远容忍
EOF
#现在wudian2是能容忍node1的污点的
kubectl apply -f wudian2.yaml
kubectl get pods -owide
NAME          READY   STATUS    RESTARTS   AGE   IP             NODE           NOMINATED NODE   READINESS GATES
wudain-pod    0/1     Pending   0          21m   <none>         <none>         <none>           <none>
wudain2-pod   1/1     Running   0          15s   10.10.179.13   ws-k8s-node1   <none>           <none>

#创建带有容忍度的pod wudian3.yaml
cat > wudian3.yaml << EOF
apiVersion: v1
kind: Pod
metadata:
  name: wudain3-pod
  namespace: default
  labels:
    app: app1
spec:
  containers:
  - name: wudian3-pod
    image: docker.io/library/tomcat
    imagePullPolicy: IfNotPresent
  tolerations:  #容忍度
  - key: "user"
    operator: "Exists"    #equal表示等于,exists代表存在
    value: ""          #根据字段,表示能容忍user=ws的污点
#如果operator为exist且value为空则代表容忍所有key相同的
    effect: "NoExecute" #需要准确匹配容忍等级,如果不匹配则不会生效
    tolerationSeconds: 1800  #effect为NoExecute时才能使用,表示容忍污染的时间,默认是0,即永远容忍
EOF
kubectl apply -f wudian3.yaml
#wudian3运行在node2上
kubectl get pods -owide | grep -i node2
wudain3-pod   1/1     Running   0          59s   10.10.234.73   ws-k8s-node2   <none>           <none>

#清理环境
kubectl delete -f wudian.yaml
kubectl delete -f wudian2.yaml
kubectl delete -f wudian3.yaml
kubectl taint node ws-k8s-node1 user-
kubectl taint node ws-k8s-node2 user-
原文地址:https://blog.csdn.net/qq_72569959/article/details/135602673
本文来自互联网用户投稿,该文观点仅代表作者本人,不代表本站立场。本站仅提供信息存储空间服务,不拥有所有权,不承担相关法律责任。
如若转载,请注明出处:http://www.7code.cn/show_57491.html
如若内容造成侵权/违法违规/事实不符,请联系代码007邮箱:suwngjj01@126.com进行投诉反馈,一经查实,立即删除!
主题授权提示:请在后台主题设置-主题授权-激活主题的正版授权,授权购买:RiTheme官网
声明:本站所有文章,如无特殊说明或标注,均为本站原创发布。任何个人或组织,在未征得本站同意时,禁止复制、盗用、采集、发布本站内容到任何网站、书籍等各类媒体平台。如若本站内容侵犯了原著者的合法权益,可联系我们进行处理。


