一、说明
本文 揭开CNN、Seq2Seq、Faster R-CNN 和 PPO ,以及transformer和humg-face— 编码和创新之路。对于此类编程的短小示例,用于对照观察,或做学习实验。
二、CNN网络示例
2.1 CNN用mnist数据集
2.1.1 CNN的基本结构:
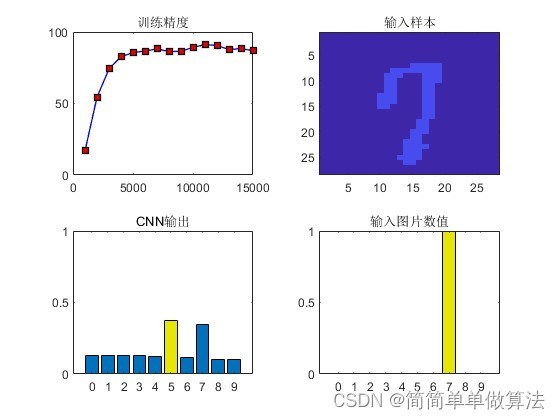
以下是使用 TensorFlow 和 Keras 库的基本卷积神经网络 (CNN) 的更全面实现。此示例将:
- 加载 MNIST 数据集,这是一个用于手写数字识别的常用数据集。
- 对数据进行预处理。
- 定义基本的 CNN 架构。
- 使用优化器、损失函数和度量编译模型。
- 在 MNIST 数据集上训练 CNN。
- 评估经过训练的 CNN 在测试数据上的准确性。
2.1.2 代码示例
import numpy as np

class NeuralNetwork:
    def __init__(self, input_size, hidden_size, output_size):
        # Initialize weights and biases with random values
        self.weights1 = np.random.randn(input_size, hidden_size)
        self.weights2 = np.random.randn(hidden_size, output_size)
        self.bias1 = np.random.randn(1, hidden_size)
        self.bias2 = np.random.randn(1, output_size)

    def sigmoid(self, x):
        return 1 / (1 + np.exp(-x))

    def sigmoid_derivative(self, x):
        return x * (1 - x)

    def forward(self, X):
        self.hidden = self.sigmoid(np.dot(X, self.weights1) + self.bias1)
        output = self.sigmoid(np.dot(self.hidden, self.weights2) + self.bias2)
        return output

    def train(self, X, y, epochs, learning_rate):
        for epoch in range(epochs):
            # Forward propagation
            output = self.forward(X)

            # Compute error
            error = y - output

            # Backward propagation
            d_output = error * self.sigmoid_derivative(output)
            error_hidden = d_output.dot(self.weights2.T)
            d_hidden = error_hidden * self.sigmoid_derivative(self.hidden)

            # Update weights and biases
            self.weights2 += self.hidden.T.dot(d_output) * learning_rate
            self.bias2 += np.sum(d_output, axis=0, keepdims=True) * learning_rate
            self.weights1 += X.T.dot(d_hidden) * learning_rate
            self.bias1 += np.sum(d_hidden, axis=0, keepdims=True) * learning_rate

            # Print the error at every 1000 epochs
            if epoch % 1000 == 0:
                print(f"Epoch {epoch}, Error: {np.mean(np.abs(error))}")

# Sample data for XOR problem
X = np.array([[0, 0], [0, 1], [1, 0], [1, 1]])
y = np.array([[0], [1], [1], [0]])

# Create neural network instance and train
nn = NeuralNetwork(input_size=2, hidden_size=4, output_size=1)
nn.train(X, y, epochs=10000, learning_rate=0.1)

# Test the neural network
print("Predictions after training:")
for data in X:
    print(f"{data} => {nn.forward(data)}")
2.2 用CIFAR-10数据集
问题陈述:在本次挑战中,您将深入计算机视觉世界并使用卷积神经网络 (CNN) 解决图像分类任务。您将使用 CIFAR-10 数据集,其中包含 10 个不同类别的 60,000 张不同图像。您的任务是构建一个 CNN 模型,能够准确地将这些图像分类为各自的类别。
# Image Classification with Convolutional Neural Networks (CNN)
import tensorflow as tf
from tensorflow.keras.datasets import cifar10
from tensorflow.keras.models import Sequential
from tensorflow.keras.layers import Conv2D, MaxPooling2D, Flatten, Dense

# Load the CIFAR-10 dataset
(x_train, y_train), (x_test, y_test) = cifar10.load_data()

# Preprocess the data
x_train, x_test = x_train / 255.0, x_test / 255.0

# Build a CNN model
model = Sequential([
    Conv2D(32, (3, 3), activation='relu', input_shape=(32, 32, 3)),
    MaxPooling2D((2, 2)),
    Conv2D(64, (3, 3), activation='relu'),
    MaxPooling2D((2, 2)),
    Conv2D(64, (3, 3), activation='relu'),
    Flatten(),
    Dense(64, activation='relu'),
    Dense(10)
])

# Compile the model
model.compile(optimizer='adam',
              loss=tf.keras.losses.SparseCategoricalCrossentropy(from_logits=True),
              metrics=['accuracy'])

# Train the model
model.fit(x_train, y_train, epochs=10, validation_data=(x_test, y_test))三、循环神经网络 (RNN)
3.1 基本RNN结构:
让我们使用 TensorFlow 和 Keras 创建一个基本的递归神经网络 (RNN)。此示例将演示:
- 加载序列数据集(我们将使用 IMDB 情感分析数据集)。
- 预处理数据。
- 定义一个简单的 RNN 架构。
- 使用优化器、损失函数和度量编译模型。
- 在数据集上训练 RNN。
- 评估经过训练的 RNN 在测试数据上的准确性。
3.2 代码示例
# Import necessary libraries
import tensorflow as tf
from tensorflow.keras.datasets import imdb
from tensorflow.keras.preprocessing.sequence import pad_sequences

# Constants
VOCAB_SIZE = 10000
MAX_LEN = 500
EMBEDDING_DIM = 32

# Load and preprocess the dataset
(train_data, train_labels), (test_data, test_labels) = imdb.load_data(num_words=VOCAB_SIZE)

# Pad sequences to the same length
train_data = pad_sequences(train_data, maxlen=MAX_LEN)
test_data = pad_sequences(test_data, maxlen=MAX_LEN)

# Define the RNN architecture
model = tf.keras.Sequential([
    tf.keras.layers.Embedding(VOCAB_SIZE, EMBEDDING_DIM, input_length=MAX_LEN),
    tf.keras.layers.SimpleRNN(32, return_sequences=True),
    tf.keras.layers.SimpleRNN(32),
    tf.keras.layers.Dense(1, activation='sigmoid')
])

# Compile the model
model.compile(optimizer='rmsprop', loss='binary_crossentropy', metrics=['accuracy'])

# Train the model
model.fit(train_data, train_labels, epochs=10, batch_size=128, validation_split=0.2)

# Evaluate the model's accuracy on the test data
test_loss, test_acc = model.evaluate(test_data, test_labels)
print(f'Test accuracy: {test_acc}')四、LSTM用于机器翻译的序列到序列 (Seq2Seq) 模型
4.1 关于Seq2Seq
问题陈述:机器翻译在打破语言障碍、促进全球交流方面发挥着至关重要的作用。在本次挑战中,您将踏上自然语言处理 (NLP) 和深度学习之旅,以实现机器翻译的序列到序列 (Seq2Seq) 模型。您的任务是建立一个模型,可以有效地将文本从一种语言翻译成另一种语言。
4.2 代码示例
# Sequence-to-Sequence (Seq2Seq) Model for Machine Translation
import tensorflow as tf
import numpy as np
from tensorflow.keras.models import Model
from tensorflow.keras.layers import Input, LSTM, Dense

# Define the encoder-decoder model for machine translation
latent_dim = 256
encoder_inputs = Input(shape=(None, num_encoder_tokens))
encoder_lstm = LSTM(latent_dim, return_state=True)
encoder_outputs, state_h, state_c = encoder_lstm(encoder_inputs)
encoder_states = [state_h, state_c]

decoder_inputs = Input(shape=(None, num_decoder_tokens))
decoder_lstm = LSTM(latent_dim, return_sequences=True, return_state=True)
decoder_outputs, _, _ = decoder_lstm(decoder_inputs, initial_state=encoder_states)
decoder_dense = Dense(num_decoder_tokens, activation='softmax')
decoder_outputs = decoder_dense(decoder_outputs)

model = Model([encoder_inputs, decoder_inputs], decoder_outputs)

# Compile and train the model for machine translation
model.compile(optimizer='adam', loss='categorical_crossentropy', metrics=['accuracy'])
model.fit([encoder_input_data, decoder_input_data], decoder_target_data, batch_size=batch_size, epochs=epochs, validation_split=0.2)五、使用 Faster R-CNN 进行物体检测
5.1 关于R-CNN的概念
问题陈述:您的任务是使用 Faster R-CNN(基于区域的卷积神经网络)模型实现对象检测。给定图像,您的目标是识别和定位图像中的对象,提供对象的类和边界框坐标。
5.2 代码示例
# Object Detection with Faster R-CNN
import tensorflow as tf
from tensorflow.keras.applications import ResNet50
from tensorflow.keras.layers import Input
from tensorflow.keras.models import Model
from tensorflow.keras.models import load_model
from tensorflow.keras.preprocessing import image
from tensorflow.keras.applications.imagenet_utils import decode_predictions

# Load a pre-trained ResNet50 model
base_model = ResNet50(weights='imagenet')

# Add custom layers for object detection
x = base_model.layers[-2].output
output = Dense(num_classes, activation='softmax')(x)
model = Model(inputs=base_model.input, outputs=output)

# Load and preprocess an image for object detection
img_path = 'image.jpg'
img = image.load_img(img_path, target_size=(224, 224))
img = image.img_to_array(img)
img = np.expand_dims(img, axis=0)
img = tf.keras.applications.resnet.preprocess_input(img)

# Make predictions for object detection
preds = model.predict(img)
predictions = decode_predictions(preds, top=5)[0]
print(predictions)六、使用近端策略优化 (PPO) 的强化学习
问题陈述:您正在进入强化学习 (RL) 的世界,并负责实施近端策略优化 (PPO) 算法来训练代理。使用 OpenAI Gym 的 CartPole-v1 环境,您的目标是开发一个 RL 代理,通过采取最大化累积奖励的行动来学习平衡移动推车上的杆子。
# Reinforcement Learning with Proximal Policy Optimization (PPO)
import gym
import tensorflow as tf
from tensorflow import keras
from tensorflow.keras.layers import Dense

# Create a Gym environment
env = gym.make('CartPole-v1')

# Build a PPO agent
model = keras.Sequential([
    Dense(64, activation='relu', input_shape=(env.observation_space.shape[0],)),
    Dense(32, activation='relu'),
    Dense(env.action_space.n, activation='softmax')
])
optimizer = keras.optimizers.Adam(learning_rate=0.001)
model.compile(optimizer, loss='categorical_crossentropy')

# Train the agent using PPO
for episode in range(1000):
    state = env.reset()
    done = False
    while not done:
        action_probs = model.predict(state.reshape(1, -1))[0]
        action = np.random.choice(env.action_space.n, p=action_probs)
        next_state, reward, done, _ = env.step(action)
        # Update the agent's policy using PPO training
        # (Implementing PPO training is a more complex task)
state = next_state关注AI更多资讯!旅程 — AI :Jasmin Bharadiya
七、变形金刚
7.1 transformer的概念
7.2 Transformer 片段(使用 Hugging Face 的 Transformers 库):
Hugging Face 的 Transformers 库使使用 BERT、GPT-2 等 Transformer 架构变得非常容易。让我们创建一个基本示例:
在本演示中,让我们使用 BERT 模型进行序列分类:
# Installation (if you haven't done it yet)
#!pip install transformers

# Import required libraries
from transformers import BertTokenizer, BertForSequenceClassification
import torch

# Load pretrained model and tokenizer
model_name = 'bert-base-uncased'
model = BertForSequenceClassification.from_pretrained(model_name, num_labels=2)  # For binary classification
tokenizer = BertTokenizer.from_pretrained(model_name)

# Tokenize input data
input_texts = ["I love using transformers!", "This library is difficult to understand."]
inputs = tokenizer(input_texts, return_tensors='pt', padding=True, truncation=True, max_length=512)

# Forward pass: get model predictions
with torch.no_grad():
    outputs = model(**inputs)
    logits = outputs.logits
    probabilities = torch.nn.functional.softmax(logits, dim=-1)

# Display predicted class probabilities
print(probabilities)此脚本初始化用于二进制序列分类的 BERT 模型,对输入句子进行标记,然后根据模型的对数进行预测。
最终输出 , 包含输入句子的预测类概率。
probabilities
八、结论
深度学习的世界是广阔的,正如上面所展示的那样,其算法可能会根据其应用领域变得复杂。然而,多亏了 TensorFlow 和 Hugging Face 等高级库,使用这些算法变得越来越容易
原文地址:https://blog.csdn.net/gongdiwudu/article/details/134657821
本文来自互联网用户投稿,该文观点仅代表作者本人,不代表本站立场。本站仅提供信息存储空间服务,不拥有所有权,不承担相关法律责任。
如若转载,请注明出处:http://www.7code.cn/show_5765.html
如若内容造成侵权/违法违规/事实不符,请联系代码007邮箱:suwngjj01@126.com进行投诉反馈,一经查实,立即删除!


