Hi,大家好,我是源于花海。本文主要使用数据标注工具 Labelme 对猫(cat)和狗(dog)这两种训练样本进行标注,使用预训练模型 VGG16 作为卷积基,并在其之上添加了全连接层。基于标注样本的信息和预训练模型的特征提取能力以及 Segnet 架构,训练自己构建的语义分割网络,从而实现迁移学习。
目录
一、导入必要库
导入必要的库(os、copy、numpy、matplotlib、PIL.Image、keras 等),为后续的图像处理和深度学习任务做准备。
#!/usr/bin/env python
# coding: utf-8
import os
import copy
import numpy as np
import matplotlib.pyplot as plt
from IPython.display import display
from PIL import Image
from keras.callbacks import EarlyStopping, ModelCheckpoint, ReduceLROnPlateau
from keras.layers import *
from keras.models import *
from keras.optimizers import Adam
from keras.utils.data_utils import get_file
二、数据集准备
构建迁移学习数据集,TL_CatDog 文件夹的结构如下(目录解释在括号里面):
├── TL_CatDog
    ├── ckpt (训练权重)
    ├── datasets (数据集总文件夹)
        ├── Annotations (标注后的 JSON 文件)
        ├── JPEGImages (训练集和测试集的猫狗原图)
            ├── test
            ├── train
        ├── Segmentation
            ├── train_and_val.txt (数据集名称和 mask 标签的 png 图像名称)
├── SegmentationClass (语义分割的 mask 标签的 png 图像)使用点标记法 Create Polygon 对 500 个猫狗待分割图像进行标注,如下图所示。
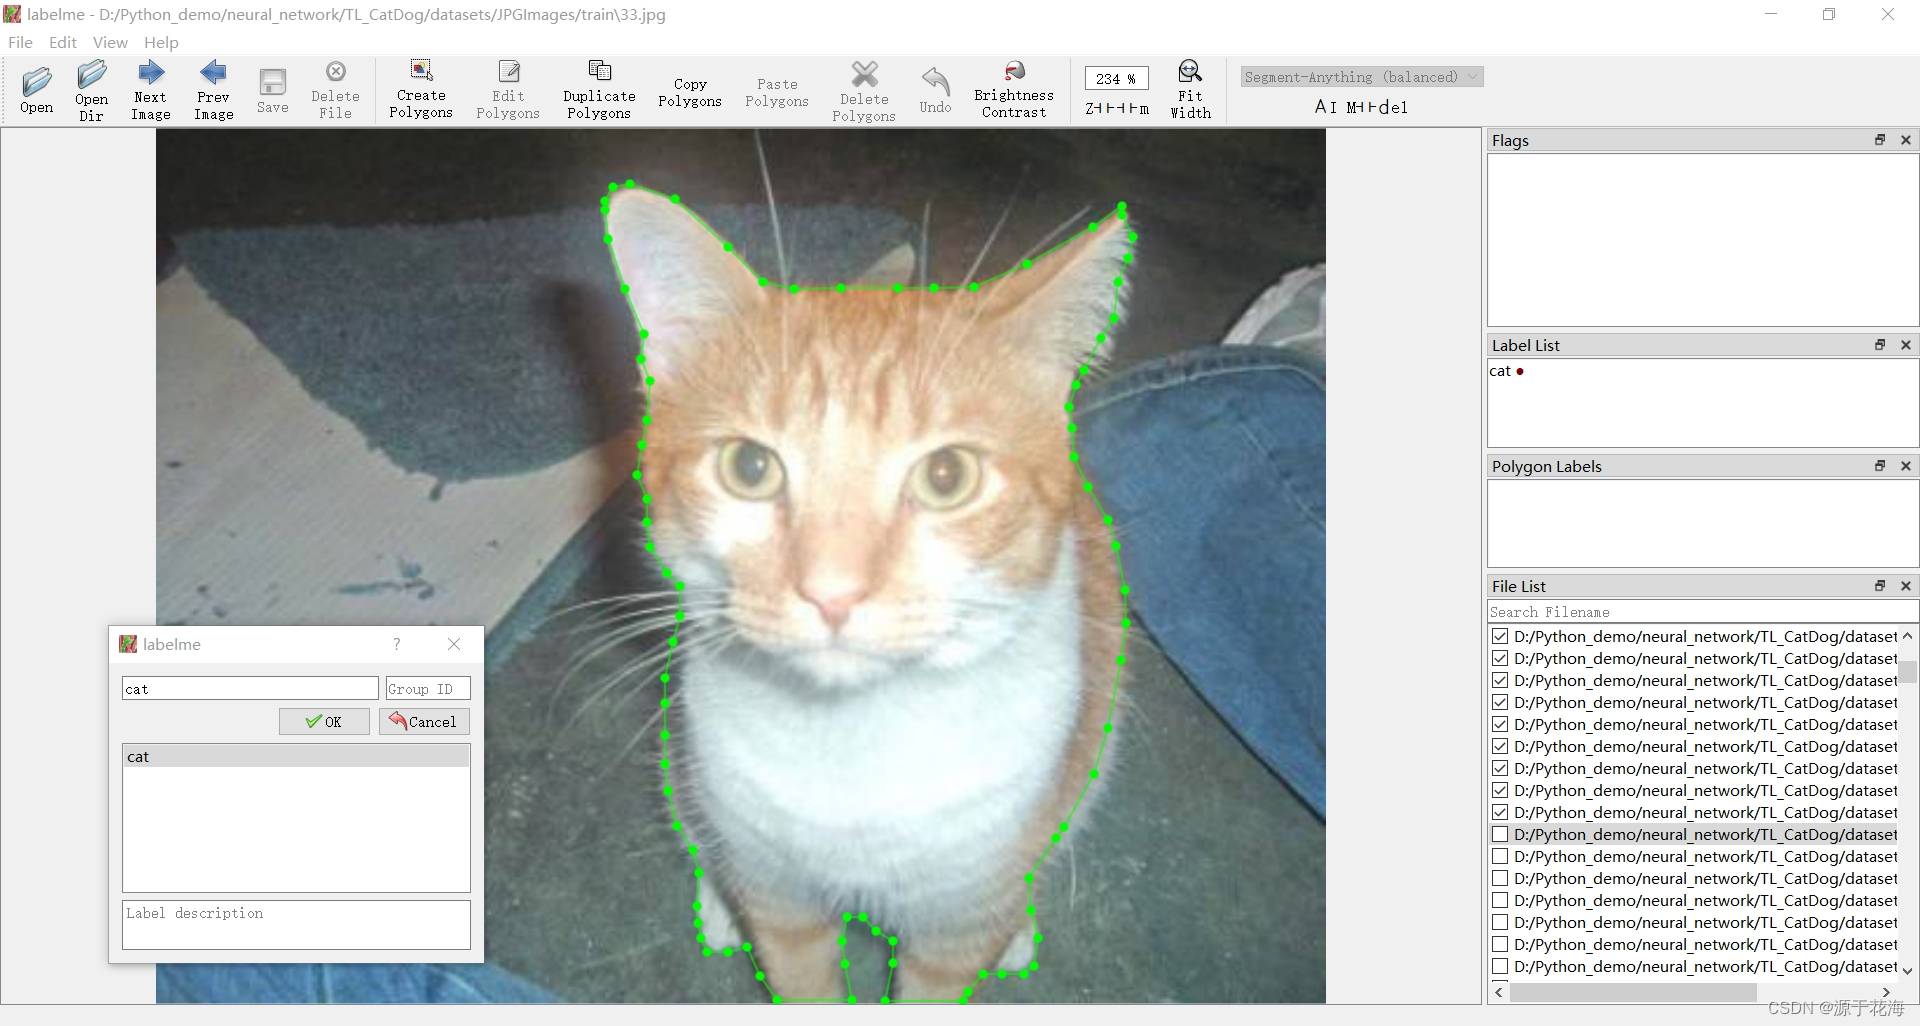
标注完成后会在同一指定目录下(./datasets/Annotation/)生成 JSON 文件,文件内容主要包括 version (labelme版本)、label (标签类别)、points (各个点坐标)、imagePath (图像路径)、imageHeight (图像高度)、imageWidth (图像宽度) 。
2.1 JSON 转换成 PNG
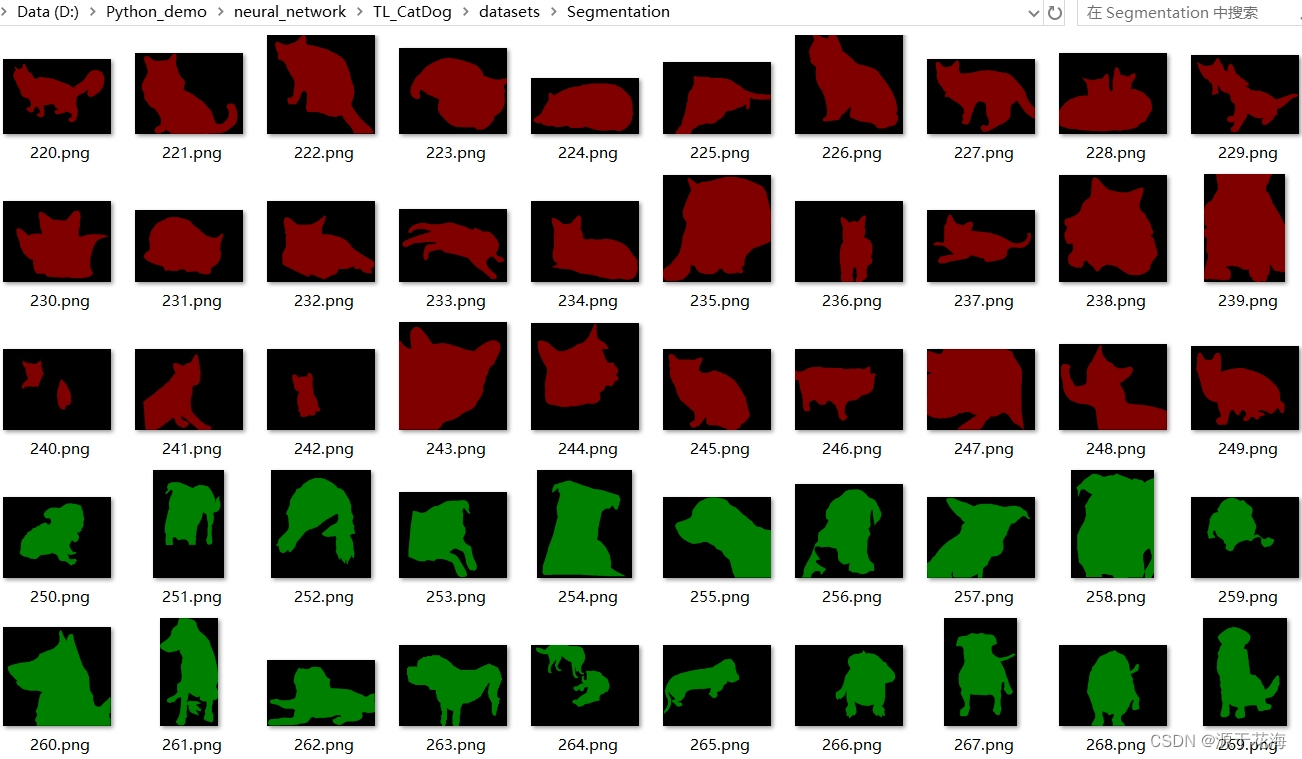
见文末的 json_to_png.py 脚本文件。
2.2 生成 JPG 图片和 mask 标签的名称文本
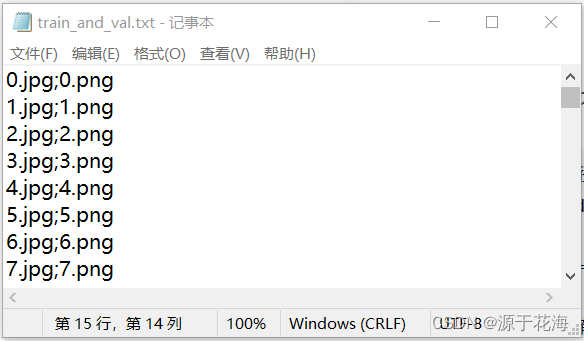
见文末的 train_to_txt.py 脚本文件。
2.3 读取部分图片查看像素值
def values(image_path):
    # 打开图像
    image = Image.open(image_path)
    # 获取图像的像素数据
    pixels = list(image.getdata())
    # 使用集合来存储唯一的像素值
    unique_pixels = set(pixels)
    # 打印每个唯一像素的RGB值
    for pixel_value in unique_pixels:
        print(f"去重后像素值: {pixel_value}")

image_path = "./datasets/SegmentationClass/467.png"
values(image_path)
去重后像素值: 0
去重后像素值: 1
去重后像素值: 2
2.4 图片标签处理
def generate_arrays_from_file(lines, batch_size):
    n = len(lines)
    i = 0
    while 1:
        X_train = []
        Y_train = []
        for _ in range(batch_size):
            if i == 0:
                np.random.shuffle(lines)  # 对数据进行随机排序,确保每个训练周期数据的顺序都是随机的。
            #   读取输入图片并进行归一化和resize
            name = lines[i].split(';')[0]
            img = Image.open("./datasets/JPEGImage/train/" + name)
            img = img.resize((WIDTH, HEIGHT), Image.BICUBIC)
            img = np.array(img) / 255
            X_train.append(img)
            #   读取标签图片并进行归一化和resize
            name = lines[i].split(';')[1].split()[0]
            label = Image.open("./datasets/SegmentationClass/" + name)
            # 通过将标签图像的大小调整为输入图像的一半,可以在减小计算开销的同时保留相对较高的语义信息。
            label = label.resize((int(WIDTH / 2), int(HEIGHT / 2)), Image.NEAREST)

            if len(np.shape(label)) == 3:  # 判断标签是不是彩色的,如果是就变为灰度图像
                label = np.array(label)[:, :, 0]
            label = np.reshape(np.array(label), [-1])  # 确保标签数据以一维形式被提供给后续的处理步骤。
            one_hot_label = np.eye(NCLASSES)[np.array(label, np.int32)]
            Y_train.append(one_hot_label)

            i = (i + 1) % n
        yield np.array(X_train), np.array(Y_train)
三、模型构建
3.1 编码器搭建
-
这里采用 VGG16 的模型结构进行搭建网络
目的:使得输入的图像进行多次卷积池化操作,提取图像中的各种特征以便后续训练使用
- 这里只采用 VGG16 的前四次提取特征行为作为编码器
- 编码器中的每个阶段都会保留一些特征信息,以供解码器在解码阶段使用。

- 上述图进行举例说明,该网络结构与上述图所述类似,但图片尺寸不同。
def get_convnet_encoder(input_height=416, input_width=416):
    img_input = Input(shape=(input_height, input_width, 3))

    # 416,416,3 -> 208,208,64
    x = Conv2D(64, (3, 3), activation='relu', padding='same', name='block1_conv1')(img_input)
    x = Conv2D(64, (3, 3), activation='relu', padding='same', name='block1_conv2')(x)
    x = MaxPooling2D((2, 2), strides=(2, 2), name='block1_pool')(x)
    f1 = x

    # 208,208,64 -> 104,104,128
    x = Conv2D(128, (3, 3), activation='relu', padding='same', name='block2_conv1')(x)
    x = Conv2D(128, (3, 3), activation='relu', padding='same', name='block2_conv2')(x)
    x = MaxPooling2D((2, 2), strides=(2, 2), name='block2_pool')(x)
    f2 = x

    # 104,104,128 -> 52,52,256
    x = Conv2D(256, (3, 3), activation='relu', padding='same', name='block3_conv1')(x)
    x = Conv2D(256, (3, 3), activation='relu', padding='same', name='block3_conv2')(x)
    x = Conv2D(256, (3, 3), activation='relu', padding='same', name='block3_conv3')(x)
    x = MaxPooling2D((2, 2), strides=(2, 2), name='block3_pool')(x)
    f3 = x

    # 52,52,256 -> 26,26,512
    x = Conv2D(512, (3, 3), activation='relu', padding='same', name='block4_conv1')(x)
    x = Conv2D(512, (3, 3), activation='relu', padding='same', name='block4_conv2')(x)
    x = Conv2D(512, (3, 3), activation='relu', padding='same', name='block4_conv3')(x)
    x = MaxPooling2D((2, 2), strides=(2, 2), name='block4_pool')(x)
    f4 = x
    return img_input, [f1, f2, f3, f4]
3.2 解码器搭建
解码器的目标是生成与输入数据相似的输出
- 为了更容易求得训练过程当中的损失值,解码器在反卷积(上采样)过程中住处生成与标签类似的输出,将在训练后续进行图像尺寸还原。
注意:
- ZeroPadding2D 的目的是:在图像边界进行零填充,目的是为了在后续的卷积操作中避免尺寸缩小
# 解码器的目标是生成与输入数据相似的输出
def segnet_decoder(f, n_classes, n_up=3):
    assert n_up >= 2

    o = f
    # 26,26,512 -> 26,26,512
    o = ZeroPadding2D((1, 1))(o)  # 在图像边界填充一个像素,这是为了避免上采样后图像尺寸减小
    o = Conv2D(512, (3, 3), padding='valid')(o)# 输出特征图的尺寸较小,因为不进行填充
    o = BatchNormalization()(o)

    # 进行一次 UpSampling2D,此时 hw 变为原来的1/8
    # 26,26,512 -> 52,52,256
    o = UpSampling2D((2, 2))(o)
    o = ZeroPadding2D((1, 1))(o)
    o = Conv2D(256, (3, 3), padding='valid')(o)
    o = BatchNormalization()(o)

    # 进行一次 UpSampling2D,此时 hw 变为原来的 1/4
    # 52,52,256 -> 104,104,128
    for _ in range(n_up-2):
        o = UpSampling2D((2, 2))(o)
        o = ZeroPadding2D((1, 1))(o)
        o = Conv2D(128, (3, 3), padding='valid')(o)
        o = BatchNormalization()(o)

    # 进行一次 UpSampling2D,此时 hw 变为原来的 1/2
    # 104,104,128 -> 208,208,64
    o = UpSampling2D((2, 2))(o)
    o = ZeroPadding2D((1, 1))(o)
    o = Conv2D(64, (3, 3), padding='valid')(o)
    o = BatchNormalization()(o)

    # 此时输出为 h_input/2, w_input/2, nclasses
    # 208,208,3
    o = Conv2D(n_classes, (3, 3), padding='same')(o)

    return o
3.3 SegNet 模型搭建
将编码器与解码器连接在一起,编码器通过多个卷积层和池化层逐渐减小特征图的空间分辨率,同时提取抽象的语义特征。解码器解码器通常包括上采样层,通过逐步上采样将特征图的分辨率增加,同时进行一些操作以恢复细节和位置信息。最终的输出是一个与输入图像具有相同尺寸的分割图。
最终采用 Softmax 计算像素类别概率进行分类。
主体如下图所示:

# SegNet 模型的构建函数
def _segnet(n_classes, encoder, input_height=416, input_width=416, encoder_level=3):
    # encoder 通过主干网络
    img_input, levels = encoder(input_height=input_height, input_width=input_width)

    # 获取 hw 压缩四次后的结果
    feat = levels[encoder_level]

    # 将特征传入 segnet 网络
    o = segnet_decoder(feat, n_classes, n_up=3)

    # 将结果进行 reshape,将其变成一维的形式,以准备进行 Softmax 操作
    o = Reshape((int(input_height / 2) * int(input_width / 2), -1))(o)

    # 将每个像素的得分映射到概率分布,表示图像中每个位置属于每个类别的概率。
    o = Softmax()(o)
    model = Model(img_input, o)

    return model


# 构建一个基于 ConvNet 编码器和 SegNet 解码器的图像分割模型
def convnet_segnet(n_classes, input_height=416, input_width=416, encoder_level=3):
    model = _segnet(n_classes, get_convnet_encoder, input_height=input_height, input_width=input_width, encoder_level=encoder_level)
    model.model_name = "convnet_segnet"
    return model

model = convnet_segnet(n_classes=3, input_height=416, input_width=416, encoder_level=3)
model.summary()  # 打印模型摘要
四、模型训练
VGG介绍: VGG 是一种深度卷积神经网络,由牛津大学视觉几何组(Visual Geometry Group)在 2014 年提出。它是由多个卷积层和池化层组成的深度神经网络,具有很强的图像分类能力,特别是在图像识别领域,取得了很好的成果。这里我们将把这个网络迁移到本项目中。
- 使用 VGG16 进行迁移学习
- 将 VGG16 权重加载加入编码器部分,使其可以利用已经训练好的权重进行特征提取,帮助节省训练时间,并且可以有更好的提取效果。
- 提高模型的泛化能力和性能。
HEIGHT = 416
WIDTH = 416
NCLASSES = 3
ckpt_dir = "./ckpt/"

def train():
    # 下载预训练权重,如果有则可直接调用
    model = convnet_segnet(n_classes=NCLASSES, input_height=HEIGHT, input_width=WIDTH)
    WEIGHTS_PATH_NO_TOP = 'https://github.com/fchollet/deep-learning-models/releases/download/v0.1/vgg16_weights_tf_dim_ordering_tf_kernels_notop.h5'
    weights_path = get_file('vgg16_weights_tf_dim_ordering_tf_kernels_notop.h5', WEIGHTS_PATH_NO_TOP, cache_subdir='models')
    model.load_weights(weights_path, by_name=True)

    # 打开数据集的txt
    with open("./datasets/Segmentation/train_and_val.txt", "r") as f:
        lines = f.readlines()

    # 打乱的数据更有利于训练,90% 用于训练,10% 用于估计。
    np.random.seed(10101)
    np.random.shuffle(lines)
    np.random.seed(None)
    num_val = int(len(lines) * 0.1)
    num_train = len(lines) - num_val

    # checkpoint 用于设置权值保存的细节,period 用于修改多少 epoch 保存一次
    checkpoint = ModelCheckpoint(ckpt_dir + 'ep{epoch:03d}-loss{loss:.3f}-val_loss{val_loss:.3f}.h5',
                                 monitor='val_loss', save_weights_only=True, save_best_only=False, period=2)
    # 当损失值停滞不前时,动态地减小学习率以提高模型的收敛性
    reduce_lr = ReduceLROnPlateau(monitor='val_loss', factor=0.5, patience=3, verbose=1)
    # 损失值在一定 epoch 数内没有明显的改善,就触发早停操作,以避免过度拟合,提前结束训练。
    early_stopping = EarlyStopping(monitor='val_loss', min_delta=0, patience=10, verbose=1)
    trainable_layer = 10
    for i in range(trainable_layer):
        model.layers[i].trainable = False
    print('freeze the first {} layers of total {} layers.'.format(trainable_layer, len(model.layers)))

    if True:
        lr = 1e-3
        batch_size = 4
        model.compile(loss='categorical_crossentropy',
                      optimizer=Adam(lr=lr),
                      metrics=['accuracy'])

        print('Train on {} samples, val on {} samples, with batch size {}.'.format(num_train, num_val, batch_size))
        history = model.fit(generate_arrays_from_file(lines[:num_train], batch_size),
                                      steps_per_epoch=max(1, num_train//batch_size),
                                      validation_data=generate_arrays_from_file(lines[num_train:], batch_size),
                                      validation_steps=max(1, num_val//batch_size),
                                      epochs=20,
                                      callbacks=[checkpoint, reduce_lr, early_stopping])
        return history

history = train()
五、可视化训练结果
经过 20 轮的训练后,基于下方的 “loss/acc” 的可视化图,可以看出训练集准确率能达到 83 %,验证集准确率能达到 79 %,而训练集损失率最低达到 40%,验证集损失率最低达到 49% ,可见网络模型的性能良好。
def plot_training_history(history):
    plt.figure(figsize=(7, 4))
    plt.plot(history.history['accuracy'], color='green', label='train_acc')  # 训练集准确率
    plt.plot(history.history['val_accuracy'], color='blue', label='val_acc')  # 验证集准确率
    plt.plot(history.history['loss'], color='orange', label='train_loss')  # 训练集损失率
    plt.plot(history.history['val_loss'], color='red', label='val_loss')  # 验证集损失率

    plt.title('Vgg16_Segnet Model')
    plt.xlabel('Epochs', fontsize=12)
    plt.ylabel('loss/acc', fontsize=12)
    plt.legend(fontsize=11)
    plt.ylim(0, 2)  # 设置纵坐标范围为 0-2
    plt.show()

plot_training_history(history)
六、模型检测
在上述训练中,我们定义了三个类别分别为 cat、dog、blackgroup,在接下来检测过程当中,我们将分别将待检测图片转化为上述构建模型所需形式,带入已经训练好的模型进行像素值类别判断,并且赋予其类别颜色,这里背景颜色为黑色,猫的颜色为红色,狗的颜色为绿色。
# 模型检测
if __name__ == "__main__":
    class_colors = [[0, 0, 0], [0, 255, 0],[255,0,0]]
    HEIGHT = 416
    WIDTH = 416
    NCLASSES = 3

    model = convnet_segnet(n_classes=NCLASSES, input_height=HEIGHT, input_width=WIDTH)

    model_path = "./ckpt/ep020-loss0.387-val_loss0.496.h5"
    model.load_weights(model_path)

    test_dir = "./datasets/JPEGImage/test/"
    test_seg_dir = "./datasets/JPEGImage/test_seg/"
    test_seg_img_dir = "./datasets/JPEGImage/test_seg_img/"

    # 对 test 文件夹进行一个遍历
    imgs = os.listdir(test_dir)

    for jpg in imgs:
        # 打开 imgs 文件夹里面的每一个图片
        img = Image.open(test_dir + jpg)

        old_img = copy.deepcopy(img)
        orininal_h = np.array(img).shape[0]
        orininal_w = np.array(img).shape[1]

        # 对输入进来的每一个图片进行 Resize
        # resize 成 [HEIGHT, WIDTH, 3]
        img = img.resize((WIDTH, HEIGHT), Image.BICUBIC)
        img = np.array(img) / 255
        img = img.reshape(-1, HEIGHT, WIDTH, 3)

        # 将图像输入到网络当中进行预测
        pr = model.predict(img)[0]
        pr = pr.reshape((int(HEIGHT / 2), int(WIDTH / 2), NCLASSES)).argmax(axis=-1)

        # 创建一副新图,并根据每个像素点的种类赋予颜色
        seg_img = np.zeros((int(HEIGHT / 2), int(WIDTH / 2), 3))
        for c in range(NCLASSES):
            seg_img[:, :, 0] += ((pr[:, :] == c) * class_colors[c][0]).astype('uint8')
            seg_img[:, :, 1] += ((pr[:, :] == c) * class_colors[c][1]).astype('uint8')
            seg_img[:, :, 2] += ((pr[:, :] == c) * class_colors[c][2]).astype('uint8')

        seg_img = Image.fromarray(np.uint8(seg_img)).resize((orininal_w, orininal_h))  # 将数组转化为图像
        seg_img.save(test_seg_dir + jpg)
        image = Image.blend(old_img, seg_img, 0.5)
        image.save(test_seg_img_dir + jpg)

# 定义读取文件夹图像函数
def display_image_collage(folder_path, rows, columns):
    # 获取文件夹下所有图片文件
    image_files = [f for f in os.listdir(folder_path) if f.endswith('.jpg') or f.endswith('.png')]

    # 计算每个图像的宽度和高度
    image_width, image_height = Image.open(os.path.join(folder_path, image_files[0])).size

    # 创建一个新的大图像
    output_image = Image.new('RGB', (columns * image_width, rows * image_height))

    # 遍历图像文件并将其粘贴到大图像中
    for i, image_file in enumerate(image_files):
        image_path = os.path.join(folder_path, image_file)
        image = Image.open(image_path)
        row = i // columns
        col = i % columns
        output_image.paste(image, (col * image_width, row * image_height))
display(output_image)语义分割的预测结果如下图:
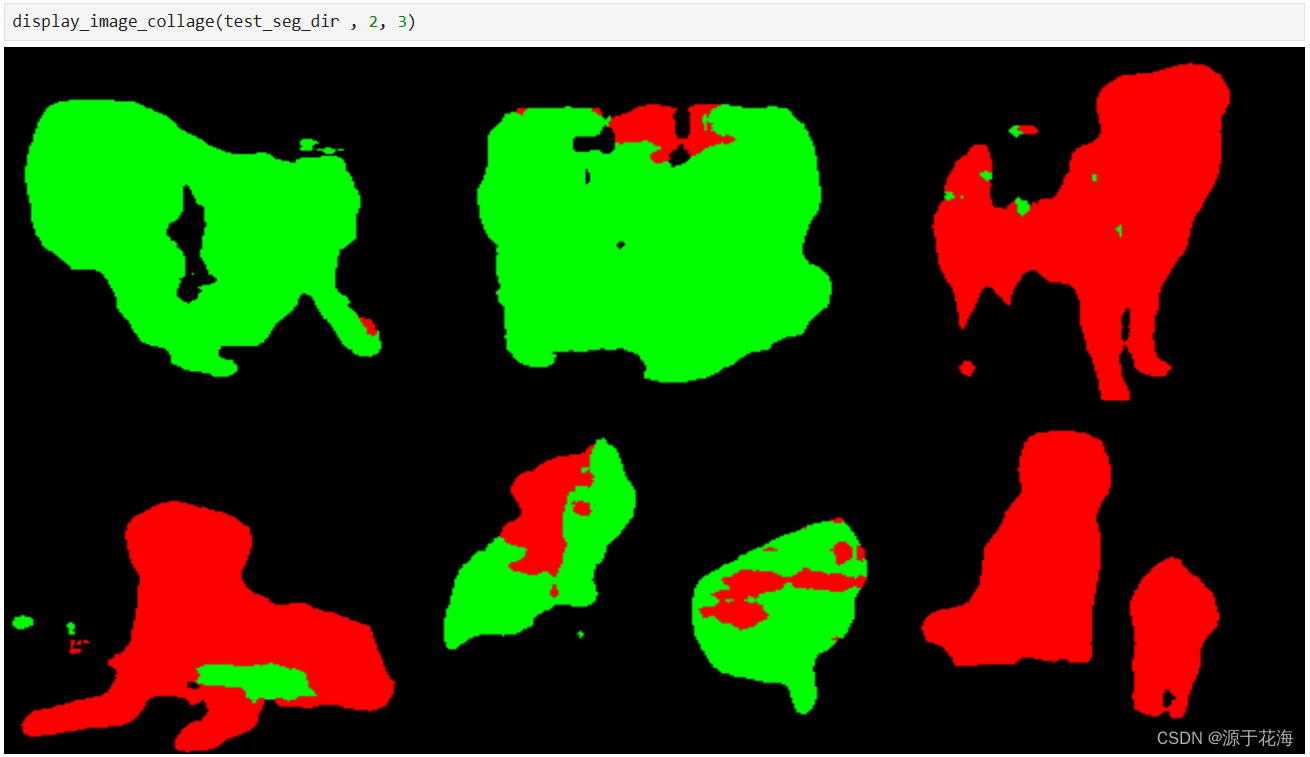
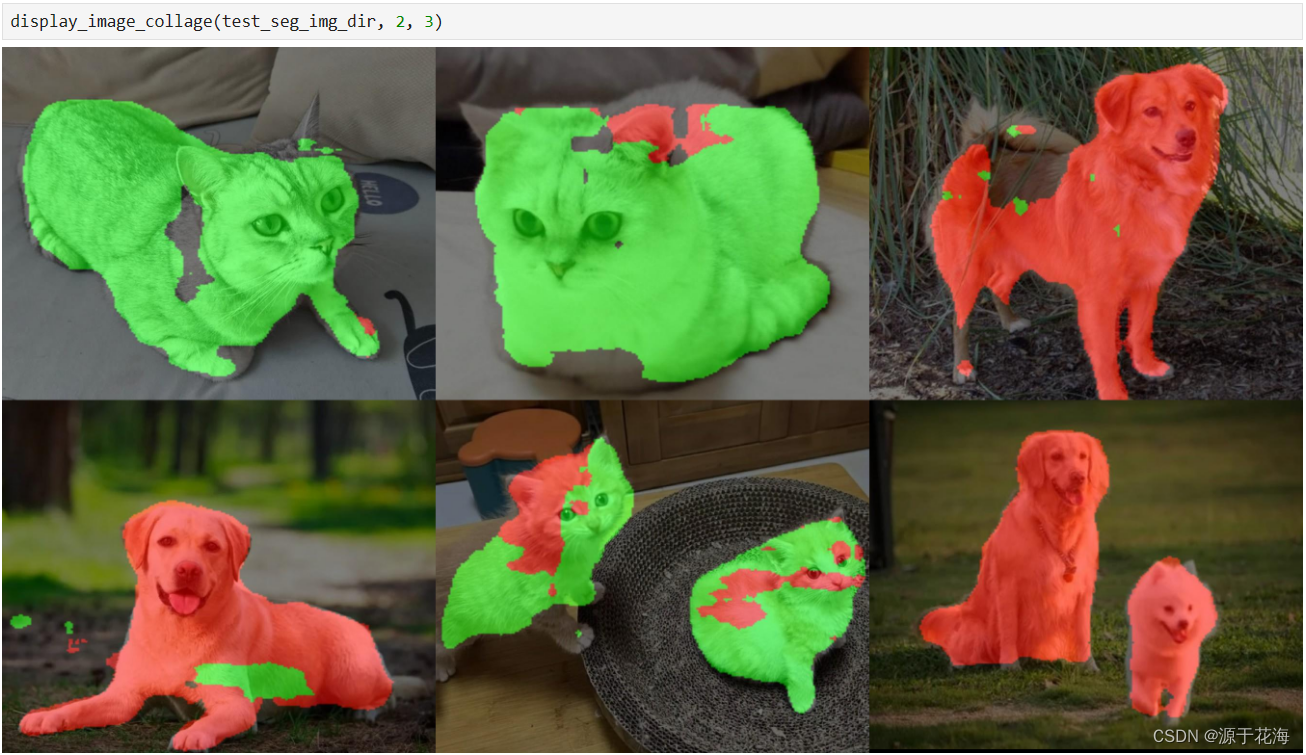
七、总结
在该项目当中,采用 VGG16 与 SegNet 相结合的方式,利用迁移学习,将已经训练好的权重文件加载到自己所搭建的网络当中进行特征提取,这帮助我们大大节省了训练时间,并且可以提高模型的泛化能力与性能。
- 不足之处:训练准确率不太高,后续我将继续改进。
- 将采用其他网络进行迁移学习,几者对比学习。
八、py 脚本文件
1. json_to_png.py
import json
import os
import os.path as osp
import sys
import PIL.Image
import yaml
from labelme import utils

def main():
    # JSON 文件夹路径,包含多个 JSON 格式文件
    json_file = "./datasets/Annotations"
    # 获取 JSON 文件列表
    count = os.listdir(json_file)

    # 遍历 JSON 文件列表
    for i in range(0, len(count)):
        # 拼接 JSON 文件路径
        path = os.path.join(json_file, count[i])  # ./datasets/Annotations/image00005.json

        # 判断路径是否为文件
        if os.path.isfile(path):
            # 读取 JSON 文件数据
            data = json.load(open(path))

            # 生成保存文件名,将点替换为下划线
            save_file_name = osp.basename(path).replace('.', '_')  # image00001_json

            # 创建 labelme_json 文件夹路径
            labelme_json = os.path.join(json_file, 'labelme_json')  # ./datasets/Annotations/labelme_json

            # 如果文件夹不存在,则创建
            if not osp.exists(labelme_json):
                os.mkdir(labelme_json)

            # 创建 labelme_json/image00001_json 文件夹路径
            out_dir = os.path.join(labelme_json, save_file_name)

            # 如果文件夹不存在,则创建
            if not osp.exists(out_dir):
                os.mkdir(out_dir)

            # 如果 JSON 文件中存在图像数据
            if data['imageData']:
                imageData = data['imageData']
            else:
                print("当前 json 文件没有查到 imageData")
                sys.exit()

            # 将 base64 编码的图像数据转换为数组
            img = utils.img_b64_to_arr(imageData)

            # 定义标签名到标签值的映射关系
            label_name_to_value = {'_background_': 0, 'cat': 1, "dog": 2}

            # 遍历 JSON 文件中的标注形状
            for shape in data['shapes']:
                label_name = shape['label']
                # 如果标签名在映射关系中,则获取标签值
                if label_name in label_name_to_value:
                    label_value = label_name_to_value[label_name]
                else:
                    print(f"当前label_name:{label_name}不在已设定的label_name_to_value中")
                    sys.exit()

            # label_values 必须是连续的
            label_values, label_names = [], []
            for ln, lv in sorted(label_name_to_value.items(), key=lambda x: x[1]):
                label_values.append(lv)
                label_names.append(ln)

            # 将标注形状转换为标签数组
            lbl_info = utils.shapes_to_label(img.shape, data['shapes'], label_name_to_value)
            lbl = lbl_info[0]

            # 保存图像,使用与 JSON 文件相同的文件名
            img_save_path = os.path.join(out_dir, save_file_name + '.png')
            lbl_save_path = os.path.join(out_dir, save_file_name + '_label.png')

            PIL.Image.fromarray(img).save(img_save_path)
            utils.lblsave(lbl_save_path, lbl)

            # 保存标签名到文件
            with open(os.path.join(out_dir, 'label_names.txt'), 'w') as f:
                for lbl_name in label_names:
                    f.write(lbl_name + 'n')

            # 保存标签信息到 YAML 文件
            info = dict(label_names=label_names)
            with open(os.path.join(out_dir, 'info.yaml'), 'w') as f:
                yaml.safe_dump(info, f, default_flow_style=False)

            # 保存标签图像到 SegmentationClass 文件夹,以与 JSON 文件一一对应
            segmentation_class_folder = os.path.join(os.path.dirname(json_file), 'SegmentationClass')

            # 如果文件夹不存在,则创建
            if not osp.exists(segmentation_class_folder):
                os.mkdir(segmentation_class_folder)

            # 保存标签图像到 SegmentationClass 文件夹,以与 JSON 文件一一对应
            lbl_save_path = os.path.join(segmentation_class_folder, f"{save_file_name[:-5]}.png")
            utils.lblsave(lbl_save_path, lbl)

            print('Saved to: %s' % out_dir)

if __name__ == '__main__':
    main()
2. train_to_txt.py
# 指定图片文件夹路径
folder_path = "./datasets/JPEGImage/train"
# 输出文本文件路径
output_file_path = "datasets/Segmentation/train_and_val.txt"

# 遍历文件夹中的所有文件
with open(output_file_path, 'w') as output_file:
    # 遍历编号从 0 到 499
    for number in range(500):
        # 构建原始文件名
        original_filename = f"{number}.jpg"
        # 构建新文件名
        new_filename = f"{number}.png"
        # 写入文本文件
        output_file.write(f"{original_filename};{new_filename}n")

print("生成文件列表完成")
原文地址:https://blog.csdn.net/ttrr27/article/details/135833356
本文来自互联网用户投稿,该文观点仅代表作者本人,不代表本站立场。本站仅提供信息存储空间服务,不拥有所有权,不承担相关法律责任。
如若转载,请注明出处:http://www.7code.cn/show_61655.html
如若内容造成侵权/违法违规/事实不符,请联系代码007邮箱:suwngjj01@126.com进行投诉反馈,一经查实,立即删除!

