在为 Elasticsearch 采集数据时,我们经常使用到 Filebeat 及 Logstash。在我们之前的很多教程中,我们通常不为 Filebeat 和 Logstash 之前的通信做安全配置。

如何为 Filebeat 及 Logstash 直接建立安全的链接?这个在很多的情况下是非常有用的。在我之前的文章 “Elasticsearch:为日志分析设置安全的 Elasticsearch 管道”,我有涉及到这个问题。最主要的是,它是针对 Elastic Stack 8.x 而设计的。在今天的文章中,我将针对最普通的情况来进行展示。
本指南提供了有关使用 OpenSSL 生成和配置 SSL 证书的详细说明,以增强 Logstash 和 Filebeat 之间通信的安全性。 概述的步骤包括为证书颁发机构 (CA) 生成私钥、为 CA 创建自签名 X509 证书以及为 Logstash 和 Filebeat 生成密钥和证书。 还包括使用这些证书的 Filebeat 和 Logstash 的配置步骤。
为 CA 生成私钥
# Generate a private key for the Certificate Authority (CA)
openssl genrsa 2048 > /path/to/your/ca-key.pem
$ pwd
/Users/liuxg/demos/filebeat_logstash
$ openssl genrsa 2048 > ca-key.pem
$ ls
ca-key.pem为 CA 生成 X509 证书
# Generate a self-signed X509 certificate for the CA
openssl req -new -x509 -nodes -days 365000
    -key /path/to/your/ca-key.pem
    -out /path/to/your/ca-cert.pem
openssl req -new -x509 -nodes -days 365000 -key ca-key.pem -out ca-cert.pem$ pwd
/Users/liuxg/demos/filebeat_logstash
$ ls
ca-key.pem
$ openssl req -new -x509 -nodes -days 365000 -key ca-key.pem -out ca-cert.pem
You are about to be asked to enter information that will be incorporated
into your certificate request.
What you are about to enter is what is called a Distinguished Name or a DN.
There are quite a few fields but you can leave some blank
For some fields there will be a default value,
If you enter '.', the field will be left blank.
-----
Country Name (2 letter code) [AU]:CN
State or Province Name (full name) [Some-State]:Beijing
Locality Name (eg, city) []:Beijing
Organization Name (eg, company) [Internet Widgits Pty Ltd]:Elastic
Organizational Unit Name (eg, section) []:Community
Common Name (e.g. server FQDN or YOUR name) []:Xiaoguo
Email Address []:x@y.com
$ ls
ca-cert.pem ca-key.pem为 Logstash 和 Filebeat 创建证书和密钥
# Generate a private key and certificate for Logstash and Filebeat using the CA
openssl req -x509 -nodes -days 365 -newkey rsa:2048
    -keyout /path/to/your/server.key
    -out /path/to/your/server.crt
    -CA /path/to/your/ca-cert.pem
    -CAkey /path/to/your/ca-key.pem
openssl req -x509 -nodes -days 365 -newkey rsa:2048
-keyout ./server.key
-out ./server.crt
-CA ./ca-cert.pem
-CAkey ./ca-key.pem$ pwd
/Users/liuxg/demos/filebeat_logstash
$ ls
ca-cert.pem ca-key.pem
$ openssl req -x509 -nodes -days 365 -newkey rsa:2048
> -keyout ./server.key
> -out ./server.crt
> -CA ./ca-cert.pem
> -CAkey ./ca-key.pem
........+...+.....+++++++++++++++++++++++++++++++++++++++++++++++++++++++++++++++++*...........+..+.+...+.........+..+.............+...+..+++++++++++++++++++++++++++++++++++++++++++++++++++++++++++++++++*..........+..........+.....+...+.........+.+..+......+.......+...............+..+...+.......+...+...+.....+......+......+.......+..+....+..+..........+..+......+......+.+..+.+..............+...+.......+..+...+.......+...+........+...+......+....+..+.......+.....+...............+......+................+......+...+......+.....+.+..+...+..........+........+................+...............+......+..+.+..+.........+...+.......+......+...+.....+.+...............+...+........+...+.........+...+.........+....+.....+.+........+...+.........+..........+......+..+.............+.....+....+...+..+.............+......+......+.........+..+...+....+...+............+...+..+.+......+.....+.+..+...+..................+.....................+....+..............+.+..+..........+..+...+....+...+......+.................+...+....+........+...+.+...........+..........+.....+...............+....+......+..............+...+......+......+...+.......+...+.....+...+.............+..+.......+.....+.+..+....+...+......+.....+..........+..+.........+.........+.+........+.+++++++++++++++++++++++++++++++++++++++++++++++++++++++++++++++++
.+.+++++++++++++++++++++++++++++++++++++++++++++++++++++++++++++++++*.........+......+...+++++++++++++++++++++++++++++++++++++++++++++++++++++++++++++++++*........+.........+.........+.....+.+.....+.+.........+..+....+........+...+.......+........+...+......+...+...+............+..........+...+..+..........+.....+.............+..+...+...+....+...+..............+....+..+......................+..+...+...+...+.+.........+......+...+..+.+...+.....+.........+...+...+.+...+..+.+........+............+..........+..+.+.....................+......+........+.+++++++++++++++++++++++++++++++++++++++++++++++++++++++++++++++++
-----
You are about to be asked to enter information that will be incorporated
into your certificate request.
What you are about to enter is what is called a Distinguished Name or a DN.
There are quite a few fields but you can leave some blank
For some fields there will be a default value,
If you enter '.', the field will be left blank.
-----
Country Name (2 letter code) [AU]:CN
State or Province Name (full name) [Some-State]:Beijing
Locality Name (eg, city) []:Beijing
Organization Name (eg, company) [Internet Widgits Pty Ltd]:Elastic
Organizational Unit Name (eg, section) []:Community
Common Name (e.g. server FQDN or YOUR name) []:localhost
Email Address []:x@y.com按照同样的方法,我们生成相应的 client 证书:
openssl req -x509 -nodes -days 365 -newkey rsa:2048
    -keyout client.key
    -out client.crt
    -CA ./ca-cert.pem
    -CAkey ./ca-key.pem
$ openssl req -x509 -nodes -days 365 -newkey rsa:2048
> -keyout ./server.key
> -out ./server.crt
> -CA ./ca-cert.pem
> -CAkey ./ca-key.pem
........+...+.....+++++++++++++++++++++++++++++++++++++++++++++++++++++++++++++++++*...........+..+.+...+.........+..+.............+...+..+++++++++++++++++++++++++++++++++++++++++++++++++++++++++++++++++*..........+..........+.....+...+.........+.+..+......+.......+...............+..+...+.......+...+...+.....+......+......+.......+..+....+..+..........+..+......+......+.+..+.+..............+...+.......+..+...+.......+...+........+...+......+....+..+.......+.....+...............+......+................+......+...+......+.....+.+..+...+..........+........+................+...............+......+..+.+..+.........+...+.......+......+...+.....+.+...............+...+........+...+.........+...+.........+....+.....+.+........+...+.........+..........+......+..+.............+.....+....+...+..+.............+......+......+.........+..+...+....+...+............+...+..+.+......+.....+.+..+...+..................+.....................+....+..............+.+..+..........+..+...+....+...+......+.................+...+....+........+...+.+...........+..........+.....+...............+....+......+..............+...+......+......+...+.......+...+.....+...+.............+..+.......+.....+.+..+....+...+......+.....+..........+..+.........+.........+.+........+.+++++++++++++++++++++++++++++++++++++++++++++++++++++++++++++++++
.+.+++++++++++++++++++++++++++++++++++++++++++++++++++++++++++++++++*.........+......+...+++++++++++++++++++++++++++++++++++++++++++++++++++++++++++++++++*........+.........+.........+.....+.+.....+.+.........+..+....+........+...+.......+........+...+......+...+...+............+..........+...+..+..........+.....+.............+..+...+...+....+...+..............+....+..+......................+..+...+...+...+.+.........+......+...+..+.+...+.....+.........+...+...+.+...+..+.+........+............+..........+..+.+.....................+......+........+.+++++++++++++++++++++++++++++++++++++++++++++++++++++++++++++++++
-----
You are about to be asked to enter information that will be incorporated
into your certificate request.
What you are about to enter is what is called a Distinguished Name or a DN.
There are quite a few fields but you can leave some blank
For some fields there will be a default value,
If you enter '.', the field will be left blank.
-----
Country Name (2 letter code) [AU]:CN
State or Province Name (full name) [Some-State]:Beijing
Locality Name (eg, city) []:Beijing
Organization Name (eg, company) [Internet Widgits Pty Ltd]:Elastic
Organizational Unit Name (eg, section) []:Community
Common Name (e.g. server FQDN or YOUR name) []:localhost
Email Address []:x@y.com
$ openssl req -x509 -nodes -days 365 -newkey rsa:2048
> -keyout client.key
> -out client.crt
> -CA ./ca-cert.pem
> -CAkey ./ca-key.pem
....+...+.+.....+++++++++++++++++++++++++++++++++++++++++++++++++++++++++++++++++*.+.........+........+++++++++++++++++++++++++++++++++++++++++++++++++++++++++++++++++*......+....+.....+....+...+...+..+..................+.+..............+.+.....................+...+..+.............+..+.......+..+......+............+......+.+......+.........+.........+......+...+++++++++++++++++++++++++++++++++++++++++++++++++++++++++++++++++
..+.....+..................+.+..+............+.+..+....+......+...+.....+.......+...+.....+......+...+.............+........+.+.....+....+..+.......+......+..+....+...+..+++++++++++++++++++++++++++++++++++++++++++++++++++++++++++++++++*....+++++++++++++++++++++++++++++++++++++++++++++++++++++++++++++++++*.+.....+......+.+...+..+....+.....+.............+........+.......+...+............+.....+..................+.......+..+.+.........+...............+.....+.+..+...+...+.+......+.....+.......+.....+...+.........+......+....+...+...........+....+...........+......+.........+....+.....+......+......+.+.....+..........+.....+............+.+......+...+...+...+..+.......+..+...+......+.+......+.....+....+...+..+...............+....+...............+..+.........+...+.+.....+................+.....+.+...+......+.....+......+.......+..+...+......+.+......+...+.....+.........+......................+...+.....+...+...+......+.........+.+.....+....+.....+...............+....+...+.....+............+.+..+.......+..+...+...+............+..........+..+................+..+...+...+.+...+........+...+.+...........+.........+......+..................+....+.....+............+....+.....+......+....+..+....+.....+.+.....+...+...............+....+.....+..........+..+................+..+............+.........+++++++++++++++++++++++++++++++++++++++++++++++++++++++++++++++++
-----
You are about to be asked to enter information that will be incorporated
into your certificate request.
What you are about to enter is what is called a Distinguished Name or a DN.
There are quite a few fields but you can leave some blank
For some fields there will be a default value,
If you enter '.', the field will be left blank.
-----
Country Name (2 letter code) [AU]:CN
State or Province Name (full name) [Some-State]:Beijing
Locality Name (eg, city) []:Beijing
Organization Name (eg, company) [Internet Widgits Pty Ltd]:Elastic
Organizational Unit Name (eg, section) []:Community
Common Name (e.g. server FQDN or YOUR name) []:localhost
Email Address []:x@y.com
$ ls
ca-cert.pem filebeat-8.12.0-darwin-aarch64.tar.gz
ca-key.pem logstash-8.12.0
client.crt logstash-8.12.0-darwin-aarch64.tar.gz
client.key server.crt
filebeat-8.12.0-darwin-aarch64 server.key配置 Filebeat(或任何 Beat)
output.logstash:
  hosts: ["localhost:5044"]

  # Specify the path to the CA certificate for verification
  ssl.certificate_authorities: ["/path/to/your/ca-cert.pem"]

  # Specify the path to the client certificate
  ssl.certificate: "/path/to/your/server.crt"

  # Specify the path to the client private key
  ssl.key: "/path/to/your/server.key"
配置 Logstash
input {
  beats {
    port => 5044
    ssl => true

    # Specify the path to the CA certificate for verification
    ssl_certificate_authorities => ["/path/to/your/ca-cert.pem"]

    # Specify the path to the server certificate
    ssl_certificate => "/path/to/your/server.crt"

    # Specify the path to the server private key
    ssl_key => "/path/to/your/server.key"

    # Set peer verification mode to force_peer
    ssl_verify_mode => "force_peer"
  }
}
确保将 /path/to/your/ 替换为密钥和证书的实际所需路径。
测试
我们在当前的目录下安装 Filebeat 及 Logstash:
filebeat_ssl.yml
$ pwd
/Users/liuxg/demos/filebeat_logstash
$ ls
ca-cert.pem                           logstash-8.12.0
ca-key.pem                            logstash-8.12.0-darwin-aarch64.tar.gz
filebeat-8.12.0-darwin-aarch64        server.crt
filebeat-8.12.0-darwin-aarch64.tar.gz server.key
$ cd filebeat-8.12.0-darwin-aarch64
$ ls filebeat_ssl.yml
filebeat_ssl.yml
filebeat.inputs:
- type: log
enabled: true
paths:
- ./logfile.log
output.logstash:
hosts: ["localhost:5044"]
ssl.certificate_authorities: ["../ca-cert.pem"]
ssl.certificate: "../server.crt"
ssl.key: "../server.key"
logging:
level: info
to_files: true
files:
path: .
name: filebeat.log
keepfiles: 7
permissions: 0644我们在 filebeat 安装目录下创建一个叫做 logfile.log 的文件。它的内容如下:
logfile.log
This is a test loglogstash.conf
input {
  beats {
    port => 5044
    ssl => true
    ssl_certificate_authorities => "../ca-cert.pem"
    ssl_certificate => "../server.crt"
    ssl_key => "../server.key"
    ssl_verify_mode => "force_peer"
  }
}

output {
  stdout { codec => rubydebug }
  file {
    path => "../outputfile.log"
  }
}
我们首先运行 logstash:
./bin/logstash -f logstash.conf
我们再接下来运行 Filebeat:

我们回到 Logstash 运行的 terminal 中进行查看:
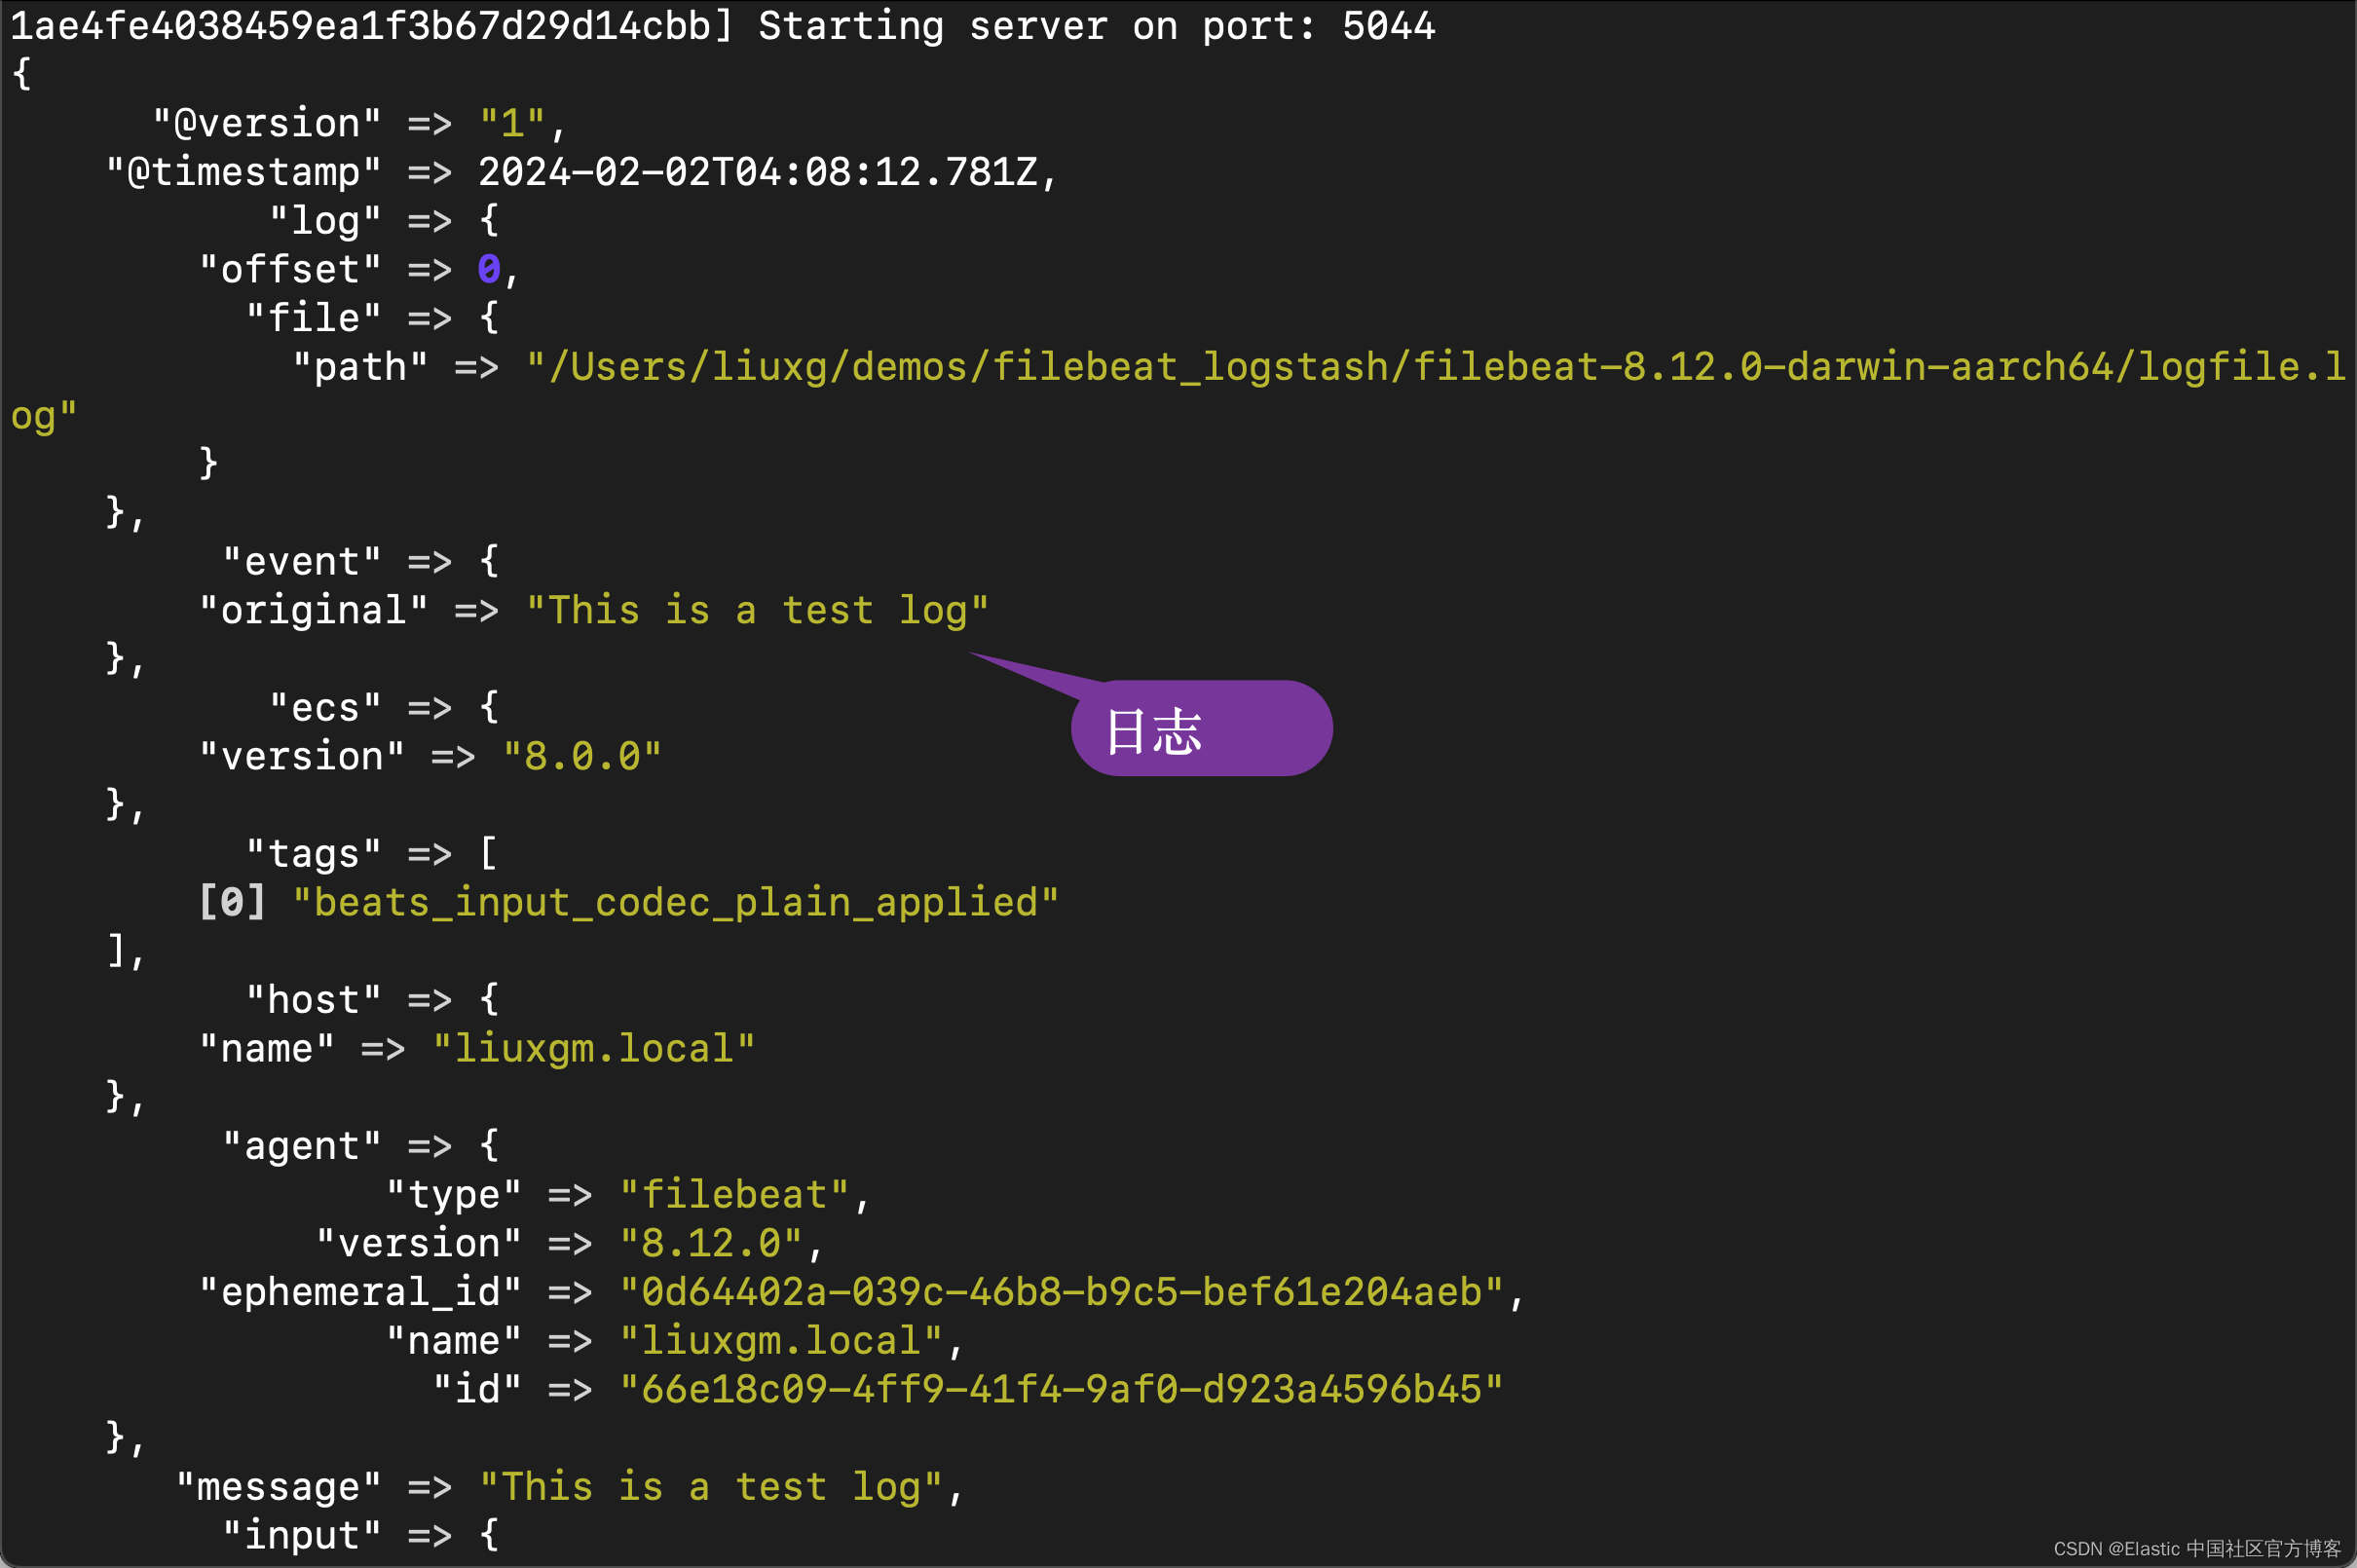
从上面的输出中,我们可以看到日志被正确地采集到 Logstash。我们可以更进一步输出到 Elasticsearch。在这里,我们就不再累述了。
原文地址:https://blog.csdn.net/UbuntuTouch/article/details/135987687
本文来自互联网用户投稿,该文观点仅代表作者本人,不代表本站立场。本站仅提供信息存储空间服务,不拥有所有权,不承担相关法律责任。
如若转载,请注明出处:http://www.7code.cn/show_65073.html
如若内容造成侵权/违法违规/事实不符,请联系代码007邮箱:suwngjj01@126.com进行投诉反馈,一经查实,立即删除!