一: Servlet API 详解
1.1 HttpServletResponse
Servlet 中的 doXXX 方法的目的就是根据请求计算得到相应, 然后把响应的数据设置到HttpServletResponse 对象中.
然后 Tomcat 就会把这个 HttpServletResponse 对象按照 HTTP 协议的格式, 转成一个字符串, 并通过Socket 写回给浏览器.
核心方法
| 方法 | 描述 |
|---|---|
| void setStatus(int sc) | 为该响应设置状态码。 |
| void setHeader(String name, String value) | 设置一个带有给定的名称和值的 header. 如果 name 已经存在, 则覆盖旧的值. |
| void addHeader(String name, String value) | 添加一个带有给定的名称和值的 header. 如果 name 已经存在, 不覆盖旧的值, 并列添加新的键值对. |
| void setContentType(String type) | 设置被发送到客户端的响应的内容类型。 |
| void setCharacterEncoding(String charset) | 设置被发送到客户端的响应的字符编码(MIME 字符集),例如,UTF-8。 |
| void sendRedirect(String location) | 使用指定的重定向位置 URL 发送临时重定向响应到客户端。 |
| PrintWriter getWriter() | 用于往 body 中写入文本格式数据。 |
| OutputStream getOutputStream() | 用于往 body 中写入二进制格式数据。 |
注意:
- 响应对象是服务器要返回给浏览器的内容, 这里的重要信息都是程序猿设置的. 因此上面的方法都是 “写” 方法.
- 对于状态码/响应头的设置要放到 getWriter / getOutputStream 之前. 否则可能设置失效.
1.2 代码示例: 设置状态码
实现一个程序, 用户在浏览器通过参数指定要返回响应的状态码.
创建 StatusServlet 类
@WebServlet("/statusServlet")
public class StatusServlet extends HttpServlet {
  @Override
  protected void doGet(HttpServletRequest req, HttpServletResponse resp)
throws ServletException, IOException {
    String statusString = req.getParameter("status");
    if (statusString != null) {
      resp.setStatus(Integer.parseInt(statusString));
   }
    resp.getWriter().write("status: " + statusString);
 }
}
部署程序, 在浏览器中通过 URL http://127.0.0.1:8080/ServletHelloWorld/statusServlet?
status=200 访问, 可以看到

抓包结果:
HTTP/1.1 200
Content-Length: 11
Date: Mon, 21 Jun 2021 08:05:37 GMT
Keep-Alive: timeout=20
Connection: keep-alive

status: 200
变换不同的 status 的值, 就可以看到不同的响应结果
1.3 代码示例: 自动刷新
实现一个程序, 让浏览器每秒钟自动刷新一次. 并显示当前的时间戳.
创建 AutoRefreshServlet 类
@WebServlet("/autoRefreshServlet")
public class AutoRefreshServlet extends HttpServlet {
  @Override
  protected void doGet(HttpServletRequest req, HttpServletResponse resp)
throws ServletException, IOException {
    resp.setHeader("Refresh", "1");
    long timeStamp = new Date().getTime();
    resp.getWriter().write("timeStamp: " + timeStamp);
 }
}
- 通过 HTTP 响应报头中的 Refresh 字段, 可以控制浏览器自动刷新的时机.
- 通过 Date 类的 getTime 方法可以获取到当前时刻的毫秒级时间戳.
部署程序, 通过 URL http://127.0.0.1:8080/ServletHelloWorld/autoRefreshServlet 访问, 可以看到浏览器每秒钟自动刷新一次.

抓包结果
HTTP/1.1 200
Refresh: 1
Content-Length: 24
Date: Mon, 21 Jun 2021 08:14:29 GMT
Keep-Alive: timeout=20
Connection: keep-alive

timeStamp: 1624263269995
1.4 代码示例: 重定向
实现一个程序, 返回一个重定向 HTTP 响应, 自动跳转到另外一个页面.
创建 RedirectServlet 类
@WebServlet("/redirectServlet")
public class RedirectServlet extends HttpServlet {
  @Override
  protected void doGet(HttpServletRequest req, HttpServletResponse resp)
throws ServletException, IOException {
    resp.sendRedirect("http://www.sogou.com");
 }
}
部署程序, 通过 URL http://127.0.0.1:8080/ServletHelloWorld/redirectServlet 访问, 可以看到, 页面自动跳转到 搜狗主页 了.
抓包结果:

HTTP/1.1 302
Location: http://www.sogou.com
Content-Length: 0
Date: Mon, 21 Jun 2021 08:17:26 GMT
Keep-Alive: timeout=20
Connection: keep-alive
二: 表白墙服务器版本
结合上述 API, 我们可以把之前实现的表白墙程序修改成服务器版本. 这样即使页面关闭, 表白墙的内容也不会丢失.
2.1 准备工作
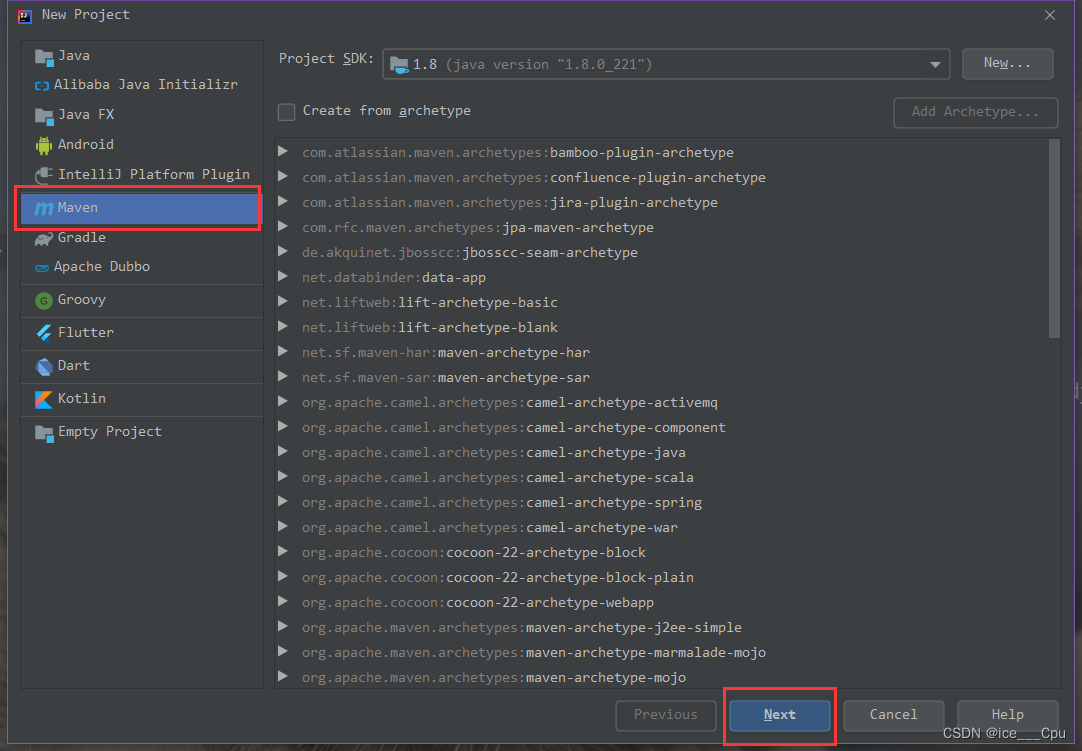
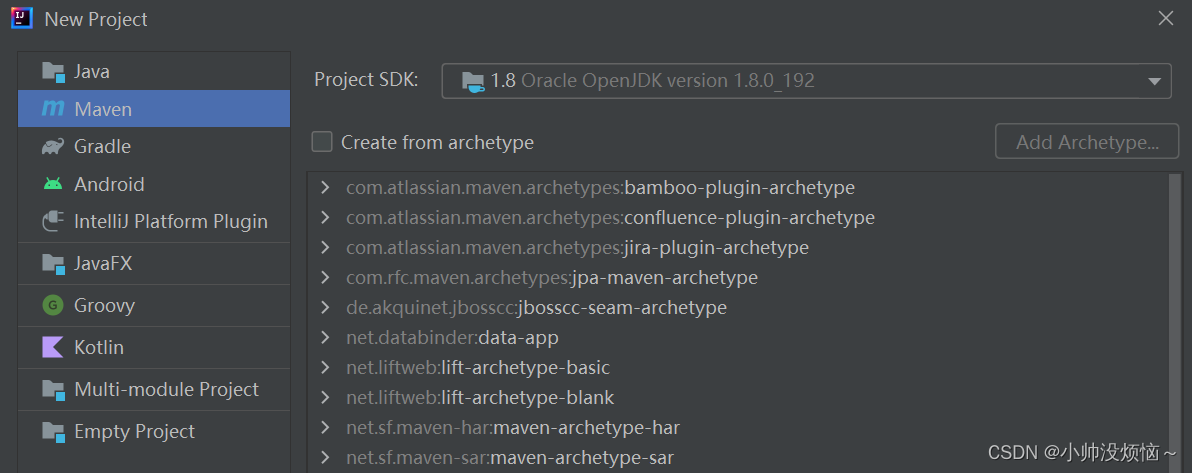
- 创建 maven 项目.
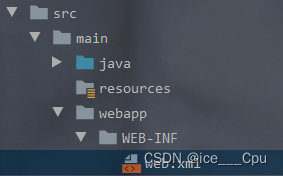
- 创建必要的目录 webapp, WEB-INF, web.xml
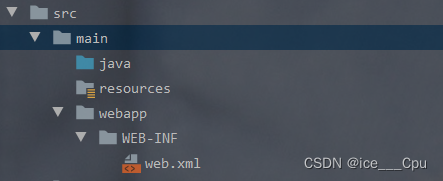
<!DOCTYPE web-app PUBLIC
    "-//Sun Microsystems, Inc.//DTD Web Application 2.3//EN"
    "http://java.sun.com/dtd/web-app_2_3.dtd" >
<web-app>
  <display-name>Archetype Created Web Application</display-name>
</web-app>
- 调整 pom.xml
引入依赖, 配置生成 war 包, 以及 war 包名字
<?xml version="1.0" encoding="UTF-8"?>
<project xmlns="http://maven.apache.org/POM/4.0.0"
xmlns:xsi="http://www.w3.org/2001/XMLSchema-instance"
    xsi:schemaLocation="http://maven.apache.org/POM/4.0.0
http://maven.apache.org/xsd/maven-4.0.0.xsd">
  <modelVersion>4.0.0</modelVersion>
  <groupId>org.example</groupId>
  <artifactId>表白墙服务器版</artifactId>
  <version>1.0-SNAPSHOT</version>
  <dependencies>
    <!-- 加入 servlet 依赖 -->
    <dependency>
      <groupId>javax.servlet</groupId>
      <artifactId>javax.servlet-api</artifactId>
      <!-- servlet 版本和 tomcat 版本有对应关系,切记 -->
      <version>3.1.0</version>
      <!-- 这个意思是我们只在开发阶段需要这个依赖,部署到 tomcat 上时就不需要了 -->
      <scope>provided</scope>
    </dependency>
    <!--
https://mvnrepository.com/artifact/com.fasterxml.jackson.core/jackson-databind -
->
    <dependency>
      <groupId>com.fasterxml.jackson.core</groupId>
      <artifactId>jackson-databind</artifactId>
      <version>2.12.3</version>
    </dependency>
  </dependencies>
  <packaging>war</packaging>
  <build>
    <finalName>MessageWall</finalName>
  </build>
</project>
- 把之前实现的表白墙前端页面拷贝到 webapp 目录中.
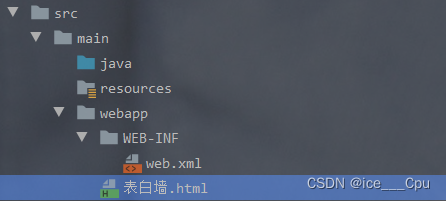
2.2 约定前后端交互接口
所谓 “前后端交互接口” 是进行 Web 开发中的关键环节,具体来说, 就是允许页面给服务器发送哪些 HTTP 请求, 并且每种请求预期获取什么样的 HTTP 响应.
- 获取全部留言
请求:
GET /message
响应: JSON 格式
[
 {
    from: "黑猫",
    to: "白猫",
    message: "喵"
 },
 {
from: "黑狗",
    to: "白狗",
    message: "汪"
 },
  ......
]
我们期望浏览器给服务器发送一个 GET /message 这样的请求, 就能返回当前一共有哪些留言记录. 结果以 json 的格式返回过来.
- 发表新留言
请求: body 也为 JSON 格式.
POST /message
{
  from: "黑猫",
  to: "白猫",
  message: "喵"
}
响应: JSON 格式.
{
  ok: 1
}
我们期望浏览器给服务器发送一个 POST /message 这样的请求, 就能把当前的留言提交给服务器.
2.3 实现服务器端代码
创建 Message 类
public class Message {
  public String from;
  public String to;
  public String message;
}
创建 MessageServlet 类
@WebServlet("/message")
public class MessageServlet extends HttpServlet {
  // 用于保存所有的留言
  private List<Message> messages = new ArrayList<Message>();
  // 用于转换 JSON 字符串
  private ObjectMapper objectMapper = new ObjectMapper();
  // 获取所有留言
  @Override
  protected void doGet(HttpServletRequest req, HttpServletResponse resp)
throws ServletException, IOException {
    resp.setContentType("application/json;charset=utf-8");
    String respString = objectMapper.writeValueAsString(messages);
    resp.getWriter().write(respString);
 }
  // 新增留言
  @Override
  protected void doPost(HttpServletRequest req, HttpServletResponse resp)
throws ServletException, IOException {
    resp.setContentType("application/json;charset=utf-8");
    Message message = objectMapper.readValue(req.getInputStream(),
Message.class);
    messages.add(message);
    resp.getWriter().write("{ "ok": 1 }");
 }
}
- ObjectMapper 的 readValue 方法也能直接从一个 InputStream 对象读取数据.
- ObjectMapper 的 writeValueAsString 方法也能把一个对象数组直接转成 JSON 格式的字符串.
2.4 调整前端页面代码
修改 “表白墙.html”
- 拷贝之前封装好的 ajax 函数
// 把之前封装的 ajax 函数拷贝过来
function ajax(args) {
// ...... 代码内容参考 HTTP 协议章节
}
- 新加 load 函数, 用于在页面加载的时候获取数据
// 从服务器加载数据, 显示在界面上
function load() {
  ajax({
    url: 'message',
    method: 'GET',
    callback: function (data, status) {
      // 先把字符串格式的 body 转成 对象数组
      let messages = JSON.parse(data);
      // 把每个消息都构造一个 HTML 标签
      for (let message of messages) {
        var row = document.createElement('div');
        row.className = 'row';
        row.innerHTML = message.from + '对' + message.to + '说: ' +
message.message;
        // 3. 把构造好的元素添加进去
        var container = document.querySelector('.container');
        container.appendChild(row);
     }
   }
 });
}
// 调动 load 执行数据加载
load();
- 修改原来的点击事件回调函数. 在点击按钮的时候同时给服务器发送消息.
// 给点击按钮注册点击事件
var submit = document.querySelector('.submit');
submit.onclick = function () {
// ...... 前面的代码略, 参考 JavaScript(WebAPI) 章节.
  // 给服务器发送消息
  ajax({
    method: "POST",
    url: "message",
    contentType: "application/json; charset=utf-8",
    body: JSON.stringify({ from: from, to: to, message: message }),
    callback: function (data, status) {
      if (status == 200) {
        console.log("提交消息成功!");
     } else {
        console.log("提交消息失败! " + status);
     }
   }
 });
}
此时在浏览器通过 URL http://127.0.0.1:8080/MessageServlet/表白墙.html 访问服务器, 即可看到
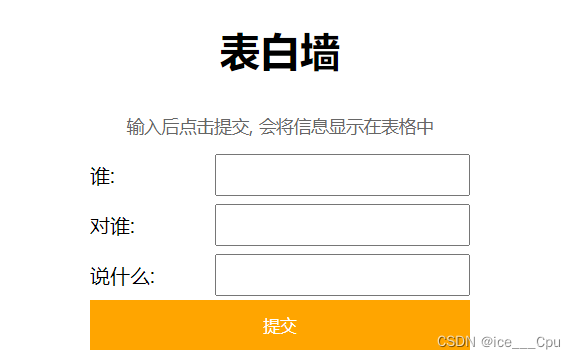
此时我们每次提交的数据都会发送给服务器. 每次打开页面的时候页面都会从服务器加载数据. 因此及时关闭页面, 数据也不会丢失.
但是数据此时是存储在服务器的内存中 ( private List messages = newArrayList(); ), 一旦服务器重启, 数据仍然会丢失.
2.5 数据存入文件
针对上面的问题, 如果把数据保存在文件中, 那么重启服务器也不会丢失数据了.
修改 MessageServlet 代码.
- 删掉之前的 messages 成员.
- 创建新的成员 String filePath, 表示要存储的文件的路径.
- 新增 load 方法, 用来从文件中读取内容. (会在页面加载的时候调用 load)
- 新增 save 方法, 用来往文件中写入内容. (会在提交留言的时候调用 save)
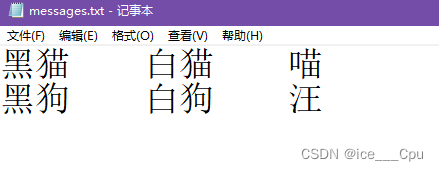
- 文件格式按照 行文本 的方式存储. 每个记录占用一行, 每个记录的字段之间(from, to, message) 使用 t 分隔.
文件格式形如:
@WebServlet("/message")
public class MessageServlet extends HttpServlet {
  // 用于保存所有的留言
  // private List<Message> messages = new ArrayList<Message>();
  // 用于转换 JSON 字符串
  private ObjectMapper objectMapper = new ObjectMapper();
  // 数据文件的路径
  private String filePath = "d:/messages.txt";
  public List<Message> load() {
    List<Message> messages = new ArrayList<>();
    System.out.println("从文件读取数据");
    try (BufferedReader bufferedReader = new BufferedReader(new
FileReader(filePath))) {
      while (true) {
        String line = bufferedReader.readLine();
        if (line == null) {
          break;
       }
        String[] tokens = line.split("t");
        Message message = new Message();
        message.from = tokens[0];
        message.to = tokens[1];
        message.message = tokens[2];
        messages.add(message);
     }
   } catch (IOException e) {
      // 首次运行的时候文件不存在, 可能会在这里触发异常.
      e.printStackTrace();
   }
    System.out.println("共读取数据 " + messages.size() + " 条!");
    return messages;
 }
  public void save(Message message) {
    System.out.println("向文件写入数据");
    // 使用追加写的方式打开文件
    try (FileWriter fileWriter = new FileWriter(filePath, true)) {
      fileWriter.write(message.from + "t" + message.to + "t" +
message.message + "n");
   } catch (IOException e) {
      e.printStackTrace();
   }
 }
  // 获取所有留言
  @Override
  protected void doGet(HttpServletRequest req, HttpServletResponse resp)
throws ServletException, IOException {
    List<Message> messages = load();
    resp.setContentType("application/json;charset=utf-8");
    String respString = objectMapper.writeValueAsString(messages);
    resp.getWriter().write(respString);
 }
  // 新增留言
  @Override
  protected void doPost(HttpServletRequest req, HttpServletResponse resp)
throws ServletException, IOException {
    resp.setContentType("application/json;charset=utf-8");
    Message message = objectMapper.readValue(req.getInputStream(),
Message.class);
    save(message);
    resp.getWriter().write("{ "ok": 1 }");
 }
}
此时即使重启服务器, 留言数据也不会丢失了.
2.6 数据存入数据库
使用文件的方式存储留言固然可行, 但是并不优雅,我们还可以借助数据库完成存储工作.
- 在 pom.xml 中引入 mysql 的依赖
<dependency>
  <groupId>mysql</groupId>
  <artifactId>mysql-connector-java</artifactId>
  <version>5.1.45</version>
</dependency>
- 创建数据库, 创建 messages 表
set character_set_database=utf8;
set character_set_server=utf8;
create database if not exists MessageWall;
use MessageWall;
drop table if exists messages;
create table messages (`from` varchar(255), `to` varchar(255), `message`
varchar(2048));
- 创建 DBUtil 类
DBUtil 类主要实现以下功能:
- 创建 MysqlDataSource 实例, 设置 URL, username, password 等属性.
- 提供 getConnection 方法, 和 MySQL 服务器建立连接.
- 提供 close 方法, 用来释放必要的资源.
// 负责和数据库建立连接
public class DBUtil {
  private static final String URL = "jdbc:mysql://127.0.0.1:3306/MessageWall?
characterEncoding=utf8&useSSL=false";
  private static final String USERNAME = "root";
  private static final String PASSWORD = "";
  private static DataSource dataSource = null;
  private static DataSource getDataSource() {
    if (dataSource == null) {
      synchronized (DBUtil.class) {
        if (dataSource == null) {
          dataSource = new MysqlDataSource();
         ((MysqlDataSource)dataSource).setUrl(URL);
         ((MysqlDataSource)dataSource).setUser(USERNAME);
         ((MysqlDataSource)dataSource).setPassword(PASSWORD);
       }
     }
   }
    return dataSource;
 }
  public static Connection getConnection() {
    try {
      return getDataSource().getConnection();
   } catch (SQLException e) {
      e.printStackTrace();
   }
    return null;
 }
  public static void close(Connection connection,
              PreparedStatement statement,
              ResultSet resultSet) {
    try {
      if (resultSet != null) {
        resultSet.close();
     }
      if (statement != null) {
        statement.close();
     }
      if (connection != null) {
        connection.close();
     }
   } catch (SQLException e) {
      e.printStackTrace();
   }
 }
}
- 修改 load 和 save 方法, 改成操作数据库
private List<Message> load() {
  List<Message> messages = new ArrayList<>();
  // 1. 和数据库建立连接
  Connection connection = DBUtil.getConnection();
  PreparedStatement statement = null;
  ResultSet resultSet = null;
  try {
    // 2. 拼装 SQL
    String sql = "select * from messages";
    statement= connection.prepareStatement(sql);
    // 3. 执行 SQL
    resultSet = statement.executeQuery();
    // 4. 遍历结果集合
    while (resultSet.next()) {
      Message message = new Message();
      message.from = resultSet.getString("from");
      message.to = resultSet.getString("to");
      message.message = resultSet.getString("message");
      messages.add(message);
   }
 } catch (SQLException e) {
    e.printStackTrace();
 } finally {
    // 5. 释放必要的资源
    DBUtil.close(connection, statement, resultSet);
 }
  return messages;
}
private void save(Message message) {
  // 1. 和数据库建立连接
  Connection connection = DBUtil.getConnection();
  PreparedStatement statement = null;
  try {
    // 2. 拼装 SQL
    String sql = "insert into messages values(?, ?, ?)";
    statement = connection.prepareStatement(sql);
    statement.setString(1, message.from);
    statement.setString(2, message.to);
    statement.setString(3, message.message);
    // 3. 执行 SQL
    statement.executeUpdate();
 } catch (SQLException e) {
    e.printStackTrace();
 } finally {
    // 4. 释放必要的资源
    DBUtil.close(connection, statement, null);
 }
}
重新部署程序, 此时使用数据库之后也可以保证即使服务器重启, 数据也不丢失.
2.7 存入文件和存入数据库的区别
虽然都是把数据存储在磁盘上, 为什么我们说 “使用文件” 不优雅, “使用数据库” 更科学 呢?当前看起来, 明显是数据库操作的代码量要比文件操作的代码量更多呀.
但是实际上, 当前我们写的程序比较简单, 存储的数据比较少, 数据格式也不复杂. 这种情况下使用文件是比数据库代码更精简一些.
但是如果我们的程序更复杂, 数据更多并且数据格式也更复杂的时候, 单纯的文件操作就要比数据库操作更麻烦了.
因为数据库已经给我们提供了很多功能可以开箱即用. (例如数据类型的校验, 约束, 聚合查询, 联合查询, 子查询, 索引, 事务等等). 而如果基于文件来完成类似的功能, 就需要我们自己写很多代码来手动实现了.
三: Cookie 和 Session
HTTP 协议自身是属于 “无状态” 协议
“无状态” 的含义指的是:默认情况下 HTTP 协议的客户端和服务器之间的这次通信, 和下次通信之间没有直接的联系.
但是实际开发中, 我们很多时候是需要知道请求之间的关联关系的,例如登陆网站成功后, 第二次访问的时候服务器就能知道该请求是否是已经登陆过了.
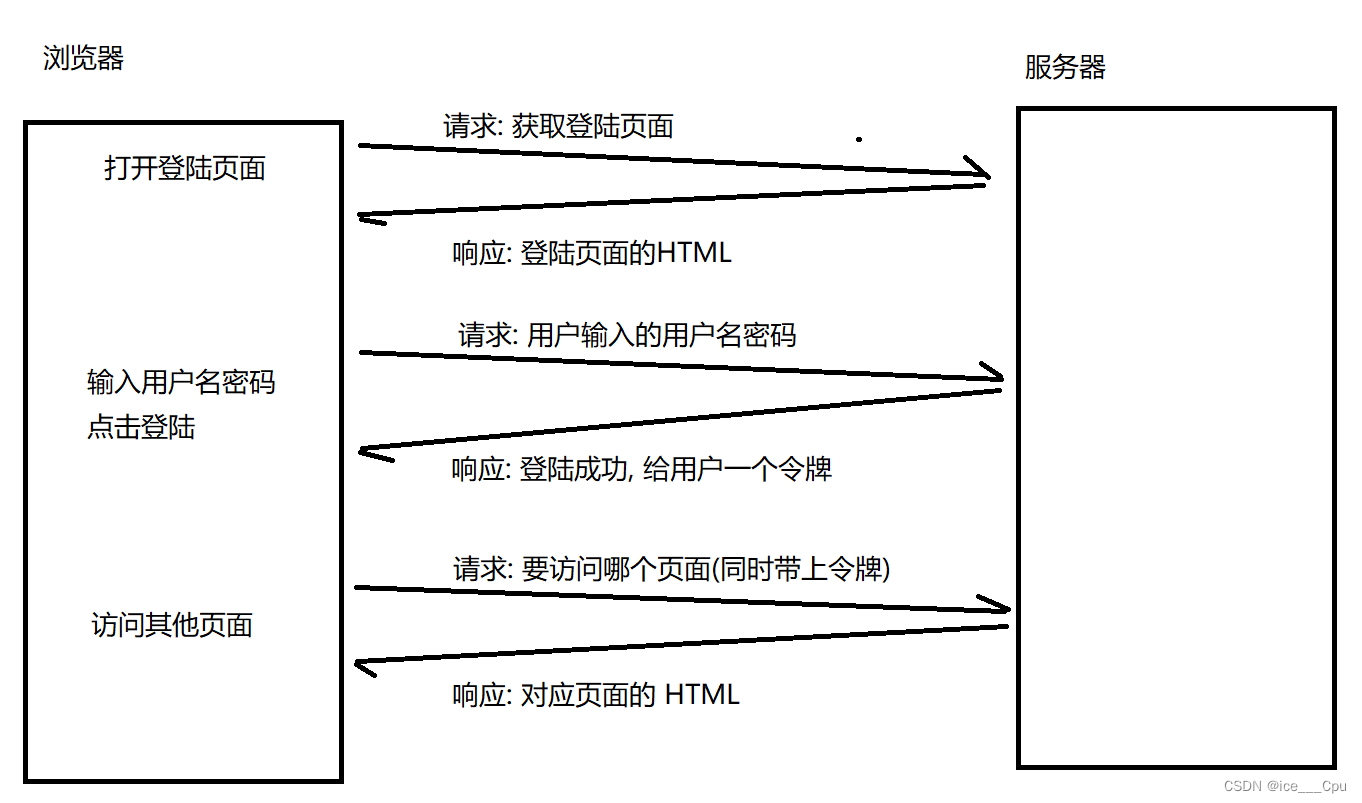
图中的 “令牌” 通常就存储在 Cookie 字段中.此时在服务器这边就需要记录令牌信息, 以及令牌对应的用户信息, 这个就是 Session 机制所做的工作.
3.1 理解会话机制 (Session)
服务器同一时刻收到的请求是很多的. 服务器需要清除的区分清楚每个请求是从属于哪个用户, 就需要在服务器这边记录每个用户令牌以及用户的信息的对应关系.
会话的本质就是一个 “哈希表”, 存储了一些键值对结构. key 就是令牌的 ID(token/sessionId), value 就是用户信息(用户信息可以根据需求灵活设计).
sessionId 是由服务器生成的一个 “唯一性字符串”, 从 session 机制的角度来看, 这个唯一性字符串称为 “sessionId”. 但是站在整个登录流程中看待, 也可以把这个唯一性字符串称为 “token”.
sessionId 和 token 就可以理解成是同一个东西的不同叫法(不同视角的叫法).
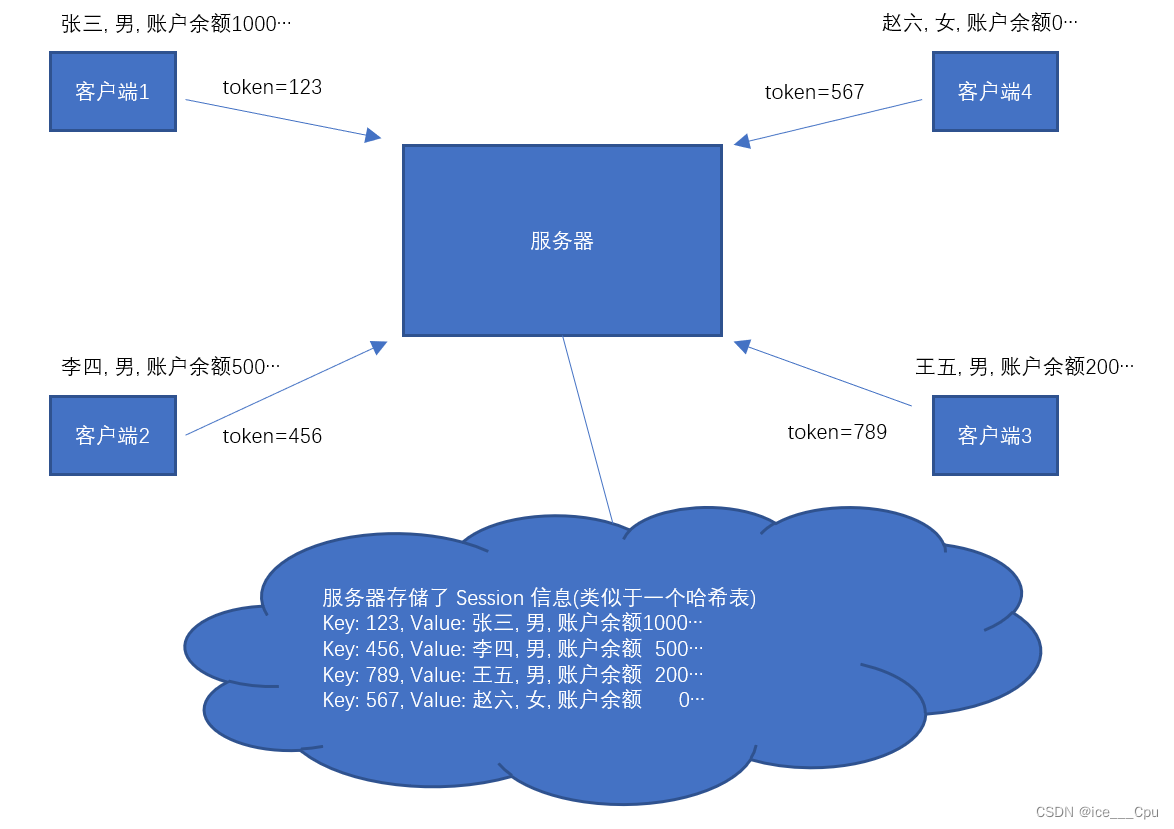
- 当用户登陆的时候, 服务器在 Session 中新增一个新记录, 并把 sessionId / token 返回给客户端.(例如通过 HTTP 响应中的 Set-Cookie 字段返回).
- 客户端后续再给服务器发送请求的时候, 需要在请求中带上 sessionId/ token. (例如通过 HTTP 请求中的 Cookie字段带上).
- 服务器收到请求之后, 根据请求中的 sessionId / token 在 Session 信息中获取到对应的用户信息,再进行后续操作.
Servlet 的 Session 默认是保存在内存中的. 如果重启服务器则 Session 数据就会丢失.
3.2 Cookie 和 Session 的区别
- Cookie 是客户端的机制. Session 是服务器端的机制.
- Cookie 和 Session 经常会在一起配合使用. 但是不是必须配合.
- 完全可以用 Cookie 来保存一些数据在客户端. 这些数据不一定是用户身份信息, 也不一定是token / sessionId
- Session 中的 token / sessionId 也不需要非得通过 Cookie / Set-Cookie 传递.
3.3 核心方法
HttpServletRequest 类中的相关方法
| 方法 | 描述 |
|---|---|
| HttpSession getSession() | 在服务器中获取会话。参数为true时,如果会话不存在则新建会话;参数为false时,如果会话不存在则返回null。 |
| Cookie[] getCookies() | 返回一个数组,包含客户端发送该请求的所有的Cookie对象。会自动将Cookie中的格式解析成键值对。 |
HttpServletResponse 类中的相关方法
| 方法 | 描述 |
|---|---|
| void addCookie(Cookie cookie) | 把指定的 cookie 添加到响应中。 |
HttpSession 类中的相关方法
一个 HttpSession 对象里面包含多个键值对. 我们可以往 HttpSession 中存任何我们需要的信息.
| 方法 | 描述 |
|---|---|
| Object getAttribute(String name) | 返回在该 session 会话中具有指定名称的对象,如果没有指定名称的对象,则返回 null. |
| void setAttribute(String name, Object value) | 将一个对象绑定到该 session 会话,使用指定的名称。 |
| boolean isNew() | 判断当前是否是新创建出的会话。 |
Cookie 类中的相关方法:
每个 Cookie 对象就是一个键值对.
| 方法 | 描述 |
|---|---|
| String getName() | 返回 cookie 的名称。名称在创建后不能改变。 |
| String getValue() | 获取与 cookie 关联的值。 |
| void setValue(String newValue) | 设置与 cookie 关联的值。 |
- HTTP 的 Cooke 字段中存储的实际上是多组键值对. 每个键值对在 Servlet 中都对应了一个 Cookie对象.
- 通过 HttpServletRequest.getCookies() 获取到请求中的一系列 Cookie 键值对.
- 通过 HttpServletResponse.addCookie() 可以向响应中添加新的 Cookie 键值对.
五: 上传文件
上传文件也是日常开发中的一类常见需求. 在 Servlet 中也进行了支持.
5.1 核心方法
HttpServletRequest 类方法
| 方法 | 描述 |
|---|---|
| Part getPart(String name) | 获取请求中给定 name 的文件 |
| Collection < Part > getParts() | 获取所有的文件 |
Part 类方法
| 方法名 | 描述 |
|---|---|
| String getSubmittedFileName() | 获取提交的文件名 |
| String getContentType() | 获取提交的文件类型 |
| long getSize() | 获取文件的大小 |
| void write(String path) | 把提交的文件数据写入磁盘文件 |
5.2 代码示例
实现程序, 通过网页提交一个图片到服务器上.
- 创建 upload.html, 放到 webapp 目录中.
<form action="upload" enctype="multipart/form-data" method="POST">
  <input type="file" name="MyImage">
  <input type="submit" value="提交图片">
</form>
- 上传文件一般通过 POST 请求的表单实现.
- 在 form 中要加上 multipart/form-data 字段.
- 创建 UploadServlet 类
@MultipartConfig
@WebServlet("/upload")
public class UploadServlet extends HttpServlet {
  @Override
  protected void doPost(HttpServletRequest req, HttpServletResponse resp)
throws ServletException, IOException {
    Part part = req.getPart("MyImage");
    System.out.println(part.getSubmittedFileName());
    System.out.println(part.getContentType());
    System.out.println(part.getSize());
    part.write("d:/MyImage.jpg");
    resp.getWriter().write("upload ok");
 }
}
- 需要给 UploadServlet 加上 @MultipartConfig 注解. 否则服务器代码无法使用 getPart 方法
- getPart 的 参数 需要和 form 中 input 标签的 name 属性对应.
- 客户端一次可以提交多个文件. (使用多个 input 标签). 此时服务器可以通过 getParts 获取所有的Part 对象.
- 部署程序, 在浏览器中通过 URLhttp://127.0.0.1:8080/ServletHelloWorld/upload.html 访问,

选择文件后, 点击提交图片, 则页面跳转到 /upload 页面.

此时可以看到服务器端的打印日志
rose.jpg
image/jpeg
13058
同时在 d 盘中生成了 MyImage.jpg

上传图片请求的抓包结果为:
POST http://127.0.0.1:8080/ServletHelloWorld/upload HTTP/1.1
Host: 127.0.0.1:8080
Connection: keep-alive
Content-Length: 13243
Cache-Control: max-age=0
sec-ch-ua: " Not;A Brand";v="99", "Google Chrome";v="91", "Chromium";v="91"
sec-ch-ua-mobile: ?0
Upgrade-Insecure-Requests: 1
Origin: http://127.0.0.1:8080
Content-Type: multipart/form-data; boundary=----
WebKitFormBoundaryTlrGjpjXbKJl4y5B
User-Agent: Mozilla/5.0 (Windows NT 10.0; Win64; x64) AppleWebKit/537.36 (KHTML,
like Gecko) Chrome/91.0.4472.114 Safari/537.36
Accept:
text/html,application/xhtml+xml,application/xml;q=0.9,image/avif,image/webp,imag
e/apng,*/*;q=0.8,application/signed-exchange;v=b3;q=0.9
Sec-Fetch-Site: same-origin
Sec-Fetch-Mode: navigate
Sec-Fetch-User: ?1
Sec-Fetch-Dest: document
Referer: http://127.0.0.1:8080/ServletHelloWorld/upload.html
Accept-Encoding: gzip, deflate, br
Accept-Language: zh-CN,zh;q=0.9,en;q=0.8
Cookie: JSESSIONID=1CBA3519A24801120ADC3C00A70FF047

------WebKitFormBoundaryTlrGjpjXbKJl4y5B
Content-Disposition: form-data; name="MyImage"; filename="rose.jpg"
Content-Type: image/jpeg

  •JFIF •• • •   ;CREATOR: gd-jpeg v1.0 (using IJG JPEG v62), quality = 95
 C ••••••••••••••••••••••••••••••••••• •• •••
•
可以看到Content-Type 为 multipart/form-data , 这样的请求中带有一个 boundary=—-
WebKitFormBoundaryTlrGjpjXbKJl4y5B , 这个 boundary 在 body 这边作为一个 “分隔线”, 分隔线下面是上传的文件的属性和文件内容.
六: 附录: 代码片段
此处把一些常用代码片段罗列在这里. 后续我们写代码的时候可以在这个基础上拷贝过去直接修改.
6.1 目录结构
6.2 pom.xml
<?xml version="1.0" encoding="UTF-8"?>
<project xmlns="http://maven.apache.org/POM/4.0.0"
    xmlns:xsi="http://www.w3.org/2001/XMLSchema-instance"
    xsi:schemaLocation="http://maven.apache.org/POM/4.0.0
http://maven.apache.org/xsd/maven-4.0.0.xsd">
  <modelVersion>4.0.0</modelVersion>
  <groupId>com.bit</groupId>
  <artifactId>test</artifactId>
  <version>1.0-SNAPSHOT</version>
  <!-- 指定属性信息 -->
  <properties>
    <encoding>UTF-8</encoding>
    <maven.compiler.source>1.8</maven.compiler.source>
    <maven.compiler.target>1.8</maven.compiler.target>
  </properties>
  <dependencies>
    <!-- 加入 servlet 依赖 -->
    <dependency>
      <groupId>javax.servlet</groupId>
      <artifactId>javax.servlet-api</artifactId>
      <!-- servlet 版本和 tomcat 版本有对应关系,切记 -->
      <version>3.1.0</version>
      <!-- 这个意思是我们只在开发阶段需要这个依赖,部署到 tomcat 上时就不需要了 -->
      <scope>provided</scope>
    </dependency>
    <dependency>
      <groupId>mysql</groupId>
      <artifactId>mysql-connector-java</artifactId>
      <version>5.1.45</version>
    </dependency>
    <!--
https://mvnrepository.com/artifact/com.fasterxml.jackson.core/jackson-databind -
->
    <dependency>
      <groupId>com.fasterxml.jackson.core</groupId>
      <artifactId>jackson-databind</artifactId>
      <version>2.12.3</version>
    </dependency>
  </dependencies>

  <!-- 打包方式是 war 包,一种用于 web 应用的包,原理类似 jar 包 -->
  <packaging>war</packaging>
  <build>
    <!-- 指定最终 war 包的名称 -->
    <finalName>test</finalName>
  </build>
</project>
6.3 web.xml
<!DOCTYPE web-app PUBLIC
    "-//Sun Microsystems, Inc.//DTD Web Application 2.3//EN"
    "http://java.sun.com/dtd/web-app_2_3.dtd" >
<web-app>
  <display-name>Archetype Created Web Application</display-name>
</web-app>
6.4 hello world
@WebServlet("/hello")
public class HelloServlet extends HttpServlet {
  @Override
  protected void doGet(HttpServletRequest req, HttpServletResponse resp)
throws ServletException, IOException {
    resp.getWriter().write("hello");
 }
}
6.5 读取请求报头
@WebServlet("/getParameter")
public class GetParameter extends HttpServlet {
  @Override
  protected void doGet(HttpServletRequest req, HttpServletResponse resp)
throws ServletException, IOException {
String contentType = req.getHeader("Content-Type");
    // 或者使用
    String contentType = req.getContentType();
 }
}
6.6 读取 GET 请求的 query string
@WebServlet("/getParameter")
public class GetParameter extends HttpServlet {
  @Override
  protected void doGet(HttpServletRequest req, HttpServletResponse resp)
throws ServletException, IOException {
    String userId = req.getParameter("userId");
    String classId = req.getParameter("classId");
 }
}
6.7 读取 POST 请求的 body
@WebServlet("/postParameter")
public class PostParameter extends HttpServlet {
  @Override
  protected void doPost(HttpServletRequest req, HttpServletResponse resp)
throws ServletException, IOException {
    resp.setContentType("text/html; charset=utf-8");
    req.setCharacterEncoding("utf-8");
    String userId = req.getParameter("userId");
    String classId = req.getParameter("classId");
    resp.getWriter().write("userId: " + userId + ", " + "classId: " +
classId);
 }
}
6.8 设置状态码
@WebServlet("/statusServlet")
public class StatusServlet extends HttpServlet {
  @Override
  protected void doGet(HttpServletRequest req, HttpServletResponse resp)
throws ServletException, IOException {
    resp.setStatus(200);
 }
}
6.9 设置响应报头
@WebServlet("/autoRefreshServlet")
public class AutoRefreshServlet extends HttpServlet {
  @Override
  protected void doGet(HttpServletRequest req, HttpServletResponse resp)
throws ServletException, IOException {
    resp.setHeader("Refresh", "1");
 }
}
6.10 重定向
@WebServlet("/redirectServlet")
public class RedirectServlet extends HttpServlet {
  @Override
  protected void doGet(HttpServletRequest req, HttpServletResponse resp)
throws ServletException, IOException {
    resp.sendRedirect("http://www.sogou.com");
 }
}
6.11 创建新 Session
@WebServlet("/login")
public class LoginServlet extends HttpServlet {
  @Override
  protected void doPost(HttpServletRequest req, HttpServletResponse resp)
throws ServletException, IOException {
    HttpSession session = req.getSession(true);
    session.setAttribute("username", "admin");
    session.setAttribute("loginCount", "0");
 }
}
6.12 获取已有 Session
@WebServlet("/login")
public class LoginServlet extends HttpServlet {
  HttpSession session = req.getSession(false);
  if (session == null) {
    // 用户没有登陆, 重定向到 login.html
    resp.sendRedirect("login.html");
    return;
 }
  // 如果已经登陆, 则从 Session 中取出数据
  String userName = (String)session.getAttribute("username");
  String countString = (String)session.getAttribute("loginCount");
}
6.13 上传文件
@MultipartConfig
@WebServlet("/upload")
public class UploadServlet extends HttpServlet {
  @Override
  protected void doPost(HttpServletRequest req, HttpServletResponse resp)
throws ServletException, IOException {
    Part part = req.getPart("MyImage");
    System.out.println(part.getSubmittedFileName());
    System.out.println(part.getContentType());
    System.out.println(part.getSize());
    part.write("d:/MyImage.jpg");
    resp.getWriter().write("upload ok");
 }
}
<form action="upload" enctype="multipart/form-data" method="POST">
  <input type="file" name="MyImage">
  <input type="submit" value="提交图片">
</form>
原文地址:https://blog.csdn.net/weixin_73232539/article/details/136045105
本文来自互联网用户投稿,该文观点仅代表作者本人,不代表本站立场。本站仅提供信息存储空间服务,不拥有所有权,不承担相关法律责任。
如若转载,请注明出处:http://www.7code.cn/show_67991.html
如若内容造成侵权/违法违规/事实不符,请联系代码007邮箱:suwngjj01@126.com进行投诉反馈,一经查实,立即删除!

