1. 使用半监督学习方法 Label Spreading 在一个生成的二维数据集上进行标签传播
import numpy as np
import matplotlib.pyplot as plt
from sklearn.semi_supervised import label_propagation
from sklearn.datasets import make_circles

# generate ring with inner box
n_samples = 200
X, y = make_circles(n_samples=n_samples, shuffle=False)
# sklearn.datasets.make_circles(n_samples=100, shuffle=True, noise=None, random_state=None, factor=0.8)
# make_circle和make_moom产生二维二元分类数据集来测试某些算法的性能,可以为数据集添加噪声,可以为二元分类器产生一些球形判决界面的数据
outer, inner = 0, 1
labels = np.full(n_samples, -1.) # 形状n_samples,数据-1
labels[0] = outer
labels[-1] = inner

# Learn with LabelSpreading
label_spread = label_propagation.LabelSpreading(kernel='knn', alpha=0.8) # kernel : {‘knn’, ‘rbf’, callable}
label_spread.fit(X, labels)

# Plot output labels
output_labels = label_spread.transduction_
plt.figure(figsize=(8.5, 4))
plt.subplot(1, 2, 1)
plt.scatter(X[labels == outer, 0], X[labels == outer, 1], color='navy', # s点的大小,lw线宽
            marker='s', lw=0, label="outer labeled", s=10)
plt.scatter(X[labels == inner, 0], X[labels == inner, 1], color='c',
            marker='s', lw=0, label='inner labeled', s=10)
plt.scatter(X[labels == -1, 0], X[labels == -1, 1], color='darkorange',
            marker='.', label='unlabeled')
plt.legend(scatterpoints=1, shadow=False, loc='upper right')
plt.title("Raw data (2 classes=outer and inner)")

plt.subplot(1, 2, 2)
output_label_array = np.asarray(output_labels) # 将结构数据转化为ndarray
outer_numbers = np.where(output_label_array == outer)[0]
inner_numbers = np.where(output_label_array == inner)[0]
plt.scatter(X[outer_numbers, 0], X[outer_numbers, 1], color='navy',
            marker='s', lw=0, s=10, label="outer learned")
plt.scatter(X[inner_numbers, 0], X[inner_numbers, 1], color='c',
            marker='s', lw=0, s=10, label="inner learned")
plt.legend(scatterpoints=1, shadow=False, loc='upper right')
plt.title("Labels learned with Label Spreading (KNN)")

plt.subplots_adjust(left=0.07, bottom=0.07, right=0.93, top=0.92)
plt.show()
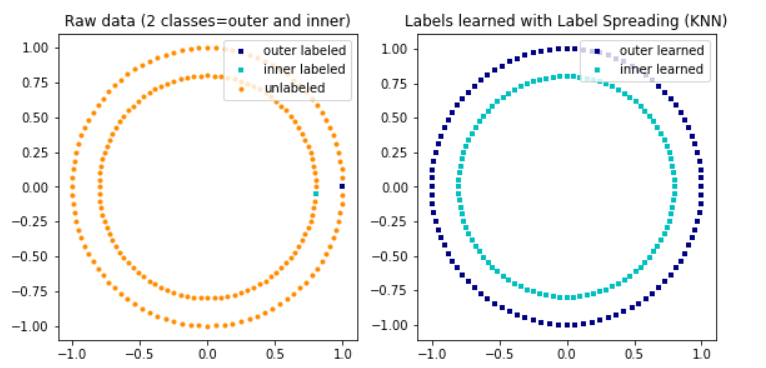
这段代码演示了使用半监督学习方法 Label Spreading 在一个生成的二维数据集上进行标签传播的
过程。Label Spreading 是一种用于利用未标记数据来改善学习模型的技术。
使用 make_circles 函数生成一个包含200个样本的二维数据集,这个数据集形成了两个圆形:一
个内圈和一个外圈。这些数据点将用于演示 Label Spreading 算法的效果。
为了进行半监督学习,我们需要一些已标记的数据。在这个示例中,我们将数据集中的第一个和最
后一个数据点分别标记为外圈和内圈,用数字0和1表示。其余数据点的标签被初始化为-1,表示它
们是未标记的。
使用 LabelSpreading 类来应用标签传播算法。通过设置 kernel=’knn 和 alpha=0.8,算法将基于最
近邻(KNN)核来传播标签,其中 alpha 参数控制标签传播过程中的平滑程度。
通过调用 fit 方法,标签传播算法使用已标记和未标记的数据来学习,并预测所有未标记数据点的
标签。代码最后部分使用 matplotlib 生成了两个子图。第一个子图展示了原始数据及其标记,第二
个子图展示了使用 Label Spreading 算法学习得到的标签。这通过比较两个子图来直观展示标签传
播算法的效果。
通过这个示例,可以看到即使只有极少数的数据点被标记,Label Spreading 也能有效地利用数据
集的结构信息来预测未标记数据点的标签,展示了半监督学习在利用未标记数据上的潜力。
2. 使用半监督学习技术(特别是 Label Spreading)和支持向量机(SVM)在鸢尾花
(Iris)数据集上进行分类
import numpy as np
import matplotlib.pyplot as plt
from sklearn import datasets
from sklearn import svm
from sklearn.semi_supervised import label_propagation

rng = np.random.RandomState(0)

iris = datasets.load_iris()

X = iris.data[:, :2]
y = iris.target

# step size in the mesh
h = .02

y_30 = np.copy(y)
y_30[rng.rand(len(y)) < 0.6] = -1
y_50 = np.copy(y)
y_50[rng.rand(len(y)) < 0.9] = -1
# we create an instance of SVM and fit out data. We do not scale our
# data since we want to plot the support vectors
ls30 = (label_propagation.LabelSpreading().fit(X, y_30),
        y_30)
ls50 = (label_propagation.LabelSpreading().fit(X, y_50),
        y_50)
ls100 = (label_propagation.LabelSpreading().fit(X, y), y)
rbf_svc = (svm.SVC(kernel='rbf', gamma=.5).fit(X, y), y)

# create a mesh to plot in
x_min, x_max = X[:, 0].min() - 1, X[:, 0].max() + 1
y_min, y_max = X[:, 1].min() - 1, X[:, 1].max() + 1
xx, yy = np.meshgrid(np.arange(x_min, x_max, h),
                     np.arange(y_min, y_max, h))

# title for the plots
titles = ['Label Spreading 30% data',
          'Label Spreading 50% data',
          'Label Spreading 0% data',
          'SVC with rbf kernel']

color_map = {-1: (1, 1, 1), 0: (0, 0, .9), 1: (1, 0, 0), 2: (.8, .6, 0)} # (1, 1, 1)白色

for i, (clf, y_train) in enumerate((ls30, ls50, ls100, rbf_svc)):
    # Plot the decision boundary. For that, we will assign a color to each
    # point in the mesh [x_min, x_max]x[y_min, y_max].
    plt.subplot(2, 2, i + 1)
    Z = clf.predict(np.c_[xx.ravel(), yy.ravel()]) # 扁平化操作

    # Put the result into a color plot
    Z = Z.reshape(xx.shape)
    plt.contourf(xx, yy, Z, cmap=plt.cm.Paired)
    plt.axis('off')

    # Plot also the training points
    colors = [color_map[y] for y in y_train]
    plt.scatter(X[:, 0], X[:, 1], c=colors, edgecolors='black')

    plt.title(titles[i])

plt.suptitle("Unlabeled points are colored white", y=0.1)
plt.show()
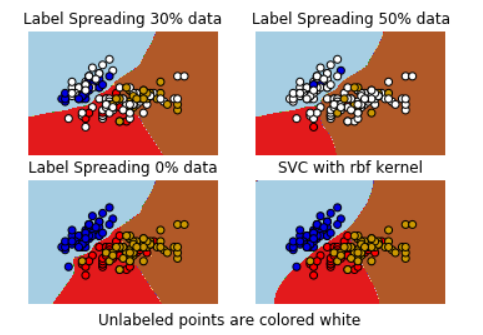
这段代码演示了如何使用半监督学习技术(特别是 Label Spreading)和支持向量机(SVM)在鸢
尾花(Iris)数据集上进行分类。这个示例展示了在不同比例的数据被标记的情况下,这些算法的
表现。从 `sklearn.datasets` 加载鸢尾花数据集。仅使用前两个特征(为了方便在二维平面上绘
图)。y_30 和 y_50 分别是复制的标签数组,其中 60% 和 90% 的标签被随机置为未知(-1),
用于模拟半监督学习场景。
使用 LabelSpreading 模型分别训练三个不同的数据集(30%、50% 标签数据和100% 标签数据)
以及一个使用 RBF 核的 SVM 模型进行比较。不对数据进行缩放,因为目的是要在图中展示支持
向量。为了绘制决策边界,创建一个网格覆盖数据集的全部范围。使用 numpy.meshgrid 函数生成
网格点的坐标矩阵。
对每个分类器和训练集组合,预测整个网格上的点的标签。使用 plt.contourf 绘制决策区域,并用
不同的颜色表示不同的类别。未标记的点(在 y_30 和 y_50 中被标记为 -1 的点)在图上用白色表
示。使用 plt.scatter 绘制训练点,颜色由 y_train 决定,边界颜色设为黑色以便区分。
为每个子图设置标题以区分不同的训练情况。使用 plt.suptitle 设置总标题。
最终显示图形,展示在不同标签数据比例下的分类效果和决策边界。
3. 使用标签传播(Label Spreading)算法在一个合成的二维数据集上进行半监督学习
import numpy as np
import matplotlib.pyplot as plt
from sklearn.semi_supervised import label_propagation
from sklearn.datasets import make_circles

# generate ring with inner box
n_samples = 200
X, y = make_circles(n_samples=n_samples, shuffle=False)
# sklearn.datasets.make_circles(n_samples=100, shuffle=True, noise=None, random_state=None, factor=0.8)
# make_circle和make_moom产生二维二元分类数据集来测试某些算法的性能,可以为数据集添加噪声,可以为二元分类器产生一些球形判决界面的数据
outer, inner = 0, 1
labels = np.full(n_samples, -1.) # 形状n_samples,数据-1
labels[0] = outer
labels[-1] = inner

# Learn with LabelSpreading
label_spread = label_propagation.LabelSpreading(kernel='knn', alpha=0.8) # kernel : {‘knn’, ‘rbf’, callable}
label_spread.fit(X, labels)

# Plot output labels
output_labels = label_spread.transduction_
plt.figure(figsize=(8.5, 4))
plt.subplot(1, 2, 1)
plt.scatter(X[labels == outer, 0], X[labels == outer, 1], color='navy', # s点的大小,lw线宽
            marker='s', lw=0, label="outer labeled", s=10)
plt.scatter(X[labels == inner, 0], X[labels == inner, 1], color='c',
            marker='s', lw=0, label='inner labeled', s=10)
plt.scatter(X[labels == -1, 0], X[labels == -1, 1], color='darkorange',
            marker='.', label='unlabeled')
plt.legend(scatterpoints=1, shadow=False, loc='upper right')
plt.title("Raw data (2 classes=outer and inner)")

plt.subplot(1, 2, 2)
output_label_array = np.asarray(output_labels) # 将结构数据转化为ndarray
outer_numbers = np.where(output_label_array == outer)[0]
inner_numbers = np.where(output_label_array == inner)[0]
plt.scatter(X[outer_numbers, 0], X[outer_numbers, 1], color='navy',
            marker='s', lw=0, s=10, label="outer learned")
plt.scatter(X[inner_numbers, 0], X[inner_numbers, 1], color='c',
            marker='s', lw=0, s=10, label="inner learned")
plt.legend(scatterpoints=1, shadow=False, loc='upper right')
plt.title("Labels learned with Label Spreading (KNN)")

plt.subplots_adjust(left=0.07, bottom=0.07, right=0.93, top=0.92)
plt.show()
这段代码演示了如何使用标签传播(Label Spreading)算法在一个合成的二维数据集上进行半监
督学习。标签传播是一种半监督学习算法,它可以利用少量的已标记数据和大量的未标记数据来训
练模型。使用 make_circles 函数生成一个由两个圆形组成的数据集,总共有200个样本。这些样本
被用来模拟一个简单的二分类问题。
初始化一个全是 -1 的标签数组,表示大部分样本都是未标记的。将第一个样本的标签设置为
outer(外圈),最后一个样本的标签设置为 inner(内圈),以此模拟已知的少量标签信息。
创建一个 LabelSpreading 模型实例,使用K近邻(KNN)作为核函数,并设置 alpha=0.8。
使用这个模型和初始的标签来训练数据集。算法将尝试根据少量的已标记数据和数据的分布,推断
出未标记数据的标签。
使用 matplotlib 创建两个子图。第一个子图展示原始数据和初始的少量标签。第二个子图展示标签
传播算法学习到的标签。在第一个子图中,已标记的外圈和内圈样本分别用不同颜色表示,未标记
的样本用第三种颜色表示。在第二个子图中,根据标签传播算法的结果,所有样本都被标记,并用
相应的颜色表示外圈和内圈。通过这种方式,可以直观地看到标签传播算法是如何利用少量的标签
信息来推断整个数据集的标签分布的。
原文地址:https://blog.csdn.net/weixin_43961909/article/details/136048421
本文来自互联网用户投稿,该文观点仅代表作者本人,不代表本站立场。本站仅提供信息存储空间服务,不拥有所有权,不承担相关法律责任。
如若转载,请注明出处:http://www.7code.cn/show_68175.html
如若内容造成侵权/违法违规/事实不符,请联系代码007邮箱:suwngjj01@126.com进行投诉反馈,一经查实,立即删除!

