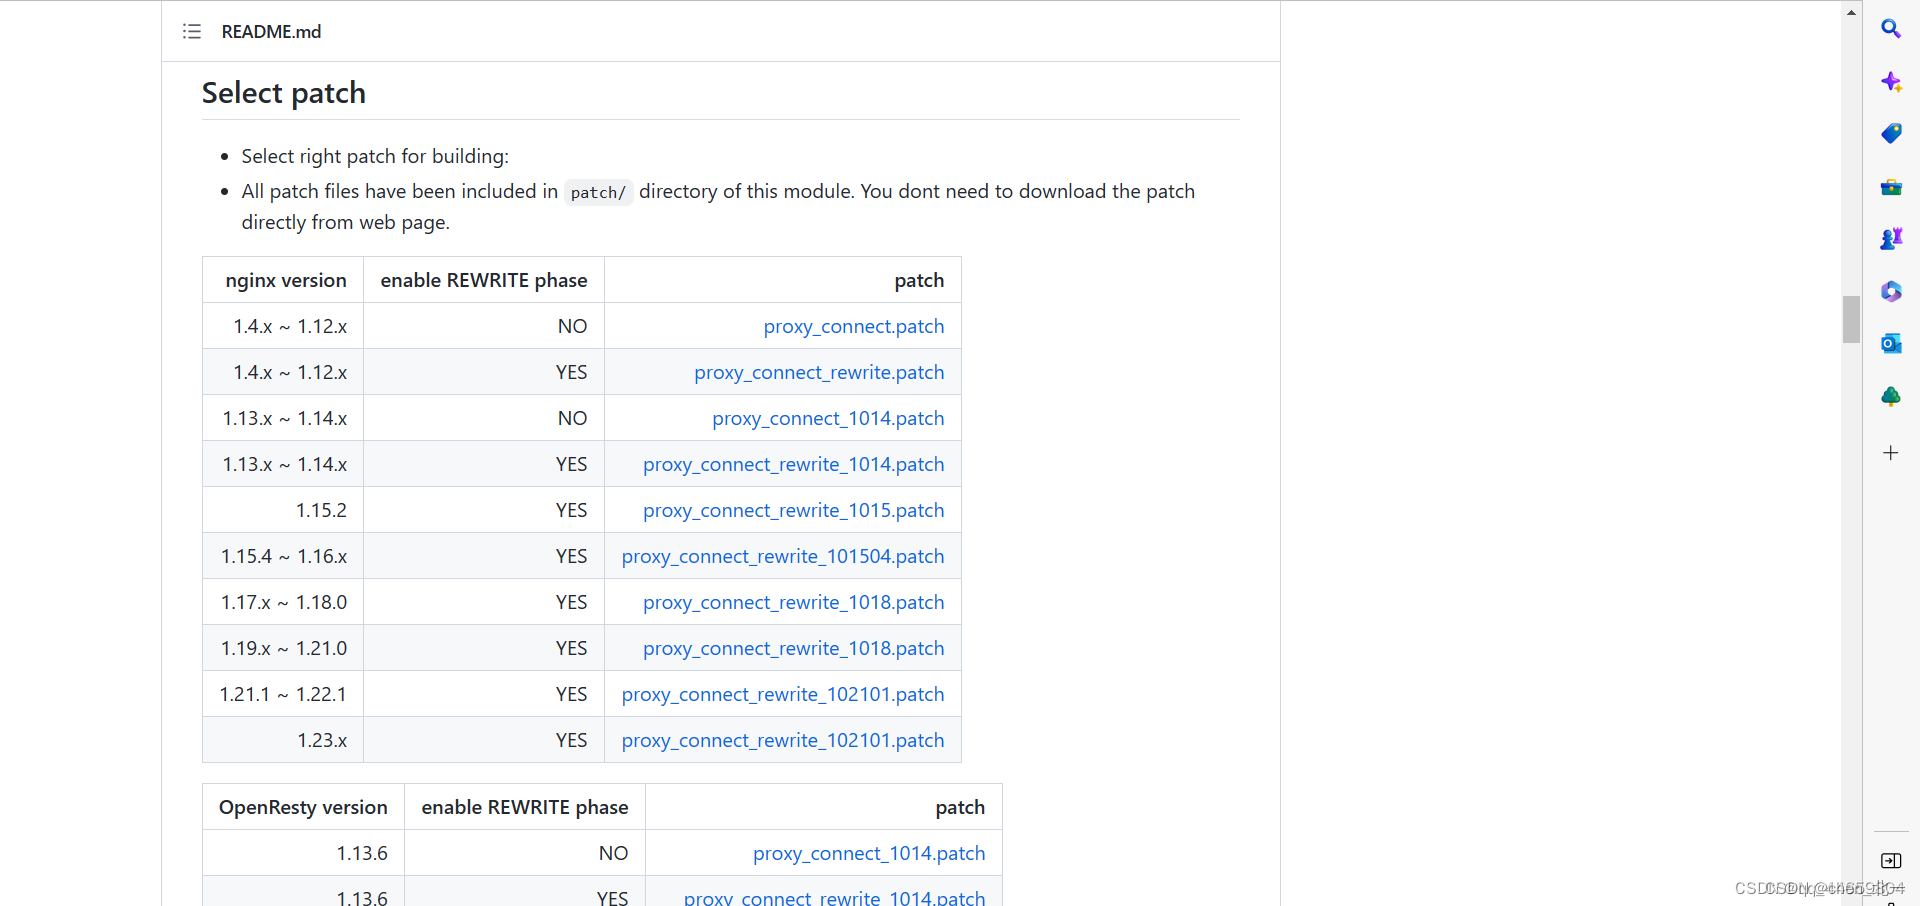
本文介绍: https://github.com/chobits/ngx_http_proxy_connect_module 下载地址。此处使用的是nginx-1.20.2,对应proxy_connect_rewrite_1018.patch。查看正向代理模块proxy_connect_rewrite_1018.patch的位置。https://nginx.org/en/download.html 官网下载地址。安装nginx 安装位置根据 编译时配置的–prefix=nginx版本与代理模块对照表。
1.下载nginx安装包 此处下载nginx-1.20
https://nginx.org/en/download.html 官网下载地址
2.下载正向代理模块包
https://github.com/chobits/ngx_http_proxy_connect_module 下载地址
3.部署nginx服务
此处使用的是nginx-1.20.2,对应proxy_connect_rewrite_1018.patch
3.1. 上传nginx包和正向模块包至互联网服务器
3.2 解压 改名
tar -xf nginx.tar.gz
unzip ngx_http_proxy_connect_module-master.zip
mv ngx_http_proxy_connect_module-master ngx_http_proxy_connect_module
3.3 安装nginx
yum -y install make gcc openssl openssl-devel pcre-devel zlib zlib-devel
查看正向代理模块proxy_connect_rewrite_1018.patch的位置
ll ../ngx_http_proxy_connect_module/patch/
patch -p1 < /nginx/ngx_http_proxy_connect_module/patch/proxy_connect_rewrite_1018.patch
#配置configure --prefix 代表安装的路径,--with-http_ssl_module 安装ssl,--with-http_stub_status_module查看nginx的客户端状态
./configure --add-module=/nginx/ngx_http_proxy_connect_module --prefix=/usr/local/nginx-1.20.2 --with-http_ssl_module --with-http_stub_status_module
make && make install
3.4 配置正向代理(举例,将正向代理端口配置在8030上)
server {
    listen 8030;
    server_name localhost;
    resolver 114.114.114.114 ipv6=off;
    proxy_connect;
    proxy_connect_allow            all;
    proxy_connect_connect_timeout  10s;
    proxy_connect_read_timeout     10s;
    proxy_connect_send_timeout     10s;

    location / {
        proxy_pass https://$host$request_uri;
        proxy_set_header HOST $host;
        proxy_http_version  1.1;
        proxy_ssl_server_name on;
    }
}
3.5 测试nginx所在的互联网机器是否正常
 curl -I http://www.baidu.com/ -v -x 127.0.0.1:8030
 curl -I https://www.baidu.com/ -v -x 127.0.0.1:8030

HTTP/1.1 200 Connection Established
Proxy-agent: nginx

HTTP/1.1 200 OK
Accept-Ranges: bytes
Cache-Control: private, no-cache, no-store, proxy-revalidate, no-transform
Connection: keep-alive
Content-Length: 277
Content-Type: text/html
Date: Sun, 12 Feb 2023 09:31:07 GMT
Etag: "575e1f60-115"
Last-Modified: Mon, 13 Jun 2016 02:50:08 GMT
Pragma: no-cache
Server: bfe/1.0.8.18
3.6 内网机器全局配置,所有请求都能够正常使用代理访问外网
# 追加配置
vim /etc/profile
# 这里的地址要写代理的服务器地址
http_proxy=192.168.0.20:80
# 这里的地址要写代理的服务器地址
https_proxy=192.168.0.20:443
# 这里的地址要写代理的服务器地址
ftp_proxy=192.168.0.20:443
export http_proxy
export https_proxy
export ftp_proxy
# 加载配置
source /etc/profile
3.7测试内网服务器(即不能访问外网的服务器),使用代理上网
curl -I https://www.baidu.com -v -x http://ip:8030

HTTP/1.1 200 Connection Established
Proxy-agent: nginx

HTTP/1.1 200 OK
Accept-Ranges: bytes
Cache-Control: private, no-cache, no-store, proxy-revalidate, no-transform
Connection: keep-alive
Content-Length: 277
Content-Type: text/html
Date: Sun, 12 Feb 2023 09:31:07 GMT
Etag: "575e1f60-115"
Last-Modified: Mon, 13 Jun 2016 02:50:08 GMT
Pragma: no-cache
Server: bfe/1.0.8.18
此时内网机器已经可以通过互联网机器对应的正向代理端口访问互联网了
原文地址:https://blog.csdn.net/chen_CJH/article/details/131827744
本文来自互联网用户投稿,该文观点仅代表作者本人,不代表本站立场。本站仅提供信息存储空间服务,不拥有所有权,不承担相关法律责任。
如若转载,请注明出处:http://www.7code.cn/show_7843.html
如若内容造成侵权/违法违规/事实不符,请联系代码007邮箱:suwngjj01@126.com进行投诉反馈,一经查实,立即删除!
声明:本站所有文章,如无特殊说明或标注,均为本站原创发布。任何个人或组织,在未征得本站同意时,禁止复制、盗用、采集、发布本站内容到任何网站、书籍等各类媒体平台。如若本站内容侵犯了原著者的合法权益,可联系我们进行处理。


