最底层,Java API-Hakari包含了java.sql和javax.sql中一些核心Java API用于处理SQL数据库。这里可以找到DataSource、Connection以及其他用于池化资源的接口,如PooledConnection或ConnectionPoolDataSource,可以找到不同供应商对这些API的多种实现。Spring Boot带有的HiKariCP是DATa Source连接池最流行的一种实现,轻量且性能良好。Hikari 在日语中的含义是光,作者特意用这个含义来表示这块数据库连接池真的速度很快。Hikari 最引以为傲的就是它的性能。
Hibernate使用这些API(以及应用程序中的HikariCP)来连接H2数据库。Hibernate中用于管理数据库的JPA风格是SessionImpl类,包含大量代码来执行语句、执行查询、处理会话的连接等。这个类通过继承来实现JPA接口EntityManager,这是JPA规范的一部分,Hibernate中有其完整实现。
Spring Data JPA在JPA的EntityManager上定义了JpaRepository接口,包含最常用的方法:find、get、delete、update等。SimpleJpaReposity是其默认实现,并使用EntityManager,这意味着不需要使用纯JPA标准或Hibernate,即可使用Spring。
数据源(自动)配置
当使用新的依赖重新执行应用程序时,会发现,并没有配置数据源,却能成功打开H2数据库并连接,这就是自动配置的功能。
通常,可以使用application.properties来配置数据源,这些属性由Spring Boot中的DataSourceProperties类定义,其中包含数据库的URL、用户名和密码等。下面是DataSourceProperties类的关于用户名sa的代码片段:
	/**
	 * Determine the username to use based on this configuration and the environment.
	 * @return the username to use
	 * @since 1.4.0
	 */
	public String determineUsername() {
		if (StringUtils.hasText(this.username)) {
			return this.username;
		}
		if (EmbeddedDatabaseConnection.isEmbedded(determineDriverClassName(), determineUrl())) {
			return "sa";
		}
		return null;
	}
Spring Boot开发者知道这些惯例,进行了预设,因此数据库开箱即用。这里使用的H2是内存中的数据库,关闭应用程序时,所有测试数据都会丢失。当然,也可以通过设置,DB_CLOSE_ON_EXIT=FALSE禁用自动关闭,让Spring Boot决定何时关闭数据库。
通常情况下,需要开发者配置数据库,例如:
# 访问H2数据库的web控制台
spring.h2.console.enabled=true
# 使用指定文件作为数据源
spring.datasource.url=jdbc:h2:file:~/multiplication;DB_CLOSE_ON_EXIT=FALSE
# 在创建或修改实体时创建和更新数据库表
spring.jpa.hibernate.ddl-auto=update
# 在控制台日志中显示数据库操作的SQL语句
spring.jpa.show-sql=true
实体
从数据角度看,JPA将实体称为Java对象,根据前面的分析,将存储User和ChallengeAttempt,就必须将它们定义为实体。
下面为User类添加一些注解,代码如下:
package cn.zhangjuli.multiplication.user;

import jakarta.persistence.Entity;
import jakarta.persistence.GeneratedValue;
import jakarta.persistence.Id;
import lombok.*;

/**
 * @author Juli Zhang, <a href="mailto:zhjl@lut.edu.cn">Contact me</a> <br>
 */
// 将该类标记为要映射到数据库的对象,如果希望使用不同的名称,可以在注解中嵌入值。
// 可以使用JPA的@Transient注解来排除字段。
@Entity
// 聚合了equals方法、hashCode方法、toString、getter和setter,非常适合实体类。
@Data
@AllArgsConstructor
// JPA和Hibernate要求实体具有默认的空构造方法。
@NoArgsConstructor
// 数据库中可能存在user,这里改变一下表名,防止出现标识符错误。
@Table(name = "s_user")
public class User {
    // 唯一标识
    @Id
    // 为一个实体生成一个唯一标识的主键(JPA要求每一个实体Entity,必须有且只有一个主键),
    // @GeneratedValue提供了主键的生成策略。
    @GeneratedValue
    private Long id;
    private String alias;

    public User(final String userAlias) {
        this(null, userAlias);
    }
}
package cn.zhangjuli.multiplication.challenge;

import cn.zhangjuli.multiplication.user.User;
import jakarta.persistence.*;
import lombok.*;

/**
 * @author Juli Zhang, <a href="mailto:zhjl@lut.edu.cn">Contact me</a> <br>
 */
// 将该类标记为要映射到数据库的对象,如果希望使用不同的名称,可以在注解中嵌入值。
// 可以使用JPA的@Transient注解来排除字段。
@Entity
// 聚合了equals方法、hashCode方法、toString、getter和setter,非常适合实体类。
@Data
@AllArgsConstructor
// JPA和Hibernate要求实体具有默认的空构造方法。
@NoArgsConstructor
public class ChallengeAttempt {
    // 唯一标识
    @Id
    // 为一个实体生成一个唯一标识的主键(JPA要求每一个实体Entity,必须有且只有一个主键),
    // @GeneratedValue提供了主键的生成策略。
    @GeneratedValue
    private Long id;
    // 多对一关系。FetchType告诉Hibernate何时为嵌入的User字段收集存储在不同表中的值。
    // 如果为EAGER,User数据会在收集ChallengeAttempt数据时一起收集。
    // 如果为LAZY,只有当ChallengeAttempt访问这个字段时,才会执行检索这个字段的查询。
    // 这里在收集ChallengeAttempt时,不需要用户的数据。
    @ManyToOne(fetch = FetchType.LAZY)
    // 用1个列来连接2个表。这会转换为CHALLENGE_ATTEMPT表的新列USER_ID,对应USER表的id。
    @JoinColumn(name = "USER_ID")
    private User user;
    private int factorA;
    private int factorB;
    private int resultAttempt;
    private boolean correct;
}
将领域类重用为实体应该注意:
JPA和Hibernate需要在类中添加setter和一个空的构造方法。这很不方便,会妨碍创建遵循“不变性”等良好实践的类。或者说,领域类被数据需求破坏了。
当构建小型应用程序且知道这些原因时,问题不大,只需要避免在代码中使用setter或空构造方法即可。但对于大型团队合作或项目,这就是一个问题了。这种情况下,可以考虑拆分域和实体类。这会带来一些代码重复,但可以实施良好实践。
存储库
遵循领域启动设计,使用存储库来连接数据库,JPA存储库和Spring Data JPA包含了相应的功能。
Spring的SimpleJpaRepository类使用JPA的EntityManager来管理数据库对象,而且还增加了一些特性,如分页和排序等,比普通JPA接口更方便。
下面就来实现ChallengeAttemptRepository接口,代码如下:
package cn.zhangjuli.multiplication.challenge;

import org.springframework.data.repository.CrudRepository;

import java.util.List;

/**
 * 继承了Spring Data Common中的CrudRepository接口,CrudRepository定义了创建、读取、更新和删除对象的基本方法。
 * @author Juli Zhang, <a href="mailto:zhjl@lut.edu.cn">Contact me</a> <br>
 */
public interface ChallengeAttemptRepository extends CrudRepository<ChallengeAttempt, Long> {
    /**
     * 根据用来别名查找top10,根据id逆序排列
     * @param userAlias 用户别名
     * @return the last 10 attempts for a given user, identified by their alias.
     */
    List<ChallengeAttempt> findTop10ByUserAliasOrderByIdDesc(String userAlias);
}
ChallengeAttemptRepository 接口继承了Spring Data Common中的CrudRepository接口,CrudRepository定义了创建、读取、更新和删除对象的基本方法。Spring Data JPA中的SimpleJpaRepository类也实现了此接口。除了CrudRepository,还有其他两种选择:
- 如果选择扩展普通的Repository接口,就没有CRUD功能。但是,如果不想使用默认方法,而是想微调CrudRepository中公开的方法时,可以用它来注解。
- 如果还需要分页和排序,可扩展PagingAndSortingRepository,这能提供更好的块处理或分页查询。
Spring Data中,可以通过在方法名称中使用命名约定来创建定义查询的方法,Spring Data会处理接口中定义的方法,检索其中没有明确定义查询且符合命名约定的方法来创建查询方法,然后,解析方法名称,将其分解为块,并构建一个与该定义相对应的JPA查询。
有时想执行一些查询方法无法实现的查询,就需要自定义查询了,可使用Java持久性查询语言(JPQL)来编写查询,如下所示:
    /**
     * 根据用来别名查找后几个ChallengeAttempt,根据id逆序排列
     * @param userAlias 用户别名
     * @return the last attempts for a given user, identified by their alias.
     */
    @Query("SELECT a FROM ChallengeAttempt a WHERE a.user.alias = ?1 ORDER BY a.id DESC")
    List<ChallengeAttempt> lastAttempts(String userAlias);
这很像标准的SQL,区别如下:
下面来实现User存储库,即UserRepository接口,如下所示:
package cn.zhangjuli.multiplication.user;

import org.springframework.data.repository.CrudRepository;

import java.util.Optional;

/**
 * @author Juli Zhang, <a href="mailto:zhjl@lut.edu.cn">Contact me</a> <br>
 */
public interface UserRepository extends CrudRepository<User, Long> {
    Optional<User> findByAlias(final String alias);
}
如果存在匹配项,findByAlias将返回一个封装在Optional中的User,如果没有,则返回一个空的Optional对象。
这两个存储库已经包含了管理数据库实体所需的一切,不需要实现这些接口,甚至不需要添加@Repository注解。Spring通过Data模块,将找到所有扩展了基本接口的接口,注入所需的Bean。
存储User和ChallengeAttempt
完成数据层后,就可以在服务层使用这些存储库了。
首先,用新的预期逻辑扩展测试用例:
- 无论ChallengeAttempt是否正确,都会存储。
- 如果是给定用户的第一个ChallengeAttempt,有别名(Alias)标识,应该创建该用户,如果别名存在,则ChallengeAttempt应该关联到已经存在的用户。
这样,需要对ChallengeServiceTest进行更新,
package cn.zhangjuli.multiplication.challenge;

import cn.zhangjuli.multiplication.user.UserRepository;
import org.junit.jupiter.api.BeforeEach;
import org.junit.jupiter.api.Test;
import org.mockito.Mock;

import static org.assertj.core.api.BDDAssertions.then;
import static org.mockito.BDDMockito.given;
import static org.mockito.AdditionalAnswers.returnsFirstArg;
import static org.mockito.ArgumentMatchers.any;

/**
 * @author Juli Zhang, <a href="mailto:zhjl@lut.edu.cn">Contact me</a> <br>
 */
@ExtendWith(MockitoExtension.class)
public class ChallengeServiceTest {
    private ChallengeService challengeService;
    // 使用Mockito进行模拟
    @Mock
    private UserRepository userRepository;
    @Mock
    private ChallengeAttemptRepository challengeAttemptRepository;

    @BeforeEach
    public void setUp() {
        challengeService = new ChallengeServiceImpl(
                userRepository,
                challengeAttemptRepository
        );
        given(challengeAttemptRepository.save(any()))
                .will(returnsFirstArg());
    }

    //...
}
    @Test
    public void checkCorrectAttemptTest() {
        // given
        // 这里希望save方法什么都不做,只返回第一个(也是唯一一个)传递的参数,这样不必调用真实的存储库即可测试该层。
        given(attemptRepository.save(any()))
                .will(returnsFirstArg());
        ChallengeAttemptDTO attemptDTO = new ChallengeAttemptDTO(50, 60, "john_doe", 3000);

        // when
        ChallengeAttempt resultAttempt = challengeService.verifyAttempt(attemptDTO);

        // then
        then(resultAttempt.isCorrect()).isTrue();
        verify(userRepository).save(new User("john_doe"));
        verify(attemptRepository).save(resultAttempt);
    }
这里,添加了一个新用例,用来验证来自同一用户的更多ChallengeAttempt并不会创建新的用户实体,而是重用现有实体。代码如下:
    @Test
    public void checkExistingUserTest() {
        // given
        given(attemptRepository.save(any()))
                .will(returnsFirstArg());
        User existingUser = new User(1L, "john_doe");
        given(userRepository.findByAlias("john_doe"))
                .willReturn(Optional.of(existingUser));
        ChallengeAttemptDTO attemptDTO = new ChallengeAttemptDTO(50, 60, "john_doe", 5000);

        // when
        ChallengeAttempt resultAttempt = challengeService.verifyAttempt(attemptDTO);

        // then
        then(resultAttempt.isCorrect()).isFalse();
        then(resultAttempt.getUser()).isEqualTo(existingUser);
        verify(userRepository, never()).save(any());
        verify(attemptRepository).save(resultAttempt);
    }
现在,无法编译该测试类,ChallengeService中需要提供两个repository,修改ChallengeServiceImpl类,代码如下:
package cn.zhangjuli.multiplication.challenge;

import cn.zhangjuli.multiplication.user.User;
import cn.zhangjuli.multiplication.user.UserRepository;
import lombok.RequiredArgsConstructor;
import lombok.extern.slf4j.Slf4j;
import org.springframework.stereotype.Service;

/**
 * @author Juli Zhang, <a href="mailto:zhjl@lut.edu.cn">Contact me</a> <br>
 */
@Service
@RequiredArgsConstructor
@Slf4j
public class ChallengeServiceImpl implements ChallengeService {
    private final UserRepository userRepository;
    private final ChallengeAttemptRepository attemptRepository;

    @Override
    public ChallengeAttempt verifyAttempt(ChallengeAttemptDTO attemptDTO) {
        // Check if the attempt is correct
        boolean isCorrect =
                attemptDTO.getGuess() == attemptDTO.getFactorA() * attemptDTO.getFactorB();

        // 检查alias用户是否存在,不存在就创建
        User user = userRepository.findByAlias(attemptDTO.getUserAlias())
                .orElseGet(() -> {
                    log.info("Creating new user with alias {}", attemptDTO.getUserAlias());
                    return userRepository.save(
                            new User(attemptDTO.getUserAlias())
                    );
                });

        // Builds the domain object. Null id for now.
        ChallengeAttempt checkedAttempt = new ChallengeAttempt(null,
                user,
                attemptDTO.getFactorA(),
                attemptDTO.getFactorB(),
                attemptDTO.getGuess(),
                isCorrect);

        // Stores the attempt
        return attemptRepository.save(checkedAttempt);
    }
}
现在,测试就可以通过了。
repository测试
没有为应用程序的数据层创建测试,因为,这没有多大意义,这里并没有编写任何实现。
显示最近的ChallengeAttempt
已经修改了ChallengeServiceImpl的服务逻辑来存储User和ChallengeAttempt,还缺少一些功能:获取最近的ChallengeAttempt并显示在页面上。
服务层可以简单地使用存储库中的查询方法,在控制器层,创建一个新的REST API以通过别名来获取ChallengeAttempt。
服务层
在ChallengeService接口中添加getStatisticsForUser方法,代码如下:
package cn.zhangjuli.multiplication.challenge;

import java.util.List;

/**
 * @author Juli Zhang, <a href="mailto:zhjl@lut.edu.cn">Contact me</a> <br>
 */
public interface ChallengeService {
    /**
     * verifies if an attempt coming from the presentation layer is correct or not.
     *
     * @param resultAttempt a DTO(Data Transfer Object) object
     * @return the resulting ChallengeAttempt object
     */
    ChallengeAttempt verifyAttempt(ChallengeAttemptDTO resultAttempt);

    /**
     * Gets the statistics for a given user.
     *
     * @param userAlias the user's alias
     * @return a list of the last 10 {@link ChallengeAttempt}
     * objects created by the user.
     */
    List<ChallengeAttempt> getStatisticsForUser(final String userAlias);
}
在ChallengeServiceTest中,编写测试代码:
    @Test
    public void retrieveStatisticsTest() {
        // given
        User user = new User("john_doe");
        ChallengeAttempt attempt1 = new ChallengeAttempt(1L, user, 50, 60, 3010, false);
        ChallengeAttempt attempt2 = new ChallengeAttempt(2L, user, 50, 60, 3051, false);
        List<ChallengeAttempt> lastAttempts = List.of(attempt1, attempt2);
        given(attemptRepository.findTop10ByUserAliasOrderByIdDesc("john_doe"))
                .willReturn(lastAttempts);

        // when
        List<ChallengeAttempt> latestAttemptsResult = challengeService.getStatisticsForUser("john_doe");

        // then
        then(latestAttemptsResult).isEqualTo(lastAttempts);
    }
实现这个方法很简单,ChallengeServiceImpl中调用repository即可:
package cn.zhangjuli.multiplication.challenge;

import cn.zhangjuli.multiplication.user.User;
import cn.zhangjuli.multiplication.user.UserRepository;
import lombok.RequiredArgsConstructor;
import lombok.extern.slf4j.Slf4j;
import org.springframework.stereotype.Service;

import java.util.List;

/**
 * @author Juli Zhang, <a href="mailto:zhjl@lut.edu.cn">Contact me</a> <br>
 */
@Service
@RequiredArgsConstructor
@Slf4j
public class ChallengeServiceImpl implements ChallengeService {
    // ...
    @Override
    public List<ChallengeAttempt> getStatisticsForUser(final String userAlias) {
        return attemptRepository.findTop10ByUserAliasOrderByIdDesc(userAlias);
    }
}
运行测试,可以通过。
控制器层
现在,需要从控制器层连接服务层。这需要通过用户别名(alias)来查询ChallengeAttempt,要使用查询参数alias,实现很简单,调用ChallengeService的方法即可,代码如下:
package cn.zhangjuli.multiplication.challenge;

import jakarta.validation.Valid;
import lombok.RequiredArgsConstructor;
import lombok.extern.slf4j.Slf4j;
import org.springframework.http.ResponseEntity;
import org.springframework.web.bind.annotation.*;

import java.util.List;

/**
 * @author Juli Zhang, <a href="mailto:zhjl@lut.edu.cn">Contact me</a> <br>
 */
@Slf4j
@RequiredArgsConstructor
@RestController
@RequestMapping("/attempts")
public class ChallengeAttemptController {
    private final ChallengeService challengeService;

    @PostMapping
    ResponseEntity<ChallengeAttempt> postResult(@RequestBody @Valid ChallengeAttemptDTO challengeAttemptDTO) {
        return ResponseEntity.ok(challengeService.verifyAttempt(challengeAttemptDTO));
    }

    @GetMapping
    ResponseEntity<List<ChallengeAttempt>> getStatistics(@RequestParam String alias) {
        return ResponseEntity.ok(challengeService.getStatisticsForUser(alias));
    }
}
    @Test
    public void getUserStatistics() throws Exception {
        // given
        User user = new User("john_doe");
        ChallengeAttempt attempt1 = new ChallengeAttempt(1L, user, 50, 70, 3500, true);
        ChallengeAttempt attempt2 = new ChallengeAttempt(2L, user, 20, 10, 210, false);
        List<ChallengeAttempt> recentAttempts = List.of(attempt1, attempt2);
        given(challengeService.getStatisticsForUser("john_doe"))
                .willReturn(recentAttempts);

        // when
        MockHttpServletResponse response = mockMvc.perform(
                get("/attempts").param("alias", "john_doe")
        ).andReturn().getResponse();

        // then
        then(response.getStatus()).isEqualTo(HttpStatus.OK.value());
        then(response.getContentAsString()).isEqualTo(
                jsonResultAttemptList.write(
                        recentAttempts
                ).getJson()
        );
    }
> http POST :8080/attempts factorA=50 factorB=60 userAlias=noise guess=5302
HTTP/1.1 200
Connection: keep-alive
Content-Type: application/json
Date: Fri, 24 Nov 2023 09:43:48 GMT
Keep-Alive: timeout=60
Transfer-Encoding: chunked
Vary: Origin, Access-Control-Request-Method, Access-Control-Request-Headers

{
    "correct": false,
    "factorA": 50,
    "factorB": 60,
    "id": 1,
    "resultAttempt": 5302,
    "user": {
        "alias": "noise",
        "id": 1
    }
}
> http :8080/attempts?alias=noise
HTTP/1.1 500
Connection: close
Content-Type: application/json
Date: Fri, 24 Nov 2023 09:49:58 GMT
Transfer-Encoding: chunked
Vary: Origin, Access-Control-Request-Method, Access-Control-Request-Headers

{
    "error": "Internal Server Error",
    "path": "/attempts",
    "status": 500,
    "timestamp": "2023-11-24T09:49:58.447+00:00"
}
可以看到REST API接口的响应,查询数据库也可以发现已经存储了执行的结果。但是,执行查询时会产生一个服务器错误。在后端日志中可以找到对应的异常。这是ByteBuddyInterceptor造成的,主要是将User配置为LAZY了,如果是EAGER,就不会发生这样的错误,这不是要的解决方案。
要继续使用LAZY模式,第一种方法是自定义JSON序列化,使其能处理Hibernate对象。这需要在pom.xml中添加jackson–datatype-hibernate依赖:
        <dependency>
            <groupId>com.fasterxml.jackson.datatype</groupId>
            <artifactId>jackson-datatype-hibernate5</artifactId>
        </dependency>
        <!--  -->
        <dependency>
            <groupId>javax.persistence</groupId>
            <artifactId>persistence-api</artifactId>
            <version>1.0.2</version>
        </dependency>
接着,需要为Jackson的新Hibernate模块创建一个Bean,Spring Boot的Jackson2ObjectMapperBuilder会通过自动配置来使用它,下面是配置代码:
package cn.zhangjuli.multiplication.configuration;

import com.fasterxml.jackson.databind.Module;
import com.fasterxml.jackson.datatype.hibernate5.Hibernate5Module;
import org.springframework.context.annotation.Bean;
import org.springframework.context.annotation.Configuration;

/**
 * @author Juli Zhang, <a href="mailto:zhjl@lut.edu.cn">Contact me</a> <br>
 */
@Configuration
public class JsonConfiguration {
    @Bean
    public Module hibernateModule() {
        return new Hibernate5Module();
    }
}
现在,启动应用程序并验证,可以成功检索ChallengeAttempt,如下所示:
> http ":8080/attempts?alias=noise"
HTTP/1.1 200
Connection: keep-alive
Content-Type: application/json
Date: Sat, 25 Nov 2023 01:04:17 GMT
Keep-Alive: timeout=60
Transfer-Encoding: chunked
Vary: Origin, Access-Control-Request-Method, Access-Control-Request-Headers

[
    {
        "correct": false,
        "factorA": 50,
        "factorB": 60,
        "id": 1,
        "resultAttempt": 5302,
        "user": null
    }
]
另一种替代方法是,在application.properties中添加Jackson序列化特性,也可以解决该问题。重新运行应用程序,可得到如下结果
spring.jackson.serialization.fail_on_empty_beans=false
> http GET :8080/attempts?alias=noise
HTTP/1.1 200
Connection: keep-alive
Content-Type: application/json
Date: Fri, 24 Nov 2023 09:56:29 GMT
Keep-Alive: timeout=60
Transfer-Encoding: chunked
Vary: Origin, Access-Control-Request-Method, Access-Control-Request-Headers

[
    {
        "correct": false,
        "factorA": 50,
        "factorB": 60,
        "id": 1,
        "resultAttempt": 5302,
        "user": {
            "alias": "noise",
            "id": 1
        }
    }
]
这里出现了非预期的输出,从控制台日志可以发现,序列器获取了用户数据,并触发了Hibernate的额外查询来获取数据,这样LAZY参数就失效了。日志如下:
Hibernate: select c1_0.id,c1_0.correct,c1_0.factora,c1_0.factorb,c1_0.result_attempt,c1_0.user_id from challenge_attempt c1_0 left join s_user u1_0 on u1_0.id=c1_0.user_id where u1_0.alias=? order by c1_0.id desc fetch first ? rows only
Hibernate: select u1_0.id,u1_0.alias from s_user u1_0 where u1_0.id=?
用户界面
最后,需要将新功能集成到React前端以显示最近的ChallengeAttempt。
现在,在基本界面上添加一个列表,用于显示用户最近的几个ChallengeAttempt。
首先,直接呈现ChallengeComponent:
import React from "react";
import './App.css';
import ChallengeComponent from './components/ChallengeComponent';

function App() {
  return (
        <ChallengeComponent/>
  );
}

export default App;
body {
  font-family: 'Segoe UI', Roboto, Arial, sans-serif;
}
App.css修改如下:
.display-column {
  display: flex;
  flex-direction: column;
  align-items: center;
}

.challenge {
  font-size: 4em;
}

th {
  padding-right: 0.5em;
  border-bottom: solid 1px;
}
定义了基本显示,需要在ApiClient.js中检索ChallengeAttempt,代码如下:
class ApiClient {
    static SERVER_URL = 'http://localhost:8080';
    static GET_CHALLENGE = '/challenges/random';
    static POST_RESULT = '/attempts';
    static GET_ATTEMPTS_BY_ALIAS = '/attempts?alias=';

    static challenge(): Promise<Response> {
        return fetch(ApiClient.SERVER_URL + ApiClient.GET_CHALLENGE);
    }

    static sendGuess(user: string,
                     a: number,
                     b: number,
                     guess: number): Promise<Response> {
        return fetch(ApiClient.SERVER_URL + ApiClient.POST_RESULT, {
            method: 'POST',
            headers: {
                'Content-Type': 'application/json'
            },
            body: JSON.stringify({
                userAlias: user,
                factorA: a,
                factorB: b,
                guess: guess
            })
        });
    }

    static getAttempts(userAlias: string): Promise<Response> {
        return fetch(ApiClient.SERVER_URL + ApiClient.GET_ATTEMPTS_BY_ALIAS + userAlias);
    }
}
export default ApiClient;
下面,创建一个新的ReactComponent来显示ChallengeAttempt列表,该组件不需要状态,这里通过父组件进行最后的ChallengeAttempt。
import * as React from "react";

class LastAttemptsComponent extends React.Component {
    render() {
        return (
            <table>
                <thead>
                <tr>
                    <th>Challenge</th>
                    <th>Your Guess</th>
                    <th>Correct</th>
                </tr>
                </thead>
                <tbody>
                {this.props.lastAttempts.map(a =>
                    <tr key={a.id} style={{color: a.correct ? 'green' : 'red'}}>
                        <td>{a.factorA} x {a.factorB}</td>
                        <td>{a.resultAttempt}</td>
                        <td>{a.correct ? "Correct" : ("Incorrect (" + a.factorA * a.factorB + ")")}</td>
                    </tr>
                )}
                </tbody>
            </table>
        )
    }
}

export default LastAttemptsComponent;
在渲染React组件时,使用map可以轻松地遍历数组。数组的每个元素都应该使用一个key属性来帮助框架识别不断变化的元素。
同时,还需要对ChallengeComponent类进行修改:
import ApiClient from "../services/ApiClient";
import * as React from "react";
import LastAttemptsComponent from "./LastAttemptsComponent";
// 类从React.Component继承,这就是React创建组件的方式。
// 唯一要实现的方法是render(),该方法必须返回DOM元素才能在浏览器中显示。
class ChallengeComponent extends React.Component {
// 构造函数,初始化属性及组件的state(如果需要的话),
// 这里创建一个state来保持检索到的挑战,以及用户为解决尝试而输入的数据。
constructor(props) {
super(props);
this.state = {
a: '',
b: '',
user: '',
message: '',
guess: '',
lastAttempts: []
};
// 两个绑定方法。如果想要在事件处理程序中使用,这是必要的,需要实现这些方法来处理用户输入的数据。
this.handleSubmitResult = this.handleSubmitResult.bind(this);
this.handleChange = this.handleChange.bind(this);
}
// 这是一个生命周期方法,用于首次渲染组件后立即执行逻辑。
componentDidMount(): void {
this.refreshChallenge();
}
handleChange(event) {
const name = event.target.name;
this.setState({
[name]: event.target.value
});
}
handleSubmitResult(event) {
event.preventDefault();
ApiClient.sendGuess(this.state.user,
this.state.a,
this.state.b,
this.state.guess)
.then(res => {
if (res.ok) {
res.json().then(json => {
if (json.correct) {
this.updateMessage("Congratulations! Your guess is correct");
} else {
this.updateMessage("Oops! Your guess " + json.reaultAttempt + " is" +
" wrong, but keep playing!");
}
this.updateLastAttempts(this.state.user);
this.refreshChallenge();
});
} else {
this.updateMessage("Error: server error or not available");
}
});
}
updateMessage(m: string) {
this.setState({
message: m
});
}
render() {
return (
<div className="display-column">
<div>
<h3>Your new challenge is</h3>
<div className="challenge">
{this.state.a} x {this.state.b}
</div>
</div>
<form onSubmit={this.handleSubmitResult}>
<label>
Your alias:
<input type="text" maxLength="12" name="user"
value={this.state.user} onChange={this.handleChange}/>
</label>
<br/>
<label>
Your guess:
<input type="number" min="0" name="guess"
value={this.state.guess} onChange={this.handleChange}/>
</label>
<br/>
<input type="submit" value="Submit"/>
</form>
<h4>{this.state.message}</h4>
{this.state.lastAttempts.length > 0 &&
<LastAttemptsComponent lastAttempts={this.state.lastAttempts}/>
}
</div>
);
}
updateLastAttempts(userAlias: string) {
ApiClient.getAttempts(userAlias).then(res => {
if (res.ok) {
let attempts: Attempt[] = [];
res.json().then(data => {
data.forEach(item => {
attempts.push(item);
});
this.setState({
lastAttempts: attempts
});
})
}
})
}
refreshChallenge() {
ApiClient.challenge().then(res => {
if (res.ok) {
res.json().then(json => {
this.setState({
a: json.factorA,
b: json.factorB,
});
});
} else {
this.updateMessage("Can't reach the server");
}
});
}
}
export default ChallengeComponent;
请注意变化的地方,添加了新属性lastAttempts到state中,添加了2个方法:updateLastAttempts和refreshChallenge,render方法也进行了修改,修改了样式,也添加了ChallengeAttempt列表显示。
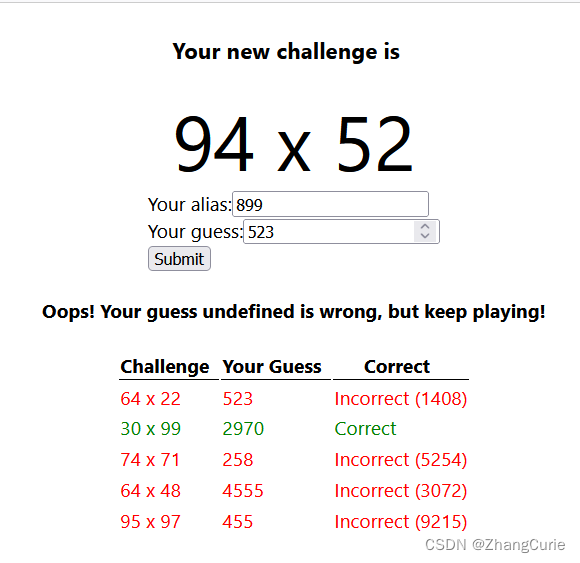
启动后端应用程序,在前端应用程序控制台执行npm start命令,进行体验。在浏览器地址栏输入:http://localhost:3000,访问页面,输入尝试,下面是一种体验:
现在,成功地完成了前端应用程序的开发。
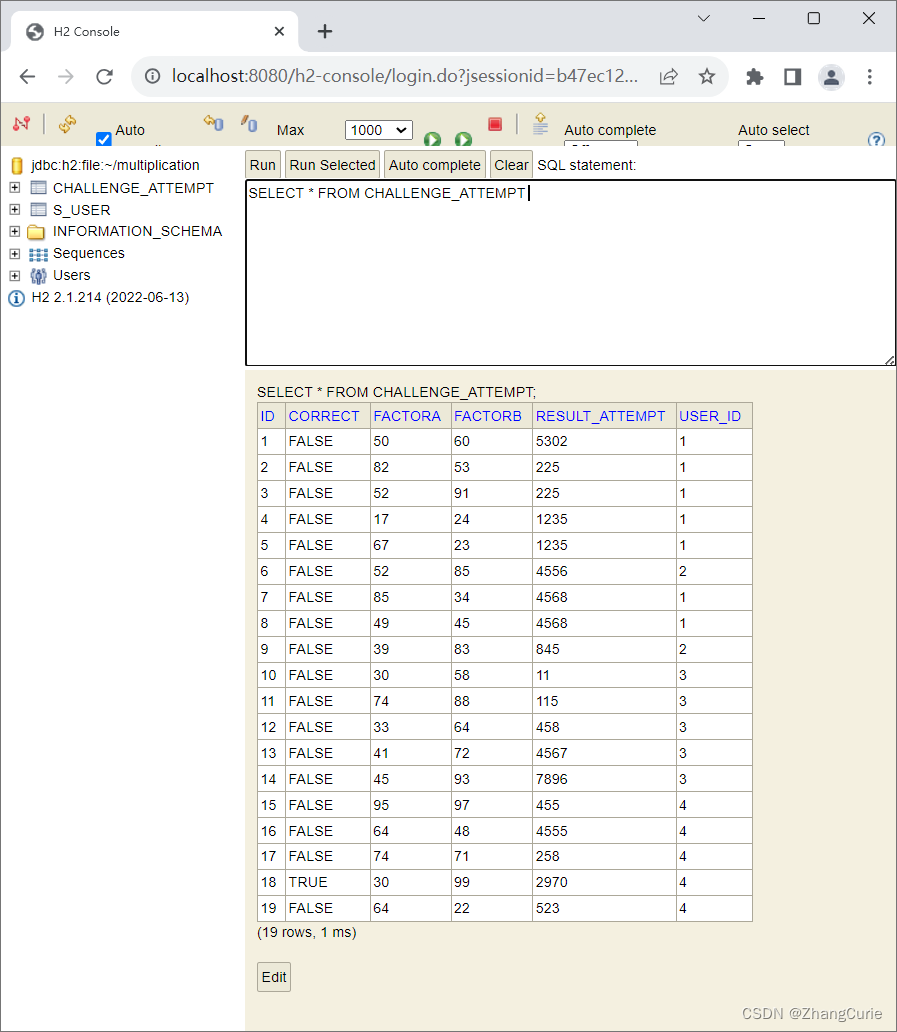
如果关心H2数据库,可以在浏览器中访问:http://localhost:8080/h2-console,下面是查询CHALLENGE_ATTEMPT表数据的截图:
小结
文章介绍了如何持久化建模数据并使用对象关系映射(ORM)将领域对象转换为数据库记录,讲述了使用JPA注解来映射Java类之间的关联,学习使用Spring Data存储库的功能,来高效编写代码的方法。通过扩展前面介绍的用户乘法测数游戏的功能扩展,展示了如何实现存储库、完善服务层,进而完成控制器层的REST API接口构建,以及如何实现前端页面组件的构造和交互。至此已经完成了整个应用程序的构造过程。
原文地址:https://blog.csdn.net/ZhangCurie/article/details/134576807
本文来自互联网用户投稿,该文观点仅代表作者本人,不代表本站立场。本站仅提供信息存储空间服务,不拥有所有权,不承担相关法律责任。
如若转载,请注明出处:http://www.7code.cn/show_9601.html
如若内容造成侵权/违法违规/事实不符,请联系代码007邮箱:suwngjj01@126.com进行投诉反馈,一经查实,立即删除!


![[设计模式Java实现附plantuml源码~行为型]请求的链式处理——职责链模式](https://img-blog.csdnimg.cn/direct/699aac3ed0c446d088772a0ed4c444ed.png)